• Skip to primary navigation
  • Skip to main content
  • Skip to primary sidebar
  • Skip to footer

Whipperberry

WhipperBerry • Your Home For Creative Inspiration

  • Home
  • Recipes
    • Starters
    • Easy Weeknight Dinners
    • Main Dish
    • Salads
    • Side Dish
    • Soups & Stews
    • Desserts
    • Breakfast
    • Miscellaneous
  • Tutorials
    • Creative Crafts
    • DIY Decor
    • Fabric Crafts
    • Food How-To
    • Jewlery
    • Paint Projects
    • Paper Art
    • Party Styling
    • Photography and Graphic Design
    • Silhouette
  • Holidays
    • St. Patrick’s Day
    • Easter
    • Mother’s Day
    • Father’s Day
    • 4th of July
    • Halloween
    • Thanksgiving
    • Christmas
    • New Years
    • Valentine’s Day
  • Gift Ideas
    • Gifts For Everyone
    • Gifts for Dad
    • Mother’s day
    • For The Girls
    • For The Kids
    • Teacher Gift Ideas
    • Christmas
  • Printables
    • Holiday
    • Gift Idea
    • LDS Primary
  • Travel
  • About
    • Terms
  • Contact
  • Nav Social Menu

    • Facebook
    • Instagram
    • Pinterest
    • RSS
    • Twitter

American

Smashed Potatoes

0 · Sep 9, 2014 · 3 Comments

This post brought to you by Pompeian Olive Oil  //  There are perfect pairings in the world, cheese & crackers,  peanut butter & jelly,  potatoes & butter…  Well, in my world I like to stretch the bounds of reason and try new things. I’m not afraid, and I’m always on the lookout for a new perfect pairing. My new discovery… Swapping my butter for olive oil when serving potatoes. Yes, I know it’s not a new thing, but for some it might be. You know who you are… Those of you who are stuck in your meat and potato rut. I’m here to save the day and give you a little heart healthy advice. Swap your butter for olive oil when it comes to roasted smashed potatoes… You’ll thank me!!

smashed-fingerling-potatoes-with-pompeian--olive-oil-#whipperberry-2

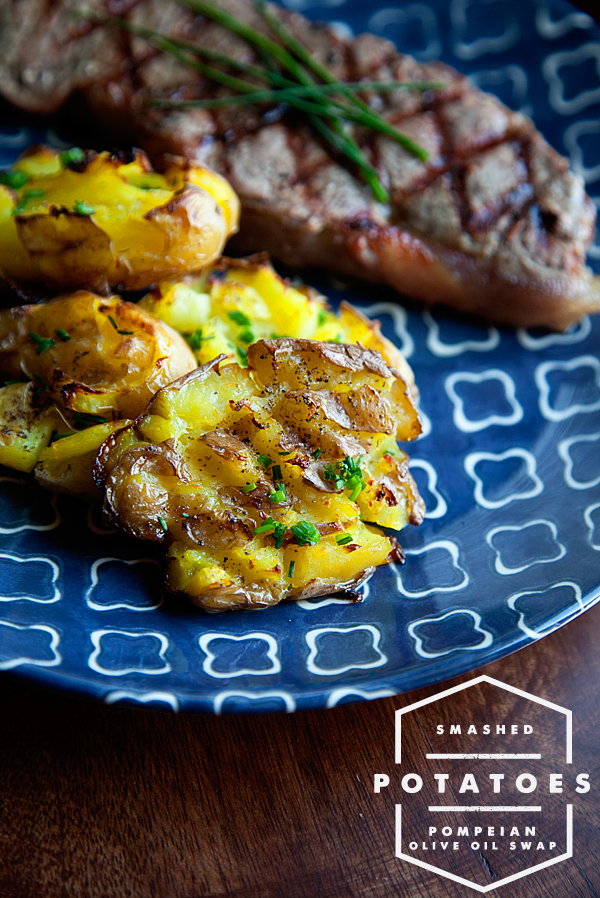
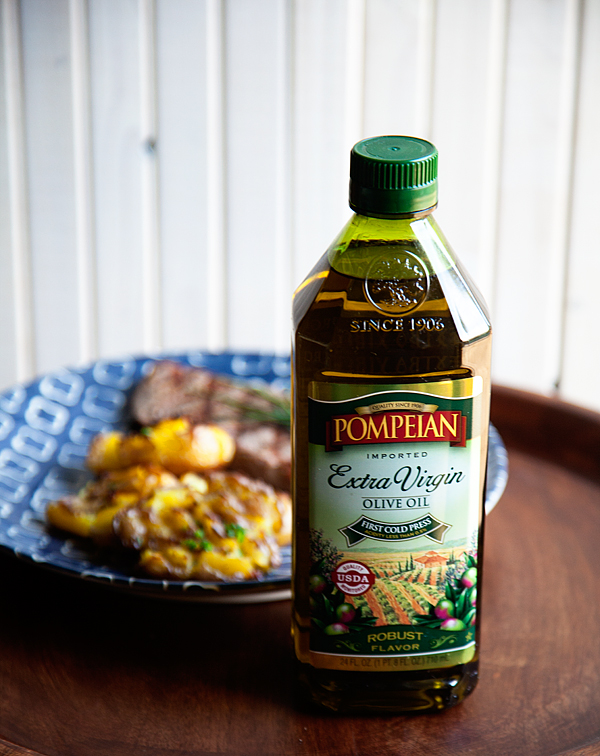
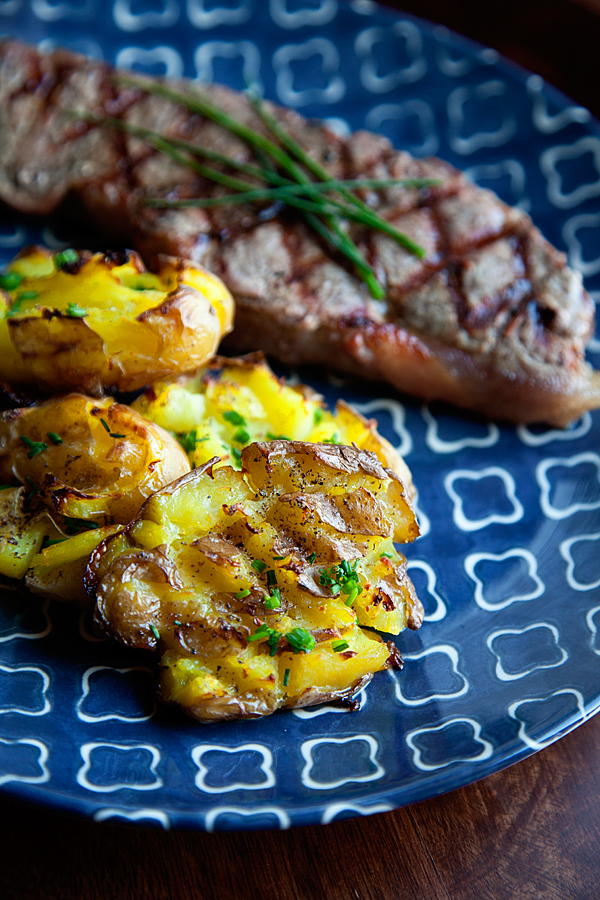
This recipe is one of my family favorites! It’s such a simple side dish, and yet it packs a good punch when served with your favorite grilled meat. I like to use either fingerling potatoes or small red potatoes for this dish. Their flesh is thin and the golden potato center is buttery and smooth. Paired with a good flavorful Extra Virgin Olive Oil like Pompeian’s Extra Virgin Olive Oil  and some fresh chopped chives, the taste is divine.

smashed-fingerling-potatoes-with-pompeian--olive-oil-#whipperberry-4

5.0 from 1 reviews
Smashed Potatoes
 
Save Print
Prep time
5 mins
Cook time
30 mins
Total time
35 mins
 
This simple side dish is perfect with any type of grilled meat, or even on their own!
Author: Heather // WhipperBerry
Recipe type: Side Dish
Cuisine: American
Serves: 6-8
Ingredients
  • 20 small red or fingerling potatoes
  • Pompeian Extra Virgin Olive Oil
  • Salt & Pepper
  • 2 table spoons of chopped chives
Instructions
  1. In a medium sauce pot, place your potatoes in cool water and place over high heat to partially boil the potatoes. Cook over high heat for 10-15 until you can pierce the potato with a knife. Make sure you don't over cook the potatoes.
  2. Remove potatoes from the heat and drain.
  3. Preheat oven to 450 degrees and place your baking sheet with 3 tablespoons of extra virgin olive oil into the oven to preheat.
  4. Once the oven and pan are up to temperature, remove from the oven and immediately place your potatoes onto the hot pan.
  5. Using a potato masher, gently smash the potatoes.
  6. Drizzle with more olive oil and season generously with salt & pepper.
  7. Place in the oven and bake for 15 minutes until the potatoes start to crisp.
  8. Remove from oven and garnish with chopped chives. Serve immediately.
3.2.2708

Now all your family and friends are going to fall in love with your potato prowess! The crispy edges of these smashed potatoes will invite them in and the flavor of the olive oil with the chives will remind them of home.  Serve with your favorite grilled meat and you will for sure be a hit!!

smashed-fingerling-potatoes-with-pompeian--olive-oil-#whipperberry-3

Disclaimer // This post is sponsored by Pompeian Olive Oil. I did receive product and payment for this post. However, all thoughts, ideas and opinions are my very own. Rest assured, I will never promote a company or product that I don’t use or believe in!

Fiesta Frozen Shirley Temple with Cherry Popsicle

4 · Jun 30, 2014 · Leave a Comment

+ Fiesta Frozen Shirley Temple +

frozen-shirley-temple-from-whipperberry

There is a fun new food trend these days that I just love. Creating a drink using a popsicle as one of the elements of the drink, so whimsical and fun! I decided for the fiesta I was to make my version of a Shirley Temple using this fun food trend idea. Since cherries are in season now, I thought it would be perfect. I made a simple syrup and blending that with a bunch of pitted cherries, added a little almond extract and then froze it in my Zoku. You can use a traditional popsicle mold if you don’t have a Zoku. I think it’s actually pretty fun to have your guests make their own popsicles and then add them to their drinks in just 7 minutes. It’s kind of a fun way to start off your party!

Cherry-Popsicles-from-WhipperBerry

Then all you do is add your cherry popsicle to a cup of either seltzer water, I used Coconut La Croix water, or you could use ginger ale or your favorite lemon-lime soda. Either way this is a super tasty treat to start off any party!

Cherry Popsicles
 
Save Print
Take your Shirley Temple to a whole new level with this fun cherry pop recipe.
Author: Heather // WhipperBerry
Recipe type: Drinks / Dessert
Cuisine: American
Ingredients
  • 1 cup water
  • 1 cup sugar
  • 2 cups pitted cherries - fresh or frozen
  • 1 tsp almond extract
Instructions
  1. Add water and sugar to a small sauce pan and over medium high heat dissolve the sugar to make a simple syrup.
  2. Once the sugar has dissolved into the water remove from heat and cool.
  3. Clean and pit your cherries and add to a blender jar.
  4. Pour in cooled simple syrup and blend until you have a nice puree.
  5. Pour into popsicle molds and freeze for at least 4 hours or 7 minutes if you have a Zoku.
  6. Enjoy the popsicle as is or create a frozen Shirley Temple by placing your popsicle into a cup with seltzer water, ginger ale or lemon-lime soda. Enjoy!
3.2.2310

Fiesta Scallop and Shrimp Cocktail

4 · Jun 30, 2014 · 1 Comment

+ Fiesta Scallop and Shrimp Cocktail recipe inspired by Marcela Valladolid from The Food Network’s Mexican Made Easy +

whipperberry-spicy-shrimp-and-scallop-cocktail

This is a fun new take on your basic shrimp cocktail and it’s super easy to make. The recipe was inspired by one of my favorite Food Network Chef’s Marcela Valladolid from  The Kitchen and Mexican Made Easy Fame.  I of course had to put a little WhipperBerry spin on it. Instead of poaching the scallops, I actually pan seared my scallops and then chilled them. It added a little more depth to the flavor of the scallop and I love it. Also, rather than starting from scratch with my cocktail sauce, I use a commercially prepared cocktail sauce as my base and then doctored it with some of Marcela’s ingredients. Here’s the recipe…

Fiesta Scallop and Shrimp Cocktail
 
Save Print
Prep time
5 mins
Cook time
5 mins
Total time
10 mins
 
Surprise your guests with this fun and spicy to take on the classic shrimp cocktail!
Author: Heather // WhipperBerry
Recipe type: Appetizer
Cuisine: American
Serves: 4
Ingredients
  • 1 lb. cooked shrimp (peeled, deveined, tail off)
  • 8 large sea scallops
  • 3 cups cocktail sauce
  • 1 large lime (juiced)
  • ½ of a serrano chili (finely diced)
  • ¼ teaspoon of Tabasco Soy Sauce
  • 2 tablespoons of olive oil
  • salt and pepper
Instructions
  1. In a large bowl or large canning jar, mix your cocktail sauce, lime juice, serrano chili, and spicy Tabasco soy sauce. Mix well, cover and let chill in the refrigerator for a least 30 minutes.
  2. Prepare scallops by rinsing gently with cold water, removing the "foot" a little flap that you will find on the side of the scallop. Just pull it off and discard. Completely dry the scallops and set on paper towel to absorb any moisture.
  3. In a skillet, add olive oil and set over high heat. Once the pan it hot, add the scallops and turn down the heat to medium high.
  4. Let the scallop cook for 2 minutes or until seared (brown) on one side and then flip over to sear the other side for another 2 minutes. Remove from the pan. Let cool and then store in an air tight container with a paper towel at the bottom, in the refrigerator until chilled and ready to use.
  5. When ready to serve, cut the scallops in half and place in a medium sized bowl. Add the shrimp making sure they are rinsed, dried and tail removed, into the bowl. Cover with cocktail sauce and combine. Place in serving cups with a small stock of celery to garnish.
3.2.2310

Pickled Tomatoes

26 · May 29, 2014 · 10 Comments

This post brought to you by Pompeian Red Wine Vinegar // I’m a pickle girl… Honestly, I don’t think I’ve met a pickle that I didn’t like.  I love all kinds of pickles not just pickled cucumbers. Have you every tried pickled okra, cauliflower, carrots… they are amazing!  We have a restaurant here in Lincoln called Granite City and they have a steak salad that I ADORE and they have a pickled tomato relish on the salad and it’s divine.  The whole idea intrigued me, so I thought I would try and come up with some pickled tomatoes of my own…

Pickled-Tomato-&-Steak-Salad-with-Pompeian-Red-Wine-Vinegar-#whipperberry-3

I love that I will have tomatoes along with some red onions that are pickled and ready in my fridge at any time. I was one of the kiddos that when my mom made salad or tacos I wouldn’t eat them if they didn’t have tomatoes, it just didn’t seem complete to me. This way I always have tomatoes on hand even when I haven’t made it to the market for a few days. This whole idea is super simple and only takes about 45 minutes to pull together. I used my favorite Pompeian Red Wine vinegar for these pickled tomatoes. You need to check out their whole line of vinegars, they have some amazing flavors!

First, I prepared my four 1 quart wide mouth Ball canning jars, by sterilizing them in the dishwasher.

Pickled-Tomato-&-Steak-Salad-with-Pompeian-Red-Wine-Vinegar-#whipperberry-10

I gathered my simple ingredients, tomatoes, salt, sugar, garlic, Pompeian Red Wine Vinegar, red onion, dill and pepper corns…

Pickled-Tomato-&-Steak-Salad-with-Pompeian-Red-Wine-Vinegar-#whipperberry-1

I prepared my pickle brine from the recipe below and while it cooled I prepped my veggies. I cut my tomatoes into large pieces, sliced my onions and peeled the garlic. I layered my veggies in the sterilized jars…

Pickled-Tomato-&-Steak-Salad-with-Pompeian-Red-Wine-Vinegar-#whipperberry-11

Now, this is a cold pickle so I wanted the brine to be cool, so that it wouldn’t cook the tomatoes. This also means that I just put the pickled tomatoes into the fridge and I don’t go through the whole preserving process. This means that I will have to keep the pickles in the fridge because they have not been officially preserved by the full canning process which kills all the possible bacteria.

The tomatoes will become rather soft, so you may want to use a small grape or cherry type tomato and not cut them for a firmer pickled tomato.

Once the brine is cool, pour it into the jar, seal the jar with the lid and place in the refrigerator. Let the tomatoes “pickle” for a few days and then serve with your favorite salad, cottage cheese, use as a burger topping… the skies the limit!  I will be sharing my copy cat Steak Salad from Granite City in a bit and share how I like to eat my pickled tomatoes.

Balsamic-Steak-Salad-with-Pickled-Tomato-Relish-#whipperberry-2

Pickled Tomatoes
 
Save Print
Prep time
15 mins
Cook time
5 mins
Total time
20 mins
 
These pickled tomatoes are a sure fire way to impress your family and friends this summer!
Author: Heather // WhipperBerry
Recipe type: condiment
Cuisine: American
Serves: 25
Ingredients
  • 3 cups Pompeian Red Wine Vinegar
  • 3 cups water
  • 3 tablespoons salt
  • ⅓ cup sugar
  • 8 garlic cloves
  • 2 tablespoons peppercorns
  • 25-30 medium sized tomatoes
  • 2 red onions
  • 1 bunch of dill
Instructions
  1. Prepare your brine by placing the vinegar, water, salt and sugar into a sauce pan over medium high heat. Heat the brine mixture until the salt and sugar have dissolved about 4 minutes over medium heat stirring occasionally. Let brine cool.
  2. Prepare your veggies by cutting the tomatoes into large pieces and slicing the red onion in onion rings and peeling the garlic. Layer the veggies in your sterilized 1 quart wide mouth Ball canning jars. Pour cooled brine into the jars and place the lid on the jars. Place in the refrigerator.
3.2.2310

Disclaimer // This post is sponsored by Pompeian. I received product and payment for my recipe. However, as always… All thoughts, ideas and opinions are my very own!

  • Go to page 1
  • Go to page 2
  • Go to page 3
  • Go to page 4
  • Go to Next Page »

Primary Sidebar

Heather from Whipperberry
Hello... my name is Heather and I'm the creator of WhipperBerry a creative lifestyle blog packed full of great recipes and creative ideas for your home and family. I find I am happiest when I'm living a creative life and I love to share what I've been up to along the way... Come explore, my hope is that you'll leave inspired!

Footer

  • Privacy Policy

Copyright © 2023 · Seasoned Pro