Last week I shared all about our Love is in the Details photo field trip with Jeanna Hayes Studios and Suzanne from She Paperie and I promised a quick tutorial on how to make this fantastic DIY burlap garland!
![DIY Burlap Garland tutorial[8]](https://whipperberry.com/wp-content/uploads/2011/06/DIY-Burlap-Garland-tutorial8.jpg)
I’m telling ya… this was one of my all time favorite projects to date!! It’s amazingly simple and absolutely STUNNING!

Here is what you will need…
-
Burlap – for this length which was about 12 feet I {get ready for this} used about 5 yards of burlap.
-
Heavy weight hemp twine
-
yarn needle
-
scissors
First you will need to cut your burlap. Now… cutting burlap straight can be a bit tricky but thanks to Linda over at Craftaholics Anonymous I learned a nifty little trick. You figure out where you would like to cut, and then pull that string out. This will then leave a perfect straight line for you to follow when you make your cut.
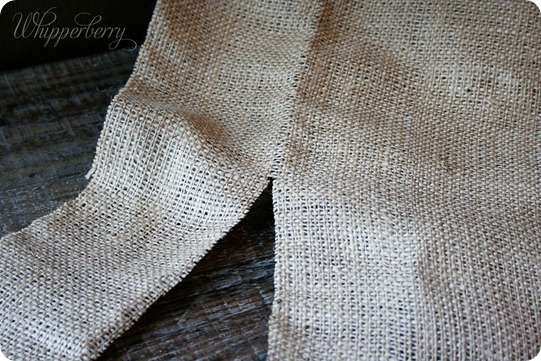
Now, I made my strips 4 inches wide. The beauty of this is you can make them as wide as you want.
Once you have everything cut you’ll need to measure your hemp twine to the length that you want for the garland. Thread your hemp twine through the large yarn needle and make a large knot at the end.
You’ll then make a very large basic stitch in the middle of the burlap strip from end to end…
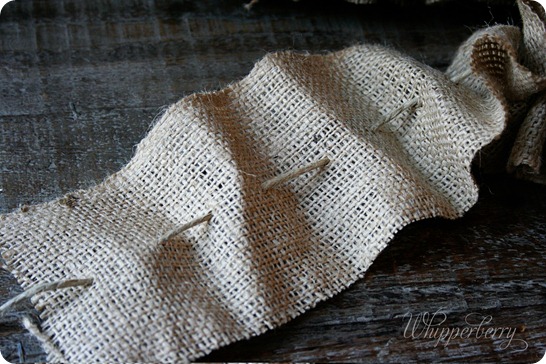
…gently push the burlap down to the knot. The burlap will naturally spin on the twine making a really neat Elizabethan collar effect…
![burlap garland tutorial[7]](https://whipperberry.com/wp-content/uploads/2011/06/burlap-garland-tutorial7.jpg)
Just keep adding strips of burlap until your twine is full and then tie it off with a large knot.
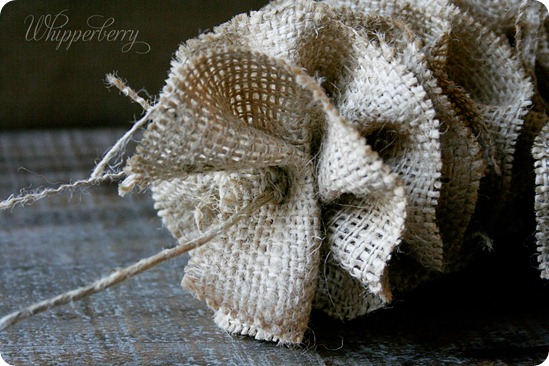
You’re all done and now you have an amazing garland that will really turn heads at your next event!
6
yep love it! i have a bakers rack in my kitchen and i have been trying to find something to garnish the top. this is it! i will totally be making this:)))
Love it!
You made it so effortlessly, this is really lovely.
Thank you for this!!
This is really cute!!!
What a pretty garland and so simple. I love it! And now I'm going to have to make one.
LOVEEEEEEEEEEEE this…I am a burlap girl and I have to make one of these!!!!
Thanks for the how to!!!
love, love, love! 5 yards???! that is a lot of burlap!:)
Oh my goodness! This is so beautiful! I am seeing burlap garlands in all kinds of sizes and colors in my future. I love the tip for cutting it straight! Can't WAIT to give these a whirl. Thanks so much for the tutorial!!
Gorgeous! I love it! Our Joann's has some yummy orange burlap- this would be perfect for Halloween! Filing it away.
xoxo,Amy
WOWZA….Gorgeous. 🙂
Lovely!
Jo-Anna
This is great and i love the tip for cutting burlap. Did you know you can get 24'x 10' of burlap at most Home Depots? For only $10! I'm so doing this for my next party!!
have a great day! Kristin @ A Simply Klssic Home
This is soooo cute thank you for sharing. I also have to tell you that I LOVE your letters they are awesome. I found this project through TT&J linky party! Thank you for sharing. Come say hi! I love new followers.
A mommy's life…with a touch of YELLOW
tyandwhitneyulrich.blogspot.com
This is beautiful – and thanks for the cutting tip!
I LOVE THIS IDEA!! Our readers would too. We'd love to see you link this up at http://www.dimpleprints.com next Monday for our link party!
I would love for you to link it up to my party that is running now. Any linky goes.
https://bacontimewiththehungryhypo.blogspot.com/2011/06/any-link-goes-party-running-now-summer.html
Come strut your stuff.
Ok I LOVE THE LETTERS in this. Did you make the letters or purchase them? I'm in love them!
Great article on burlap garland
I googled Burlap garland, and it linked up to you, but I cannot see any of your pictures! There is a black box with an exclamation point instead of pictures! I just wanted to let you know in case you were unaware. I hope to see pictures of it, I would love to do this! (I saw an example on https://www.simplyklassichome.com/2012/09/my-2012-fall-mantel.html )
Ditta to Rebecca’s comment. I found your tutorial though the same site and cannot see any of your images. I would love to be able to!
Can you please repair the photos on your page? They are not showing. Or possibly link to another tutorial that contains pictures?
I love this idea for my fall decor but need a little more guidance, hoping the photos will help!
Thanks!