• Skip to primary navigation
  • Skip to main content
  • Skip to primary sidebar
  • Skip to footer

Whipperberry

WhipperBerry • Your Home For Creative Inspiration

  • Home
  • Recipes
    • Starters
    • Easy Weeknight Dinners
    • Main Dish
    • Salads
    • Side Dish
    • Soups & Stews
    • Desserts
    • Breakfast
    • Miscellaneous
  • Tutorials
    • Creative Crafts
    • DIY Decor
    • Fabric Crafts
    • Food How-To
    • Jewlery
    • Paint Projects
    • Paper Art
    • Party Styling
    • Photography and Graphic Design
    • Silhouette
  • Holidays
    • St. Patrick’s Day
    • Easter
    • Mother’s Day
    • Father’s Day
    • 4th of July
    • Halloween
    • Thanksgiving
    • Christmas
    • New Years
    • Valentine’s Day
  • Gift Ideas
    • Gifts For Everyone
    • Gifts for Dad
    • Mother’s day
    • For The Girls
    • For The Kids
    • Teacher Gift Ideas
    • Christmas
  • Printables
    • Holiday
    • Gift Idea
    • LDS Primary
  • Travel
  • About
    • Terms
  • Contact
  • Nav Social Menu

    • Facebook
    • Instagram
    • Pinterest
    • RSS
    • Twitter

In a Jar

How to Paint Buffalo Check Jars

3 · Dec 5, 2017 · Leave a Comment

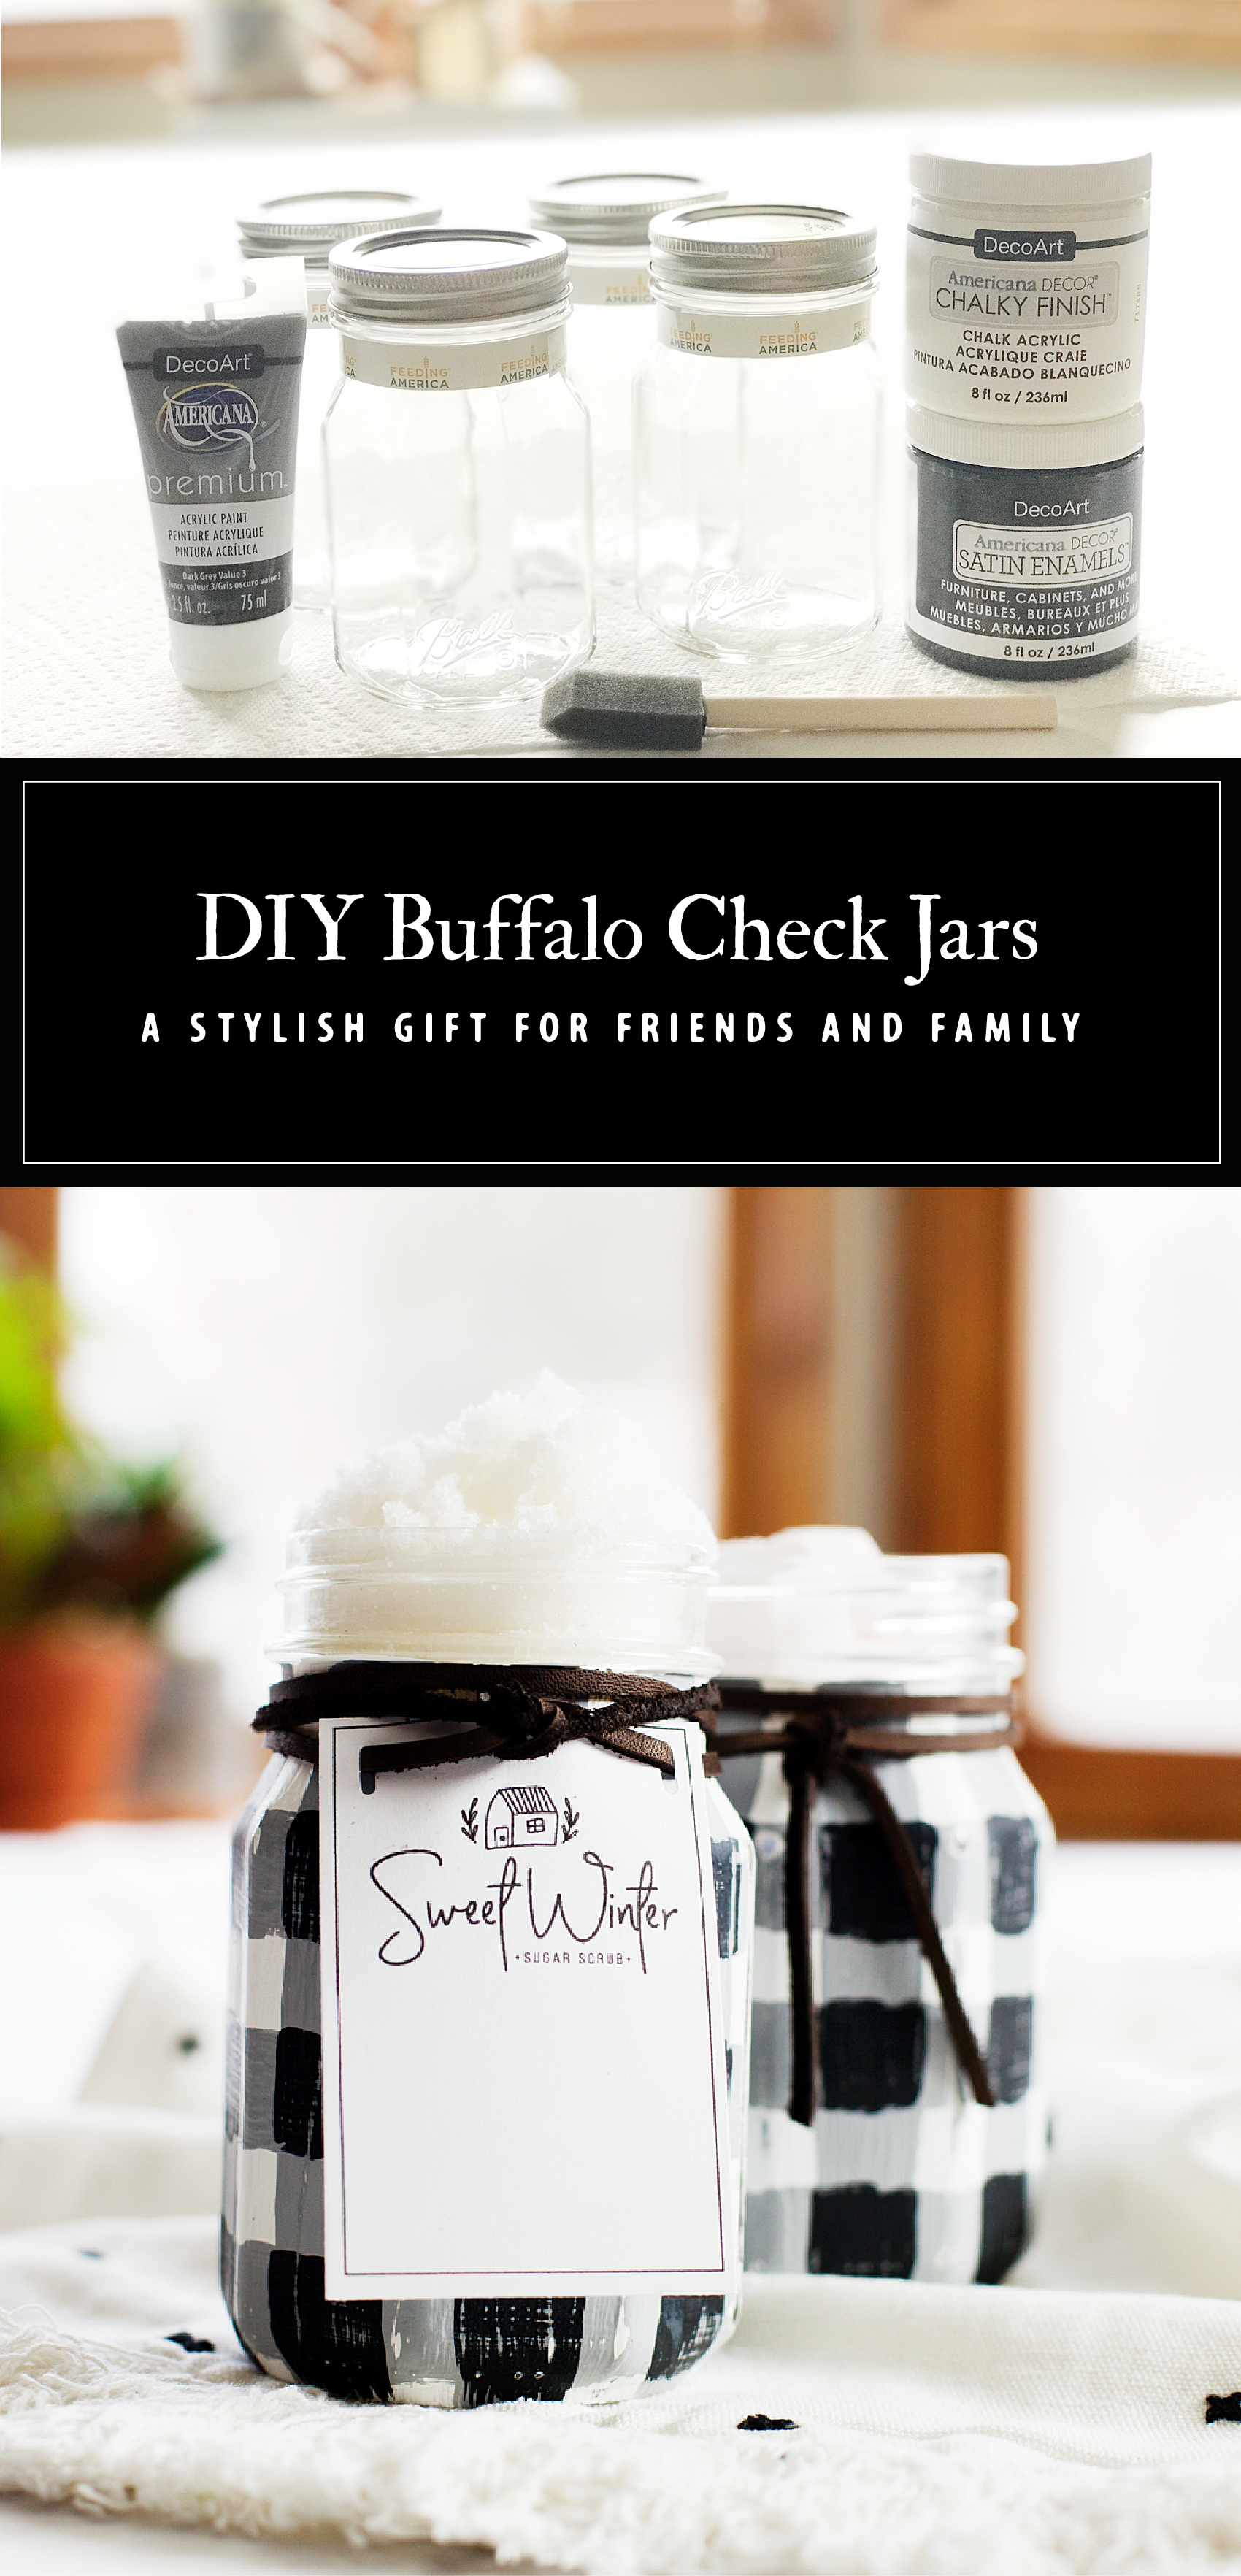
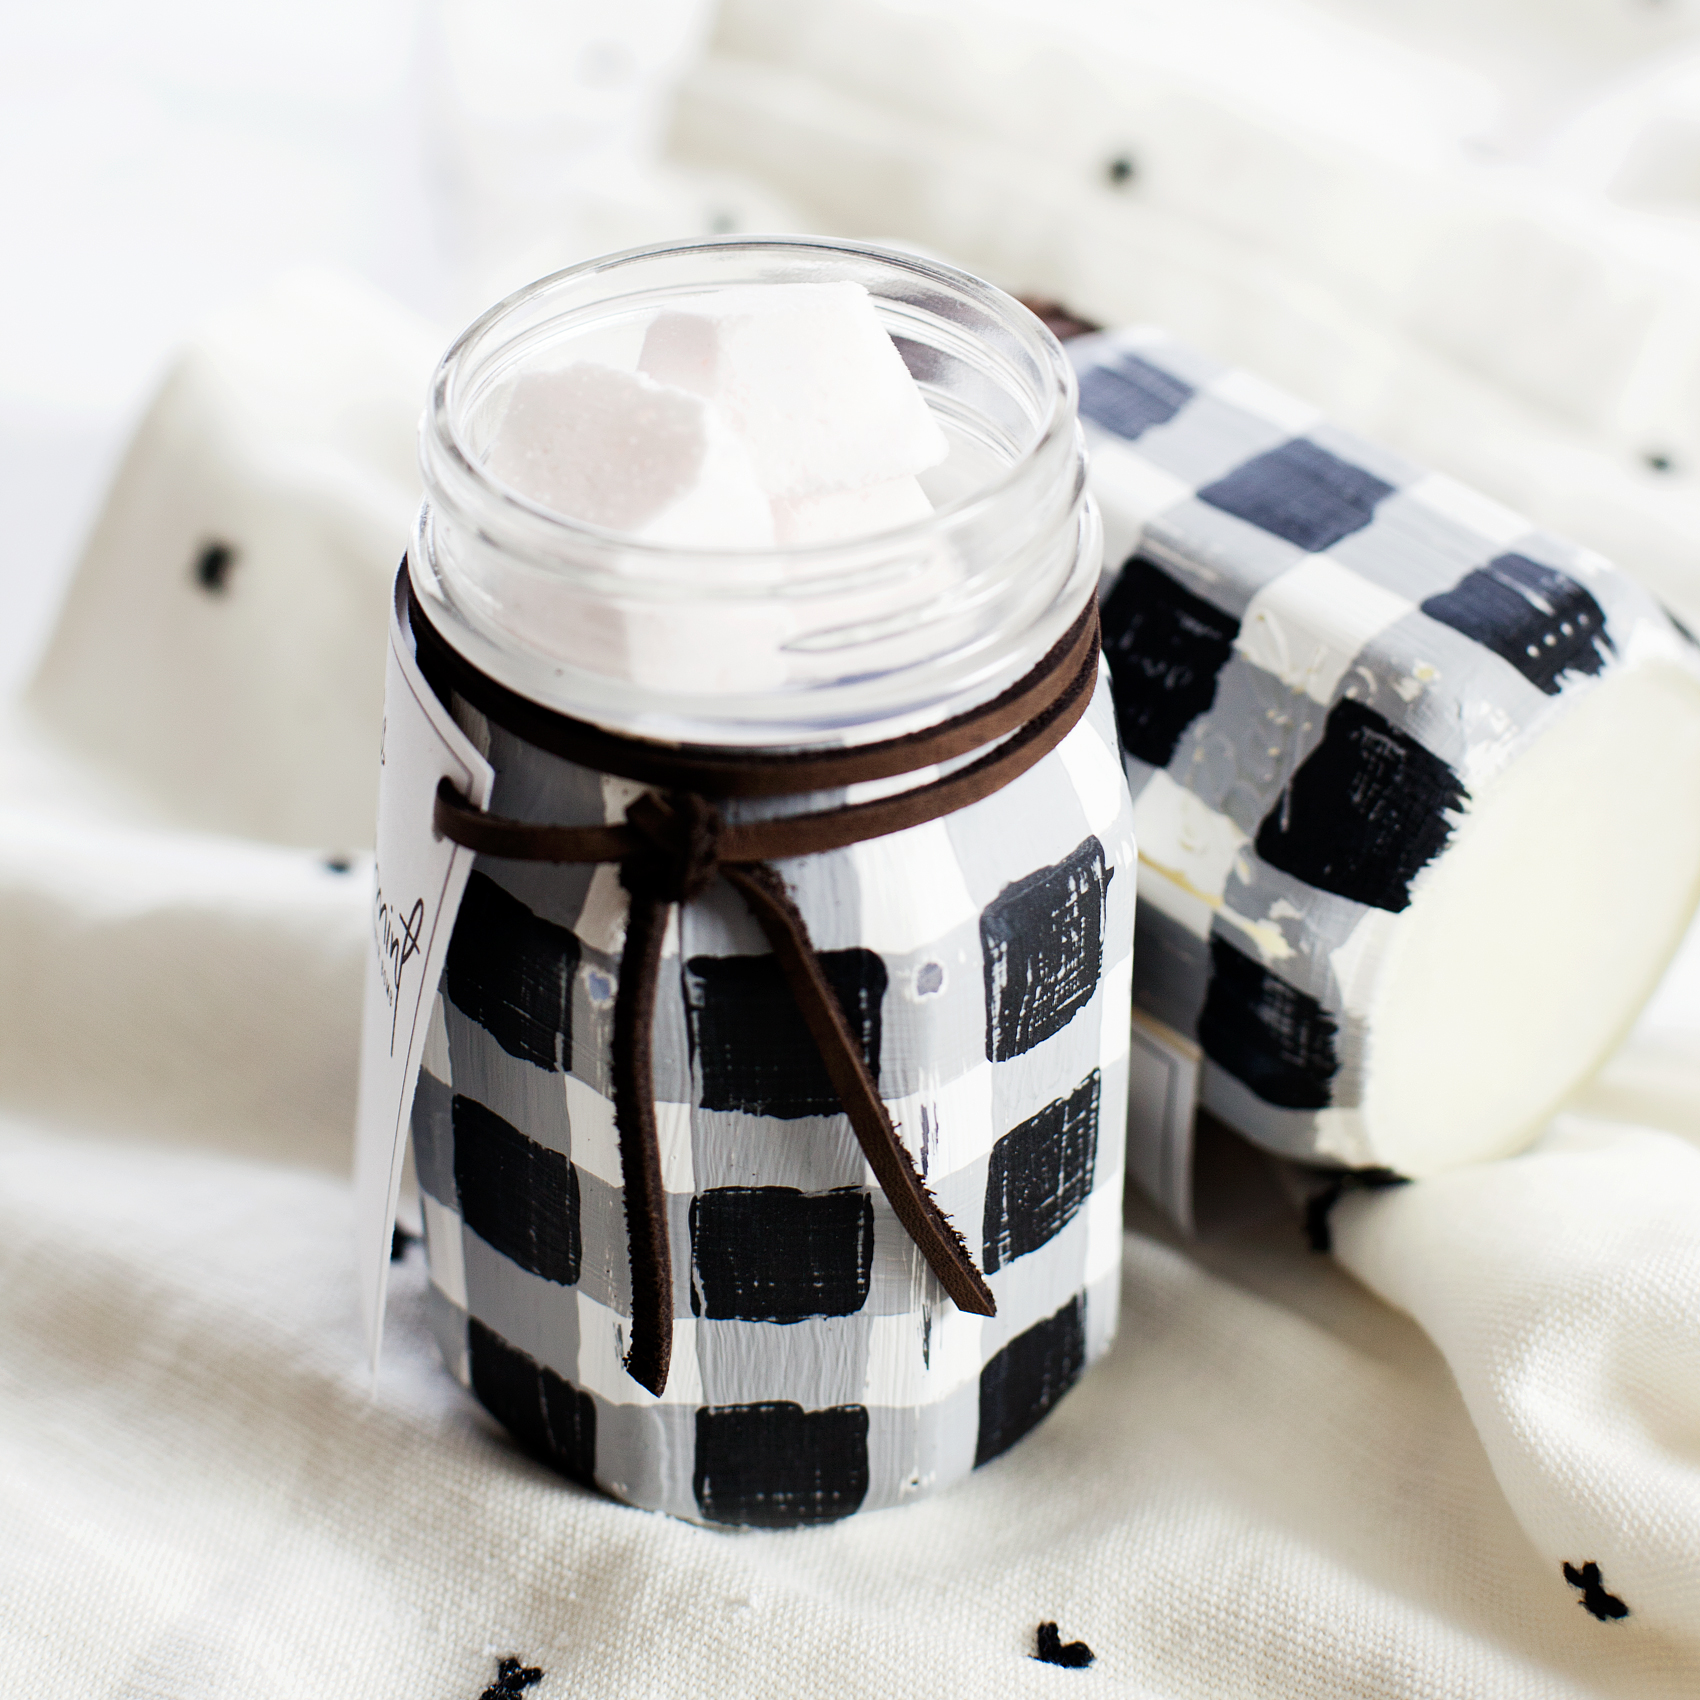
Love the Buffalo Check trend? Yep, me too! I thought it would be fun to use some of the Ball® Sharing Jars to create some Buffalo Check Jars to use as gifts this Holiday Season. Here’s how you can make some of your own.

+ This post brought to you by the folks at Newell Brands, makers of Ball® Fresh Preserving Products +

Love the Buffalo Check trend? Yep, me too! I thought it would be fun to use some of the Ball® Giving Jars to create some Buffalo Check Jars to use as gifts this Holiday Season. Here's how you can make some of your own.

Ball® Sharing Jars

This project looks a bit challenging, but truly it’s not! All you need are some of those fabulous Ball® Sharing Jars and some paint and you can create this trendy look for yourself.

I love the shape of the Sharing Jars and I love the mission. When you purchase the Sharing Jars your purchase will benefit Feeding America® – the nation’s largest domestic hunger-relief organization. For every package of Sharing Jars purchased, Newell Brands will donate 4 meals*! I LOVE it when I can help support a worthy cause when buying stuff I would normally buy any way.

* Newell Brands® will donate $0.36 per package of Sharing Jars sold, up to $150,000 provided to Feeding America®.  $1 helps provide 11 meals secured by Feeding America® on behalf of local member food banks.

Buffalo Check Jars

I’m a huge fan of the Buffalo Check trend and can’t get enough of it right now. Pretty much everyone I know feels the same way so, I thought a stylish Buffalo Check Jar would be the perfect gift for friends and family for Christmas this year. I’ve filled them with all kinds of stuff; candy, bath scrubs, shower bombs, soup starters, cookie kits, all kinds of stuff. Of course after the jars are painted, you can no longer preserve in them but, they’re great for everything else. Here’s how to make them.

Materials

  • Ball® Sharing Jars
  • Americana Decor Chalky Paint in Everlasting, Yesteryear & Carbon
  • sponge paint brush
  • 1/4″ flat head paint brush
  • 240 grit sandpaper
  • Americana Decor Clear Crème Wax
  • lint free cloth

Instructions

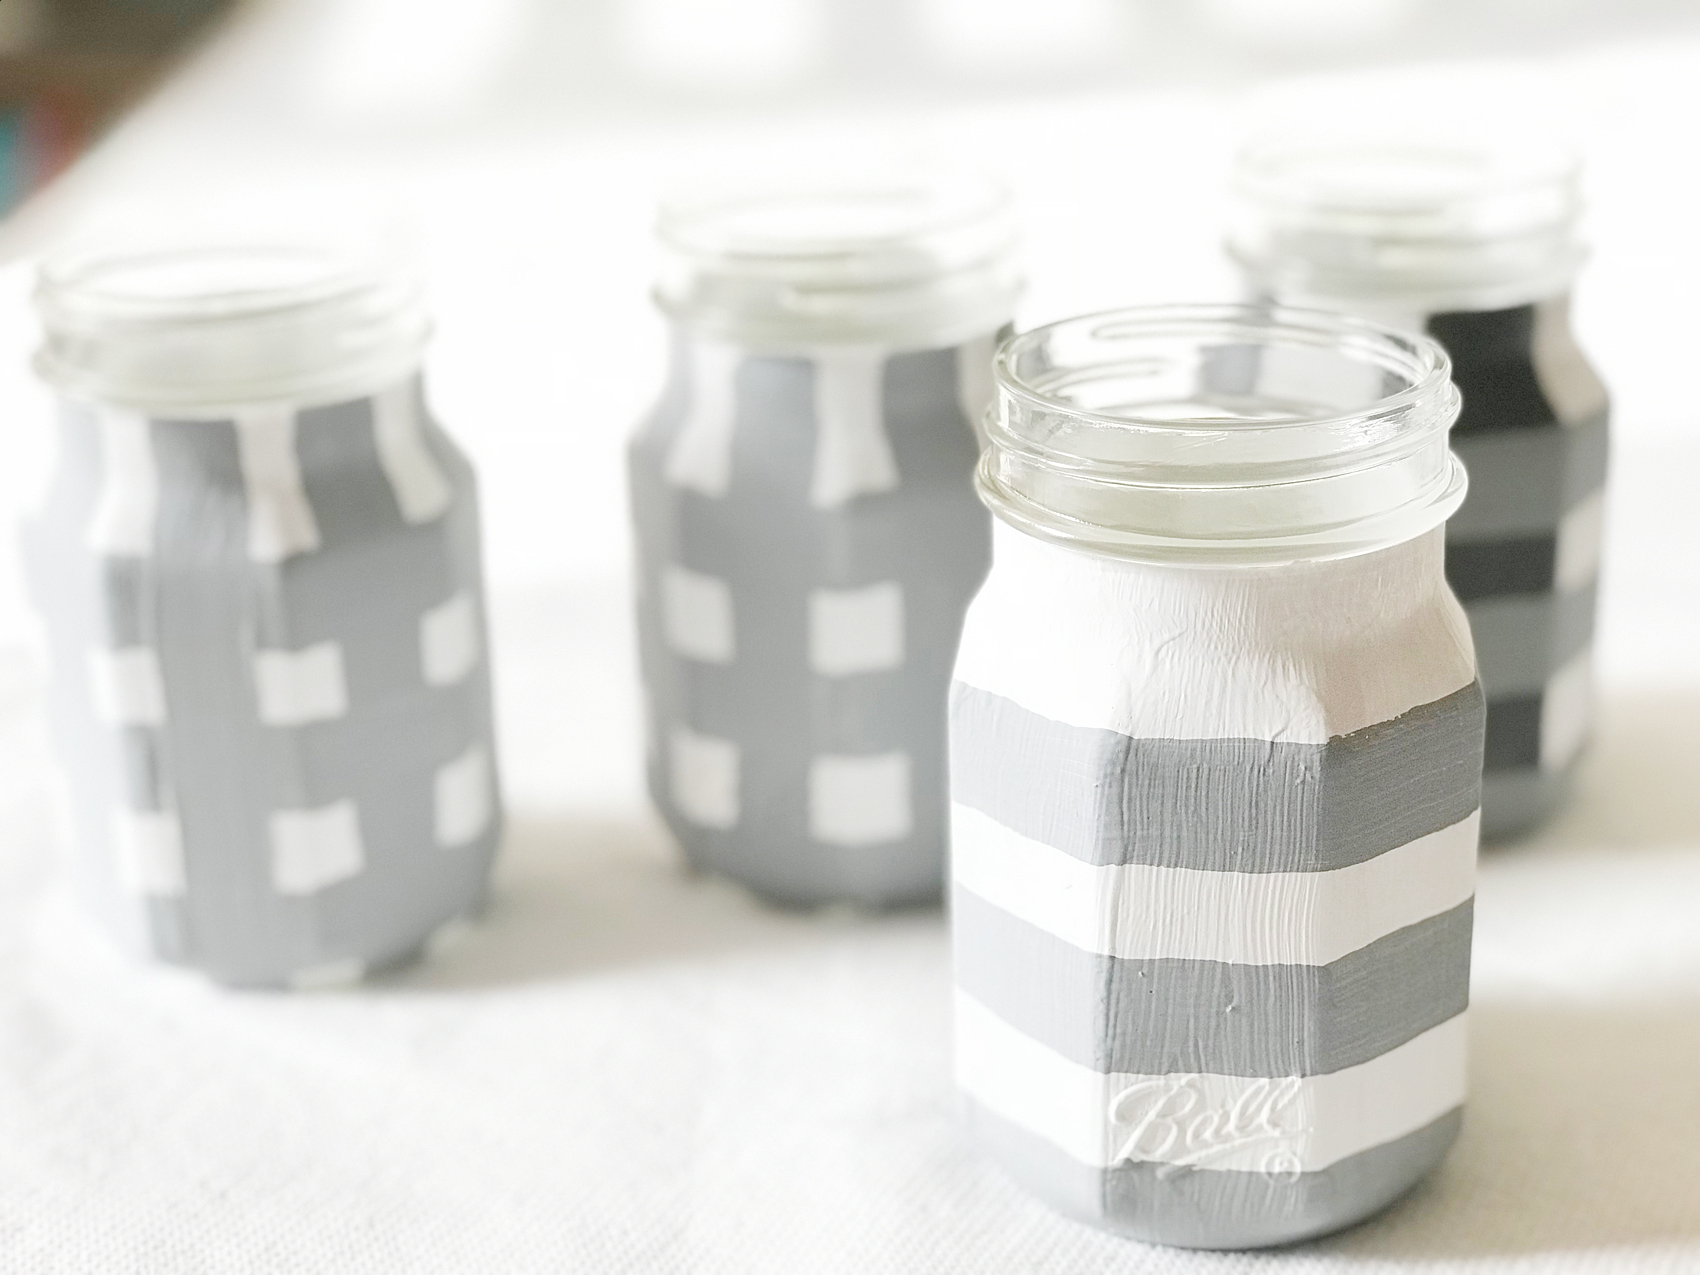
To begin, make sure you have washed and dried your jars. Then paint a couple of layers of the white (Everlasting) chalky paint onto the jar with the sponge brush. You can use your favorite kind of chalk paint here.

Love the Buffalo Check trend? Yep, me too! I thought it would be fun to use some of the Ball® Giving Jars to create some Buffalo Check Jars to use as gifts this Holiday Season. Here's how you can make some of your own.

Love the Buffalo Check trend? Yep, me too! I thought it would be fun to use some of the Ball® Giving Jars to create some Buffalo Check Jars to use as gifts this Holiday Season. Here's how you can make some of your own.

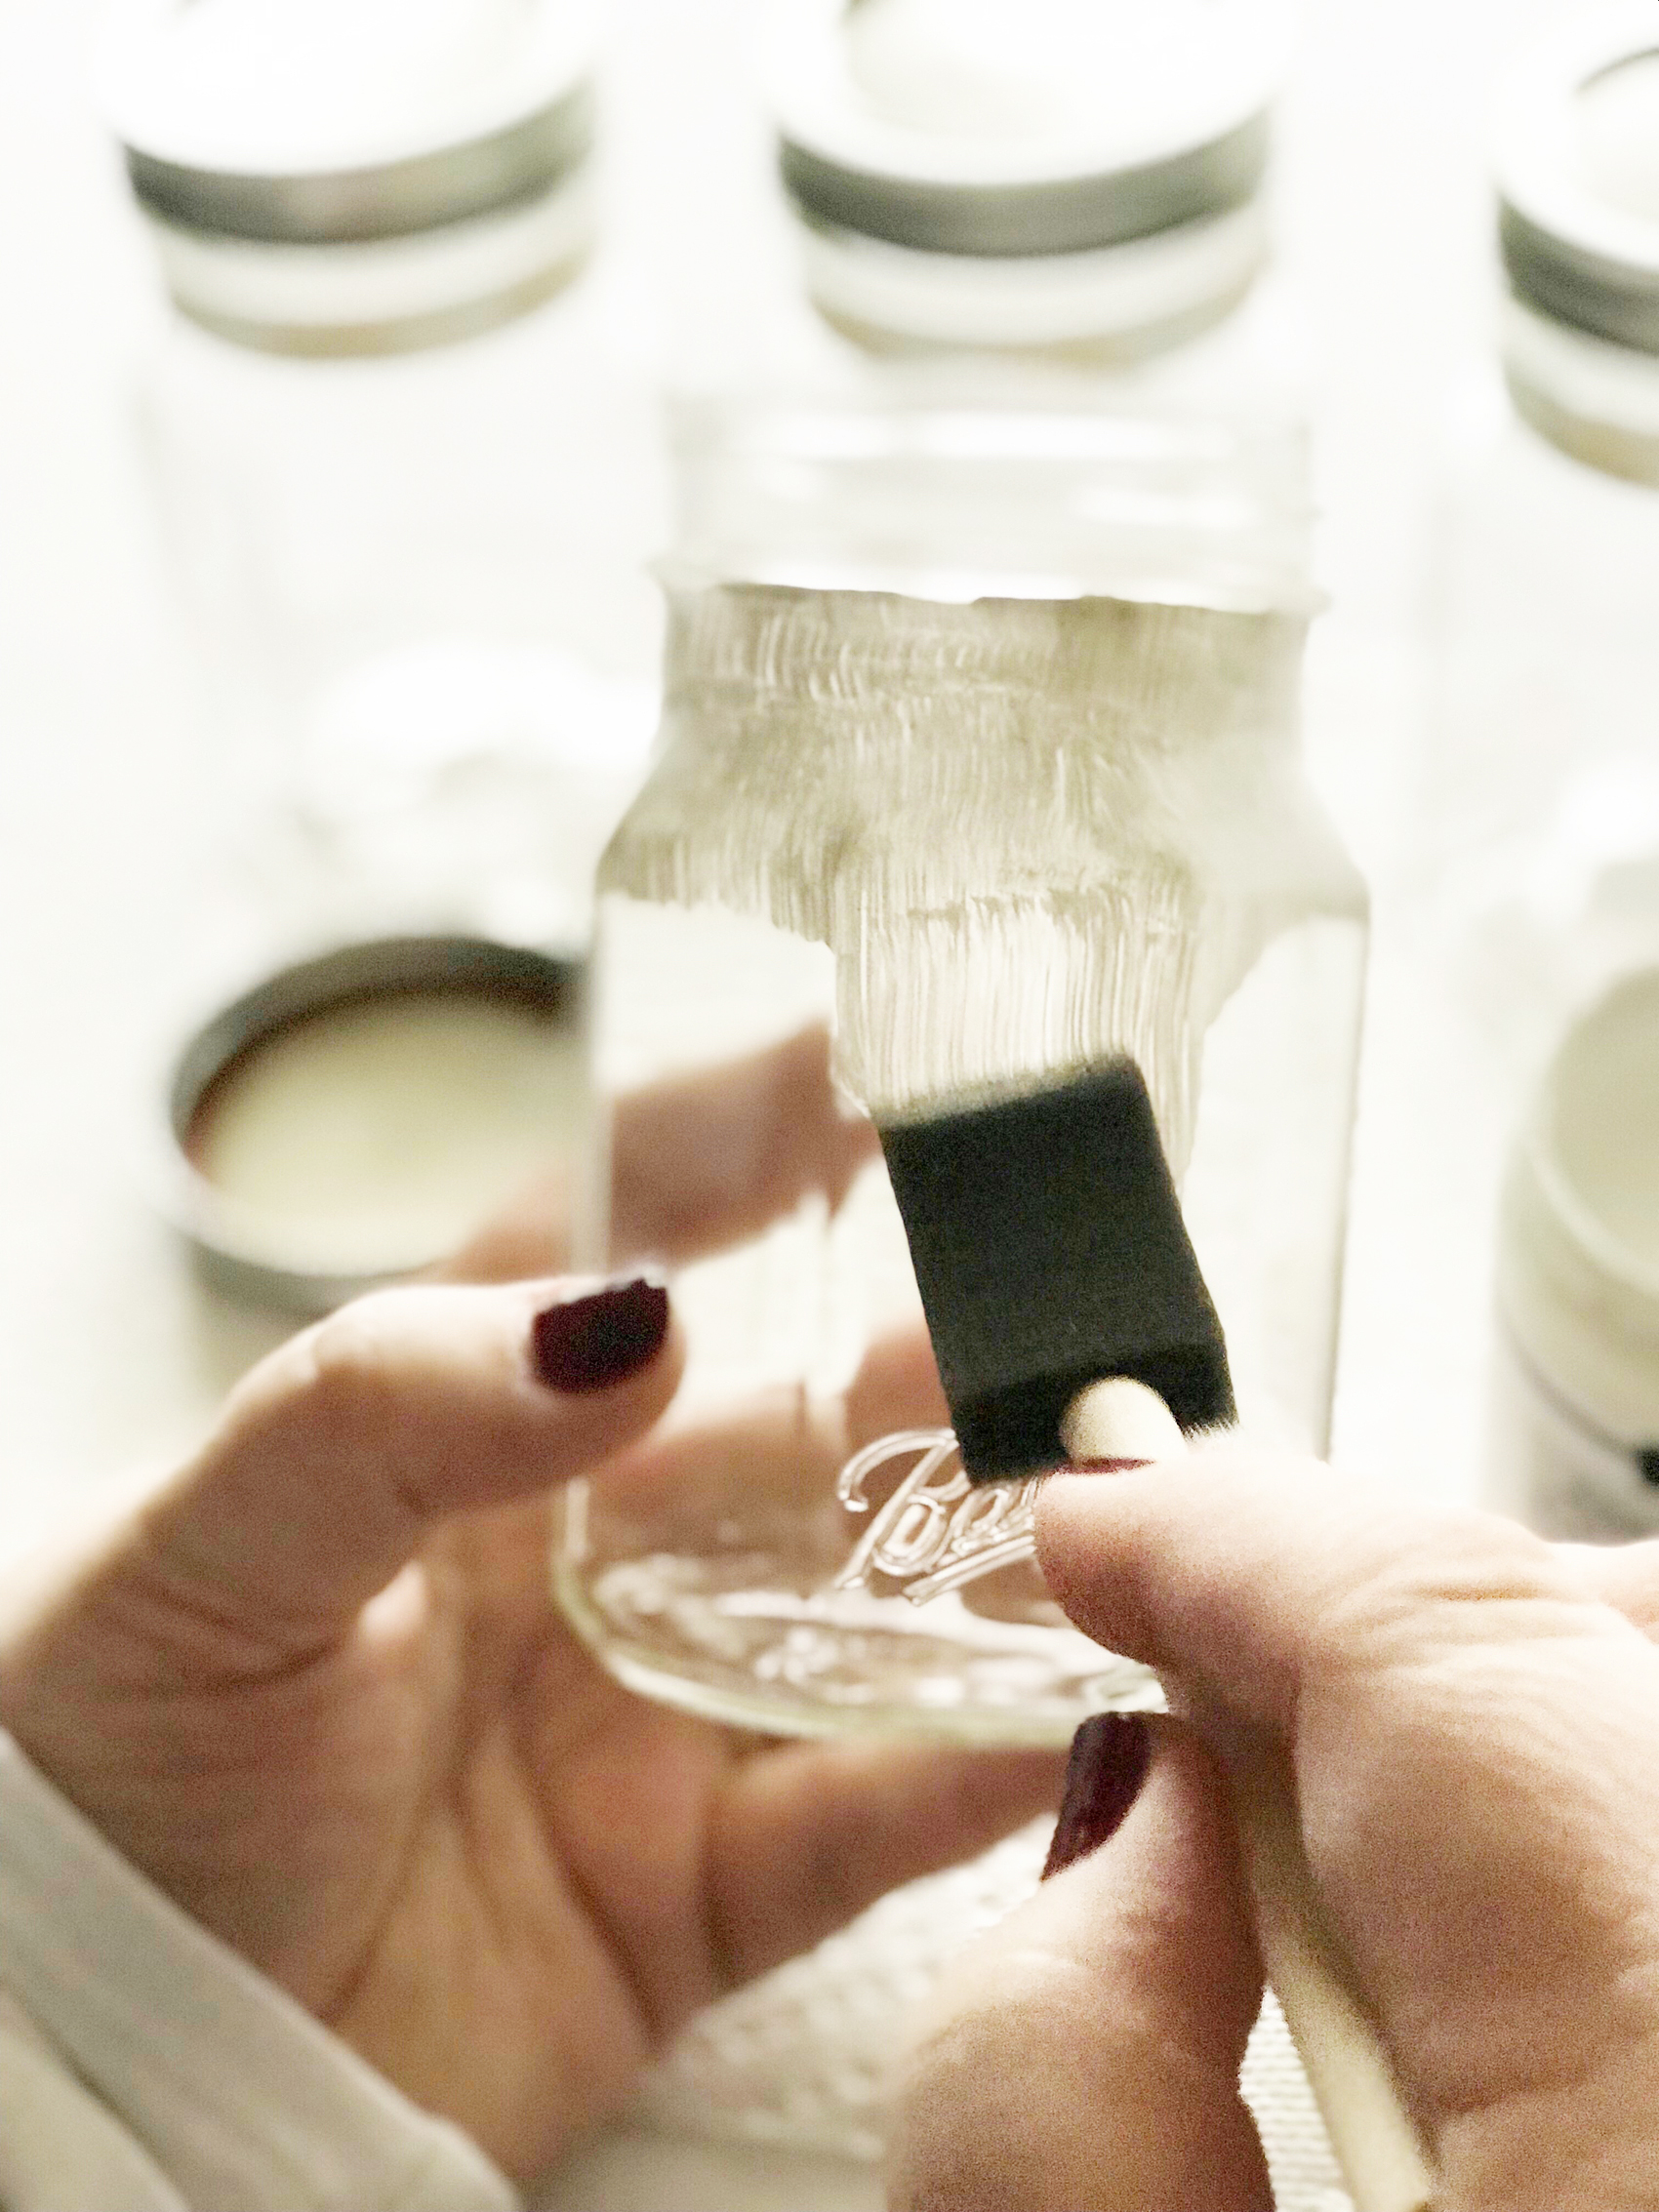
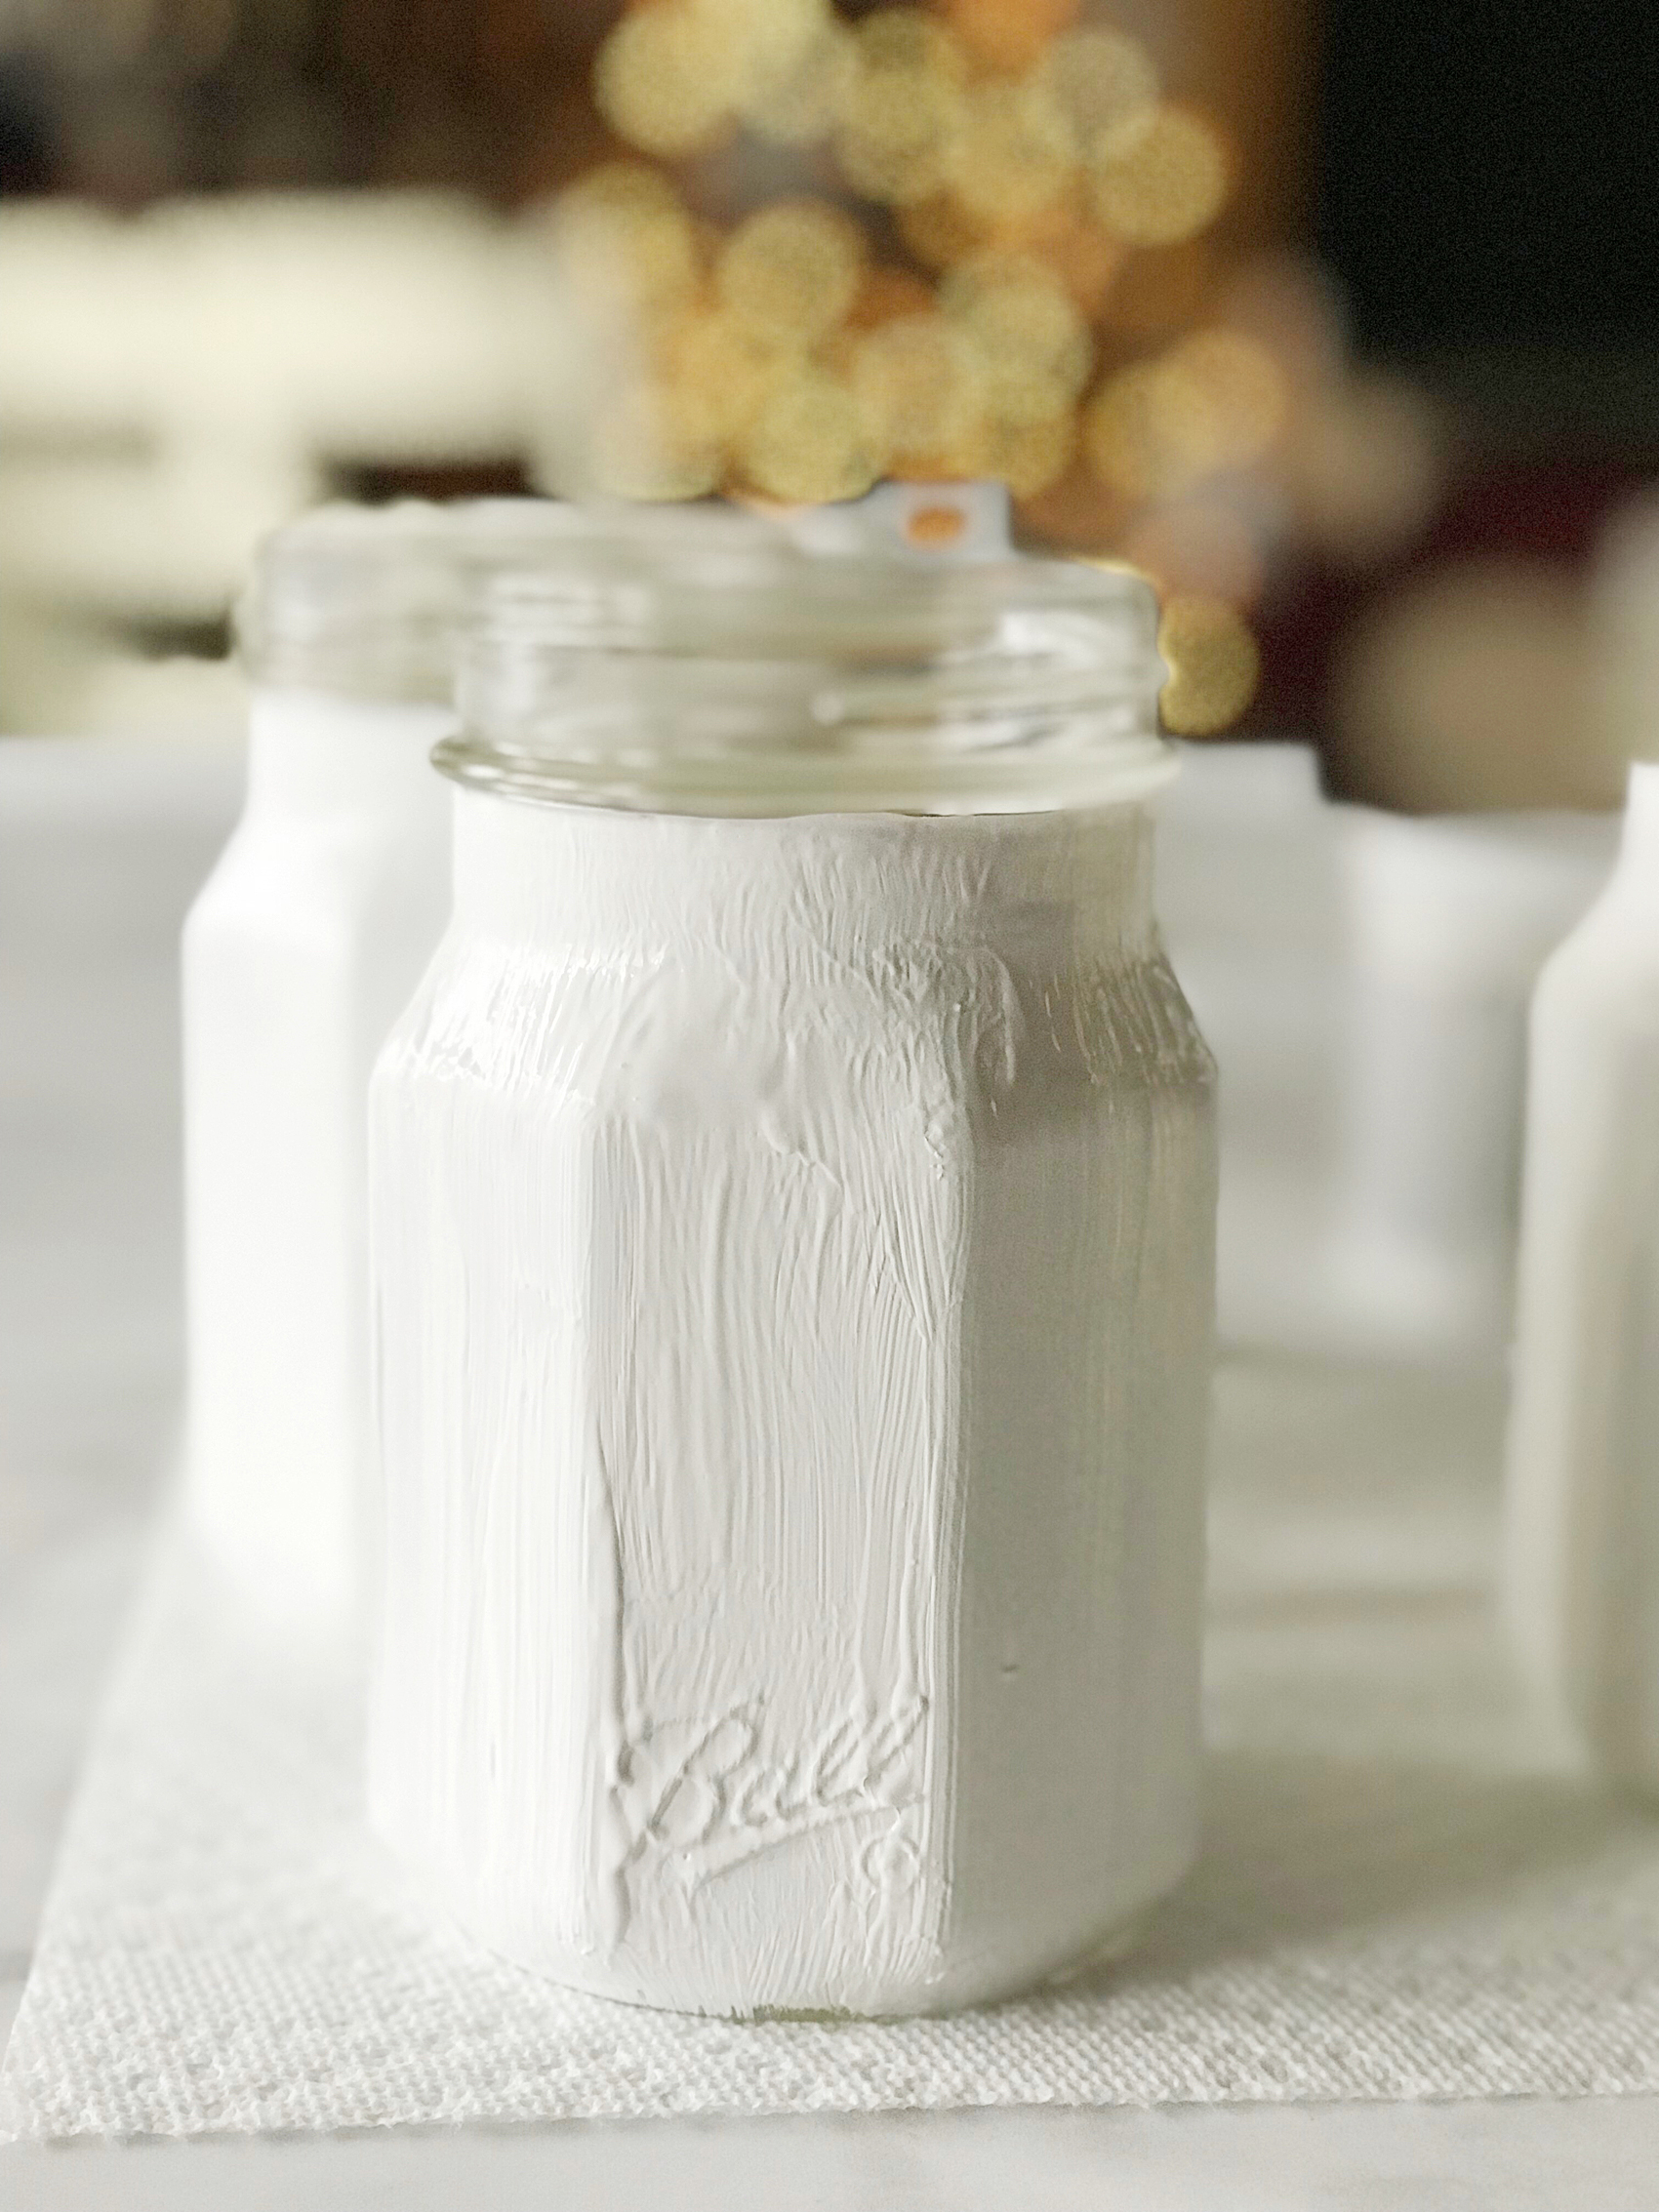
Don’t worry about brush strokes, they will get smoothed out in the finishing process at the end. Let dry, ideally for a few hours or overnight.

Next, you’ll use the 1/4″ flat paint brush to paint the gray (Yesteryear) stripes onto the jar.

Love the Buffalo Check trend? Yep, me too! I thought it would be fun to use some of the Ball® Giving Jars to create some Buffalo Check Jars to use as gifts this Holiday Season. Here's how you can make some of your own.

You will loosely use the lines on the jars as guides. I really didn’t want a precise looking check wanting it to look more free form or hand painted. I didn’t want this project to become to crazy with measuring every little detail and taping the jar to get perfect lines. This to me makes the project so much more enjoyable and I love the look.

Start at the top points of the lines in the Sharing Jar and use your 1/4 inch brush line to create the stripes. Three stripes around the jar and then a vertical stripe in the center of the flat sections of the sharing jar. Let dry completely.

Love the Buffalo Check trend? Yep, me too! I thought it would be fun to use some of the Ball® Giving Jars to create some Buffalo Check Jars to use as gifts this Holiday Season. Here's how you can make some of your own.

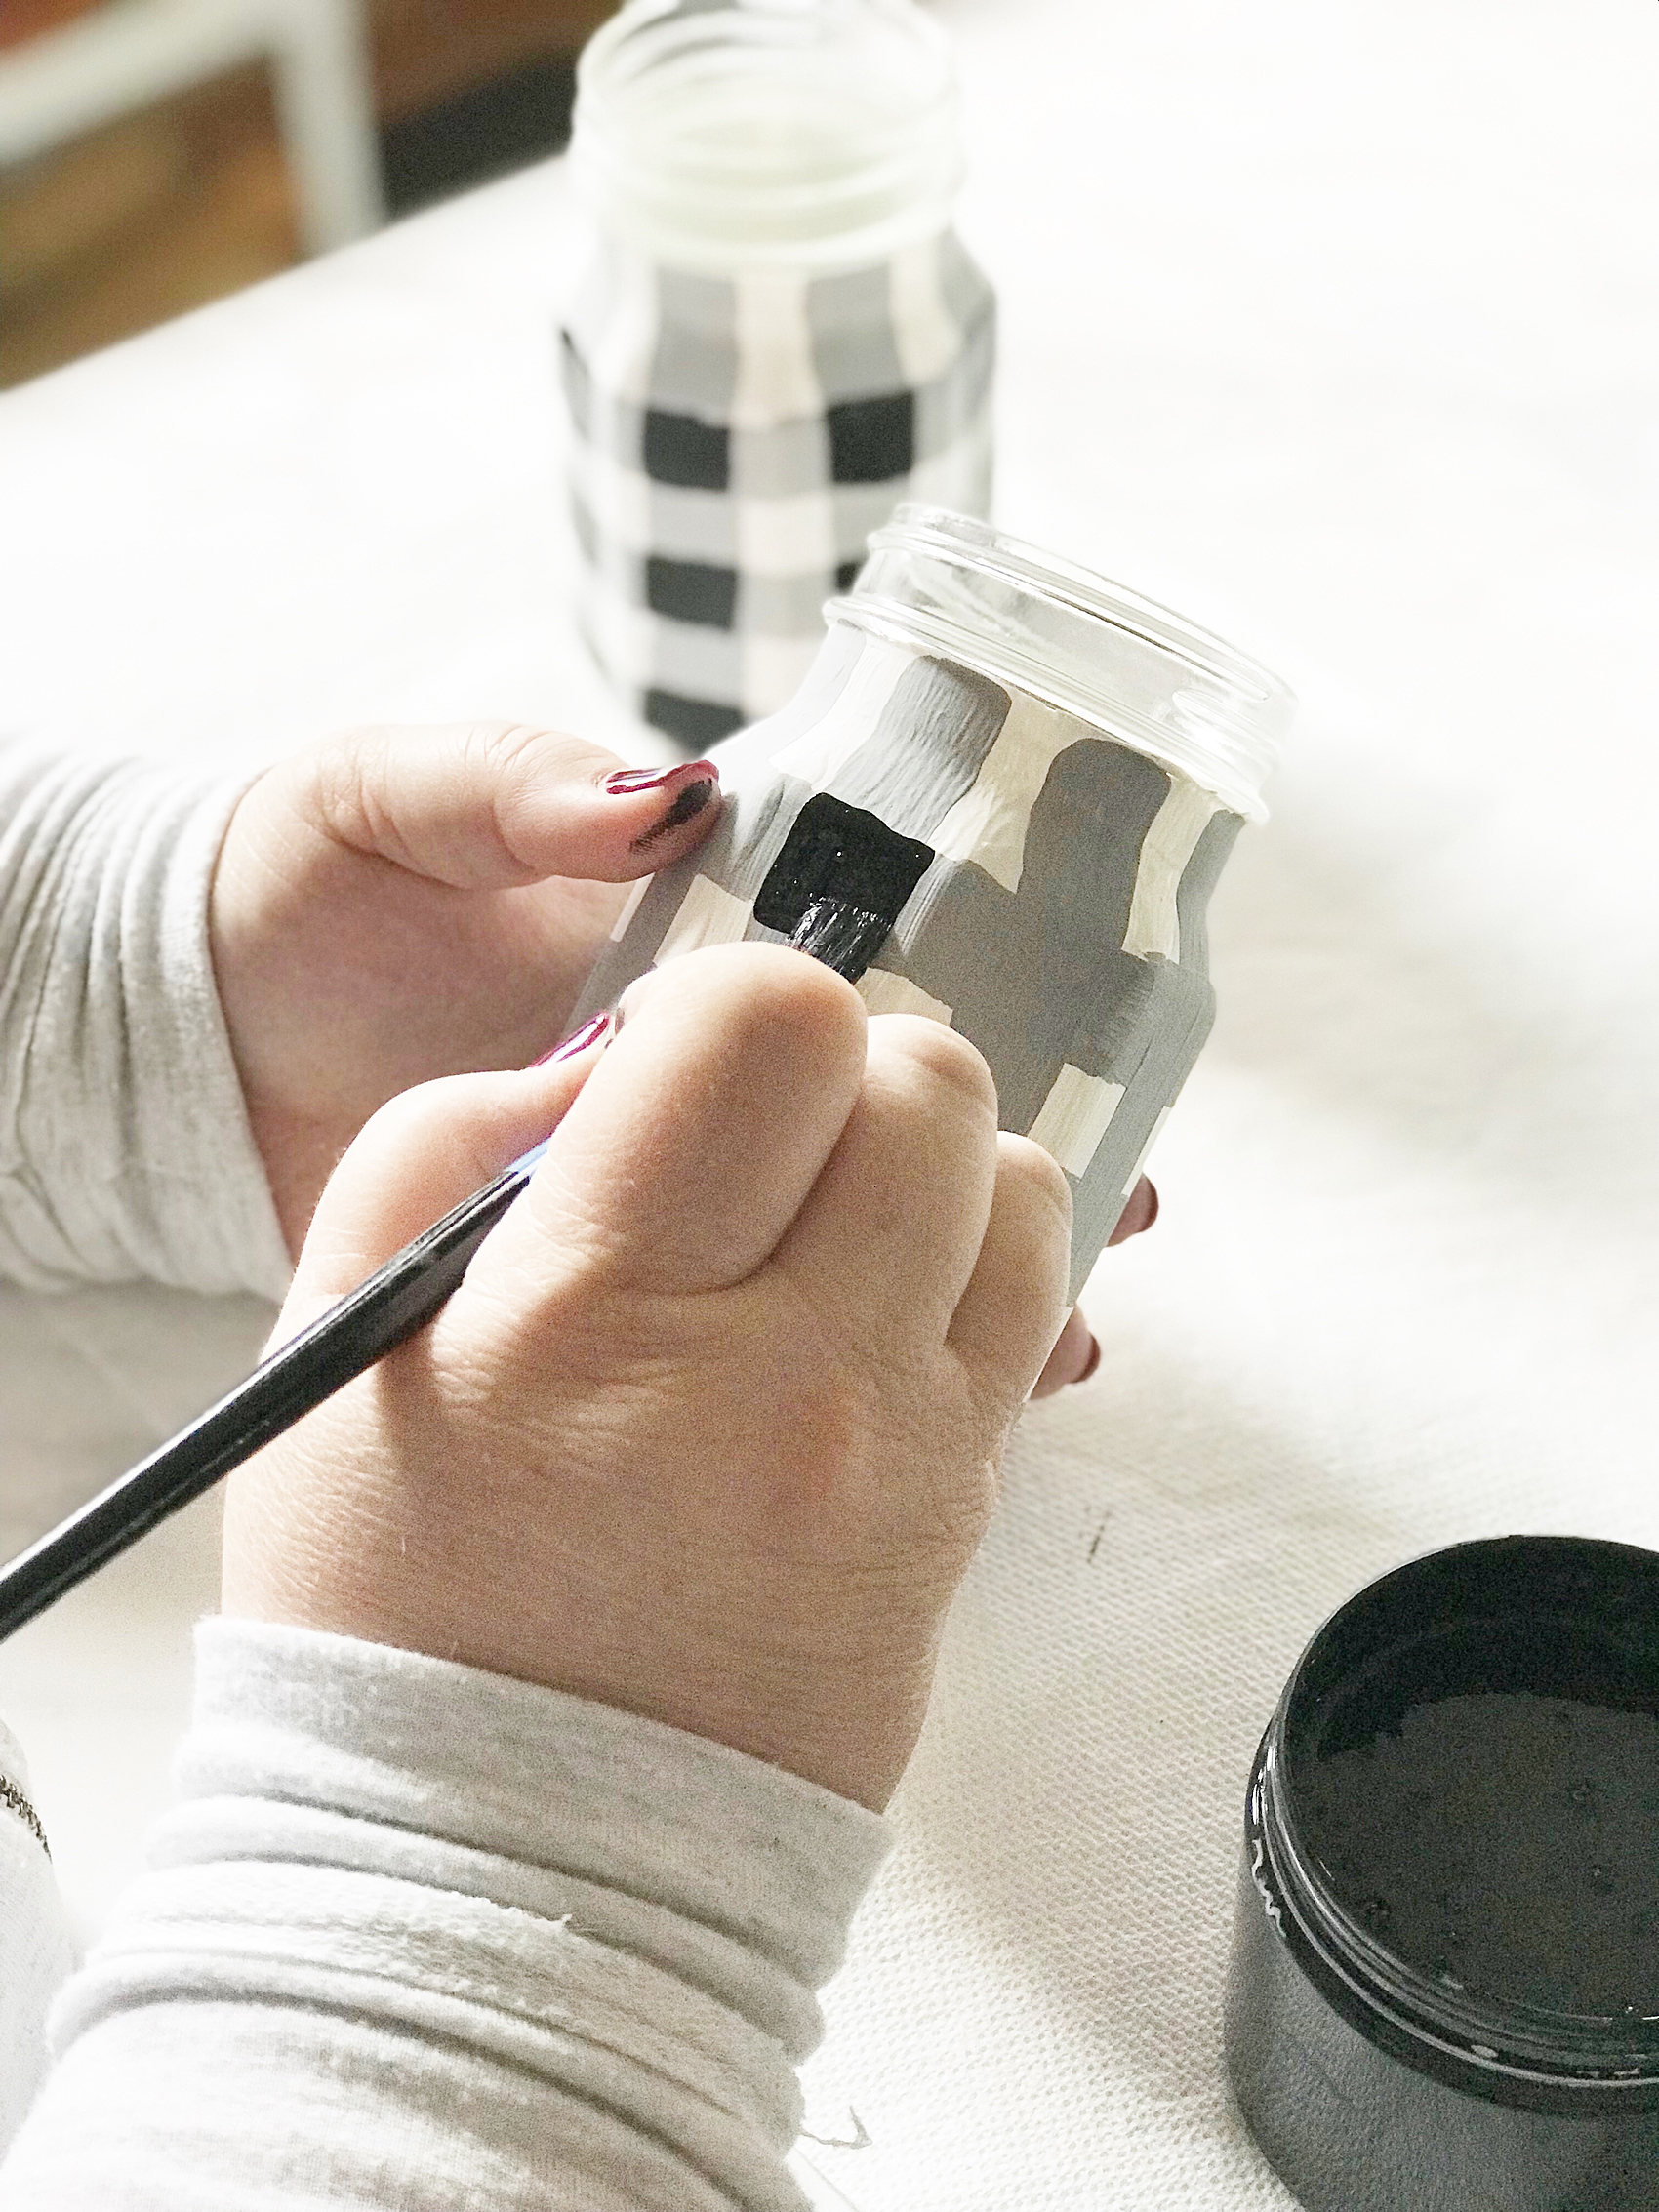
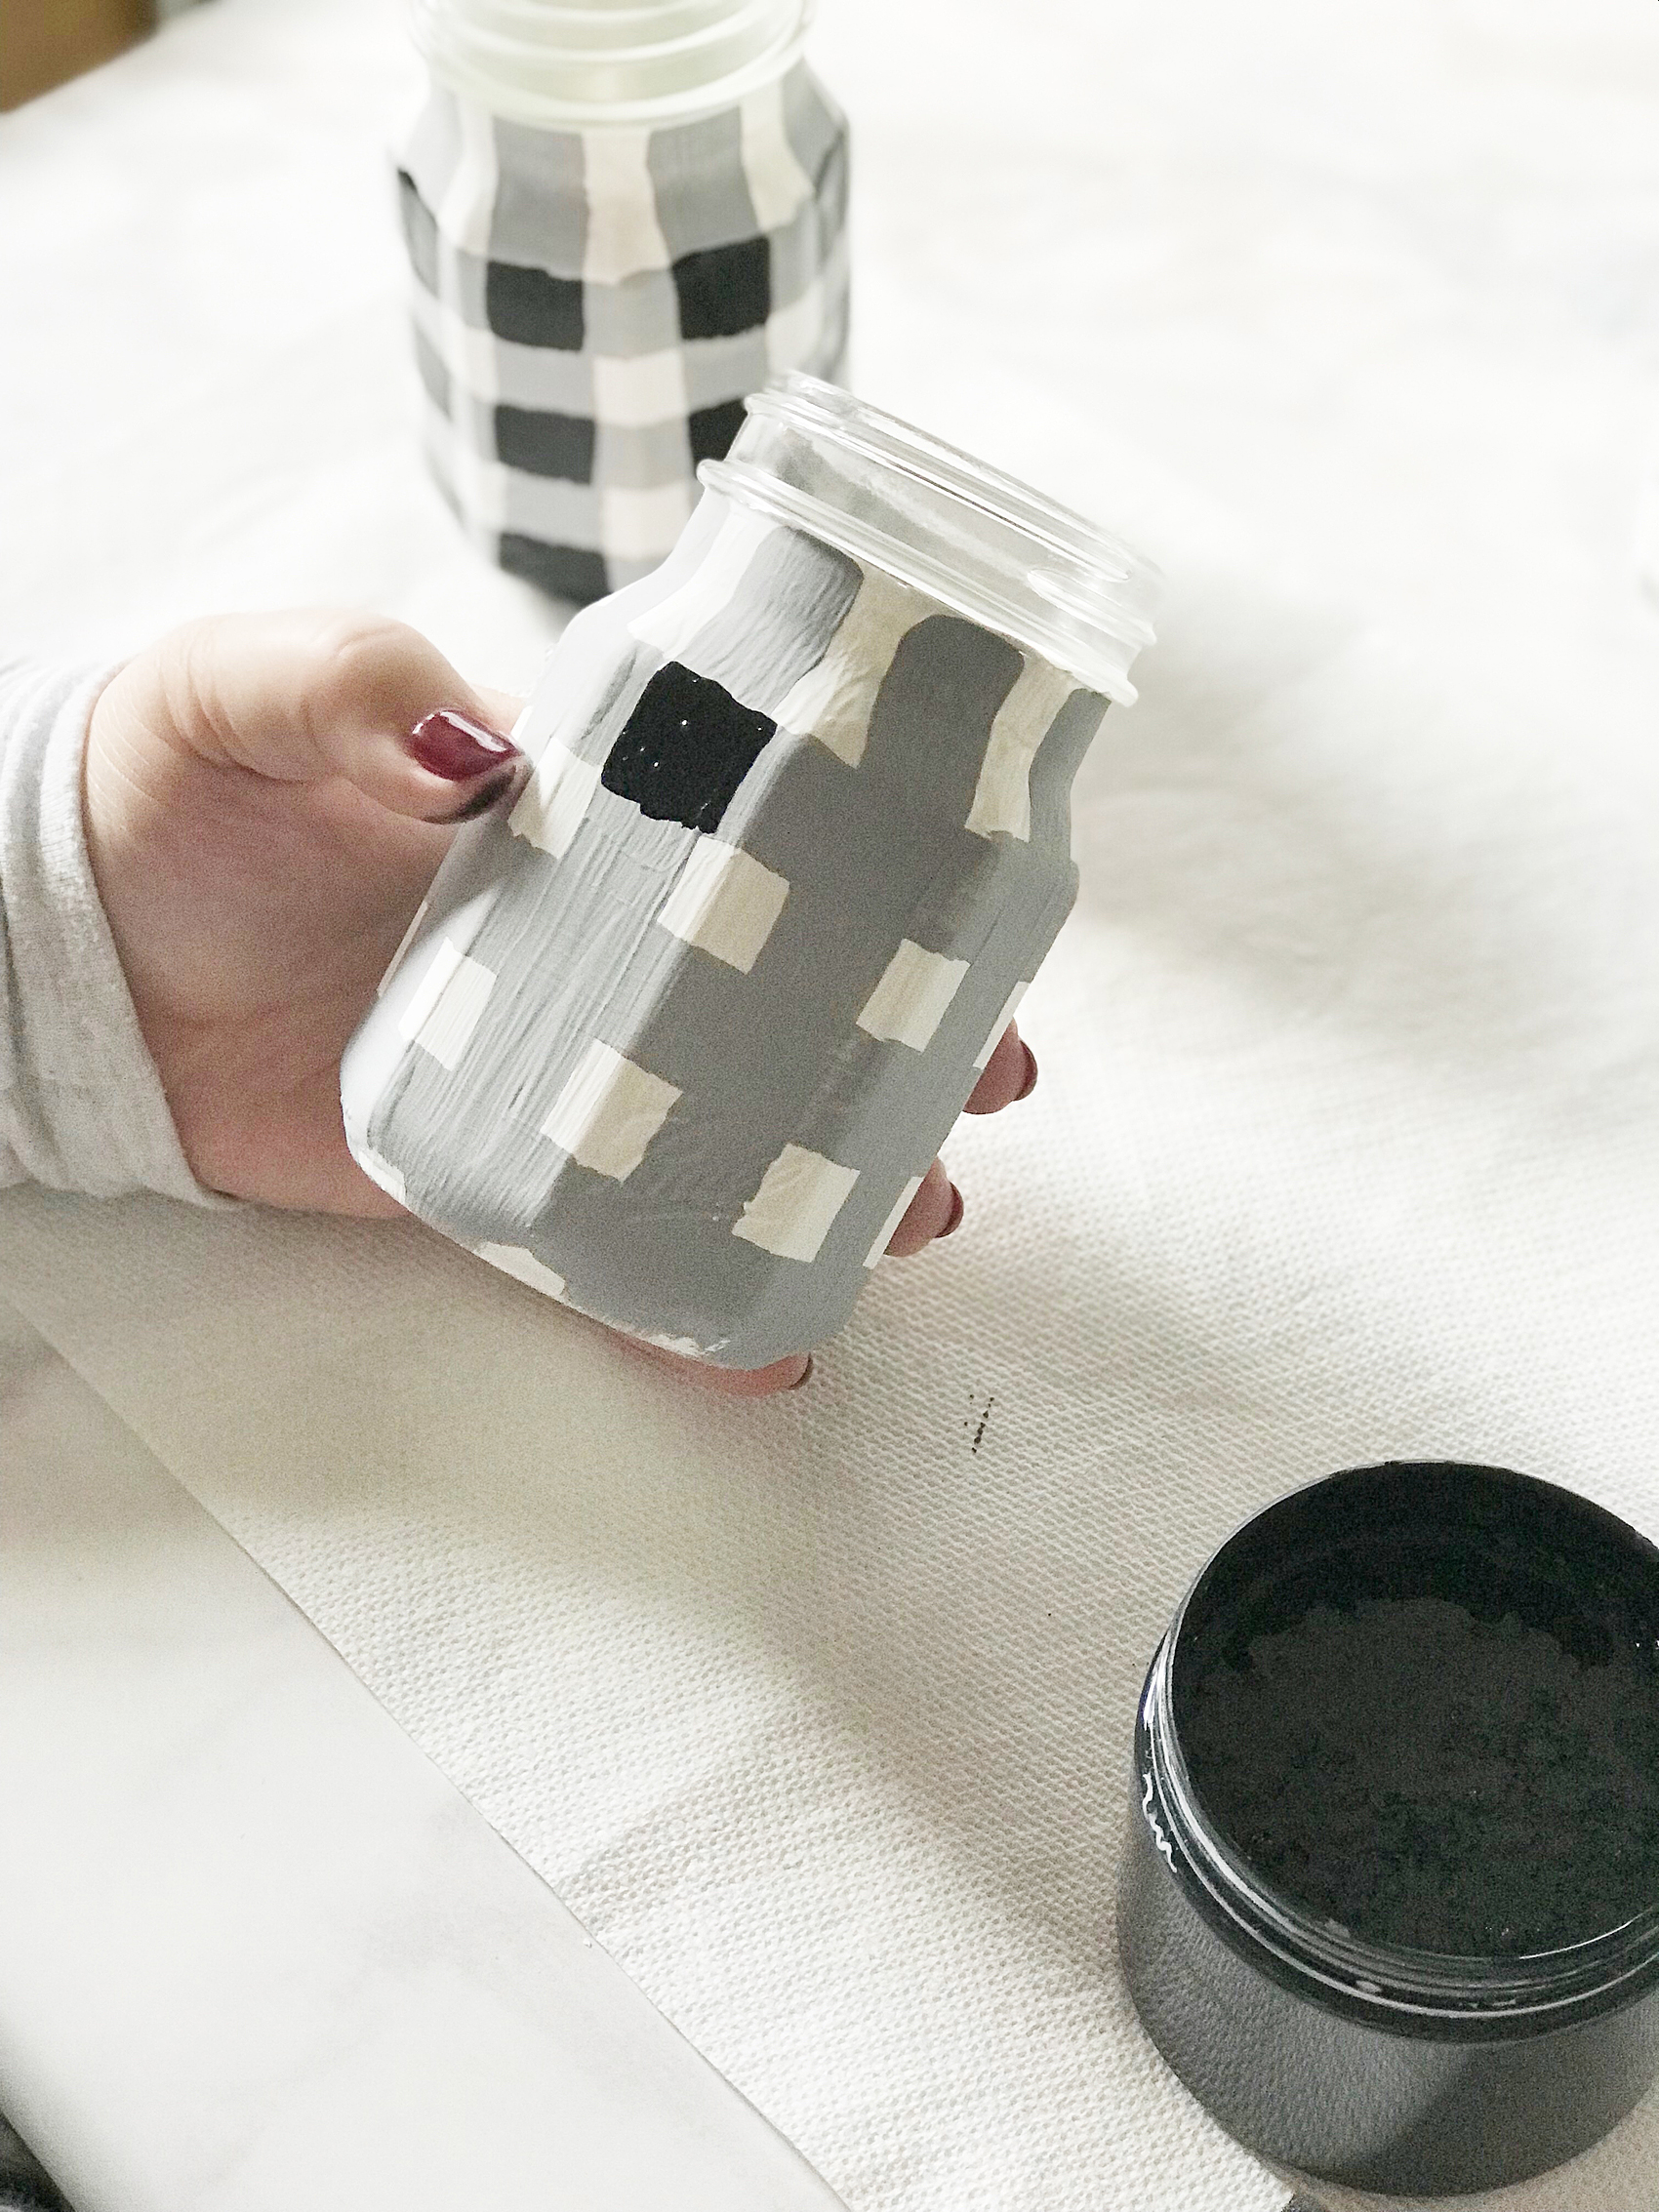
Now, you’ll use the black (Carbon) paint to paint on the black section of the check in the intersections of the gray stripes. Again, let paint dry completely. It would be best at this stage to let the paint cure overnight. It will help the paint adhere to the glass much better.

Love the Buffalo Check trend? Yep, me too! I thought it would be fun to use some of the Ball® Giving Jars to create some Buffalo Check Jars to use as gifts this Holiday Season. Here's how you can make some of your own.

Love the Buffalo Check trend? Yep, me too! I thought it would be fun to use some of the Ball® Giving Jars to create some Buffalo Check Jars to use as gifts this Holiday Season. Here's how you can make some of your own.

Once the paint is dry, you will use the sand paper to smooth and distress the paint. Be careful not to attach the jar with a little too much vigor. You don’t want to sand the paint right off the jar. Using a soft hand, smooth the dry paint, (this will remove the brush strokes) and then carefully distress the high points of the jar.

Love the Buffalo Check trend? Yep, me too! I thought it would be fun to use some of the Ball® Giving Jars to create some Buffalo Check Jars to use as gifts this Holiday Season. Here's how you can make some of your own.

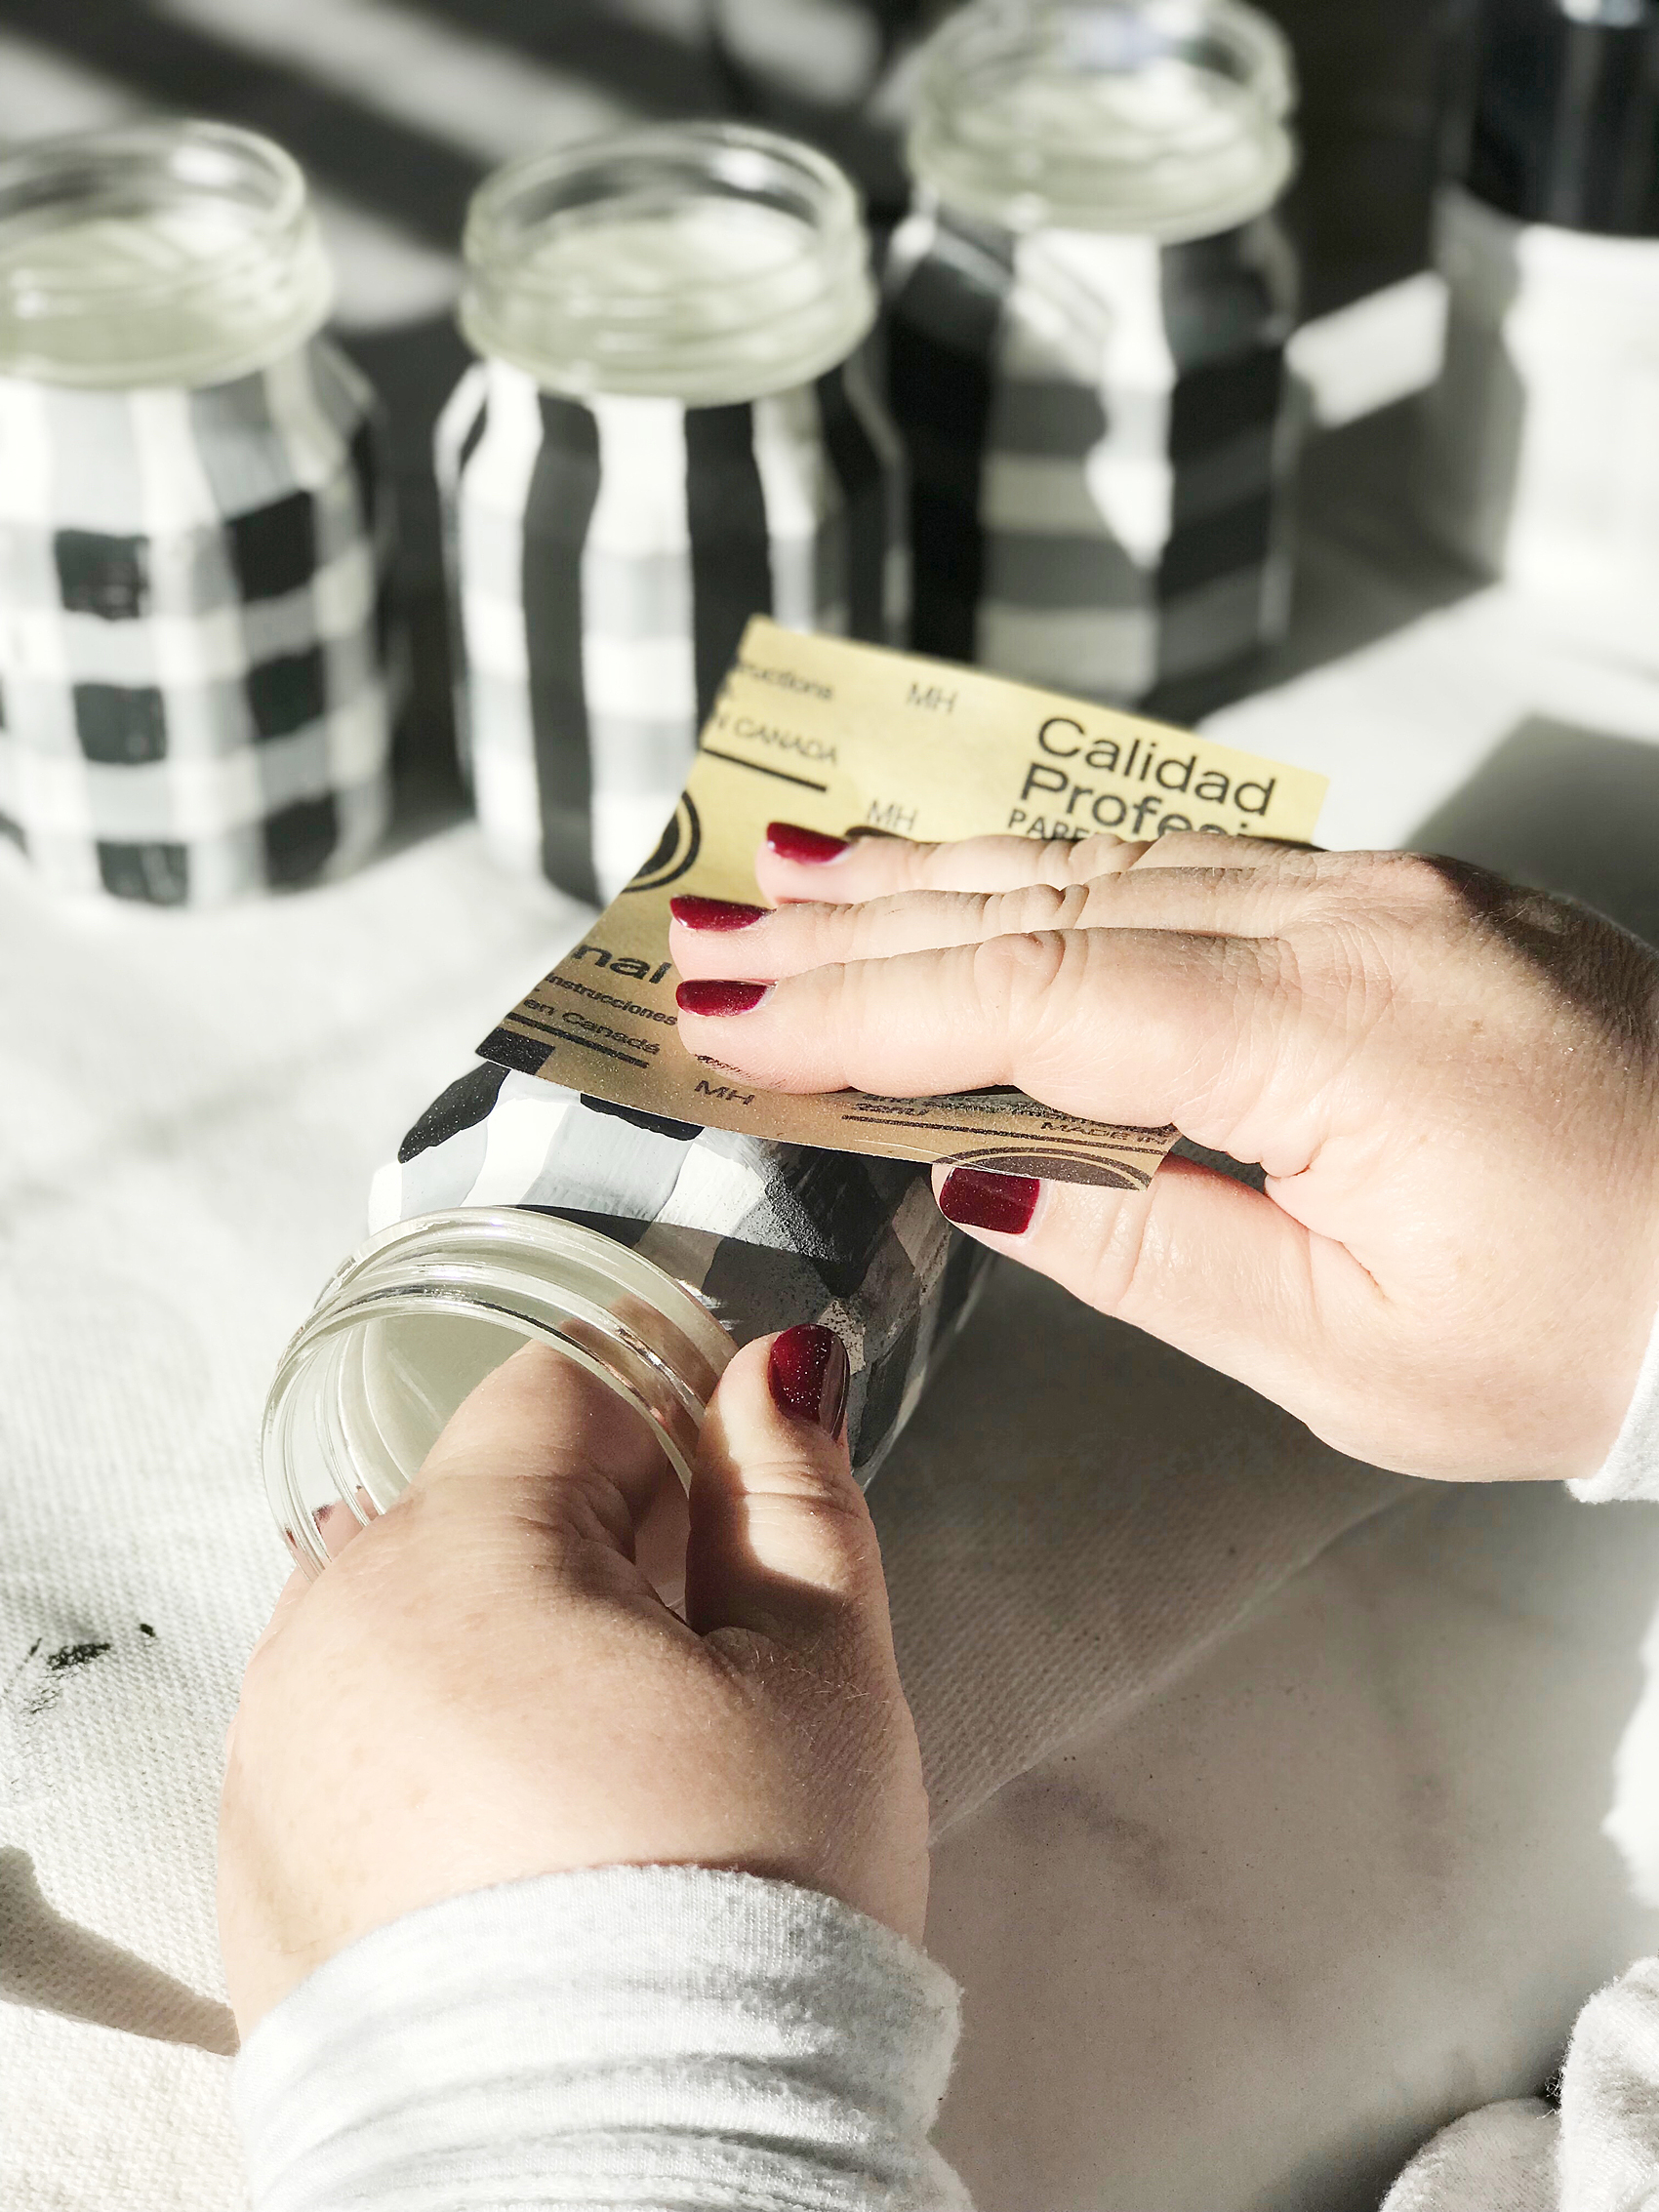
Once this step is complete, you’ll want to wipe down the jars with a damp cloth to remove any of the remaining dust. Then you’ll use your lint free cloth to wipe on some of the wax to seal the paint onto the jar. Use the lint free cloth to then wipe off any excess wax and buff the wax.

Now, you’re finished! You have the cutest Buffalo Check Jars ready to fill with whatever you like.

Love the Buffalo Check trend? Yep, me too! I thought it would be fun to use some of the Ball® Giving Jars to create some Buffalo Check Jars to use as gifts this Holiday Season. Here's how you can make some of your own.

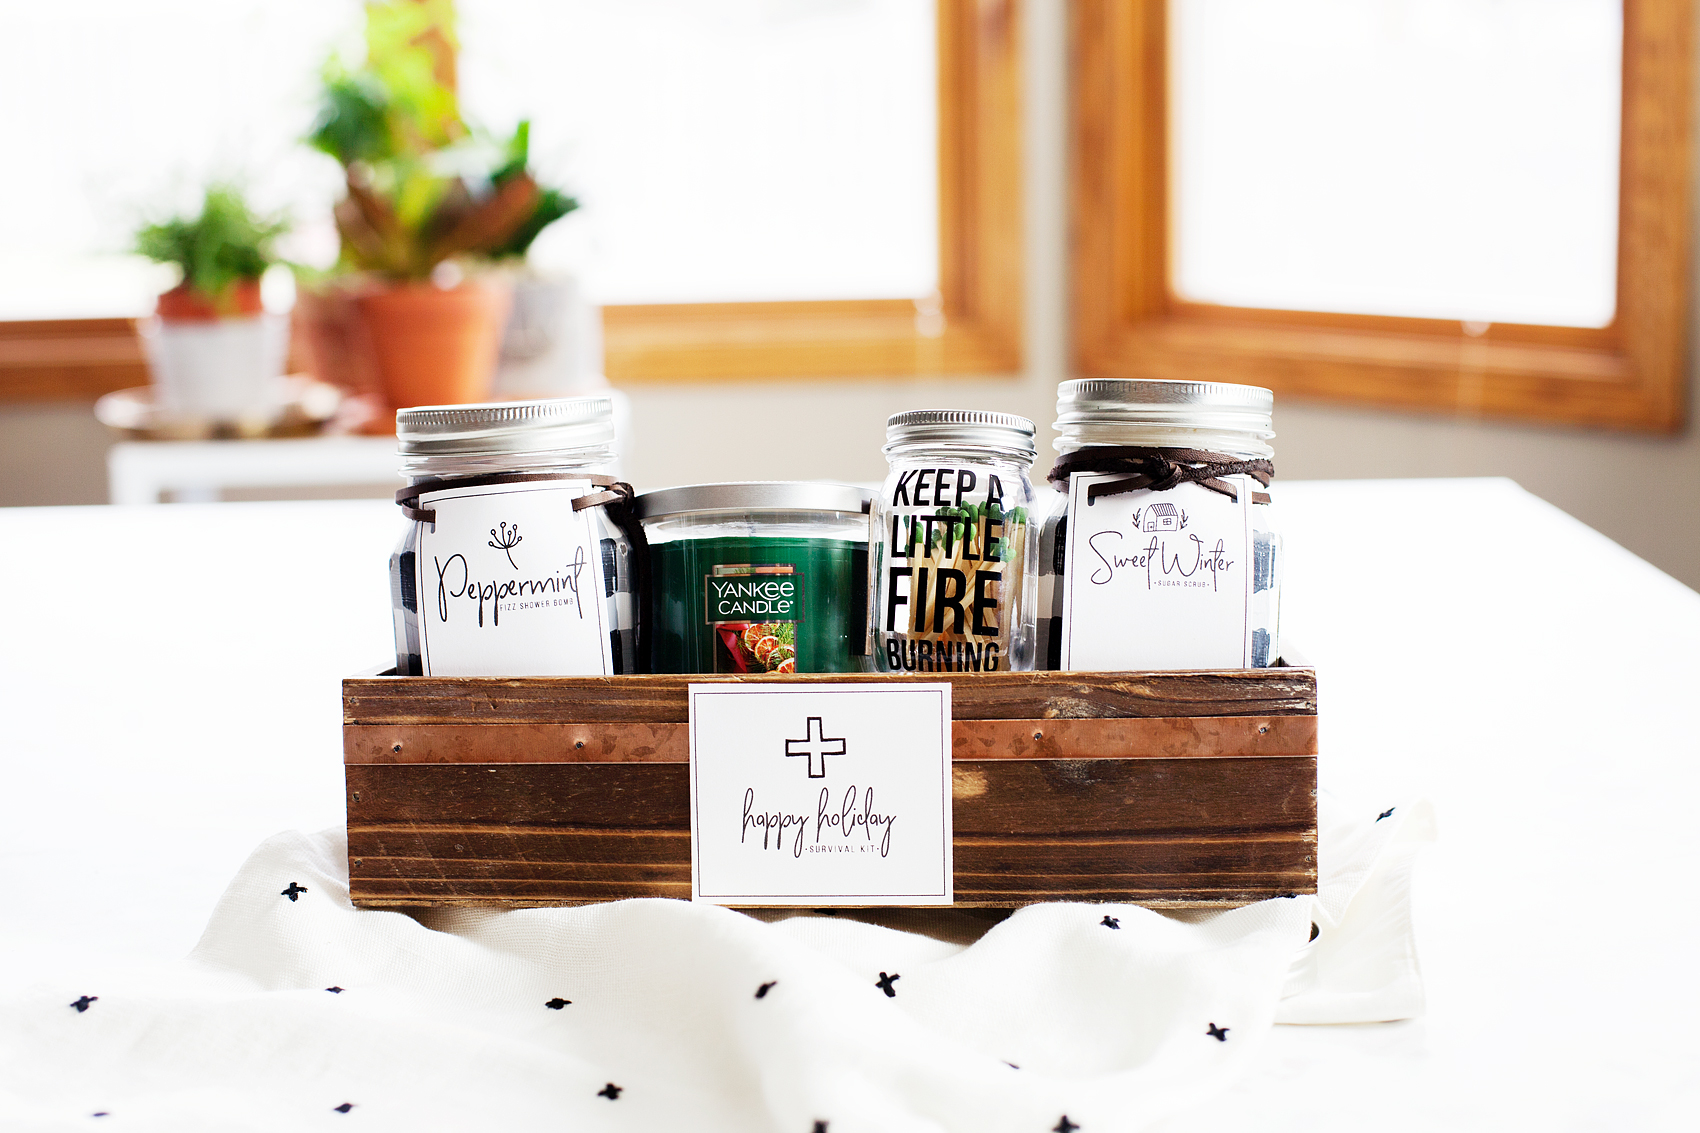
I created a fun Holiday Survival Kit and filled the jars with a homemade sugar scrub, some shower bombs and included a Yankee Candle® along with the cutest little match jar ever… You’ll have to check it out. It even comes with free printable gift tags.

Love the Buffalo Check trend? Yep, me too! I thought it would be fun to use some of the Ball® Giving Jars to create some Buffalo Check Jars to use as gifts this Holiday Season. Here's how you can make some of your own.

Disclosure +  I am a paid partner for Newell Brands, makers of Ball® Fresh Preserving Products. However, all thoughts and opinions expressed are entirely my own. 

Mini-Egg Dessert Bars

4 · Mar 21, 2014 · 4 Comments

Hey guys!  Jenn here again from Clean and Scentsible.  Like many of you, I have been counting down the last days of winter and am so excited that today I finally get to say Happy Spring!  I am SO ready for some warmer weather, longer days, and pretty spring blooms.  Now that spring is here, Easter will soon be around the corner and I have a yummy treat to share with you today with my all-time favorite chocolate – mini-eggs!

Mini-Eggs Dessert Bars

These mini-egg dessert bars are super easy to make – the trick is to not eat all of the mini-eggs before you get around to actually making them!

Mini-Egg Dessert Bars.

Mini-Egg Dessert Bars
 
Save Print
Usher in the Easter season with these yummy mini chocolate egg dessert bars.
Author: Jenn // Clean and Scentsible
Recipe type: Dessert
Cuisine: American
Serves: 12-14
Ingredients
  • 1 cup flour
  • ½ tsp salt
  • ½ tsp baking powder
  • 1 cup sugar
  • 1 cup mini eggs
  • ¾ cup chopped nuts {I used walnuts}
  • ⅓ cup chocolate chips
  • ½ cup butter, softened
  • 2 eggs, lightly beaten
  • ½ tsp vanilla
Instructions
  1. Preheat oven to 350F.
  2. Sift the flour, baking powder, salt, and sugar together. Mix in the butter, beaten eggs, and vanilla and stir until well blended.
  3. Add the mini-eggs, chocolate chips, and nuts.
  4. Prepare a 9x9-inch baking pan with non-stick cooking spray.
  5. Pour the batter into the pan and bake for 30 to 35 minutes. Allow to cool and cut into squares.
3.2.2310

If you are looking for a fun Easter gift idea, the dry ingredients for these bars can be packaged up in a mason jar and would make a nice little hostess gift or treat for your favorite teacher or neighbor.

Mini-Egg Dessert Bars

Just layer the ingredients in a 1 quart mason jar as follows:

  • flour, baking powder, salt
  • sugar
  • mini-eggs
  • chocolate chips and nuts

I have also created some printables to help you dress up your jars – there is a Bunny Bars label for the front and baking instructions for the back.  

Just head over to Clean and Scentsible to download them!

Mini-Egg Dessert Bars
If you are looking for more Easter ideas, you might also want to check out these posts….

Easter Projects
Easter Bunny Sundaes
Easter Bunny Canvas
Easter Bunny Treats

Have a wonderful spring and thanks so much to Heather for having me!

Pazookie | Recipe

9 · Dec 28, 2011 · 26 Comments

A few weeks ago I participated in the holiday cookie exchange at LoveFeast Table and thought I would share my Pazookie with you guys today.  No, no… it's not misspelled, it's a Pizookie in a jar, so I called it a PAZOOKIE. I came up with it for a fun, out of the box cookie exchange idea, but I think it would also be great for a cozy New Years celebration… So, here you have it, the Pazookie!


You may have heard of a Pizookie… a chocolate chip cookie baked in a pan and is kind of like a gooey, chocolate pizza.  Well, a Pazookie is a similar treat, however it is baked in a jar.  I am a big fan of creating fun treats in jars.  They are portioned perfectly and provide a fabulous blank canvas in order embellish your fun treat.  Here are some of the other treats in a jar from WhipperBerry…

…

Read On →

  • « Go to Previous Page
  • Go to page 1
  • Go to page 2

Primary Sidebar

Heather from Whipperberry
Hello... my name is Heather and I'm the creator of WhipperBerry a creative lifestyle blog packed full of great recipes and creative ideas for your home and family. I find I am happiest when I'm living a creative life and I love to share what I've been up to along the way... Come explore, my hope is that you'll leave inspired!

Footer

  • Privacy Policy

Copyright © 2023 · Seasoned Pro