I don’t think I’m alone when I say that I associate pumpkin with Fall. But I have been finding some amazing winter pumpkin recipes, and I am dying to give them a try. Here’s a few highlights:
The Farm Girl has this wonderful recipe for Gingerbread Pumpkin Waffles that includes a buttermilk syrup and whipped cream! Yum!!
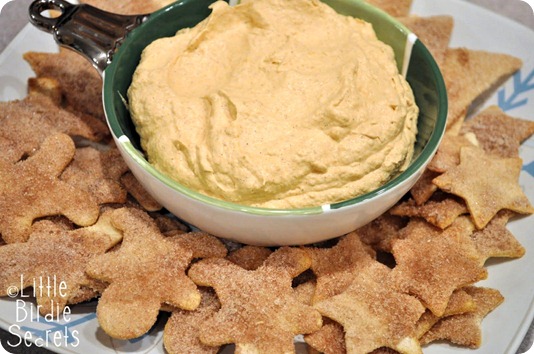
Little Birdie Secrets made this Fluffy Pumpkin Dip, and she even gives the how-to on the cinnamon-sugar tortilla chips.
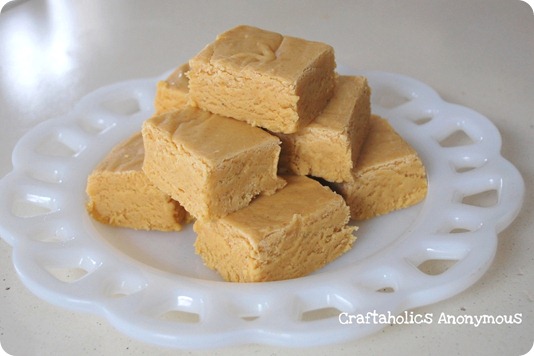
Finally, Craftaholics Anonymous shares this recipe for Pumpkin Fudge! It makes my mouth water just looking at it – but the best part? She says it only takes 15 minutes to make!
So maybe it’s time to re-think pumpkin, and let it out of its little Autumn box.
![gingerbread_pumpkin_waffles[3]2 gingerbread_pumpkin_waffles[3]2](https://lh3.ggpht.com/_vust898tmIA/TRgn_uxcYHI/AAAAAAAAAzg/8CrwlmA3cpE/gingerbread_pumpkin_waffles%5B3%5D2_thumb%5B2%5D.jpg?imgmax=800)
![Signature[5] Signature[5]](https://lh4.ggpht.com/_vust898tmIA/TRgoCwc0OPI/AAAAAAAAAz0/4JM-WXX2Ajg/Signature%5B5%5D%5B8%5D.jpg?imgmax=800)

![WB_271[9]-- WB_271[9]--](https://lh6.ggpht.com/_vust898tmIA/TRKkrOkHnYI/AAAAAAAAAtw/iXS9tUJy11Y/WB_271%5B9%5D--_thumb%5B2%5D.jpg?imgmax=800)
![WB_143[3]- WB_143[3]-](https://lh5.ggpht.com/_vust898tmIA/TRKkstuA_5I/AAAAAAAAAt4/2rH3LmyLqnI/WB_143%5B3%5D-_thumb%5B3%5D.jpg?imgmax=800)
![WB_128[4]--- WB_128[4]---](https://lh3.ggpht.com/_vust898tmIA/TRKkt1RB3II/AAAAAAAAAuA/jjnPU5YHgEM/WB_128%5B4%5D---_thumb%5B17%5D.jpg?imgmax=800)
![WB_125[5]- WB_125[5]-](https://lh3.ggpht.com/_vust898tmIA/TRKkvPEUq3I/AAAAAAAAAuI/MXUknBYzORE/WB_125%5B5%5D-_thumb%5B17%5D.jpg?imgmax=800)
![WB_133[5]- WB_133[5]-](https://lh3.ggpht.com/_vust898tmIA/TRKkwf63AnI/AAAAAAAAAuQ/Ddb7nrgs0Jk/WB_133%5B5%5D-_thumb%5B2%5D.jpg?imgmax=800)
![WB_135[4]- WB_135[4]-](https://lh4.ggpht.com/_vust898tmIA/TRKkxjVnR4I/AAAAAAAAAuY/3gNRvN49BvY/WB_135%5B4%5D-_thumb%5B2%5D.jpg?imgmax=800)
![WB_139[4]-- WB_139[4]--](https://lh6.ggpht.com/_vust898tmIA/TRKkyqEVvuI/AAAAAAAAAug/tkKFTTF6dg0/WB_139%5B4%5D--_thumb%5B2%5D.jpg?imgmax=800)
![WB_144[3]-- WB_144[3]--](https://lh3.ggpht.com/_vust898tmIA/TRKkz-Y1u4I/AAAAAAAAAuo/T7UC_r_Kx44/WB_144%5B3%5D--_thumb%5B3%5D.jpg?imgmax=800)
![WB_148[6]- WB_148[6]-](https://lh3.ggpht.com/_vust898tmIA/TRKk1PLQoxI/AAAAAAAAAuw/5GfJEc6gc7A/WB_148%5B6%5D-_thumb%5B4%5D.jpg?imgmax=800)
![WB_153[6]- WB_153[6]-](https://lh4.ggpht.com/_vust898tmIA/TRKk2KqN9fI/AAAAAAAAAu8/0qEdnUtBVOY/WB_153%5B6%5D-_thumb%5B4%5D.jpg?imgmax=800)
![WB_156[5]- WB_156[5]-](https://lh6.ggpht.com/_vust898tmIA/TRKk3PlrmpI/AAAAAAAAAvE/DLu977ULaCY/WB_156%5B5%5D-_thumb%5B4%5D.jpg?imgmax=800)
![WB_169[5]- WB_169[5]-](https://lh4.ggpht.com/_vust898tmIA/TRKk4jC78yI/AAAAAAAAAvM/KorVOx_pKYE/WB_169%5B5%5D-_thumb%5B4%5D.jpg?imgmax=800)
![WB_171[5]- WB_171[5]-](https://lh3.ggpht.com/_vust898tmIA/TRKk5v3iFFI/AAAAAAAAAvU/S16-p-4X__Q/WB_171%5B5%5D-_thumb%5B4%5D.jpg?imgmax=800)
![WB_173[4]- WB_173[4]-](https://lh4.ggpht.com/_vust898tmIA/TRKk61x-kII/AAAAAAAAAvc/Pz0pt5qlSu4/WB_173%5B4%5D-_thumb%5B4%5D.jpg?imgmax=800)
![WB_179[4]-- WB_179[4]--](https://lh6.ggpht.com/_vust898tmIA/TRKk8IuLXTI/AAAAAAAAAvk/mw3hYCvFwMI/WB_179%5B4%5D--_thumb%5B2%5D.jpg?imgmax=800)
![WB_175[6]-- WB_175[6]--](https://lh4.ggpht.com/_vust898tmIA/TRKk9B3Jn2I/AAAAAAAAAvs/IWjRRFhwL3c/WB_175%5B6%5D--_thumb%5B14%5D.jpg?imgmax=800)
![WB_177[5]- WB_177[5]-](https://lh4.ggpht.com/_vust898tmIA/TRKk-ae4HmI/AAAAAAAAAv0/9ZIV6iqX4uw/WB_177%5B5%5D-_thumb%5B12%5D.jpg?imgmax=800)
![WB_182[4]--- WB_182[4]---](https://lh6.ggpht.com/_vust898tmIA/TRKk_bpWt2I/AAAAAAAAAv8/NNZSEKfywow/WB_182%5B4%5D---_thumb%5B2%5D.jpg?imgmax=800)
![WB_186[4]- WB_186[4]-](https://lh4.ggpht.com/_vust898tmIA/TRKlAvlDeNI/AAAAAAAAAwE/uPiRenfQ_SM/WB_186%5B4%5D-_thumb%5B2%5D.jpg?imgmax=800)
![WB_190[4]- WB_190[4]-](https://lh6.ggpht.com/_vust898tmIA/TRKlBw28YgI/AAAAAAAAAwM/Hbspuj-o7M0/WB_190%5B4%5D-_thumb%5B3%5D.jpg?imgmax=800)
![WB_193[4]- WB_193[4]-](https://lh5.ggpht.com/_vust898tmIA/TRKlDH9WDZI/AAAAAAAAAwU/pnHke6NzIr8/WB_193%5B4%5D-_thumb%5B2%5D.jpg?imgmax=800)
![WB_197[4]- WB_197[4]-](https://lh6.ggpht.com/_vust898tmIA/TRKlEMtrH2I/AAAAAAAAAwg/fSYWbJxy7tA/WB_197%5B4%5D-_thumb%5B2%5D.jpg?imgmax=800)
![WB_198[4]-- WB_198[4]--](https://lh6.ggpht.com/_vust898tmIA/TRKlFhSxFXI/AAAAAAAAAwo/Zo7Hsh4ZN3w/WB_198%5B4%5D--_thumb%5B2%5D.jpg?imgmax=800)
![WB_207[4]- WB_207[4]-](https://lh5.ggpht.com/_vust898tmIA/TRKlG7wL6WI/AAAAAAAAAww/nEoN2Nv2hAc/WB_207%5B4%5D-_thumb%5B2%5D.jpg?imgmax=800)
![WB_213[6]- WB_213[6]-](https://lh6.ggpht.com/_vust898tmIA/TRKlH9Ssh3I/AAAAAAAAAw4/K9zuzjN-jgM/WB_213%5B6%5D-_thumb%5B6%5D.jpg?imgmax=800)
![WB_216[5]- WB_216[5]-](https://lh3.ggpht.com/_vust898tmIA/TRKlJDhc4wI/AAAAAAAAAxA/_fOudDaBG1A/WB_216%5B5%5D-_thumb%5B6%5D.jpg?imgmax=800)
![WB_219[5]- WB_219[5]-](https://lh3.ggpht.com/_vust898tmIA/TRKlMZfnzbI/AAAAAAAAAxg/gk3InDyQ22Y/WB_219%5B5%5D-_thumb%5B13%5D.jpg?imgmax=800)
![WB_221[4]- WB_221[4]-](https://lh5.ggpht.com/_vust898tmIA/TRKlNWLV-II/AAAAAAAAAxo/6hazN0ywK3k/WB_221%5B4%5D-_thumb%5B13%5D.jpg?imgmax=800)
![WB_229[10]- WB_229[10]-](https://lh4.ggpht.com/_vust898tmIA/TRKlOtQv1bI/AAAAAAAAAxw/3b87ks_cXYw/WB_229%5B10%5D-_thumb%5B2%5D.jpg?imgmax=800)
![WB_231[10]- WB_231[10]-](https://lh4.ggpht.com/_vust898tmIA/TRKlQfrUNaI/AAAAAAAAAx4/jZjoY9Lx1xY/WB_231%5B10%5D-_thumb%5B2%5D.jpg?imgmax=800)
![WB_235[16] WB_235[16]](https://lh4.ggpht.com/_vust898tmIA/TRKlRo7P2eI/AAAAAAAAAyA/AmYsnazHAH8/WB_235%5B16%5D_thumb%5B2%5D.jpg?imgmax=800)
![WB_239[6] WB_239[6]](https://lh6.ggpht.com/_vust898tmIA/TRKlS4oQ23I/AAAAAAAAAyI/aEH8BcsFKBA/WB_239%5B6%5D_thumb%5B8%5D.jpg?imgmax=800)
![WB_242[4] WB_242[4]](https://lh5.ggpht.com/_vust898tmIA/TRKlT-gjYaI/AAAAAAAAAyQ/SP8Q0nKomUc/WB_242%5B4%5D_thumb%5B7%5D.jpg?imgmax=800)
![WB_252[3] WB_252[3]](https://lh3.ggpht.com/_vust898tmIA/TRKlVWUnHEI/AAAAAAAAAyY/yXXmei6UU7k/WB_252%5B3%5D_thumb%5B2%5D.jpg?imgmax=800)
![WB_248[3]- WB_248[3]-](https://lh6.ggpht.com/_vust898tmIA/TRKlWlutlII/AAAAAAAAAyg/VNjJOd7nyzs/WB_248%5B3%5D-_thumb%5B2%5D.jpg?imgmax=800)
![Signature[5] Signature[5]](https://lh6.ggpht.com/_vust898tmIA/TRKlWx2AeGI/AAAAAAAAAyk/1ecGaZauLgA/Signature%5B5%5D%5B7%5D.jpg?imgmax=800)



![PB29601b32[1]_thumb[1] PB29601b32[1]_thumb[1]](https://lh3.ggpht.com/_vust898tmIA/TQs8YDIPAfI/AAAAAAAAAh4/JXIOi0HXBYs/PB29601b32%5B1%5D_thumb%5B1%5D%5B6%5D.jpg?imgmax=800)







![Signature[5] Signature[5]](https://lh3.ggpht.com/_vust898tmIA/TQs8oPYrWDI/AAAAAAAAAjs/x6xR65sdv6w/Signature%5B5%5D%5B5%5D.jpg?imgmax=800)






![Signature[5] Signature[5]](https://lh6.ggpht.com/_vust898tmIA/TQhvLVxMCCI/AAAAAAAAAf0/LgAqfgORo_o/Signature%5B5%5D%5B5%5D.jpg?imgmax=800)
