• Skip to primary navigation
  • Skip to main content
  • Skip to primary sidebar
  • Skip to footer

Whipperberry

WhipperBerry • Your Home For Creative Inspiration

  • Home
  • Recipes
    • Starters
    • Easy Weeknight Dinners
    • Main Dish
    • Salads
    • Side Dish
    • Soups & Stews
    • Desserts
    • Breakfast
    • Miscellaneous
  • Tutorials
    • Creative Crafts
    • DIY Decor
    • Fabric Crafts
    • Food How-To
    • Jewlery
    • Paint Projects
    • Paper Art
    • Party Styling
    • Photography and Graphic Design
    • Silhouette
  • Holidays
    • Easter
    • Mother’s Day
    • Father’s Day
    • 4th of July
    • Halloween
    • Thanksgiving
    • Christmas
    • Valentine’s Day
  • Gift Ideas
    • Gifts For Everyone
    • Gifts for Dad
    • Mother’s day
    • For The Girls
    • For The Kids
    • Teacher Gift Ideas
    • Christmas
  • Printables
    • Holiday
    • Gift Idea
    • LDS Primary
  • Travel
  • About
    • Terms
  • Contact
  • Nav Social Menu

    • Facebook
    • Instagram
    • Pinterest
    • RSS
    • Twitter

Grilling

Grilled Pineapple Delight Boats

10 · Jul 20, 2016 · 1 Comment

+ This Grilled Pineapple Delight Boats Recipe brought to you by Old El Paso +

Grilled Pineapple Delight Boats - A tropical dessert from WhipperBerry

We’re a huge fan of pineapple at our house! That fresh tropical flavor is perfect with all kinds of dishes from savory to sweet. I especially LOVE to grill pineapple during the summer months. One night I was enjoying some grilled pineapple and started to dream up a fun new dessert that I just had to try. It’s a cross between a taco and a cheesecake. Yep, kind of crazy but once you try it… You’ll know it’s crazy awesome!!

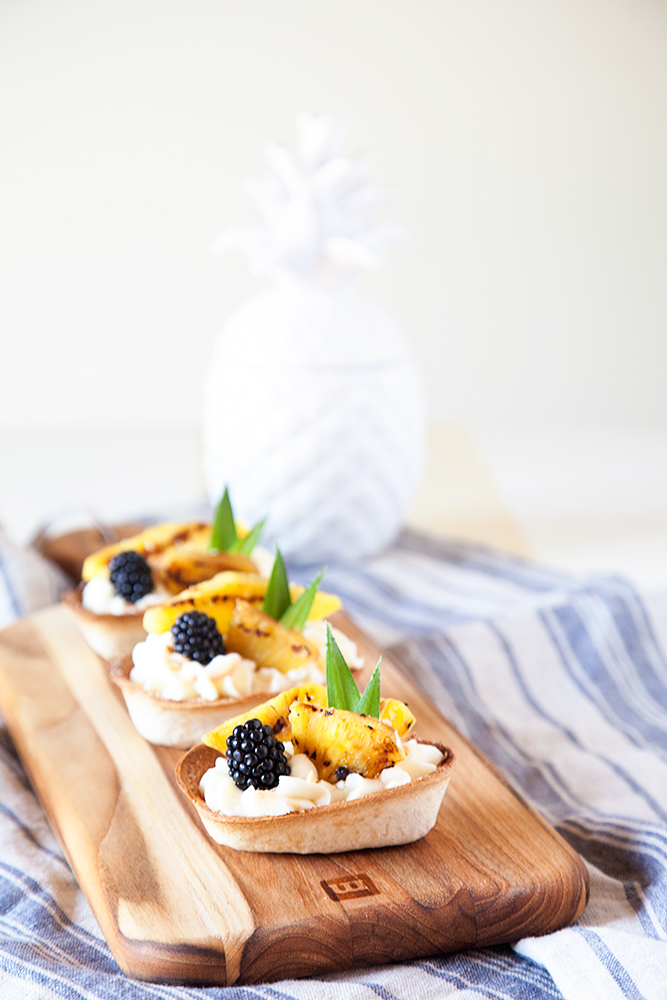
I started with the base of the dessert by using our favorite Old El Paso Mini Taco Boats. It’s a perfect 2 bite dessert that’s perfect for a party. I coat the mini taco boats in cinnamon sugar and pop it in the oven for a few minutes. Then I fill them with a scrumptious cream cheese mixture that also involves marshmallow creme… Yep, now we’re talking! Top that with some grilled pineapple and you will be in heaven. Here’s how to make them.

Grilled Pineapple Delight Boats Recipe

Grilled Pineapple Delight Boats
 
Save Print
Prep time
30 mins
Cook time
8 mins
Total time
38 mins
 
Author: Heather // WhipperBerry
Cuisine: Dessert
Serves: 12
Ingredients
  • 1 package of Old El Paso Mini Soft Tortilla Taco Boats
  • Cooking Spray
  • 3 tablespoons cinnamon sugar
  • 2- 8 oz. packages of cream cheese - room temperature
  • 2- 7 oz jars of marshmallow creme
  • ¼ cup sweetened condensed milk
  • 1 tsp. vanilla
  • 1 pineapple
  • 12 blackberries - optional
  • ⅛ cup of toasted unsweetened coconut - optional
Instructions
  1. Prepare Mini Taco Boats first by preheating the oven to 400˚ then place Mini Taco Boats on a parchment lined baking sheet and spray with cooking spray.
  2. Coat each of the Mini Taco Boats with cinnamon sugar.
  3. Place in the oven for 8-10 minutes until golden brown.
  4. While the Mini Taco Boats are cooling, place the cream cheese, marshmallow creme, sweetened condensed milk and vanilla into a large mixing bowl and mix starting on the lowest speed and gradually increase the speed until the ingredients are fully combined. If you aren’t using this right away, you’ll want to place in the refrigerator until ready to use.
  5. Cut pineapple into roughly 1 inch wedges about a ½ and inch thick. Grill on a grill pan for 1 minute on each side or until you see some grill marks appearing. Remove from grill and let cool completely.
  6. To assemble your dessert either spoon or pipe your filling into the Mini Taco Boats, top with a couple of slices of pineapple, a blackberry and garnish with toasted coconut.
3.4.3177

For more great recipes visit the Old El Paso website! They have thousands of tasty and unique recipes that your family will love.

Disclaimer // I am an Old El Paso blogger and receive payment for my time and efforts in developing new ideas and recipes. All thoughts, ideas and opinions are my very own. Rest assured, I won’t ever promote a company or a brand that I truly use in my every day life and truly believe in.

Balsamic Chicken Bites Recipe

6 · Jan 21, 2016 · 1 Comment

+ This Balsamic Chicken Bites Recipe is a sponsored post written by me on behalf of Tyson Foods, Inc. All opinions are entirely my own. +

Balsamic Chicken Bites from WhipperBerry

It’s getting EXCITING!!

THE BIG GAME is almost here!

No matter who you are rooting for, the Super Bowl is always a fantastic time to gather with friends and family to enjoy some crazy excitement together and to enjoy some fantastic food!

Whether the game is a wild ride or a blowout, you want to make sure your game time snacks are ON POINT!

The Super Bowl just isn’t the Super Bowl without a scrumptious, tempting spread of all kinds of snackable treats. Just like any event or holiday, you want to make sure you have some great recipes that are tried and true so that you can look like a kitchen ROCKSTAR!

You can find all kinds of fantastic ideas at Talk About Delicious or the Talk About Delicious Game Pinterest Board. It’s packed full of great ideas. Today, I have a tasty recipe for you as well. Our family’s favorite Balsamic Chicken Bites…

WhipperBerry Balsamic Chicken Bites Perfect appetizer for the BIG GAME!

What I LOVE about this little bite sized treat is that it’s on the healthier end of the typical game time snack spectrum and it’s packed full of flavor. It’s also super easy to make, you can even make it a head of time which is fabulous, since you don’t want to be bogged down with food prep when you’re with your friends and the game is on.

I typically head to Walmart to gather all of my supplies. I love using the fresh Tyson® Chicken found in the refrigerated meat section of the store. Then I grab the rest of the ingredients for my marinade, one of the stars of the show.

Ingredients for Balsamic Chicken Bites from WhipperBerry

For the chicken marinade you’ll need–

1/4 cup olive oil

1/4 cup honey

1/4 cup balsamic vinegar

1 tablespoon dried oregano

1/4 teaspoon salt & pepper

1 tablespoon minced garlic

Balsamic-Chicken-Bites-4

Cut two Tyson® Chicken Breasts into bite-sized pieces and add your dry ingredients.

Balsamic-Chicken-Bites-5

Then add your wet ingredients and mix well. Store in an air tight container or Ziploc bag for at least one hour or up to 4 hours. This is a strong marinade and you don’t want to over do it with those bite sized pieces of chicken.

Now, this marinade is one of my go-to recipes when it comes to making scrumptious chicken meals for the family throughout the year.  When I am using it with whole Tyson® Chicken Breasts, I can marinate it overnight and it will be just fine. I normally serve it with a lovely salad and some French bread and you’re good to go.

Once the chicken is full of that balsamic flavor, you’re ready to cook your chicken. Typically if I am cooking whole breasts, we grill them BUT, since these little gems won’t really work on the grill AND it’s February… I cook them inside either on a cast iron grill pan or a cast iron pan. I LOVE my cast iron cookware, I’ve grabbed most of my pans at Walmart. They are fantastic and you can’t beat the price. I purchased the pan I’m using in the photo below for less than $15!

Balsamic-Chicken-Bites-6

Now these little gems cook pretty quick. I heat-up my pan until it’s screaming hot and then I turn down the temperature to medium. I add a little olive oil to the pan and then place the chicken into the pan making sure not to over crowd them or add too much liquid to the pan. You want to sear them, NOT boil or steam them. I typically cook them in batches. Turn them after 1-2 minutes and continue to do so until you have a good sear on them. Make sure to keep a close watch on them. Because of the high sugar content, they can burn quickly.

These little balsamic chicken gems cook pretty fast, usually 4-5 minutes but you’ll want to check the temperature to make sure they are fully cooked and are safe at 165˚. Remove from pan and set aside until you have finished cooking all of your chicken.

Tyson® Balsamic Chicken Bites

Next, all you need to do is assemble your Balsamic Chicken Bites. You’ll need…

How-to-assemble-Balsamic-Chicken-Bites

cherry or grape tomatoes

balsamic chicken gems

buffalo mozzarella pearls

Now, the key to making this appetizer sing is to pair the Balsamic Chicken gems with some scrumptious bite-sized tomatoes like these cherry tomatoes still on the vine or some lovely grape tomatoes. Either one will work really well.

 I use a large toothpick and feed a tomato onto the toothpick followed by a balsamic chicken gem and then cap it with a buffalo mozzarella pearl.

Balsamic-Chicken-Bites-12

It’s super slick. You can either serve the chicken warm or cold. They taste great either way. I like to lay out a few basil leaves to set the Balsamic Chicken Bites on…

Balsamic-Chicken-Bites-13

… I love how it adds some lovely color and some fresh vibrant flavors to your Super Bowl spread!

Looking for more GAME DAY ideas? Don’t forget to visit Talk About Delicious for more fantastic ideas and then visit your local Walmart to stock-up on all your game day goodies!

Roasted Eggplant Dip Recipe

0 · Dec 4, 2014 · Leave a Comment

+ This Roasted Eggplant Dip Recipe brought to you by the folks at Pompeian +

Roasted-Eggplant-Dip

Last fall I went on a trip of a lifetime… I joined a handful of bloggers as we traveled to Israel for an amazing food tour called the Taste of Israel.  I shared a little of my experience in my post about zucchini hummus, you should check it out.

Today, I have another recipe that came from my Israel travels, Roasted Eggplant Dip.

If you are an eggplant fan, this dip is amazing! We learned all about it while spending the afternoon at the Dan Gourmet School of Kosher Culinary Arts. We had the pleasure to learn a few little tips and tricks from the director of the school Chef Amir Ilan.

10835010_887785124573704_5485780136697377424_o

I wish I could spend an entire week shadowing Chef Ilan. This man is amazing and his passion for teaching the culinary arts comes through in his work. When we first arrived in his kitchen he placed several eggplants directing on the gas burner and we just sat and watched them char as he taught us about the school.

IMG_9022

Once the eggplants were fully charred, he removed them from the flame and then we, or shall I say, Kevin from Closet Cooking removed the charred skin. Then Chef Ilan cut the eggplant down the middle opening up the soft flesh, he salted it lightly, and added some prepared tahini, drizzled with a nice full bodied olive oil and that was it!

IMG_9048

IMG_9050

There’s Kevin and Ally from Ally’s Kitchen in the background snapping photos.

That was it! Just a simple eggplant some seasoning and a flavorful olive oil! Our hosts told us that this is an appetizer that is on almost every Israeli table when they entertain or have family over. Mainly because of the ease of  the dish, but the flavors are divine as well.

IMG_9053

You serve it with bread or pita and it’s lovely!

I thought with the Holidays upon us and the season of entertaining, this would be a great addition to your family table as well.

All you need is an eggplant or two. I don’t have a gas stove at my house (so sad, I know) and it’s to cold to grill right now here in Lincoln, I thought I would just roast my eggplant in the oven.

First, I washed and pierced my eggplant a couple of times and then just placed them in a 425˚ oven on a baking sheet…

eggplant

After about 25-30 remove your eggplant and let cool for a few minutes.  They come out looking rather sad, but trust me, they taste amazing when you are finished!

roasted-eggplant

Now because the skin isn’t charred, you can skip the step of removing the skin. I just cut it into quarters, leaving the top intact.

how-to-cut-the-eggplant

Fan it out like so. Next, lightly salt the flesh of the eggplant. I then lightly drizzled some tahini sauce onto the eggplant. Tahini is a sesame paste that is made out of pressed sesame seeds. It’s well known for it’s role in Hummus, but’s it’s fantastic in all kinds of applications.

I then drizzled the eggplant with a lovely full-bodied Extra Virgin Olive Oil from Pompeian.

Roasted-Eggplant-Dip-3

In the Middle East and Mediterranean countries, olive oil is way more than an oil to cook with. It’s more of a comment as well. When you are using it as a dip or dressing, you want to make sure you are using a GOOD olive oil that is rich and flavorful like the robust flavor of the Pompeian Extra Virgin Olive Oil. I drizzle it right only my eggplant, add some pita chips and serve. Your guest scoop the dip right out of the eggplant, it couldn’t be simpler than that!

The flavors of the soft eggplant, the tahini & the olive oil are amazing! If you are an eggplant lover you should give this a try.

Disclaimer // This post is sponsored by Pompeian. I received product and payment for my recipe development.

Filet of Sirloin with Rosemary Butter // Recipe

2 · Aug 28, 2014 · Leave a Comment

Filet of Sirloin with Rosemary Butter Recipe // There are some times in life when there is nothing better than a good steak. Seriously… nothing better!! My love of steak started with my first pregnancy. I couldn’t get enough steak. I wanted it morning, noon and night. I tried all different kinds of recipes and basically every form of steak that you could imagine. You know what I learned… When it comes to a good steak recipe, keep it SIMPLE!

Let the steak shine and take center stage. Recently, I had the opportunity to sample some Certified Angus Beef® brand steaks and boy can those steaks SING!

When you have a good quality steak, you really don’t need anything else other than some salt and pepper and a few simple rules for the grill, maybe a touch of herbs. I found a great recipe on the Certified Angus Beef® brand website for Grilled Ribeye Steak with Classic Steak Butter and put my little spin on it.

Certified-Angus-Beef-with-grilled-peaches

First of all, I used a Filet of Sirloin rather than the Ribeye cut and simplified the recipe down to a few basic simple ingredients.

Filet of Sirloin with Rosemary Butter

4 Filet of Sirloin

generous salt and pepper

1/2 stick of unsalted butter at room temperature

1/2 teaspoon of fresh minced rosemary

a pinch of salt

Season the steak generously with salt and pepper. Place on a very hot grill. After 2 minutes, flip the steak over and cook for another 2 minutes. Continue that process until you get to the temperature that you prefer. We like our steak medium rare, so we grilled our steak for a total of 12 minutes, turning it every 2 minutes. Let rest for at least 5 minutes before serving.

For the butter, place the room temperature butter in a small bowl with a pinch of salt and the minced rosemary. Stir until completely combined. Place on a sheet of parchment paper and roll butter into a log. Place in freezer for 20 minutes. Once butter is chilled, cut into medallions and place on hot steak and serve.

This quite honestly is my all-time favorite meal. I paired it with smashed fingerling potatoes and some grilled peaches and it was truly divine. We also applied the same recipe and cooking method with some New York Strip Steaks and paired them with the smashed fingerling potatoes and thick slices of beef steak tomatoes topped with salt, pepper and chives. Seriously, this meal is out of this world!

Certified-Angus-Beef-from-WhipperBerry

When you have quality meat like the Certified Angus Beef® brand, you know that you are getting quality steaks and pairing them with simple, yet flavorful sides will take your meal or event to a whole new level. To find where you can purchase Certified Angus Beef® brand products visit their site to find a location in your area!

What is your favorite way to serve steak? Looking for more inspiration? Follow the folks at the Certified Angus Beef® brand on Instagram for all kinds of mouth watering ideas!

This is a sponsored conversation written by me on behalf of Certified Angus Beef via Burst Media. The opinions and text are all mine.

  • Page 1
  • Page 2
  • Go to Next Page »

Primary Sidebar

Heather from Whipperberry
Hello... my name is Heather and I'm the creator of WhipperBerry a creative lifestyle blog packed full of great recipes and creative ideas for your home and family. I find I am happiest when I'm living a creative life and I love to share what I've been up to along the way... Come explore, my hope is that you'll leave inspired!

Footer

  • Privacy Policy
  • Crafts
  • Food
  • Gifts
  • Holidays
  • Home
  • Mom Life
  • Recipes
  • Travel

Copyright © 2026 · Seasoned Pro