• Skip to primary navigation
  • Skip to content
  • Skip to primary sidebar
  • Skip to footer

Whipperberry

WhipperBerry • Your Home For Creative Inspiration

  • Home
  • About
    • Terms
  • Recipes
    • ZipList
    • Starters
    • Easy Weeknight Dinners
    • Main Dish
    • Salads
    • Side Dish
    • Soups & Stews
    • Desserts
    • Breakfast
    • Miscellaneous
  • Tutorials
    • Creative Crafts
    • DYI Decor
    • Fabric Crafts
    • Food How-To
    • Jewlery
    • Paint Projects
    • Paper Art
    • Party Styling
    • Photography and Graphic Design
    • Silhouette
  • Holidays
    • St. Patrick’s Day
    • Easter
    • Mother’s Day
    • Father’s Day
    • 4th of July
    • Halloween
    • Thanksgiving
    • Christmas
    • New Years
    • Valentine’s Day
  • Gift Ideas
    • Gifts For Everyone
    • Gifts for Dad
    • Mother’s Day
    • Mother’s day
    • For The Girls
    • For The Kids
    • Teacher Gift Ideas
    • Christmas
  • Printables
    • Holiday
    • Gift Idea
    • LDS Primary
  • Travel
  • Contact
  • Nav Social Menu

    • Facebook
    • Google+
    • Instagram
    • Pinterest
    • RSS
    • Twitter
You are here: Home / Holidays / Christmas / DIY Paper Fan Photo Ornaments

DIY Paper Fan Photo Ornaments

15 · Dec 8, 2013 · 7 Comments

 
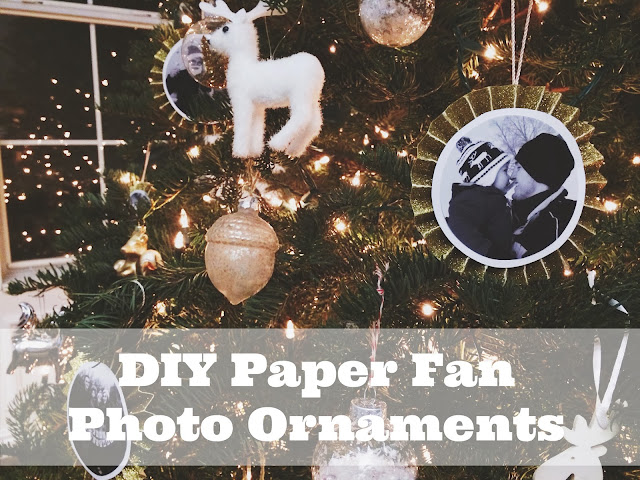
Hello everyone! December snuck up on me…but I'm grateful Heather is so sweet to still share my photo ornament project! Hopefully some of you are like me, and still doing holiday crafting and decorating. Anyone? Buhler?? haha! I love subtly incorporating photos into decor…as seen here. 🙂 I made quite a few photo ornaments this year…and hope to carry on the tradition in years to come, making just a few more ornaments each year to add to the collection, displaying sweet winter memories.
 
Supplies you'll need:
Cardstock (I used gold glitter cardstock from Joann Fabric & Craft)
White Cardstock (or whatever color you'd want to frame/outline your photo)
Hot glue gun (with extra glue!)
Scissors
String/twine/yarn
Photos!
 
You can print/create your circular photos a few different ways:
–> I used two apps on my phone–Afterlight to get the photos into frames, then Diptic to put the circular photos into a collage (I put one picture in one part of the two-picture collage, and printed them out as 4×6's)
–> Print a bunch of photos (I liked mine black and white) and then use a cup or something circular to trace circles onto the photos….just make sure they're as uniform as possible.
–> Or you can use an online photo editing site like PicMonkey to create the circular pictures.
 
Then cut!
 
You'll want to reinforce the sturdiness of the photo by hot glueing the photos to card stock, then cut them out again (I left a thin frame/outline around the edge).


To create the paper fans, I used a tutorial Heather actually shared a few years ago over on the lovely Stephanie Lynn's blog, Under The Table and Dreaming. 🙂 Go here to see the how-to. Just be sure that the width of the paper strips you cut out (you'll need two strips per ornament) are a little more than what the radius (half the width) is of your circular photo.
 
Heather's tutorial for the paper fan has you glue a piece of paper to back, which I did here–and I wrote the month/year of the photo that would be on the front. And with the thicker card stock paper, I needed more than just a drop of glue, so I put about 3 or 4 circle/swirls of hot glue (moving quickly, as it dries fast) on each cut-out circle and pressed them onto the paper fan and held for a few seconds to make sure it was secure. 
**A photo is hot glued on the back of the lower fan already…that way I didn't have to hold it for the picture I was taking. But you'll need to hold it tight and flat on your work surface until you hot glue your paper to it.
 
Then you'll hot glue the photos…it's coming together! Again, quickly swirling the hot glue around the back of the paper/photo to make sure there is good coverage, then press it onto the paper fan and give it a good rub down to make sure it stays put. 😉 


Next, put the "hangers" on. I just cut pieces of the string/twine and, with a dab of hot glue, glued the two ends to the back, in one of the folds). And I used a pen to push the string down and get it nice and stuck in the glue. Remember to make sure you're putting the loop at a spot in the back where, when it hangs, the picture will be straight. 🙂 
 
Voila!!


Then trim your tree and deck yours halls!! I used ours as ornaments…but I'm thinking I may make more and create a garland for over our mantle. Lots and lots of possibilities. 🙂
 

Thank you Heather! And thank you WhipperBerry readers! Happy Holidays everyone!

 
xo
Haley
 
PS – Here are a couple Christmas projects I shared last year:
 
Go here for our Christmas box advent calendar…love this magical season and the sweet traditions that come with it!! 
 
Go here for stencils to create these Christmas photo booth props. We used them for our Christmas card, as well as at an Ugly Sweater party and a company holiday party! SO FUN.
15
Pin
Share
Tweet
+1

Christmas, Crafts, Creative Team, Holidays, Paper Crafts Christmas, Crafts

Reader Interactions

Comments

  1. Jenn says

    December 9, 2013 at 9:53 pm

    Aww…these are so cute!  I love displaying photos especially over the holidays!

    Reply
    • Haley Kjar says

      December 12, 2013 at 8:16 pm

      Thank you! I do too! Adds the perfect personal touch. 🙂 And it's the memories we make (some of which are captured in photos) that make the holidays so special! xo

      Reply
  2. Haley Kjar says

    December 12, 2013 at 8:15 pm

    Thanks again for having me Heather! xo

    Reply
  3. Megan says

    January 6, 2014 at 4:23 am

    Heather, I just wanted to thank you for making and sharing this project. I did my own version right before Christmas (after seeing and pinning yours') and they have been adorning the walls of my mom's room in the ICU. I wrote about them this morning. http://www.thehomesihavemade.com/2014/01/family-photo-medallion-ornaments.html

    Heart-felt thanks,

    Megan

    Reply
  4. Diana says

    January 19, 2014 at 11:21 am

    I love this!!! I just wish I saw this post earlier in December… but I might surprise my boyfriend with something like this on Valentine's day 🙂 Thank you for sharing! xx

    Reply

Trackbacks

  1. Happy Weekend! | Hey Love Designs says:
    December 13, 2013 at 2:32 am

    […] DIY Paper Fan Photo Ornaments | Whipperberry […]

    Reply
  2. The Best 25 DIY Christmas Ornament Ideas To Get You In The Festive Spirits | CollageCab says:
    December 3, 2018 at 8:26 pm

    […] Chic paper photo fan ornaments. Pic source whipperberry.com […]

    Reply

Leave a Reply Cancel reply

Your email address will not be published. Required fields are marked *

This site uses Akismet to reduce spam. Learn how your comment data is processed.

Primary Sidebar

Hello... my name is Heather and I'm the creator of WhipperBerry a creative lifestyle blog packed full of great recipes and creative ideas for your home and family. I find I am happiest when I'm living a creative life and I love to share what I've been up to along the way... Come explore, my hope is that you'll leave inspired!

Load up on new recipes, exclusive goodies, + more!

Get the exclusive content you crave straight to your inbox.

Featured Recipes

Not all holiday gifts need to be ooey gooey sweet. Savory holiday gifts are just as lovely, sometimes even more so. I personally have been off sugar for 3 months now and I’m really nervous for the holiday season to arrive. Having the house fill up with sweets is NOT what I’m wishing for this Christmas. I would LOVE to get one of these Ball® Sharing Jar soup mixes as a gift. Not only are they soothing to the soul, but they are also good for you as well. - WhipperBerry @ballcanning #soupinajar #printabletags #souprecipe

Soup Mix Sharing Jars 

This year, I’m working on all kinds of fun gifts for the Holidays that will look spectacular gifted inside of a jar. One of my favorites is the White Chocolate Ginger Scone Mix in a jar. It’s really easy to put together a whole bunch of these gifts and really not expensive at all. It’s always a bonus to save a little money during the holidays. @ballcanning #giftsinajar #neighborgifts #teachergifts #sconeinajar

White Chocolate Ginger Scone Mix In A Jar 

As much as we hate to admit it, cold and flu season is on its way. There is nothing more miserable than one of those lousy winter colds. What’s almost just as bad is watching someone you care for dealing with a cold or, Heaven forbid, the flu! I’m always looking for ways to help cheer them up and let them know that we love them and hope for their better health. That’s when I came up with this idea for a Cold and Flu Rescue Kit to share with those loved ones that are suffering. • WhipperBerry

Cold and Flu Rescue Kit

Not to knock commercially prepared applesauce, but when you have the opportunity to enjoy homemade applesauce, you will know the difference. It’s sweet and tangy with the perfect texture. Not to mention the fact that it harmonizes well with many different notes on your palette AND, it’s super easy to make! #applesauce #applesaucerecipe #homemadeapplesauce

Maple Applesauce Recipe + Maple Applesauce Overnight Oatmeal Recipe

I was recently introduced to a simple Roasted Garlic and Roma tomato sauce recipe from Ball® Fresh Preserving that I have been dying to try. I knew it was going to be a GREAT base for my favorite Israeli Shakshuka dish and boy was I right. Come learn how to make this fabulous sauce for your family.

Roasted Garlic and Roma Tomato Sauce + an Easy Shakshuka Recipe

More

Footer

Instagram

Instagram has returned invalid data.

Copyright © 2021 · Seasoned Pro