• Skip to primary navigation
  • Skip to main content
  • Skip to primary sidebar
  • Skip to footer

Whipperberry

WhipperBerry • Your Home For Creative Inspiration

  • Home
  • Recipes
    • Starters
    • Easy Weeknight Dinners
    • Main Dish
    • Salads
    • Side Dish
    • Soups & Stews
    • Desserts
    • Breakfast
    • Miscellaneous
  • Tutorials
    • Creative Crafts
    • DIY Decor
    • Fabric Crafts
    • Food How-To
    • Jewlery
    • Paint Projects
    • Paper Art
    • Party Styling
    • Photography and Graphic Design
    • Silhouette
  • Holidays
    • Easter
    • Mother’s Day
    • Father’s Day
    • 4th of July
    • Halloween
    • Thanksgiving
    • Christmas
    • Valentine’s Day
  • Gift Ideas
    • Gifts For Everyone
    • Gifts for Dad
    • Mother’s day
    • For The Girls
    • For The Kids
    • Teacher Gift Ideas
    • Christmas
  • Printables
    • Holiday
    • Gift Idea
    • LDS Primary
  • Travel
  • About
    • Terms
  • Contact
  • Nav Social Menu

    • Facebook
    • Instagram
    • Pinterest
    • RSS
    • Twitter

Dessert

How Long Does Cheesecake Last in the Fridge?

0 · Jun 12, 2026 · Leave a Comment

Few desserts evoke the same sense of pure indulgence as a perfectly baked, velvety cheesecake. Whether it is a classic New York-style slice, a trendy burnt Basque masterpiece, or a refreshing no-bake berry variant, cheesecake is the crown jewel of the dessert table.

But because cheesecake is rich, dense, and packed with dairy, it requires careful handling. If you have leftover slices from a weekend celebration—or if you are a professional baker managing inventory—a critical question arises: How long does cheesecake actually last in the fridge?

The short answer is that a standard, properly stored homemade cheesecake will remain fresh and safe to eat for 3 to 5 days in a residential refrigerator. However, its exact shelf life depends entirely on how it was made, how it is packaged, and the type of refrigeration environment it is held in.

Let’s dive deep into the science of cheesecake preservation, storage best practices, and how to spot the signs that your favorite dessert has crossed the line.

How Long Does Cheesecake Last

The Quick Guide: Cheesecake Shelf Life

Before breaking down the details, here is a quick-reference overview of how long different types of cheesecake will last when kept constantly refrigerated at or below 40°F (4°C):

Cheesecake TypeFridge Shelf LifeKey Characteristic
Homemade (Baked)3 to 5 daysContains no artificial preservatives; highly sensitive to ambient moisture.
Homemade (No-Bake)4 to 5 daysRelies on gelatin or chilling to set; texture can break down faster.
Store-Bought / Commercial5 to 7 daysOften contains stabilizers or vacuum packaging that extends life slightly.
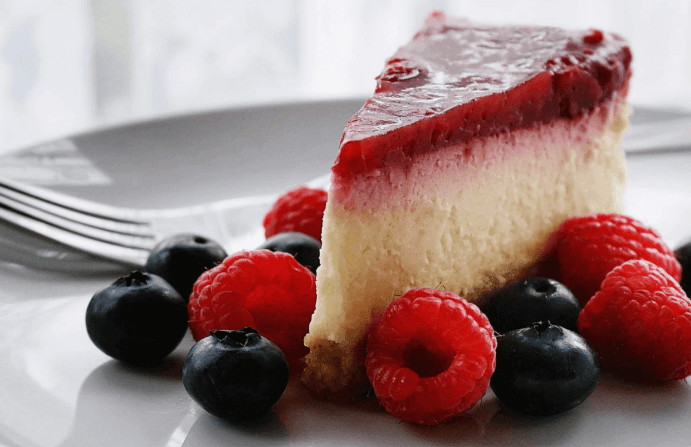
With Fresh Fruit Topping1 to 2 daysFruit releases moisture rapidly, causing the crust to get soggy and mold to form.
Opened Commercial Box3 to 5 daysOnce exposed to outside air, the clock ticks at the homemade rate.
Left at Room Temperature2 hours maximumThe critical window before dangerous bacterial growth accelerates.

Why Cheesecake is Highly Perishable: The Science

To understand why cheesecake has a relatively brief shelf life compared to a standard sponge cake, we have to look at its ingredients.

Cheesecake is not really a cake at all—baking experts classify it as a custard or a tart. The primary ingredients are soft dairy products: cream cheese, sour cream, heavy cream, and eggs. This high-protein, high-moisture matrix creates an ideal breeding ground for foodborne pathogens and spoilage organisms if left exposed to the wrong conditions.

Microbiologists measure food safety using a metric called water activity, which dictates how much “free water” is available for bacteria and mold to use for reproduction. Cheesecake has a high water activity level. When kept at room temperature, bacteria like Staphylococcus aureus or Salmonella can multiply to dangerous levels in just a few hours.

This is why food safety agencies strictly enforce the Two-Hour Rule: cheesecake must never sit on a kitchen counter or buffet line for more than two hours total before being returned to cold storage.

Storage Environments: Home vs. Commercial Settings

Where you store your cheesecake matters just as much as how you wrap it. The dynamic changes dramatically when shifting from a quiet home kitchen to a bustling food service operation.

1. The Home Refrigerator

In a residential kitchen, a cheesecake easily lasts its full 5-day span if placed on a main shelf. The primary challenge in a home fridge is odor cross-contamination. Because cream cheese contains a high concentration of fats, it acts like a sponge for airborne aromas. If you store an uncovered cheesecake next to leftover garlic pasta or chopped onions, your dessert will absorb those savory flavors within 24 hours.

2. The Commercial Fridge Environment

For bakeries, restaurants, and catering businesses, managing cheesecake longevity requires a heavy-duty commercial fridge. These units are engineered to maintain strict, food-safe temperatures even when the doors are opened and closed hundreds of times a day by kitchen staff.

A commercial fridge relies on powerful, high-velocity fans to circulate cold air evenly across stainless steel shelving. While this constant airflow is spectacular for preventing hot spots and keeping the dairy safely below 40°F (4°C), it presents a unique threat to pastries: evaporative drying.

An uncovered cheesecake placed in a commercial fridge will experience rapid surface evaporation. Within a few hours, the smooth, glossy top of a New York cheesecake will dry out, develop unsightly cracks, and take on a rubbery, leathery texture. Furthermore, because commercial kitchens handle a vast array of raw and cooked ingredients, strict cross-contamination protocols must be enforced to ensure the delicate dessert remains pristine.

cheesecake

How to Maximize the Shelf Life of Your Cheesecake

Whether you are using a standard household refrigerator or a professional commercial fridge, following these preparation and packaging rules will preserve your dessert’s flavor and texture for as long as humanly possible.

Step 1: Cool Completely Before Refrigerating

Never rush a hot cheesecake straight from the oven into a cold fridge. The sudden temperature drop causes thermal shock, which violently contracts the structure and creates deep cracks across the surface. More importantly, trapping a hot cake inside a container creates immediate steam. This steam condenses into water droplets on the lid, dripping back down onto the cake, creating a slimy surface and a soggy, ruined graham cracker crust. Allow the cake to cool to room temperature on a wire rack first.

Step 2: Wrap Firmly and Securely

To protect against both the drying air currents of a commercial fridge and the unwanted odors of a home kitchen, your sealing technique must be airtight.

  • The Best Method: Place the chilled cheesecake on its cardboard round or plastic base. Wrap the entire structure snugly in two layers of plastic wrap, ensuring no gaps remain. For absolute protection, place the wrapped cake inside a dedicated plastic cake carrier or a sealable airtight container.
  • Slices: If you are storing individual slices, wrap each piece tightly in plastic wrap or place them inside individual, snap-lock glass containers.

Step 3: Hold the Toppings

If you are baking a cheesecake ahead of time for an event, do not add toppings like strawberry compote, cherry glaze, or fresh whipped cream until right before you plan to serve it. Fruit glazes contain high levels of moisture and acid that will gradually seep down into the dense filling, breaking down the structural integrity of the cake and causing it to become watery and sour.

Red Flags: How to Tell If a Cheesecake Has Gone Bad

Before taking a bite of a forgotten cheesecake, execute a sensory inspection using these three criteria:

  1. Visual Signs (The Surface Check): Look closely at the edges where the cake meets the crust. If you see any gray, green, or white fuzzy spots, mold has taken hold. Additionally, look for a distinct color shift; an aging cheesecake will often turn a dull, dark yellow or develop an oily sheen on top.
  2. Texture Shifts (The Consistency Check): A fresh cheesecake is dense, smooth, and creamy. If the cake has begun to separate, leaving a pool of watery liquid at the bottom of the container (a process known as syneresis), or if the edges have turned hard and rubbery while the center has become slimy, it is time to discard it.
  3. The Aroma Test: Fresh cheesecake smells delightfully sweet, milky, and faintly of vanilla or citrus. If you open the container and detect a sharp, sour, tangy, or yeast-like odor reminiscent of spoiled milk, microorganisms have altered the dairy. Trust your nose—when in doubt, throw it out.

Long-Term Storage: Can You Freeze Cheesecake?

If you realize you won’t be able to finish your cheesecake within the golden 5-day refrigerator window, the freezer is your best friend. Cheesecake freezes exceptionally well due to its high fat and low water content compared to delicate sponge cakes.

To freeze a cheesecake properly, let it firm up in the fridge first. Once cold, wrap the whole cake or individual portions tightly in a layer of plastic wrap, followed by a sturdy layer of heavy-duty aluminum foil to guard against freezer burn. When stored this way, a cheesecake will maintain peak quality for 2 to 3 months. When you are ready to indulge, simply transfer the cake back into your refrigerator and let it thaw slowly overnight before serving.

DIY Frozen Treats the Whole Family Can Make Together

0 · Jul 17, 2025 · Leave a Comment

You know what I’ve realized? Some of our best family memories aren’t the big vacations or the perfectly planned outings. They’re the simple little things, like making homemade popsicles on a Saturday morning. Sure, you can buy a box at the store, but there’s something special about blending, pouring, and layering your own frozen treats as a family. The sticky fingers, colorful messes, and giggles over taste tests? That’s the good stuff.

Making DIY frozen treats is more than just a fun kitchen activity. It’s a hands-on way to slow down, create, and enjoy something sweet together. Whether you’ve got toddlers helping with fruit or teens experimenting with flavors, this is one of those simple traditions that sticks. And it’s way easier than it looks!

Why Frozen Treats Bring Families Together

Let me be frank: you don’t just freeze stuff—you freeze moments. Here’s why whipping up frozen treats with your kids works wonders:

  • Sensory joy. Sticky sweetness, chill that tingles, colorful splashes—it’s a mini adventure for the senses.
  • Creative freedom. Let me catch this—your kid’s coloring the mold with berries, your teen layering juice and cream. It’s art you can eat.
  • Casual education. Measuring ingredients, converting cups to milliliters—it’s learning disguised as fun.
  • Ritual and routine. Saturday mornings with molds lined up? That’s tradition in motion.

So trust me, this isn’t just a food project. It’s a weekend moment.

DIY Frozen Treats

How We’re Keeping It Cool

Before we slice, swirl, or sip, we gotta talk chill. If your mix is too warm, textures go mushy, colors blur, and layers bleed. That’s where techniques from commercial kitchens (and, yes, high-end ice machines) can come in handy.

You can even check out pro-grade tools like a commercial ice machine. These machines keep things frosty and fast, perfect for serious home pros.

Why Chill Matters

  • Texture is everything. Fast chilling prevents large ice crystals so your treats are smooth, not grainy.
  • Flavor holds. Cold keeps volatile aromas trapped until you bite.
  • Slot layering. Want those rainbow layers? Chill between pours—no color bleed.

The Science Behind Freezing

Knowledge for the curious: freezing at 0°F (–18 °C) halts bacterial growth and preserves food safety indefinitely, although quality may degrade over time.

At Cornell, prep techniques like ice baths and quick freezing are recommended to maintain texture and flavor—especially for fruits and vegetables . So while homemade pops are kid-made, they still rely on sound science.

Chill Hacks & Prep Tricks

Here’s your cheat sheet to crunchy, colorful treats:

  1. Pre‑chill your tools. Freeze the molds and mixing bowls at least 30 minutes beforehand. It’s a pro chef tip.
  2. Ice bath drills. After cooking a liquid base, cool it fast in ice water—no waiting for it to drop to room temperature.
  3. Layer like a boss. Pour, freeze a bit, then add next layer. It makes those Instagram-worthy stripes pop.
  4. Use instant coffee kits. If you’re adding coffee flavor, dissolve espresso powder in a tiny bit of hot water—no foreign flakes.
  5. Cover and date. Labeling molds avoids that mystery tray from last month.

DIY Frozen Treats Recipes for the Crew

1. Rainbow Fruit Pops (Simple + Stunning)

Ingredients (makes 12):

  • 2 cups mixed fruit (mangoes, berries, peaches)
  • ½ cup Greek yogurt or juice
  • 1–2 tbsp honey or maple syrup (optional)

Directions:

  1. Blend fruit and yogurt until silky. Taste, adjust.
  2. Divide into three or four bowls—add a dash of food coloring if you want rainbows.
  3. Pour the first color, freeze 30–45 min, then layer the next.
  4. Freeze overnight (6–8 hrs).

Bonus: Between layers, stick in fresh fruit chunks—hello, surprise pop.

2. Coffee‑Cream Pops (Grown‑Up Twist)

Ingredients (makes 10):

  • 1 cup brewed coffee, cooled
  • ½ cup milk or cream (dairy or plant-based)
  • 2 tbsp sugar or syrup
  • Optional: sprinkle of cocoa or cinnamon

Directions:

  1. Mix coffee, milk, sweetener. Taste—strong, smooth, perfect.
  2. Pour into molds, freeze 4–6 hrs.
  3. Dessert-level upgrade: drizzle in melted dark chocolate halfway through freezing.

3. Banana‑Soft‑Shake Pops

Ingredients (makes 8):

  • 2 ripe bananas
  • 1 cup vanilla yogurt
  • ½ cup milk or almond milk

Directions:

  1. Blend until thick and creamy.
  2. Pour into molds, freeze 3–4 hrs.
  3. For milkshake texture, blend again mid-freeze, then re-freeze.

4. Citrus Mint Cooler Pops

Ingredients (makes 12):

  • Juice of 3 oranges + 1 lemon
  • ½ cup water or sparkling water
  • 1 tbsp honey
  • Small mint leaf per mold

Directions:

  1. Mix juice, water, honey. Taste adjust.
  2. Place mint leaves in molds, pour juice lightly.
  3. Freeze partway, then top off with remaining juice. Freeze fully.
Citrus Mint Cooler Pops

Creative Add‑Ins

Let the family personalize with these:

  • Mini chocolate chips
  • Crushed cereal (like mini‑wheats or oats)
  • Sprinkles or edible glitter
  • Tiny marshmallows
  • Crushed dried fruits (apricot, cranberries)

Mini‑tip: Keep mix-ins under ¼ cup per mold to maintain texture and reduce swirl.

Storage & Lifespan

  • Date it. Cold safety indefinite, but flavor and texture best within 2–3 weeks.
  • Wrap it. Plastic or silicone molds → airtight zip bags → flat in freezer.
  • Rotate smartly. Store at the back—not the door—to avoid temperature dips.

Handling Mishaps

  • Grainy texture? Freeze was too slow. Pre‑chill and use ice bath.
  • Muddled layers? You skipped partial freezes. Try 30–45 minutes before layering.
  • Freezer burn wrinkles? Check seals and storage temp—door placement is your culprit.
  • Too sweet or tart? Add honey, syrup, or yogurt to balance; or mix juice with water for lighter sweetness.

Lessons from Kitchen Science

You’re sneaking in science like a ninja:

  1. Phase changes: The liquid → solid transformation involves energy exchange—kids feel it (it’s cold!) and taste it (smooth vs crystalline).
  2. Concentration matters: Sugars and salts lower freezing point—so sweeter mixes freeze softer. Great for creamy desserts.
  3. Ice crystal control: Chilling fast = small crystals; slow freeze = ice shards. Know the science, eat better treats.

Nutritional Swaps & Tips

  • Use low-fat Greek yogurt to boost protein.
  • Swap cane sugar for pure maple syrup or honey.
  • Try plant-based milks (oat, soy, almond) to reduce dairy.
  • Sneak in veggies—spinach, carrot purée, zucchini—all mask well in fruity bases.

Bonding Through the Chill

This is real talk: you’re not just making food—you’re making memories. The spilled blender, the fruity mustaches, the shield-your-face laughter when the ice cube tumbles out early. You’ll look at your freezer tray one day and it’ll whisper, “We did this together.”

Putting It All Together: A Sample Weekend Plan

Time Activity
Saturday 10 AM Pre‑chill molds and bowls.
10:30 AM Blend rainbow fruit base with kiddos watching closely.
11:00 AM Pour first layer; freeze 45 min.
11:45 AM Layer second color; top with fresh berries; freeze again.
12:30 PM Lunch break while pops freeze.
1:00 PM Prep coffee‑cream pops for evening treat.
Sunday 5 PM Family taste test + rerun favorite recipe next weekend.

Wrapping Up

Here’s the scoop: making frozen treats with your family is a simple, joyful project that delivers a ton more than a tasty dessert. You get playtime, mini‑science lessons, creative bursts, and memories you’ll laugh about forever.

So pull out those molds, gather your crew, and let the kitchen turn into a popsicle lab for the afternoon. You don’t need anything fancy – just a few ingredients, a dash of creativity, and some eager little hands. Who knows? You might even start your own family frozen treat ritual that comes back every summer.

The Last-Minute Dessert That’ll Wow Everyone: Balsamic Macerated Berries (with a Special Twist!)

2 · May 14, 2025 · Leave a Comment

Guests are popping over last minute, or that sweet tooth hits HARD after dinner, and you want something that feels a little bit special without spending hours in the kitchen? Girl, I have SO been there! You want to whip up something that looks and tastes amazing, but the thought of a complicated recipe just makes you want to reach for a bag of cookies instead (no judgment here!). Enter Balsamic Macerated Berries!

What’s the magic? All About Macerating Berries!

So, what exactly is macerating? If you haven’t heard the term, don’t worry, it’s not nearly as complicated as it sounds. Think of it like marinating, but for fruit! It’s just a fancy word for letting fruit sit in a little bit of liquid (and maybe some sugar) which helps to soften it, draw out its amazing natural juices, and make all those berry flavors really pop and mingle.

The fruit releases its own syrupy goodness, and the flavors become deeper and more concentrated. It’s a simple trick that takes fruit from just ‘good’ to ‘oh-my-goodness-amazing!’ and it’s the secret behind this incredibly easy dessert.

Balsamic Macerated Berries

Recipe for a Showstopper Dessert

Okay, ready for the easiest ‘recipe’ ever? You barely need to measure for this one, and it’s all about a few quality ingredients shining bright and doing their delicious thing together. This is less about strict rules and more about tasting and adjusting to your liking!

  • Fresh Berries: Grab a punnet (or two!) of your favorite fresh berries. I’m talking about a beautiful mix of strawberries, blueberries, raspberries, and blackberries if you can get them! The more variety, the prettier and tastier it is. Think gorgeous, juicy, and colorful. About 2 cups of mixed berries is a good starting point for a few servings.

  • A Touch of Sweetness (Optional): A tiny sprinkle of sugar – maybe a teaspoon or two, depending on your berries and your preference – can help draw out those lovely juices, especially if your berries aren’t at their peak ripeness. But honestly, if my berries are super sweet and juicy, sometimes I skip the sugar altogether! You do you.

  • The Magic Ingredient: This, my friends, is where the real magic happens! You don’t need a lot, just a tablespoon or two of a really good balsamic vinegar. It’s so important to use a quality one here, as its flavor will really stand out.

For this, I absolutely adore using Giusti’s balsamic vinegar of Modena. Its incredible quality, rich syrupy flavor, and perfect sweet-tart balance just does something truly incredible to the berries without being overpowering.

  • The “Special Twist” (Pick Your Fave, or Get Adventurous!):

    • Fresh Mint or Basil: A few finely chopped fresh mint leaves (about 1 tablespoon) or even a little chiffonade of basil (about 3-4 leaves, sliced thinly – trust me on this, it’s surprisingly delicious with strawberries!) adds such a lovely, fresh zing and a beautiful aroma.

    • A Pinch of Black Pepper: Sounds wild, right? But a tiny crack of fresh black pepper (just a little pinch!) actually makes the berries taste even sweeter and adds a little sophisticated warmth. It’s an old chef’s trick and so good if you’re feeling a bit daring!

Let the magic happen (the super simple steps):

  1. Prep Your Berries: Gently wash and pat your berries dry. If you’re using strawberries, hull them (remove the green tops) and slice or quarter any large ones so they’re bite-sized and can mingle nicely with the smaller berries.

  2. Combine & Sweeten (If Using): Place all your lovely prepped berries in a pretty serving bowl. If you’re using sugar, sprinkle it over the berries now.

  3. Drizzle with Balsamic Goodness: Now for that amazing Giusti’s balsamic vinegar of Modena! Drizzle it over the berries. I usually start with about 1 tablespoon for 2 cups of berries, give it a gentle stir, and then taste. You can always add a little more if you think it needs it, aiming for a nice coating without drowning them.

  4. Add Your Special Twist: Sprinkle in your chopped fresh mint or basil, or that daring little pinch of freshly cracked black pepper.

  5. Toss Gently: Give everything a very gentle toss with a soft spatula or spoon, just enough to make sure all the berries get a little bit of that balsamic love and herb/pepper goodness. You don’t want to mash them!

  6. The Waiting Game (The Hardest Part!): Now for the hardest part: let them sit and get acquainted! Cover the bowl and let the berries macerate at room temperature for at least 15-30 minutes. An hour is even better if you have the time! You’ll see them start to release their beautiful juices, creating a light, delicious syrup. You can even pop them in the fridge if you’re making them a bit ahead (say, an hour or two), but I recommend letting them come to room temperature for about 15-20 minutes before serving for the best flavor.

Berries for Balsamic Macerated Berries

Serving Suggestions to Make Everyone Swoon!

Okay, your berries are now beautifully syrupy, glistening, and absolutely bursting with incredible flavor! How do you serve these little jewels to really make everyone swoon and think you’re a culinary genius? Oh, let me count the ways! This dessert is SO versatile.

  • Over Vanilla Bean Ice Cream: This is a classic for a reason, friends! The contrast of the warm (or room temp), complex, tangy-sweet berries against cold, creamy vanilla bean ice cream is pure, unadulterated heaven. It’s my go-to! If you want a sugar-free, healthier ice cream version, check out Entirely Emmy for recipes.

  • With Panna Cotta or Custard: Talk about an elegant dessert! The slightly tart, juicy berries cut through the richness of a creamy panna cotta or a smooth custard beautifully.

  • Atop a Slice of Pound Cake or Angel Food Cake: Oh my! The syrupy juices from the berries will soak into the cake, making it moist and incredibly flavorful. A little dollop of whipped cream on top? Perfection.

6 Party Desserts to Sweeten Your Celebration and Impress Your Guests

0 · Mar 30, 2025 · Leave a Comment

No party is complete without a spread of irresistible desserts. Whether you’re hosting an elegant sit-down dinner or a lively birthday bash, the right party desserts can turn an ordinary event into something truly special. A great dessert table offers a mix of flavors and textures—some rich and indulgent, others light and refreshing—to keep guests coming back for more.

If you’re looking for crowd-pleasing options that are as delicious as they are eye-catching, these six party desserts will take your celebration to the next level.

Sweet E’s Signature Cupcakes

Cupcakes are a guaranteed hit at any gathering, and Sweet E’s Signature Cupcakes make it effortless to serve up a variety of flavors without the hassle of slicing a cake. These bite-sized personalized desserts come in an array of flavors, from classic vanilla bean and rich chocolate lovers to fun twists like strawberry shortcake, cookies and cream, and chocolate peanut butter.

Perfect for birthdays, baby showers, or any event where guests want to grab something sweet while mingling, these cupcakes are as beautiful as they are delicious. And with the option to order desserts delivery online from Sweet E’s Bake Shop, you can have these treats brought straight to your door, making party prep that much easier and convenient.

Party Desserts

Oreo Brownies

If there’s one thing that will never go out of style, it’s the combination of cookies and brownies. Oreo brownies are a chocolate lover’s dream—thick, fudgy brownies swirled with a rich cheesecake-like layer and packed with chunks of America’s favorite cookie.

They’re also very easy to make by adding a cream chase layer full of crushed Oreos on top of your brownie batter. Serve these at game nights, casual get-togethers, or even a backyard BBQ. They pair beautifully with a cold glass of milk or a bold cup of coffee, making them a nostalgic yet sophisticated treat.

Chocolate Dipped Strawberries

Looking for a dessert that’s both luxurious and effortless? Chocolate-Dipped Strawberries are a stunning addition to any dessert table. Sweet E’s Bake Shop’s version takes it up a notch with hand-dipped fresh strawberries coated in rich dark and white chocolate, finished with edible 24k gold leaf for a touch of glamour.

Ideal for anniversaries, weddings, or sophisticated soirées, these strawberries offer a lighter option for guests who want something sweet but not overly heavy. Plus, they add a beautiful pop of color and elegance to your dessert spread.

Chocolate Fondue

Want to turn dessert into an experience? A pot of warm, velvety chocolate fondue is the way to go. It’s simple to make—just heat cream, milk, vanilla, and sea salt, then stir in high-quality chocolate until smooth. Serve it with an assortment of dippables like strawberries, bananas, marshmallows, pound cake, and even potato chips for a salty-sweet twist.


Perfect for holiday parties, New Year’s Eve celebrations, or intimate gatherings, chocolate fondue invites guests to dip, drizzle, and indulge at their own pace. It’s fun, interactive, and guaranteed to be a conversation starter.

Stuffed Chocolate Chip Cookies

For those who love classic cookies but crave something a little bit extra, Sweet E’s Stuffed Chocolate Chip Cookies deliver a serious upgrade. Each oversized cookie is packed to the brim with a surprise filling like Twix, Oreos, and Reese’s.


These cookies are perfect for birthday parties, casual movie nights, or any occasion where comfort food is a must. And with the convenience of ordering online from Sweet E’s, treating your guests to these decadent delights has never been easier.

Cake in a Jar

If you want a dessert that’s as convenient as it is delicious, Sweet E’s Cake in a Jar is the answer. Layers of cake and frosting come neatly packaged in a jar, making them easy to serve and even easier to enjoy. Available in flavors like Vanilla Confetti, Chocolate Lovers, and Oreo Cookies and Cream, these jars bring all the joy of a traditional cake without the need for plates or forks.

Ideal for picnics, party favors, or any event where guests are on the move, Cake in a Jar is a fun, mess-free way to enjoy a slice of celebration.

Sweeten Your Celebration with the Perfect Party Desserts

An important occasion deserves great party desserts, and these treats will ensure your guests leave with smiles and a satisfied sweet tooth. Whether you’re keeping it simple with homemade treats or planning to order dessert online, serving the right desserts can elevate any celebration.


  • Page 1
  • Page 2
  • Page 3
  • Interim pages omitted …
  • Page 28
  • Go to Next Page »

Primary Sidebar

Heather from Whipperberry
Hello... my name is Heather and I'm the creator of WhipperBerry a creative lifestyle blog packed full of great recipes and creative ideas for your home and family. I find I am happiest when I'm living a creative life and I love to share what I've been up to along the way... Come explore, my hope is that you'll leave inspired!

Footer

  • Privacy Policy
  • Crafts
  • Food
  • Gifts
  • Holidays
  • Home
  • Mom Life
  • Recipes
  • Travel

Copyright © 2026 · Seasoned Pro