• Skip to primary navigation
  • Skip to main content
  • Skip to primary sidebar
  • Skip to footer

Whipperberry

WhipperBerry • Your Home For Creative Inspiration

  • Home
  • Recipes
    • Starters
    • Easy Weeknight Dinners
    • Main Dish
    • Salads
    • Side Dish
    • Soups & Stews
    • Desserts
    • Breakfast
    • Miscellaneous
  • Tutorials
    • Creative Crafts
    • DIY Decor
    • Fabric Crafts
    • Food How-To
    • Jewlery
    • Paint Projects
    • Paper Art
    • Party Styling
    • Photography and Graphic Design
    • Silhouette
  • Holidays
    • Easter
    • Mother’s Day
    • Father’s Day
    • 4th of July
    • Halloween
    • Thanksgiving
    • Christmas
    • Valentine’s Day
  • Gift Ideas
    • Gifts For Everyone
    • Gifts for Dad
    • Mother’s day
    • For The Girls
    • For The Kids
    • Teacher Gift Ideas
    • Christmas
  • Printables
    • Holiday
    • Gift Idea
    • LDS Primary
  • Travel
  • About
    • Terms
  • Contact
  • Nav Social Menu

    • Facebook
    • Instagram
    • Pinterest
    • RSS
    • Twitter

Neighbor Gifts

Spice Cookies with Holiday Nog Glaze Recipe

6 · Dec 3, 2014 ·

+ This Spice Cookie with Holiday Nog Glaze post is brought to you by the folks at Silk +

There is nothing better to usher in the Holiday season than a good batch of Spice Cookies! My kiddos and I think that they are truly Christmas on a plate for sure…

Spice-Cookies-with-Holiday-Nog-Glaze-3

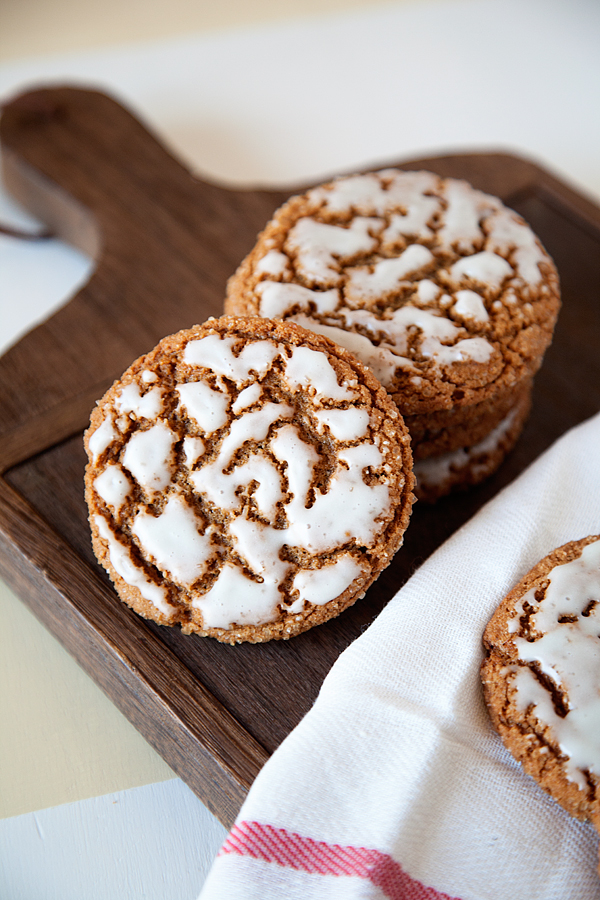
There is just something special about a soft chewy cookie that is packed full of the spices of the season… Cinnamon, nutmeg, cloves, ginger, molasses & a new addition cardamom, YUM!

This is a cookie that truly stands the test of time. People have been making spice cookies for hundreds of years and it’s a fun tradition at our house. This year I decided to add a little flair with a Holiday Nog Glaze…

Spice-Cookies-with-Holiday-Nog-Glaze-4

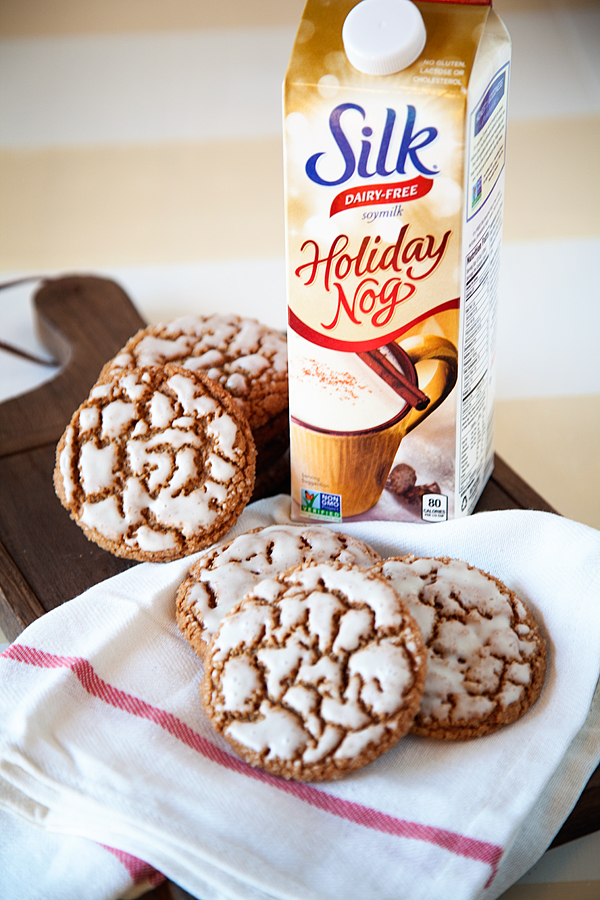
Yep, you got it… It adds a whole lotta love to those scrumptious cookies. I chose Silk Holiday Nog over traditional Egg Nog for a few reasons…

​First, I LOVE IT!! Seriously, have you tried this stuff? It’s all of the flavors of the season without all the guilt! I don’t think I will ever drink traditional Egg Nog ever again.

Second, It’s a great dairy-free alternative for our dairy-sensitive friends! Plus, here are the other goodies about Silk Holiday Nog…

Absolutely no cholesterol or saturated fat

Free of dairy, lactose, gluten, casein, egg and MSG

Verified by the Non-GMO Project’s product verification program

No artificial colors, flavors or funny business

Yea… it’s a NOG that I can truly get behind.

Third… As a Silk Member, you can enter to win a $500 Spa Gift Card!

Yes, we all know we could use one of those babies after the mad rush of the Holidays! You too can become a member HERE. They have new giveaways every month along with fabulous coupons for their members! SCORE!!

Now on to the cookies… Here’s how to make these scrumptious, Christmas on a plate, Spice Cookies with Holiday Nog Glaze.

Silk Cookies with Holiday Nog Glaze Recipe

Preheat oven to 350˚

​3 sticks of butter (1 1/2 cups) softened

1 cup white sugar

1 cup brown sugar

2 eggs

1 egg yolk

1/2 cup molasses

4 1/2 cups all-purpose flour

4 teaspoons ground ginger

1/2 teaspoon cinnamon

1/2 teaspoon ground cardamom

1/4 nutmeg

1 teaspoon ground cloves

1/4 teaspoon salt

2 teaspoons baking soda

1 cup of course sugar

1/4 cup Silk Holiday Nog

3 cups powdered sugar

1/4 teaspoon salt

Cream butter & sugars with an electric mixer until light and fluffy. Add eggs, egg yolk and molasses.

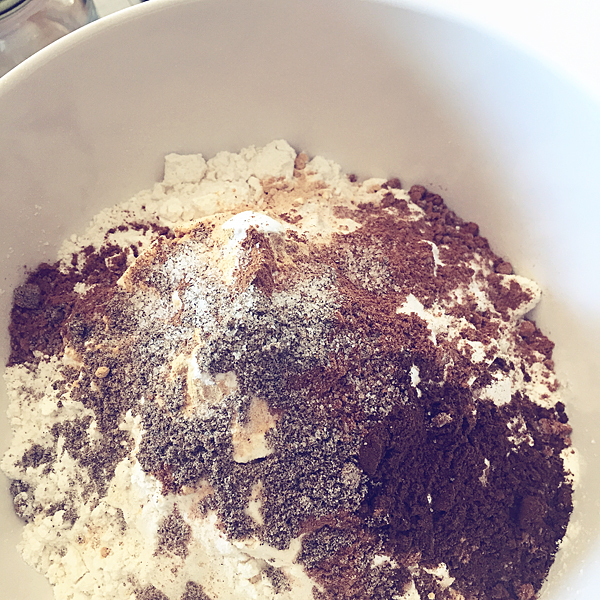
In a large bowl, combine your spices and dry ingredients; flour, salt, baking soda and all of the spices…

spices

Aren’t they pretty?!

Gradually add the dry ingredients into the creamed sugar mixture until fully incorporated.

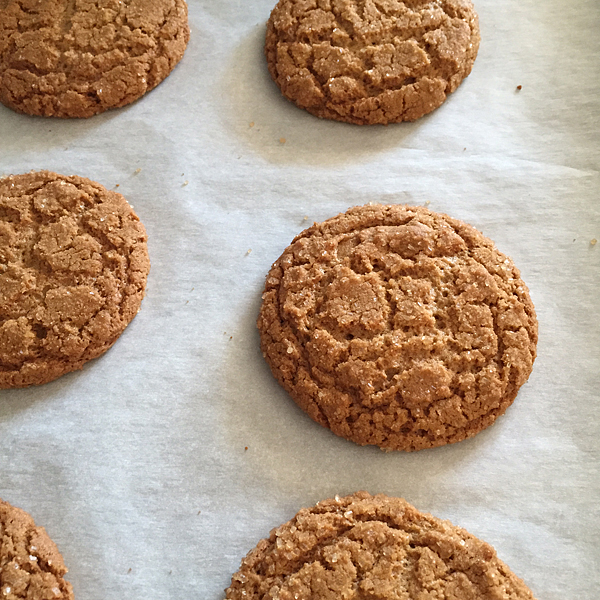
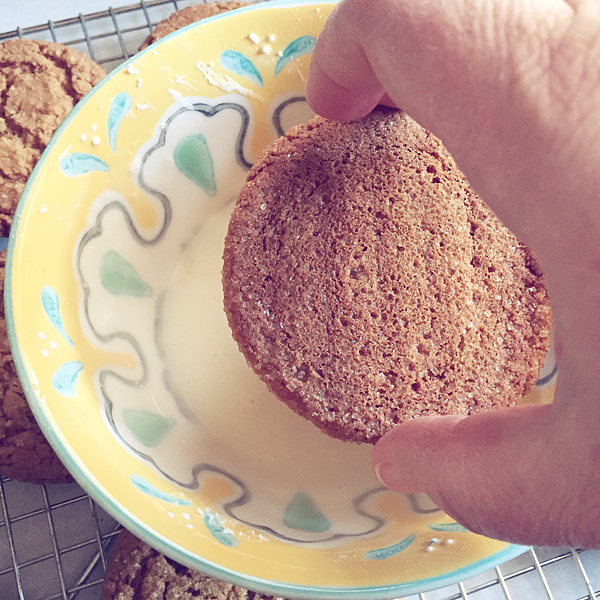
Place dough in the refrigerator for 30 minutes. Remove the dough and scoop the dough into 2 inch balls with a cookie scoop. Roll the cookie balls in a bowl with the course sugar. Place on a parchment lined baking sheet and place in a 350˚ oven for 13-14 minutes. Remove from oven and let cool.

spice-cookies

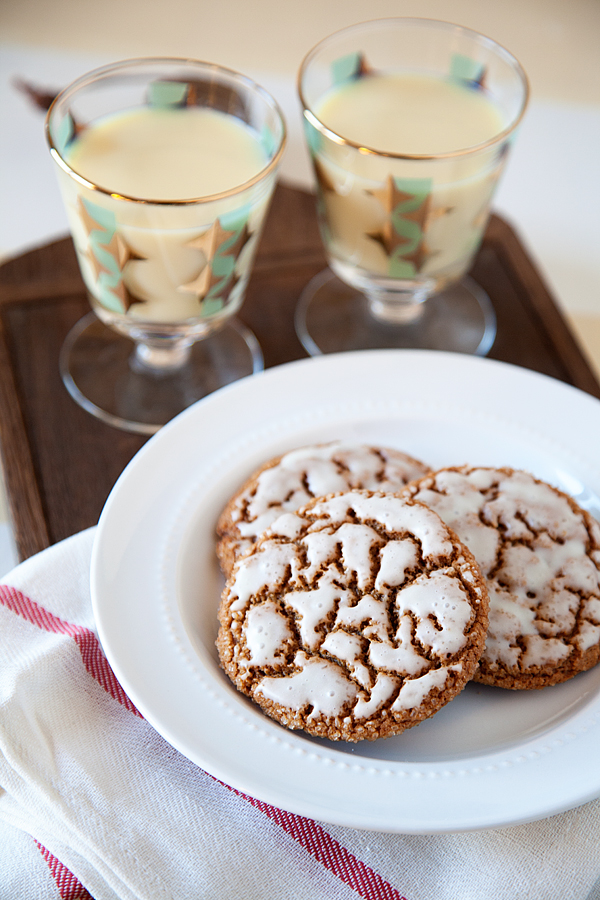
Mix Holiday Nog glaze while cookies are cooling. Add the powdered sugar to a small bowl, add salt and Silk Holiday Nog and whisk until it turns into a thick glaze.

Once the cookies are cool, dip the top part of the cookie into the glaze. Be careful to not fully submerge.

Holiday-Nog-Glaze

You only want to lightly kiss the top of the cookie with the glaze. Place on a cooling rack and wait for the glaze to set.

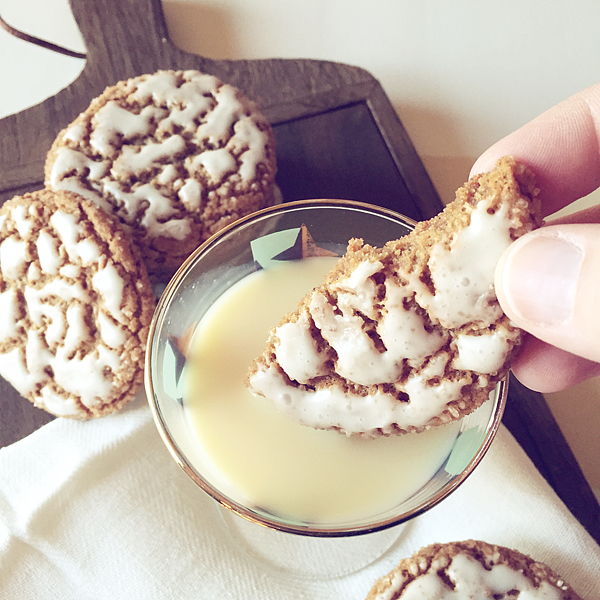
Once the glaze is set, serve your cookies with a nice glass of Silk Holiday Nog!

Spice-Cookies-with-Holiday-Nog-Glaze-2

They taste great dunked into the nog as well… just sayin’

dipping-your-spice-cookies-in-your-Silk-Holiday-Nog

Hannah and I thoroughly enjoyed them…

Spice-Cookies-with-Holiday-Nog-Glaze-5

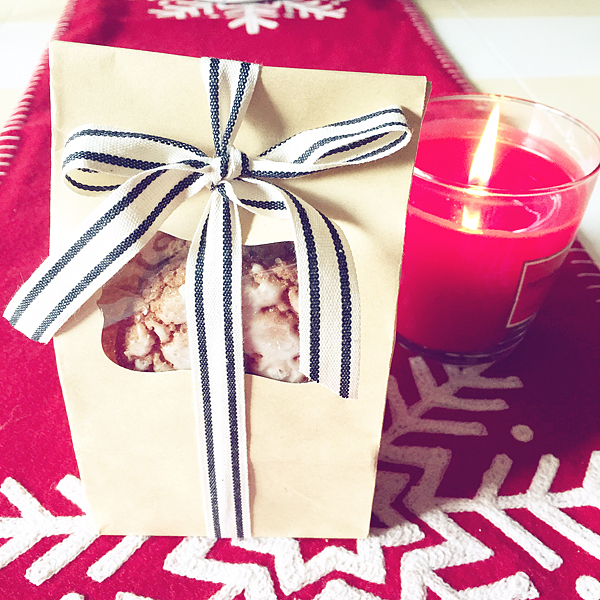
The also make perfect Holiday neighbor gifts! Bag up a few of these bad boys and share with your family and friends. I would even pair it with a carton of silk, they’ll thank you for it!

spice-cookie-neighbor-gift

This conversation is sponsored by Silk. The opinions and text are all mine.

Minty Muddy Chex Party Mix // A Fun Holiday Goodie

2 · Dec 16, 2013 · Leave a Comment


WhipperBerry Minty Chocolate Peanut Butter Chex Mix-4

Ahhhh, I love this time of the year! Everyone is starting to focus more on family and getting ready for the holidays. I know in our house with the weather cooling down we are also slowing down and doing more things together like watching movies and playing games together. With all that… We are constantly on the look out for good snacks. One of our all time favorite is the iconic Chex® Party Mix. You can never go wrong when you are snacking on Chex® Party Mix! 

Let's start with the cereal it's self… They have EIGHT different flavors! Seven of them are gluten free (Wheat Chex® cereal is not. For more Nutritional information please visit this site and make sure you read each label.) They have everything from Rice Chex®, Corn Chex® and even some super fancy ones like Chocolate, Vanilla and even Apple Cinnamon Chex® Cereal. All of them are like blank canvases when it comes to making Chex® Party Mix. Seriously… The sky is the limit. Don't believe me, check out the Chex® Party Mix Recipe site and you'll see all kinds of fun ideas. The nice thing about the party mix is that, yes… you get to have some of those scrumptious treats that we all crave but, you also get a nice helping of some good whole grains from the Chex® Cereal. Win / win!

The kiddos and I decided to create our own salty & sweet Chex® Party Mix recipe to have around the house. We call it Minty Muddy Chex® Mix and it's a fun flavor combination of sweet chocolate, Jiff's Whipped Peanut Butter & Chocolate Mint Spread, Peanut butter pretzels and salty Corn Chex® Cereal. It's sweet and nutty all at the same time. The bonus… It only takes 15 minutes to make!

Minty Muddy Chex® Party Mix Ingredients

8 cups Corn Chex® cereal

​2 cups Vanilla Chex® cereal

1 cup butter

1 cup Jiff's Whipped Peanut Butter Chocolate Mint Spread

1 cup semi-sweet chocolate chips

1/2 vanilla

1/2 cup powdered sugar

salt

1 cup mini M&M's

2 cups Rold Gold peanut butter pretzels

Minty Muddy Chex® Party Mix Directions

Start with a small microwave safe bowl. Add a 1/2 a stick of butter, the chocolate chips and the Jiff Whipped Peanut Butter Chocolate Mint Spread. Microwave in 30 second segments until the mixture has melted and is nice and smooth. Remove from Microwave and stir in vanilla. Place 3 cups of Corn Chex® into a large bowl and drizzle chocolate mixture on top. Carefully fold the chocolate mixture into the Corn Chex® Cereal. Place the chocolate covered cereal into a large Ziplock bag and add powdered sugar into the bag. Seal bag and shake the bag until the chocolate covered cereal is covered with the powdered sugar. Pour out onto a wax paper lined cookie sheet. Place in the refrigerator to set.

In another small microwave safe bowl or measuring cup, add the remaining butter. Place in Microwave for 45-60 seconds or until melted. Add the remaining Corn Chex® cereal into a large microwave safe bowl and drizzle the butter over the top. Add a generous amount of salt to the bowl and gently fold in the butter and salt into the cereal. Once the mixture is mixed well, place in the microwave for 3-4 minutes. Remove from the microwave and place in the refrigerator to cool for a few minutes.

Once your salty and sweet mixture is cool and set, place into a large bowl and add remaining ingredients. Mix well. 

Now, this snack is fabulous to share with family and friends during all of your favorite activities. This year I am going to make up several large batches and then bag them up as a fun holiday treat to share with neighbors, friends, co-workers, the mailman… anyone really!

WhipperBerry Minty Chocolate Peanut Butter Chex Mix-2

This post brought to you by Chex® cereal. I have been compensated and given free product for my time & commitment, but all opinions are 100% mine

DIY Lace Flower Pots

7 · Dec 10, 2013 · 3 Comments

This post is brought to you by Elmer's Glue // I'm super excited to share this idea with you guys today! This time of year I am ALWAYS looking for fun handmade gift ideas. Gifts that are easy to make but huge on the WOW factor.  These DIY Lace Flower Pots fit the bill just perfect!!

Lace Flower pots with Elmers Craft Bond Fabric Glue by WhipperBerry

These are PERFECT neighbor gifts, teacher gifts… anyone really. Add a poinsettia or a festive evergreen and it's a stylish gift for anyone. Here's what you need to make them…

Lace Flower Pot Supplies

Terra cotta pots – any size.

Lace – for smaller pots, you can use scraps, larger pots will need possibly a yard or so. You will have to measure your pots for exact measurements.

Elmer's Craft Bond Fabric & Paper Glue

Scissors

Lace Flower pots with Elmers Craft Bond Fabric Glue by WhipperBerry-1

Lace Flower Pots Instructions

First you need to measure the lace and make sure that it will fit your desired spot on the pot. Then generously add glue to the pot  in small sections and lay the lace down.

Lace Flower pots with Elmers Craft Bond Fabric Glue by WhipperBerry-2

Use your fingers to work glue around the lace. Don't worry about the white color. This type of Elmer's Fabric & Paper Glue dries clear. Make sure that all of the lace is covered in the glue and then move on to the next section. 

NOTE: You may want to wear disposable gloves when working with the glue. I didn't and it took a bit to wash off my hands.

Trim the lace so that the seam doesn't show and then smooth everything down. Let dry over night.  The next morning, you will have the most beautiful lace  flower pots. It's just that easy!  Now, all you have to do is figure out what you want to fill the pot with. You can fill it will any kind of indoor plant or you could fill it will a scrumptious batch of cookies. It's your call!!

Lace Flower pots with Elmers Craft Bond Fabric Glue by WhipperBerry-7

Lace Flower pots with Elmers Craft Bond Fabric Glue by WhipperBerry-6

You will be amazed at how strong the glue is! I actually tried to pull the lace off once it was dried and couldn't. I ran water over it and it still looked like new when it dried. Gotta say… Pretty happy with this gift idea! 

What would you fill your DIY Lace Flower Pots with?

Disclaimer // This post is sponsored by Elmer's Glue. I am a member of Elmer's Craft it Crew and received payment and product for this post. Rest assured, I will never work with a brand or product that I don't whole heartedly endorse and use in my every day life.

Gift Giving with Styled by Tori Spelling

1 · Jan 30, 2013 · 3 Comments

Gift Jar with Styled by Tori Spelling Key Chain // Hello my friends!  We're running slow today with another snow day here in Lincoln. Can't complain at all in my book. Snow days are the BEST!!!! We've settled down with a Harry Potter marathon and I, of course had to do a little creating on the side. With Valentine's day around the corner I thought it would be fun to make some simple little gifts for teachers and such with some of my favorite Styled by Tori Spelling goodies…

Gift Giving with Styled by Tori and WhipperBerry

I thought it would be fun to create a gift jar (of course) and make a little key chain for my daughters teacher this year. For the jar I just took a little 4 oz. jelly jar and cut some craft paper to fit the lid and glued on a gem flower from Styled by Tori on top…

Creating a gift jar with Styled by Tori

Toss in some coordinating tissue paper and you have a simple yet beautiful little gift jar. Couldn't be any easier than that. The jar, quite frankly is also part of the gift. The person who receives it will be able to use it to store little items in and they will adore it!! 

Next, I created a fun peacock key chain for the "gift" in the pretty jar…

gift jar with styled by tori

This one is super simple as well. I found this lovely peacock charm from the Styled by Tori line and then I bought a nice clip to attach to it to make the key chain…

key chain components

You may need to use some needle nose pliers to open the ring up a bit to attach the clasp and peacock. Close the ring and voila, you have a fancy new key chain…

key chain made with styled by tori

Many of the Styled by Tori charms will work perfect to make a fun decorative key chain. Next, all you need to do is to attach your key ring with your keys and you are in business. I always like to have little clip on my keys so I don't lose them in my bag, so that was a must!

key chain with styled by tori and whipperberry

Won't this be a fun little gift for teachers or friends for Valentine's Day, teacher appreciation,  mother's day, birthdays, anything really. You can make up a bunch and keep them in your gift stash and always be ready with a fun gift at hand. 

  • « Go to Previous Page
  • Page 1
  • Interim pages omitted …
  • Page 4
  • Page 5
  • Page 6
  • Page 7
  • Page 8
  • Interim pages omitted …
  • Page 10
  • Go to Next Page »

Primary Sidebar

Heather from Whipperberry
Hello... my name is Heather and I'm the creator of WhipperBerry a creative lifestyle blog packed full of great recipes and creative ideas for your home and family. I find I am happiest when I'm living a creative life and I love to share what I've been up to along the way... Come explore, my hope is that you'll leave inspired!

Footer

  • Privacy Policy
  • Crafts
  • Food
  • Gifts
  • Holidays
  • Home
  • Mom Life
  • Recipes
  • Travel

Copyright © 2026 · Seasoned Pro