• Skip to primary navigation
  • Skip to main content
  • Skip to primary sidebar
  • Skip to footer

Whipperberry

WhipperBerry • Your Home For Creative Inspiration

  • Home
  • Recipes
    • Starters
    • Easy Weeknight Dinners
    • Main Dish
    • Salads
    • Side Dish
    • Soups & Stews
    • Desserts
    • Breakfast
    • Miscellaneous
  • Tutorials
    • Creative Crafts
    • DIY Decor
    • Fabric Crafts
    • Food How-To
    • Jewlery
    • Paint Projects
    • Paper Art
    • Party Styling
    • Photography and Graphic Design
    • Silhouette
  • Holidays
    • Easter
    • Mother’s Day
    • Father’s Day
    • 4th of July
    • Halloween
    • Thanksgiving
    • Christmas
    • Valentine’s Day
  • Gift Ideas
    • Gifts For Everyone
    • Gifts for Dad
    • Mother’s day
    • For The Girls
    • For The Kids
    • Teacher Gift Ideas
    • Christmas
  • Printables
    • Holiday
    • Gift Idea
    • LDS Primary
  • Travel
  • About
    • Terms
  • Contact
  • Nav Social Menu

    • Facebook
    • Instagram
    • Pinterest
    • RSS
    • Twitter

Thanksgiving

Printable Thanksgiving Bread Wraps + 12 More Thanksgiving Printables

10 · Nov 6, 2013 · 9 Comments

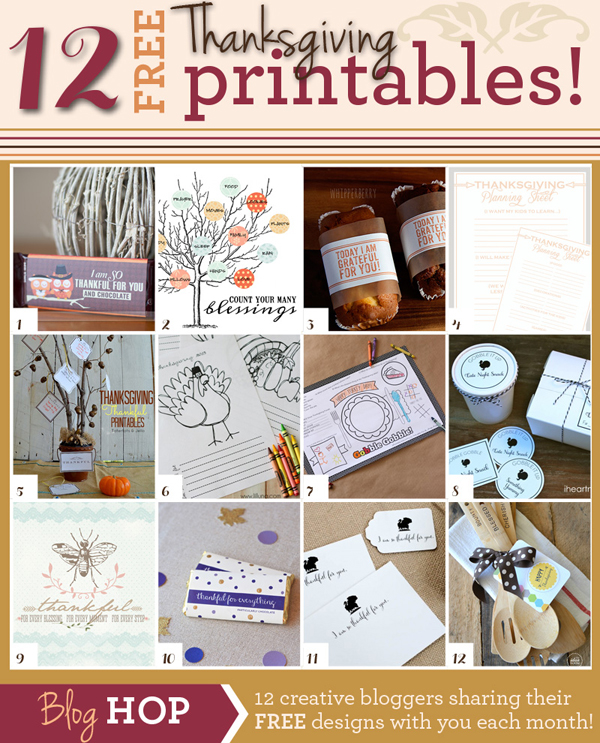
Free Printable Thanksgiving Bread Wraps  //  Well hello November! Can you believe we are already here… It’s time for Thanksgiving! It’s also time for this months Printable Club. We have 12 fabulous Thanksgiving printables for you…

Thanksgiving Grid-sm

Aren’t they all so fun?!  I created a “Today I am grateful for You!” bread wrap. This time of year we are all busting out our baking pans and making all kinds of lovely quick breads like pumpkin bread and banana bread and sharing them with friends and neighbors. I thought it would be fun to create a nice wrap for those scrumptious gifts that we all love to share. Even if you aren’t much of a baker, you can find some tasty breads at your local market and repackage them with this wrap and look like a rock star!

printable canvas bread wrap from WhipperBerry

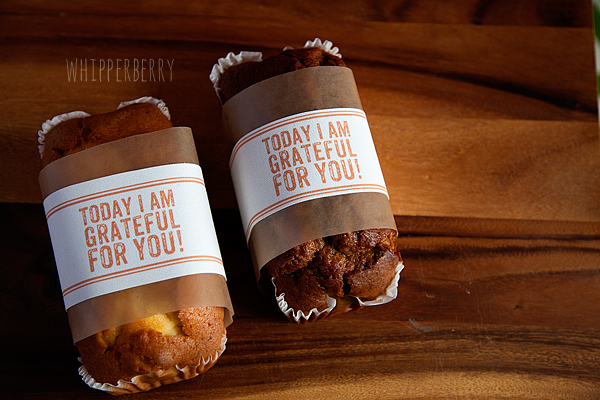
All you have to do is download the file from the Box.com box below and then print out as many sheets as you want. Cut them how ever you like and wrap your bread with them. I actually wrapped my bread in some parchment paper first and then the bread wrap because the wrap didn’t make it all the way around the bread. With the parchment you have something to affix the wrap to and it looks great.

whipperberry printable bread wrap

You can even go a step further if you like… I printed mine on printable canvas from Silhouette. This stuff is super cool and you don’t need to have a Silhouette machine to use it. It goes right through your printer and then is self-adhesive as well. Perfect for this kind of stuff. Then your friends will REALLY think you are a rock star because who knows how to print on fabric? Um, YOU DO!  Here’s the file for you to download…

But wait, there’s more… Wow, I’m starting to sound like an infomercial. I have 11 more super talented friends who are sharing their Thanksgiving printables with all of us as well! Click on their links below to see all of their amazing creations!

Thanksgiving Banner-sm

1 // The Dating Divas – Give your hubby this cute, personalized candy bar wrapper to show your gratitude for him!
2 // Somewhat Simple – Count Your Blessings Tree | Includes everything you need to create a beautiful display of all the things you’re grateful for.
3 // Whipperberry – Printable bread wrapper to show your friends and family how grateful you are for them.
4 // Crafting Chicks – Thanksgiving planning pages to create the best, most organized and most purposeful Thanksgiving yet!
5 // Tatertots & Jello – Thanksgiving centerpiece idea and activity.
6 // L’il Luna – Free Thanksgiving Coloring Pages perfect for the kids while the adults are busy cooking!
7 // My Sister’s Suitcase – Keep the kids busy coloring this Printable Thanksgiving Placemat – full of games, jokes, and puzzles!
8 // I Heart Nap Time – Give Thanksgiving leftovers the respect they deserve with these easy to use ‘leftovers’ printables!
9 // The 36th Avenue – Timeless “Bee” Thankful Printable and Thankful Tags. Available in two colors.
10 // Paging Supermom – “Thankful for Everything” chocolate wrapper coordinates with a collection of FREE Thanksgiving dinner decor!
11 // The TomKat Studio – Give thanks with these stylish notecards and gift tags!
12 // The Idea Room – Printable Happy Thanksgiving Gift Tags for Thanksgiving or Hostess Gifts.

40+ Fabulous Thanksgiving Ideas

1 · Oct 30, 2013 · 7 Comments

40+ Thanksgiving Ideas // 

Thanksgiving ideas 7


Can you believe that it's already time to start thinking about Thanksgiving?!  Today I'm sharing some of the best of Thanksgiving from around blogland, everything from decorating, to table settings, amazing dishes, and even what to do with those leftovers!  Enjoy!!

DIY Placemats / Thanksgiving Pies & Beautiful Color Palette / Simple, Rustic Table Setting

Simple Thankful Garland / Silverware Stem Pumpkins / Simple Thanksgiving Bunting

Wood Slice Chalkboard Menu / Mini Cornucopias / Book Page Leaf Garland

Pumpkin Praline Trifle / Muffin Tin Pumpkin Pies / Salted Caramel Pumpkin Parfaits

15 Minute Salted Maple Butter / Fall Breads / Pumpkin Spice Soup

Glitter Leaf Garland / Turkey & Dot Garland / Pinecone Garland

Simple Bottles & Candles Centerpiece / Gold Leaf Pumpkin Place Cards / DIY Fall Leaf Place Cards

Pilgrim Crayon Cup / Simple Kids' Table Setting / Feather Head Dress

"Best Stuffing Ever" / Roasted Brown Sugar & Rosemary Squash / Cornbread Cranberry Dressing

Stamped Serve Ware / Metallic Dipped Serving Utensils / Thanksgiving Muffin Wrapping

DIY Chalkboard Table Runner / Eclectic Fall Tablescape / DIY Linens

Thanksgiving Mantel / Wood Slice Cake Stands / DIY Tepee Decorations

Thanksgiving Leftover Pizza / Perfect Crock Pot Apples / Pumpkin Spice Muddy Buddies

Chalkboard Printables / Subway Printables / Give Thanks Printables

Simple, Rustic Decor / Gobble Sign / Book Page Wreath

DIY Thanksgiving Garland

0 · Oct 28, 2013 · 10 Comments

DIY Thanksgiving Garland //
 
Hi Whipperberry readers! Haley here, from Life Is Sweet. I can't resist festive garlands, and this year I made a few!  I'm enjoying them on our mantle, but any of these would be great on bookshelves, windows, railings, or just up on the wall. Two embraced the feeling of autumn and one embraced the wonderful holiday coming up next month, Thanksgiving! Jenn said it perfectly in her post of her fabulous Thanksgiving Centerpiece–it's a beautiful time of year dedicated to expressing gratitude for blessings, surrounding yourself with loved ones, and making and enjoying great food! 
 
The first two garlands I'm sharing how to make are pretty simple. The leaf garland just calls for needle+thread along with leaves bought from the craft store (I've tried displaying real fallen leaves but they shriveled and lost their color within a couple days). The second one calls for needle+string and pompoms. I happened to find my pom balls at a thrift store (cheers to pre-loved nick-nacks!) but you can order felt poms in an array of colors from Hello Maypole. Then string away!
 
The "Give Thanks" garland takes a little more work, but is still very doable and you can create whatever message you'd like!
SUPPLIES:
Black cardstock
Scissors
White color pencil
Pencil
Rope/String
Paper hole-punch
Pencil sharpener (not pictured)
Ruler (or Colorbök Scrapbook paper pack has a ruler on the back)
 
You'll first want to decide the shape and size you want your garland pieces to be–pentagons, triangles, rectangles, circles, etc. Mine are pentagon-shaped that measured out to be 7.5 inches tall and 5.5 inches wide. 
 
For a pentagon shape you cut off two corners–the two short sides of mine measured 2.75 inches and 2.5 inches. Then use that pentagon to trace the rest of the pieces you need–I got two out of each 12×12 inch sheet.
 
I used a pencil to lightly sketch out the letters (after typing out "GIVE THANKS" in a Word document and chose the two fonts I liked: Snell Roundhand Black and Baskerville Old Face). But stencils would be another great way to get the letters on the garland. You'll then use the white colored pencil to fill in the letters. I loved how it gave it a fun chalk look, without the mess and I was able to be more precise. Now is when the pencil sharpener will come in handy.
 
You'll use a hole punch to put holes in the top corners of your garland pieces. I used a three-hole punch, and the spacing worked great for me to punch two at a time. Then string them up!
 
 
I hung/displayed all three garlands using good ol' scotch tape and, because my mantel is white, colored the tape with a white Painters marker (purchased at Walmart) so it's a bit camouflaged. 😉
 
 
Thanks again Heather for having me!
 
xo, Haley

Thanksgiving Centerpiece

0 · Oct 22, 2013 · 17 Comments

Thanksgiving Centerpiece // Hi all!  It's Jenn from My Fabuless Life.  Can you believe that Thanksgiving is already around the corner?!  The older I get, the more I LOVE Thanksgiving.  I love that it gives us a whole month to focus on our blessings, gather with family, and of course, an excuse to throw diet cares out the window and and EAT!!

I loved all of the "Thankful Trees" I saw floating around the blog world last year, so this year, I wanted to create my own. We'll call it the "deconstructed," sparkly version.  

I started by cutting out my letters on my Cricut on some mat paper (like for matting pictures).  You can pick it up in packages of 20 at Hobby Lobby, and it's super cheap.  It's quickly becoming one of my new favorite crafting tools because there are about a million and uses for it.

After I cut out my letters, I just coated them with a layer of Mod Podge, and then glitter.  For the sticks, I used some fun paper straws from Target, and for the base, just a stick from the yard.

I drilled holes in the stick and placed the straws in.

Since I wanted the text to be kind of fun and crazy, I hot-glued the letters on at different heights before I trimmed the straws.  

Then I trimmed them up and set them on my table.

I wrote down things we were thankful for on some kraft paper (you can see my four year old's on the left–my favorite) and glued them to a few more of the straws.  This is my favorite part of this project, because it's a great way to teach my little one about blessings and being grateful, and the responses are priceless–as you can see.  You could easily save these in a scrapbook and look back over them each year too, making for some great memories.


  • « Go to Previous Page
  • Page 1
  • Page 2
  • Page 3
  • Page 4
  • Page 5
  • Go to Next Page »

Primary Sidebar

Heather from Whipperberry
Hello... my name is Heather and I'm the creator of WhipperBerry a creative lifestyle blog packed full of great recipes and creative ideas for your home and family. I find I am happiest when I'm living a creative life and I love to share what I've been up to along the way... Come explore, my hope is that you'll leave inspired!

Footer

  • Privacy Policy
  • Crafts
  • Food
  • Gifts
  • Holidays
  • Home
  • Mom Life
  • Recipes
  • Travel

Copyright © 2026 · Seasoned Pro