• Skip to primary navigation
  • Skip to main content
  • Skip to primary sidebar
  • Skip to footer

Whipperberry

WhipperBerry • Your Home For Creative Inspiration

  • Home
  • Recipes
    • Starters
    • Easy Weeknight Dinners
    • Main Dish
    • Salads
    • Side Dish
    • Soups & Stews
    • Desserts
    • Breakfast
    • Miscellaneous
  • Tutorials
    • Creative Crafts
    • DIY Decor
    • Fabric Crafts
    • Food How-To
    • Jewlery
    • Paint Projects
    • Paper Art
    • Party Styling
    • Photography and Graphic Design
    • Silhouette
  • Holidays
    • Easter
    • Mother’s Day
    • Father’s Day
    • 4th of July
    • Halloween
    • Thanksgiving
    • Christmas
    • Valentine’s Day
  • Gift Ideas
    • Gifts For Everyone
    • Gifts for Dad
    • Mother’s day
    • For The Girls
    • For The Kids
    • Teacher Gift Ideas
    • Christmas
  • Printables
    • Holiday
    • Gift Idea
    • LDS Primary
  • Travel
  • About
    • Terms
  • Contact
  • Nav Social Menu

    • Facebook
    • Instagram
    • Pinterest
    • RSS
    • Twitter

Valentine's Day

Italian Soda Valentine with International Delights

1 · Feb 13, 2013 · 7 Comments

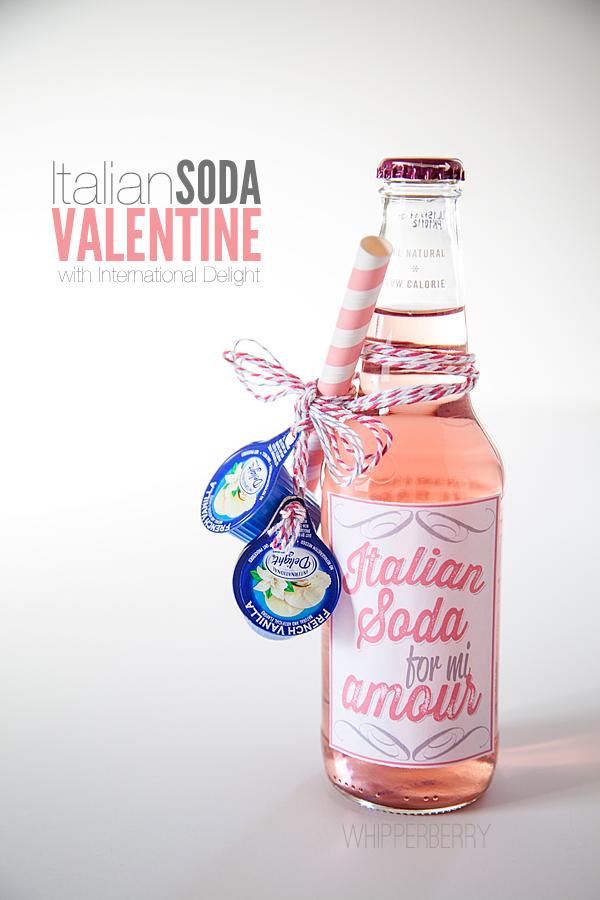
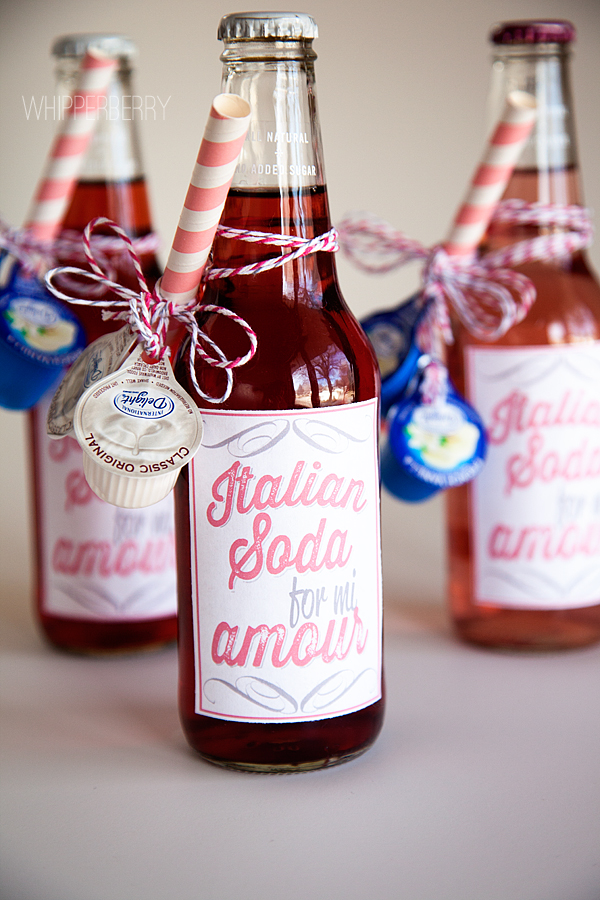
Italian Soda Valentine with International Delights // Every year for Valentine's Day my family has a special tradition… We have a fun Valentine's Day dinner together with all the pink, red and heart fixin's. Some of the items on the menu heart shaped pizza, heart shaped jell-o and for a special drink we have Italian Sodas with some type of red or pink soda. With all the heart shaped fun, my kiddos favorite is the Italian soda. If you don't know what an Italian soda is, it's basically some type of flavored soda as the base and then you add a shot of cream to make it extra special. I thought I could take it a step further and create a fun little gift that we can give out as Valentine's to our friends and family this year. With the help of International Delight's handy little creamer cups it worked like a charm!

Italian Soda with International Delight 

It is jus the cutest little Valentine and something original that everyone will just adore. Here is what you will need…

Italian Soda Supplies with International Delight 

Supplies

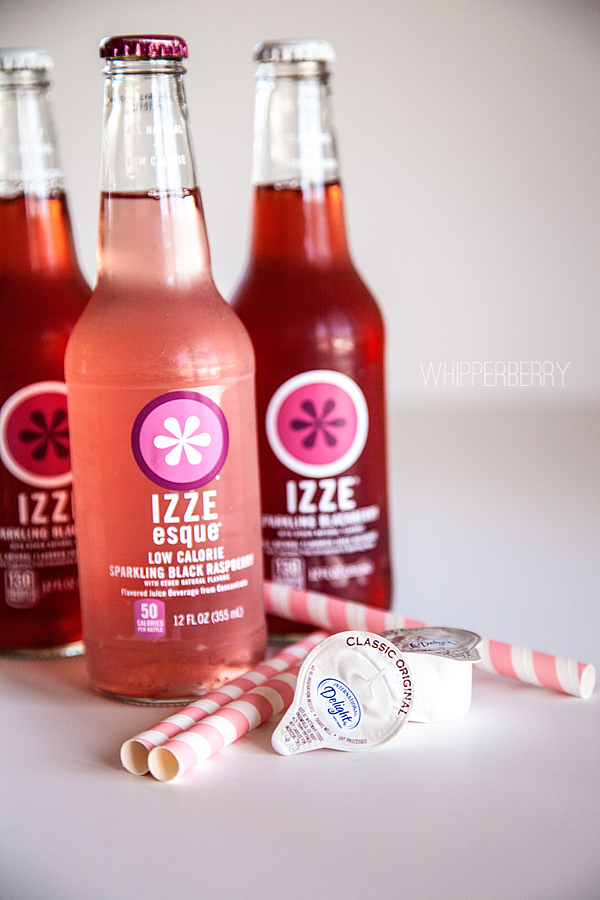
  • Red or pink soda of your choice
  • International Delight creamer cups,  in original or vanilla 
  • A fun straw
  • Baker's twine
  • A standard hole punch
  • scissors & paper cutter
  • Printable bottle label 
  • Double sided tape
  • Plain printer paper

Instructions

Print the label that I created for this project on plain printer paper. 

Cut the labels out and secure to the bottle with double sided tape.

Carefully punch a hole in the tab of the creamer cup and set aside. 

Italian Soda 

Cut baker's twine long enough to wrap around the bottle twice, roughly 24 inches.  Wrap the bottle with the bakers twine twice and tie into a basic knot. Tie the straw on next and secure with a bow with long ends. Thread the creamer cup onto the ends of the baker's twine bow and secure with a knot. Voila, you have the cutest Valentine and your kiddos and friends will love it.

International Delight Italian Soda 

Now, you can create you Italian Soda two ways… Pour your chilled soda into a glass and add the creamer or, take a few drinks out of the bottle and then carefully add the creamer to the bottle of soda. Be careful with the second method because the soda will bubble up with the addition of the creamer. Stir or swirl the soda to mix and enjoy!

This Valentine’s Day, share the love with recipes and homemade gift ideas! Don’t miss the International Delight Valentine’s Day Twitter Giveaway. Enter by following International Delight on Twitter and by tweeting your favorite ID flavor  with the hashtag #IDLove. Winners will be contacted on February 15th and will receive ID Valentine’s Day Sampler Packages!

This is a sponsored conversation written by me on behalf of International Delight. The opinions and text are all mine.

Silhouette Portrait Giveaway, Discount Code and the NEW Double Sided Adhesive

0 · Feb 2, 2013 · 10 Comments

Silhouette Portrait GIVEAWAY, Discount Code and Glitter Art with Double Sided Adhesive // That's a mouth full!! So much stuff going on this week. It's started yesterday, with our Ultimate Valentine's Day Getaway Giveaway and now I have a rare Saturday post with the ever popular Silhouette GIVEAWAY!!

Silhouette Portrait Giveaway

But, before we get to the giveaway… I'm and super excited to show off one of the new products that Silhouette announced at CHA last month. Their Double Sided Adhesive and the new Silhouette Glitter, perfect for creating stunning glitter art…


Glitter Art with Silhouette

I created this wall art for Valentine's Day by cutting out an image from Rhonna Designs Insta Kiss kit in the new Double Sided Adhesive using the Silhouette Designer Edition software. The double sided adhesive is perfect for all kinds of applications that involve glitter or flocking and certainly makes the whole process of working with glitter sooooooo much easier! I cut the image and weeded out the excess material…


cutting double sided adhesive from Silhouette

Then I decided to use transfer tape to make sure the image stayed in tact. When cutting a more simple design, you really don't need to use the transfer tape.


Use transfer paper to help transfer your double sided adhesive

Next, I removed the transfer tape and the white layer of the adhesive and got ready for the fun part,  the glitter…


My heart and soul sign

Now who doesn't love GLITTER? Well, maybe my husband. He hates it!! But you know, the Double Sided Adhesive actually makes it really easy to work with…


Silhouette Glitter

All you need to do is pour the glitter onto to the adhesive…


Glitter with Silhouette double sided adhesive

Brush it away with the brush that is included in the Double Sided Adhesive starter kit and voila you're done!! No messy glue, and your image is perfect and crisp.


My heart and soul glitter art

I framed my "Heart and Soul" in a trendy frame from Hobby Lobby and I LOVE it!! Want to give it a go? You know you want to! Silhouette has a great deal for you whether you have a Portrait, CAMEO already or if you don't… Silhouette has a special deal for that as well.

Use WHIPPER at checkout to receive the February discount

Click here to access the February Silhouette Special!

If you're feeling lucky… You can enter to win a Portrait!!

a Rafflecopter giveaway

Heart Attack // HUGE Valentine’s Day Link Party

11 · Jan 28, 2013 · 49 Comments

WhipperBerry's Printable Heart Attack // Typically a "heart attack" isn't a good thing… but, not in this case! This Heart Attack is a fun way to show your friends and family that you A*D*O*R*E them. 

Heart Attack Printable by WhipperBerry

My girls have been participating in "Heart Attacks" for years. They would cut out a bunch of hearts and tape them on someone's door to tell them that they love them, it also has a fun door bell ditch element to it. I thought I would kick it up a notch and create some fun heart printables for the event. You can choose to use them however you like, but here are a few ideas…

  1. Cut out the hearts and write little notes to your loved ones on the back and leave them in special places during the month of February.
  2. Prepare the hearts and tape to a friend or loved one's door and door bell ditch them.
  3. Prepare the hearts by using a glue dot to attach candy to the back and place in a jar with my printable label for your lucky heart attack friend or loved one, and leave them on their door step with a door bell ditch.
  4. Go into full on ATTACK mode, make some goodies and along with your sweet little heart attack hearts start a HEART ATTACK in your neighborhood!

I chose to make a fun Heart Attack Jar…

Heart Attack Valentine's Day Printables from WhipperBerry

How fun is that? I attached the free printable label to the jar, wrapped the lid with some washi tape, added a baker's twine bow and that's it! All there is left to do is leave it on my neighbor's door step and the attack will be complete. The kits also has a door sign that let's people know that you've been Heart Attacked and a list of instructions to tell people how they can keep this Heart Attack going.

We've Been Heart Attacked by WhipperBerry #valentinesday #printable

Here are the instructions…

Heart Attack Instructions

Here are all of the files that you can download for free…

I'm actually sharing this post as part of a HUGE Valentine's day link party with these lovely ladies…

Valentine's Day Bloggers.550

  • Karly from Buns in my Oven – follow on Pinterest
  • Tiffany from Eat at Home – follow on Pinterest
  • Liz from Hoosier Homemade – follow on Pinterest
  • Myra from My Blessed Life – follow on Pinterest
  • Amy from MomAdvice – follow on Pinterest
  • Kellie from Nest of Posies – follow on Pinterest
  • Amy from Positively Splendid – follow on Pinterest
  • Lisa from The Pennington Point – follow on Pinterest
  • Gina from The Shabby Creek Cottage – follow on Pinterest
  • Heather from WhipperBerry – follow on Pinterest

And YOU can share your fun Valentine's day ideas as well during this HUGE Valentine's Day Link Party!! Come on over an share some of your brilliant ideas with over 100,000 blog fans and show off how fabulous you are!!


Valentine’s Day Red Velvet Pancakes with Buttermilk Syrup // Recipe

24 · Jan 2, 2013 · 22 Comments

Red Velvet Pancakes with Buttermilk Syrup // While I'm taking a little break with the family for our holiday vacation, I thought I would share an older post from a few years back.  A fun Valentine's Day breakfast idea, Red Velvet Pancakes with Buttermilk Syrup.

heart shaped red velvet pancakes

Serve up a romantic breakfast-in-bed for your Valentine with these decadent pancakes.  Simply beautiful, and yet more pleasing to the taste-buds than even the eyes.  I know my sweetheart revels in any opportunity to feel just so pampered. How fun it is to celebrate the month of love through the delights of sweet treats.

Red Velvet Pancakes:

1 1/2 C. Buttermilk

4  Eggs

4 Tbsp. Butter, melted

1 tsp. Vanilla

2 Tbsp. Red Food Coloring

2 C. Flour

2 Tbsp. Cocoa

1/3 cup Sugar

2 tsp. Baking Powder

1/2 tsp. Baking Soda

1 tsp. Salt

 Buttermilk Syrup:

 1 C Butter

1 C Buttermilk

2 C Sugar

2 T Vanilla

1 t Baking Soda

Directions

For the pancakes, mix together dry ingredients and set aside. Melt butter in separate bowl, then add buttermilk, eggs, vanilla, and food coloring. Blend well. Pour in dry mixture and beat until smooth.

Pour ½ cup of the whipped batter on a greased skillet. Pan fry on medium heat until browned. Flip over and brown again. Top with desired toppings and serve warm.

(To make a heart shaped pancake (optional), place a heart shaped cookie cutter on the skillet, and pour batter into the cookie cutter. Remove form before flipping.)

Make the syrup by bringing the first three ingredients to a boil and boil for one minute, stirring constantly.  Remove from heat and add vanilla and baking soda.  Stir and Serve.

*Optional toppings include syrup, butter, whipping cream, and shaved chocolate.

  • « Go to Previous Page
  • Page 1
  • Page 2
  • Page 3
  • Page 4
  • Page 5
  • Go to Next Page »

Primary Sidebar

Heather from Whipperberry
Hello... my name is Heather and I'm the creator of WhipperBerry a creative lifestyle blog packed full of great recipes and creative ideas for your home and family. I find I am happiest when I'm living a creative life and I love to share what I've been up to along the way... Come explore, my hope is that you'll leave inspired!

Footer

  • Privacy Policy
  • Crafts
  • Food
  • Gifts
  • Holidays
  • Home
  • Mom Life
  • Recipes
  • Travel

Copyright © 2026 · Seasoned Pro