• Skip to primary navigation
  • Skip to main content
  • Skip to primary sidebar
  • Skip to footer

Whipperberry

WhipperBerry • Your Home For Creative Inspiration

  • Home
  • Recipes
    • Starters
    • Easy Weeknight Dinners
    • Main Dish
    • Salads
    • Side Dish
    • Soups & Stews
    • Desserts
    • Breakfast
    • Miscellaneous
  • Tutorials
    • Creative Crafts
    • DIY Decor
    • Fabric Crafts
    • Food How-To
    • Jewlery
    • Paint Projects
    • Paper Art
    • Party Styling
    • Photography and Graphic Design
    • Silhouette
  • Holidays
    • Easter
    • Mother’s Day
    • Father’s Day
    • 4th of July
    • Halloween
    • Thanksgiving
    • Christmas
    • Valentine’s Day
  • Gift Ideas
    • Gifts For Everyone
    • Gifts for Dad
    • Mother’s day
    • For The Girls
    • For The Kids
    • Teacher Gift Ideas
    • Christmas
  • Printables
    • Holiday
    • Gift Idea
    • LDS Primary
  • Travel
  • About
    • Terms
  • Contact
  • Nav Social Menu

    • Facebook
    • Instagram
    • Pinterest
    • RSS
    • Twitter

Holidays

Free Printable Christmas Countdown and Wood Clipboard Tutorial

0 · Nov 26, 2013 · 3 Comments

Hi all!  It’s Jenn from My Fabuless Life.  I’m SO excited that the Christmas season is HERE, and even more excited to share a little printable Christmas Countdown project with all of you.  If you follow me on my blog, you already know that I’m a sucker for all things counting down to the big Holiday, so this is one of several advent calendars that I have around my house.  
 
 
All you’ll need for this project is:
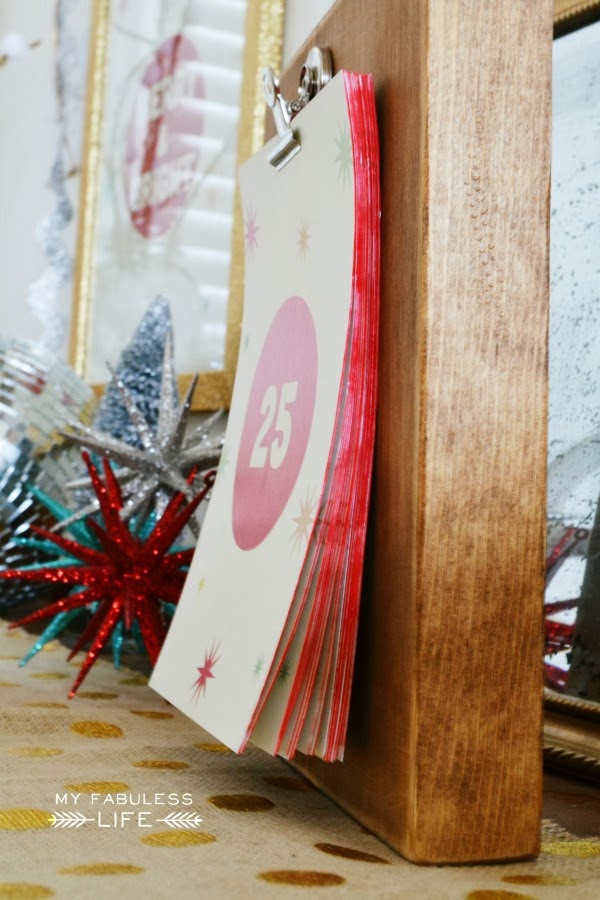
* a block of wood (mine is 8×10, purchased from a local woodcraft store, but you can easily use whatever scraps you have lying around, or even a picture frame).
*a metal clip or clothespin
*the printables I’ve provided for you at the end of the post
 
I sanded and rounded out the edges of my wood block, and then stained it with my favorite stain (Early American from Minwax).  Once the stain was dry, I sanded the edges again to give them a more aged look,
then I hot glued the clip on in the center of the wood. 
 
 
To give the cards a little something extra, I colored the edges with a red marker. 
 
 
This would be a really fun project with a picture frame too.  Just put some pretty paper inside the frame, and glue the clip to the glass on the frame.  
 
 
{DOWNLOAD FILES HERE}
 

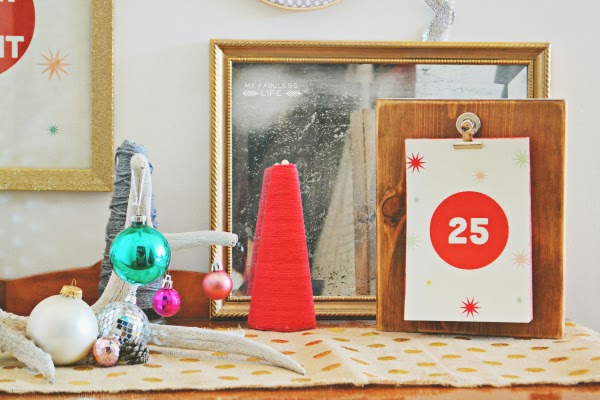
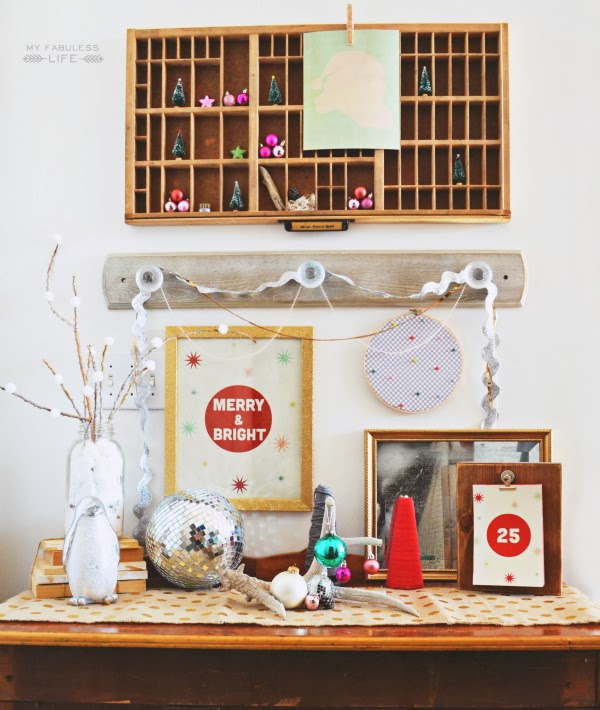
Enjoy!  And happy Holiday decorating!  You can get details on my full Christmas display (including details on the coordinating "Merry & Bright" print) over at My Fabuless Life.


Or you might enjoy a few of these other Christmas projects:

Gold & White Nativity / Holiday Table Decorating Tips / $20 Handmade Tree 


From Napkin Rings to Beautiful Wreaths, Five Festive Ornament Frame Ideas

11 · Nov 24, 2013 · 11 Comments

This post brought to you by Michaels Craft Stores // I have always been a fan of the Ornament Frame, they are just perfect for creating all kinds of goodies for the holidays. I've given them as personalized gifts for years. This year, Michaels challenged me to come up with FIVE different "out of the frame" ideas for crafting with ornament frames.

Merry Christmas Banner

We will start with my Merry Christmas banner. This one was last minute inspiration, but turned out to be one of my favorite projects. I used my Silhouette Portrait to cut letters out of gold vinyl and then affixed it to the face of the frame. Then, this is the good part… I found these super cute gift bags at Michaels that I just fell in love with. I thought they would be a great background for the letter frames to make a fun banner. SUPER cool and SUPER easy to make. You don't have to cut any paper just use the bag as is as your banner background! 

Michael's Mini Frames #justaddmichaels-6

This year's hot trend is using both silver and gold together so, I thought the silver frames would look fantastic with the gold accents.

Michael's Mini Frames #justaddmichaels-4

The banner looks perfect in my new GIANT shadow box…

Michael's Mini Frames #justaddmichaels-5

Personalized Napkin Rings

Chalkboard Napkin Rings-5 #justaddmichaels

This idea was super simple and will add a little flair to your holiday table. Just use a little chalkboard paint on the face of the frame to make a chalkboard surface. Glue the frame onto a basic napkin ring and you're set.

Michael's Mini Frame napkin rings #justaddmichaels

Use a chalkboard maker to personalize your stylish napkin rings. You can even use a 3D Glue Dot to temporarily affix your frame to the napkin ring. At the end of the night, add the ribbon back and send the ornament home with your guests as a party favor.

Decorative Wall Art

Michael's Mini Frames #justaddmichaels-7

This piece was so fun to make. I again employed my Silhouette Portrait to help with this project. I cut several holiday images out of their gold vinyl and affixed it to the face of the frames. Then I glued the frames to an inexpensive silver charger that I found at Michaels. I LOVE how this turned out!!

Michael's Mini Frames #justaddmichaels-8

Accent Element

Michael's Mini Frames #justaddmichaels-2

This one is SIMPLE… I used one of the ornament frames to add a little accent element to a sign that I had created. Again, I used my Silhouette to cut the 2013 out of gold vinyl and affixed it to the frame. It was a great addition to my shadow box display…

Michael's Mini Frames #justaddmichaels-1

Personalized Gift Tag

Michael's Mini Frames #justaddmichaels-10

Last, but not least… I created a decorative gift tag that can be used over and over and over. I used one of those cute tiny gift bags that I had left over from the banner, cut it to size and then placed that inside the frame. You can then use dry erase or chalkboard makers to write the name on the tag and voilá, you have a stunning gift tag that anyone will love!

Well… there you have it. 5 different ways to create with a simple ornament frame. Did that get your imagination running? What would you make? Take a little time to "think outside the frame" and create something fun with some ornament frames!

Disclaimer // This post was sponsored by Michaels Craft Stores. I receive product from Michaels in order to create the projects in the post. 

Grinch Oreo Pops

2 · Nov 21, 2013 · 5 Comments

Hello Whipperberry readers!  Jenn here from Clean and Scentsible. I am SO excited to be back here today with these fun Grinch Oreo Pops….

Grinch Oreo Pops.  So fun!

Although I love celebrating all of the holidays, the Christmas season is by far my favorite.  December is always filled with so many activities with family and friends and I love repeating all of our Christmas traditions.  The kids and I look forward to all of the Christmas specials that come on television and The Grinch Who Stole Christmas is always on the top of our list.  This past weekend, we had an early Grinch party with some of the neighborhood kids to start off the Christmas season and these Grinch pops were the hit of the party!

Grinch Oreo Pops.

Ingredients

  • Oreo cookies
  • wooden skewer sticks {or thin sucker sticks}
  • green candy melts {I used about half a package for 8 pops}
  • banana marshmallows
  • black edible ink pen
  • large red sprinkle for the nose
  • strawberry marshmallows
  • mini marshmallows
  • toothpick
  • white mini cupcake liners

Directions

  • Melt chocolate melts in the microwave according to package directions.  Be careful not to overheat.
  • Cut banana marshmallows into small almond shapes for the eyes and use the edible ink pen to draw in an eyeball.  
  • Insert skewer into the center of the Oreo.
  • Spread chocolate around all sides of the cookie.  
  • Add eyes and the sprinkle for the nose.
  • Place on parchment paper and allow chocolate to harden.
  • Spread out cupcake liners, turn it upside down, ad pierce skewer through the center.

NOTE: My original plan was to draw on a mouth with the edible marker, however, it did not draw well over the chocolate and I just decided to skip it.  If you would like to do a mouth, you could try using a toothpick to carve it out of the chocolate before it hardens.

Grinch Oreo Pops

Even if you are not having a party, these pops would be great for a family Grinch night or fun class treat!  And of course, you can't have Oreos without milk! 🙂

If you are looking for more Grinch party ideas, head on over to Clean and Scentsible to see the rest of the party.

Grinch Party.

 Feel free to check out some of my other Christmas projects while you are there or connect with me here: FACEBOOK / PINTEREST / INSTAGRAM / TWITTER 

Fun Christmas projects!

Elf on the Shelf Breakfast / Twinkling Christmas Canvas / Chocolate Oreo Cheesecake Balls

"Maybe Christmas", he thought, "Doesn't come from a store.  Maybe Christmas, perhaps, means a little bit more."

Happy Holidays!

Sparkly Ornament Advent Calendar

3 · Nov 7, 2013 · 8 Comments

Well ho ho ho hello there!  I'm so happy to be back here again this month!  I'm stepping away from my usual food posts, and instead I've got a little Christmas project to share with you.  I know, Christmas feels very far away, but it's not really, especially if you want to make your own advent calendar which needs to be ready for December 1!

Every year we have advent calendars for the kids and they love the countdown to the big day (secrets be told, I do too)!  I've always just bought those candy or picture advent calendars, but this year I wanted to do something a little different and make my own.  I was inspired by this advent calendar that I saw on Bower Power blog a couple of years ago, so when I received a box of ornaments in the mail recently, I knew they would make an amazing advent calendar.

Ornament-Advent-Calendar-{A-Pretty-Life}7-_edited-1

The idea with this advent calendar is that there is a unique ornament for each day leading up to Christmas that the kids can hang on our tree.

Ornament Advent Calendar {A Pretty Life}

Here's How To:

Materials:

  • A picture frame
  • A piece of cork board to fit the frame
  • Paper or fabric to cover the cork board
  • 25 paper key tags (you can find these in any office supply store)
  • 25 silver push pins
  • 25 ornaments
  • number stamps & silver stamping ink
  • Large ribbon for hanging the frame.

Ornament Advent Calendar {A Pretty Life}

Instructions:

  • First choose a frame for your calendar, then string through a 2 1/2 foot long ribbon for hanging.
  • Then cut a piece of cork board to fit the frame, and wrap it in paper or fabric.  I liked this sparkly wrapping paper, as it was very forgiving when I needed to move around the push pins…it hid tiny holes well.
  • Place the covered cork board firmly into the frame.
  • Chose 25 different ornaments to hang in the frame.
  • To mark each day, you can use paper key tags, and stamp them with the number of the day.
  • Now it's time to hang the ornaments!  First lay out the ornaments approximately where you would like to hang them.
  • Use a push pin to first hang the date tag, then the ornament.

That's it!  SO simple!

Ornament-Advent-Calendar-{A-Pretty-Life}2-_edited-1

Here's what mine looks like all done!  Sparkly, fun & festive!

Ornament Advent Calendar {A Pretty Life}

The fun part of making your own advent calendar is you can tailor it to your own Christmas decor.  Have fun with colours, textures and different kinds of ornaments!

Here are some ideas for your calendar:

  • Use a picture frame that you can hang on your wall each season.
  • Or put heavy duty magnets on the back of the frame so that you can hang it on your fridge.
  • Keep the background on the frame neutral so you can change the ornaments every year.  I just used silver sparkly wrapping paper.

Instead of tree ornaments you can hang:

  • Little envelopes with Christmas messages.
  • Or put a little note in an envelope that has a seasonal activity to do for that day:  things like skating, make hot chocolate, go for a walk, bake cookies…
  • You can hang little bags filled with candy.
  • Fill envelopes or little boxes with tiny treasures like money, earrings, erasers…fun little dollar store items.

Ornament Advent Calendar {A Pretty Life}

I hope I inspired you to make an advent calendar of your own!

Thank you so much for reading today!  Have a wonderful day! Signature

Feel free to stop on by anytime!  I'd love to have you!

Facebook  |  Pinterest  |  Twitter  |  Instagram

Printable Thanksgiving Bread Wraps + 12 More Thanksgiving Printables

10 · Nov 6, 2013 · 9 Comments

Free Printable Thanksgiving Bread Wraps  //  Well hello November! Can you believe we are already here… It’s time for Thanksgiving! It’s also time for this months Printable Club. We have 12 fabulous Thanksgiving printables for you…

Thanksgiving Grid-sm

Aren’t they all so fun?!  I created a “Today I am grateful for You!” bread wrap. This time of year we are all busting out our baking pans and making all kinds of lovely quick breads like pumpkin bread and banana bread and sharing them with friends and neighbors. I thought it would be fun to create a nice wrap for those scrumptious gifts that we all love to share. Even if you aren’t much of a baker, you can find some tasty breads at your local market and repackage them with this wrap and look like a rock star!

printable canvas bread wrap from WhipperBerry

All you have to do is download the file from the Box.com box below and then print out as many sheets as you want. Cut them how ever you like and wrap your bread with them. I actually wrapped my bread in some parchment paper first and then the bread wrap because the wrap didn’t make it all the way around the bread. With the parchment you have something to affix the wrap to and it looks great.

whipperberry printable bread wrap

You can even go a step further if you like… I printed mine on printable canvas from Silhouette. This stuff is super cool and you don’t need to have a Silhouette machine to use it. It goes right through your printer and then is self-adhesive as well. Perfect for this kind of stuff. Then your friends will REALLY think you are a rock star because who knows how to print on fabric? Um, YOU DO!  Here’s the file for you to download…

But wait, there’s more… Wow, I’m starting to sound like an infomercial. I have 11 more super talented friends who are sharing their Thanksgiving printables with all of us as well! Click on their links below to see all of their amazing creations!

Thanksgiving Banner-sm

1 // The Dating Divas – Give your hubby this cute, personalized candy bar wrapper to show your gratitude for him!
2 // Somewhat Simple – Count Your Blessings Tree | Includes everything you need to create a beautiful display of all the things you’re grateful for.
3 // Whipperberry – Printable bread wrapper to show your friends and family how grateful you are for them.
4 // Crafting Chicks – Thanksgiving planning pages to create the best, most organized and most purposeful Thanksgiving yet!
5 // Tatertots & Jello – Thanksgiving centerpiece idea and activity.
6 // L’il Luna – Free Thanksgiving Coloring Pages perfect for the kids while the adults are busy cooking!
7 // My Sister’s Suitcase – Keep the kids busy coloring this Printable Thanksgiving Placemat – full of games, jokes, and puzzles!
8 // I Heart Nap Time – Give Thanksgiving leftovers the respect they deserve with these easy to use ‘leftovers’ printables!
9 // The 36th Avenue – Timeless “Bee” Thankful Printable and Thankful Tags. Available in two colors.
10 // Paging Supermom – “Thankful for Everything” chocolate wrapper coordinates with a collection of FREE Thanksgiving dinner decor!
11 // The TomKat Studio – Give thanks with these stylish notecards and gift tags!
12 // The Idea Room – Printable Happy Thanksgiving Gift Tags for Thanksgiving or Hostess Gifts.

  • « Go to Previous Page
  • Page 1
  • Interim pages omitted …
  • Page 22
  • Page 23
  • Page 24
  • Page 25
  • Page 26
  • Interim pages omitted …
  • Page 37
  • Go to Next Page »

Primary Sidebar

Heather from Whipperberry
Hello... my name is Heather and I'm the creator of WhipperBerry a creative lifestyle blog packed full of great recipes and creative ideas for your home and family. I find I am happiest when I'm living a creative life and I love to share what I've been up to along the way... Come explore, my hope is that you'll leave inspired!

Footer

  • Privacy Policy
  • Crafts
  • Food
  • Gifts
  • Holidays
  • Home
  • Mom Life
  • Recipes
  • Travel

Copyright © 2026 · Seasoned Pro