• Skip to primary navigation
  • Skip to main content
  • Skip to primary sidebar
  • Skip to footer

Whipperberry

WhipperBerry • Your Home For Creative Inspiration

  • Home
  • About
    • Terms
  • Recipes
    • ZipList
    • Starters
    • Easy Weeknight Dinners
    • Main Dish
    • Salads
    • Side Dish
    • Soups & Stews
    • Desserts
    • Breakfast
    • Miscellaneous
  • Tutorials
    • Creative Crafts
    • DYI Decor
    • Fabric Crafts
    • Food How-To
    • Jewlery
    • Paint Projects
    • Paper Art
    • Party Styling
    • Photography and Graphic Design
    • Silhouette
  • Holidays
    • St. Patrick’s Day
    • Easter
    • Mother’s Day
    • Father’s Day
    • 4th of July
    • Halloween
    • Thanksgiving
    • Christmas
    • New Years
    • Valentine’s Day
  • Gift Ideas
    • Gifts For Everyone
    • Gifts for Dad
    • Mother’s day
    • For The Girls
    • For The Kids
    • Teacher Gift Ideas
    • Christmas
  • Printables
    • Holiday
    • Gift Idea
    • LDS Primary
  • Travel
  • Contact
  • Nav Social Menu

    • Facebook
    • Instagram
    • Pinterest
    • RSS
    • Twitter

#torisyle

DIY Statement Ring with Styled by Tori

0 · Nov 7, 2012 · 4 Comments

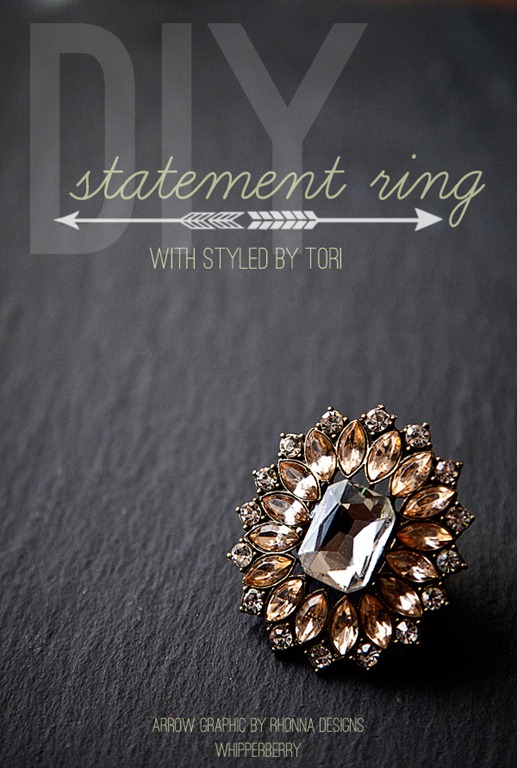
From the minute I was introduced to the Styled by Tori collection of DIY jewelry, I thought some of the necklace pendants would make fabulous statement rings…

DIY Statement Ring with Styled by Tori #toristyle copy

arrow design element // rhonna designs

I mean, check that out!  Wouldn’t it look fabulous on your hand? I gathered up some simple supplies and set to work on the easiest jewelry project EVER!

supplies needed for DIY statement ring

Supplies

  • adjustable ring base
  • Styled by Tori pendant
  • E-6000 glue

Instructions

This couldn’t be easier… I took my scissors and roughed up the ring base a little bit so that the glue had something to hold on to. Then I placed a dollop of E-6000 on the ring base. Not too much, a little less than a pea size drop. Place the pendant on the ring base and then set the ring pendant side down in a safe place.

how to make your own statement ring with styled by tori #toristyle

Now’s the hard part, you have to sit and wait.  Let the ring sit over night so that the glue can cure and create a strong bond.  That way you won’t ever have to worry about the sparkle popping off, ever! Once the glue is cured, all you have to do is slide that fabulous ring on your hand and head on out and strut your stuff! Here’s lil’Whip a.k.a. my daughter Hales showing off this fun ring…

beautiful statement ring with styled by tori #toristyle

Isn’t is pretty? I actually bought a fun statement ring from a major retailer not too long ago and paid almost three times the price than what I paid to DIY this little beauty myself.  Here you check out the difference…

6ce6532c59f511e18bb812313804a181_7  styled by tori ring

The picture on the left is the Instagram that I took right after I bought my fancy ring and paid the fancy price for it.  On the right is the ring that I DIY’d with Style by Tori. I have developed quite a crush on the ring and it’s lower price tag!

Wouldn’t it be fun to make a whole bunch of these to give out to your favorite girl friends for the Holiday’s this year? You’ll look like a DIY rock star… well, that maybe a bit of an overstatement.  But, I’m sure all your friends will love them!

You can find the entire collection of Styled by Tori at your local Michaels and a large selection is also available at your Joann Craft Center.  I noticed that they are on sale over at JoAnns this week, a great time to stock up for the holidays!

Heather copy

Discloser Statement

Jeweled Mini Christmas Wreath with Styled by Tori

1 · Nov 6, 2012 · 7 Comments

It’s beginning to look a lot like Christmas… well not really. But it’s GO TIME for holiday crafting. I love this time of year, it’s a time to pull the magic back into our lives for a few months and I just love it.  I love that with holiday decorating you can transform your home into a wonderland for just a little bit and show off your fun style for that season.  This year I am loving the possibilities with the Styled by Tori line of custom jewelry and craft elements. I decided to make a Styled by Tori jeweled wreath out of some of the fun necklace pendants in the line along with a necklace bottom to be the foundation for the wreath…

wb 018 copy

This is a cute mini wreath that you can use as a tree ornament or add it as a fun embellishment to your décor. It would make a fabulous gift for your friends or family and it’s super simple to make… I just love how they turned out! Here is what you will need.

styled by tori elements

Supplies for the Mini Jeweled Wreath

  • Heavy gauge aluminum floral wire
  • Light 22 gauge aluminum floral wire
  • Styled by Tori Glitz Necklace Bottom
  • 3-8 Styled by Tori necklace pendants
  • 1 Styled by Tori Chain Connector
  • Needle nose pliers with wire cutting capability
  • E-6000 Glue (optional)

Instructions

To begin, you will need to cut a piece of the heavy gauge floral wire roughly about 12 inches. Then feed it through the necklace bottom and connect the two sides together with the chain connector.

how to make a wreath from a necklace #toristyle

Feed the tails of the wire back through the necklace bottom and trim off any excess.

wb 014

Work it into a nice circle shape.  Next using the light gauge floral wire, begin to attach the necklace pendants onto the wreath form. I chose to use wire rather than glue, because I didn’t want to worry about one of the pendants popping off.  I felt like wire would make a more stable wreath.

wiring the styled by tori elements onto the wreath

For added stability you can add a little E-6000 if you would like.  I wired mine pretty well so I didn’t feel the need to add the glue.

At this point you are the designer.  You can fill the entire wreath with pendants like this…

wb 022

Or you can use just a few to accent the necklace bottom wreath like this…

elegant wreath ornament from styled by tori elements

Either way, it makes a lovely little accent piece for your holiday décor.  You could even add a ribbon and use it to decorate some gifts if you like.  Wouldn’t that make for a stunning gift box? What do you think? How would you use your jeweled mini wreath?

Heather copy

Discloser Statement

Styled by Tori Inspiration

0 · Oct 30, 2012 · Leave a Comment

With the crafting season in full swing everyone is looking for great new ideas to share with family and friends.  I’ve talked about them before but I have fallen in love with the Styled by Tori line of fashion accessories.  I have all kinds of ideas up my sleeve right now for the holidays, but I thought I would share some of my favorite ideas that I’ve found so far…

spiderweb pillow title

With Halloween so close I thought I would place this one first, you can file it away for next year.  Amy from Positively Splendid used a lovely piece from the Styled by Tori collection to create this fun spider web pillow.

no sew felt poppies vintage lace brooches

Amy also created these felt poppies and lace brooches that I just ADORE!!

DSC_0280-550x365

Heidi from Sew.Craft.Create created this whole nautical set with Styled by Tori and it’s just divine!

bracelettorigtxt

I love this bracelet from Christina at Intimate Weddings… Truly a classic piece.

broochestori

Christina also made these stylish Styled by Tori napkin rings that would be PERFECT for your Thanksgiving tables.

diy cluster brooch  diy bracelet

I’ve always admired Megan from Brassy Apple’s style and she takes it to a new level with her Styled by Tori creations.  Her cluster brooch and cuff bracelets would dress any ensemble up!

What have you been working on with all of the fun Styled by Tori products?  I would love to see what you’ve been working on!! Visit the Styled by Tori Facebook page for even more inspiration. Then you can visit your local Michaels or Jo-Anns to stock up on supplies for all that winter crafting!!

Heather copy

Discloser Statement

Jewelry Organizer with Styled by Tori

1 · Oct 24, 2012 · 1 Comment

I’m one of those girls who just can’t leave well enough alone when something could us a little dressing up.  That’s why I am soooo in love with the entire line of Styled by Tori products!! They make it so easy to dress-up yourself or dress-up a fun project that you are working on.

Crafting with Styled by Tori

I decided that I needed to “dress-up” a fun jewelry organizer for all of my Styled by Tori goodies. I picked a couple of pieces that I thought would look great with a plain jane hanger that I found at Pick your Plum.

Styled by Tori Crafting

I grabbed my trusty E-6000 and glued the two pieces together.  I let them cure overnight just to make sure the bond was secure. Then I used the E-6000 to glue the newly created cluster directly to the plain jane hanger…

Styled by Tori Jewelry Organzier

How simple is that.  Now I have the perfect place to display my Styled by Tori creations that I use to “dress-up” ME!!

styled  by Tori Jewelry

I simply adore every single collection in the Styled by Tori family.  Each one has it’s own look and feel and are so fun to work with.  You can find the Styled by Tori line at Michaels (by the way, October is jewelry month at Michaels some great deals out there) and Jo-Ann's.

Let me know what you would like to make with some Styled by Tori goodies! Do you like to “dress-up” yourself or “dress-up” fun projects?

Here are a couple of other projects that I’ve used Styled by Tori to add a little icing to the cake…

Styled by Tori Art

wedding bouquet /// necklace /// Halloween décor /// bracelet

DISCLOSER

Heather copy

  • « Go to Previous Page
  • Go to page 1
  • Go to page 2

Primary Sidebar

Heather from Whipperberry
Hello... my name is Heather and I'm the creator of WhipperBerry a creative lifestyle blog packed full of great recipes and creative ideas for your home and family. I find I am happiest when I'm living a creative life and I love to share what I've been up to along the way... Come explore, my hope is that you'll leave inspired!

Footer

  • Privacy Policy

Copyright © 2023 · Seasoned Pro