Picture clearing a quiet corner of your kitchen table here in the US on a Saturday afternoon, no plans, no rush, just a flat box of laser-cut wooden pieces waiting to become a tiny glowing alleyway in Kyoto.
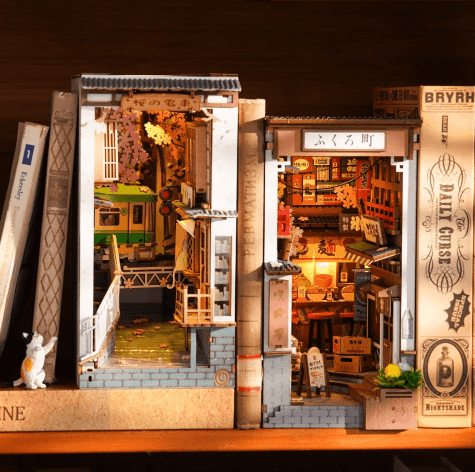
That’s the appeal of a book nook in a single image, a miniature scene that slides between two books on a shelf and lights up at night like a genuine window into another world. If you’ve never built one before, here’s exactly what to expect and how to set yourself up for a genuinely satisfying first build.
Why This Hobby Is Such a Good Fit for Genuine Beginners
It helps to understand why hands-on building projects like this feel so good, not just enjoyable but genuinely restorative. According to a Drexel University study published in the peer-reviewed journal Art Therapy, 75% of participants showed lowered cortisol levels after just 45 minutes of hands-on art-making, regardless of their prior skill level or artistic experience.
That distinction matters enormously for anyone nervous about trying this for the first time. The stress-reducing effect showed up equally across complete beginners and experienced makers alike, which is exactly the kind of low barrier to entry that makes a book nook kit such a forgiving, welcoming first project, even if you’ve never touched a craft knife before.
What a Japanese Book Nook Kit Actually Includes
Before opening the box, it helps to know what you’re actually working with. A typical kit combines a few consistent elements:
- Precision laser-cut wooden pieces, usually cut to a tenth of a millimetre so everything fits together cleanly without sanding or trimming
- Built-in LED lighting, typically USB-powered, that brings the finished scene to life once it’s dark
- Illustrated, step-by-step instructions, designed to be followed without prior model-building experience
- A themed scene, in this case drawing specifically on Japanese aesthetics, torii gates, stone lanterns, narrow Showa-era alleyways, or the quiet hush of a bamboo temple
Together, these pieces mean a beginner isn’t just buying a box of wood, they’re getting everything needed to go from flat pieces to a finished, glowing scene without any extra tools or materials to track down.
Choosing the Right Difficulty Level for Your First Build
This is really the middle of what separates a genuinely enjoyable first attempt from a frustrating one. Kits are typically rated by difficulty, and picking one that matches your actual patience and available time, rather than the most visually striking option, makes a real difference to how the experience feels.
Looking through a japanese book nook kit collection like the one from Wood Miniatures makes this easier to navigate, since each model is rated by difficulty level and estimated build time, generally somewhere between 3 and 8 hours depending on complexity. A beginner genuinely benefits from starting with a lower difficulty rating, even if a more elaborate scene catches the eye first, since a smooth first build builds the confidence to tackle something more ambitious next time.
Setting Up Your Workspace Before You Start
A little preparation goes a long way toward making the actual build enjoyable rather than stressful:
- Clear a flat, well-lit surface with enough room to lay pieces out in order
- Keep a small tray or bowl nearby for tiny components so nothing rolls away or gets lost
- Read through the full instruction booklet once before starting, so the overall sequence makes sense before you dive into step one
- Set aside a realistic block of time rather than rushing, since this is meant to feel relaxing rather than like a race
None of this takes more than a few minutes, but it’s the difference between a calm, focused build and one spent hunting for a piece that rolled under the couch.
Common Beginner Mistakes Worth Avoiding
A few small missteps account for most of the frustration first-time builders run into:
- Rushing the glue-drying stages, which can shift pieces out of alignment before they’ve properly set
- Skipping ahead in the instructions instead of following the intended sequence, which often means going back to redo a step
- Forcing a piece that doesn’t fit smoothly, rather than double-checking it’s the correct piece and orientation first
- Building in poor lighting, which makes it genuinely harder to spot small details and numbering on delicate wooden pieces
Every one of these mistakes is easy to avoid once you know to watch for it, which is really the whole point of a beginner’s guide like this one.
Your First Build, Step by Step
Pulling everything together, here’s what the actual process looks like from start to finish:
- Unpack and check every piece against the numbered diagram before starting, resisting the urge to dive in before confirming nothing is missing.
- Build the base structure and walls first. Most kits are constructed from the outer frame inward, giving the whole scene its shape before any detail work begins.
- Add the interior details, the lanterns, signage, or foliage that give the scene its personality, gluing each piece and giving it real time to set before moving on to the next.
- Install and test the LED wiring according to the diagram. This is usually the most delicate step, so testing the lighting before final assembly makes any issue easy to fix.
- Close up the structure and let everything cure fully before handling it, so nothing shifts out of place while the glue is still setting.
- Slide the finished book nook onto its shelf, positioned between two books, where the LED glow does the rest.
Once everything is assembled, tested, and securely in place, your finished book nook is ready to bring a little miniature magic to your bookshelf.
Conclusion
Building your first Japanese book nook kit is a genuinely accessible way to try a hands-on hobby, one that rewards patience over raw skill and produces something beautiful to actually display afterward.
Given how much a slow, screen-free project like this can offer in terms of genuine relaxation, and how forgiving a well-chosen beginner kit is for someone with zero prior experience, there’s rarely a better way to find out whether this hobby is for you than simply clearing a little table space and starting your first build.
0
Leave a Reply