• Skip to primary navigation
  • Skip to main content
  • Skip to primary sidebar
  • Skip to footer

Whipperberry

WhipperBerry • Your Home For Creative Inspiration

  • Home
  • Recipes
    • Starters
    • Easy Weeknight Dinners
    • Main Dish
    • Salads
    • Side Dish
    • Soups & Stews
    • Desserts
    • Breakfast
    • Miscellaneous
  • Tutorials
    • Creative Crafts
    • DIY Decor
    • Fabric Crafts
    • Food How-To
    • Jewlery
    • Paint Projects
    • Paper Art
    • Party Styling
    • Photography and Graphic Design
    • Silhouette
  • Holidays
    • Easter
    • Mother’s Day
    • Father’s Day
    • 4th of July
    • Halloween
    • Thanksgiving
    • Christmas
    • Valentine’s Day
  • Gift Ideas
    • Gifts For Everyone
    • Gifts for Dad
    • Mother’s day
    • For The Girls
    • For The Kids
    • Teacher Gift Ideas
    • Christmas
  • Printables
    • Holiday
    • Gift Idea
    • LDS Primary
  • Travel
  • About
    • Terms
  • Contact
  • Nav Social Menu

    • Facebook
    • Instagram
    • Pinterest
    • RSS
    • Twitter

Kids

Gnome Garden

4 · May 1, 2017 · 3 Comments

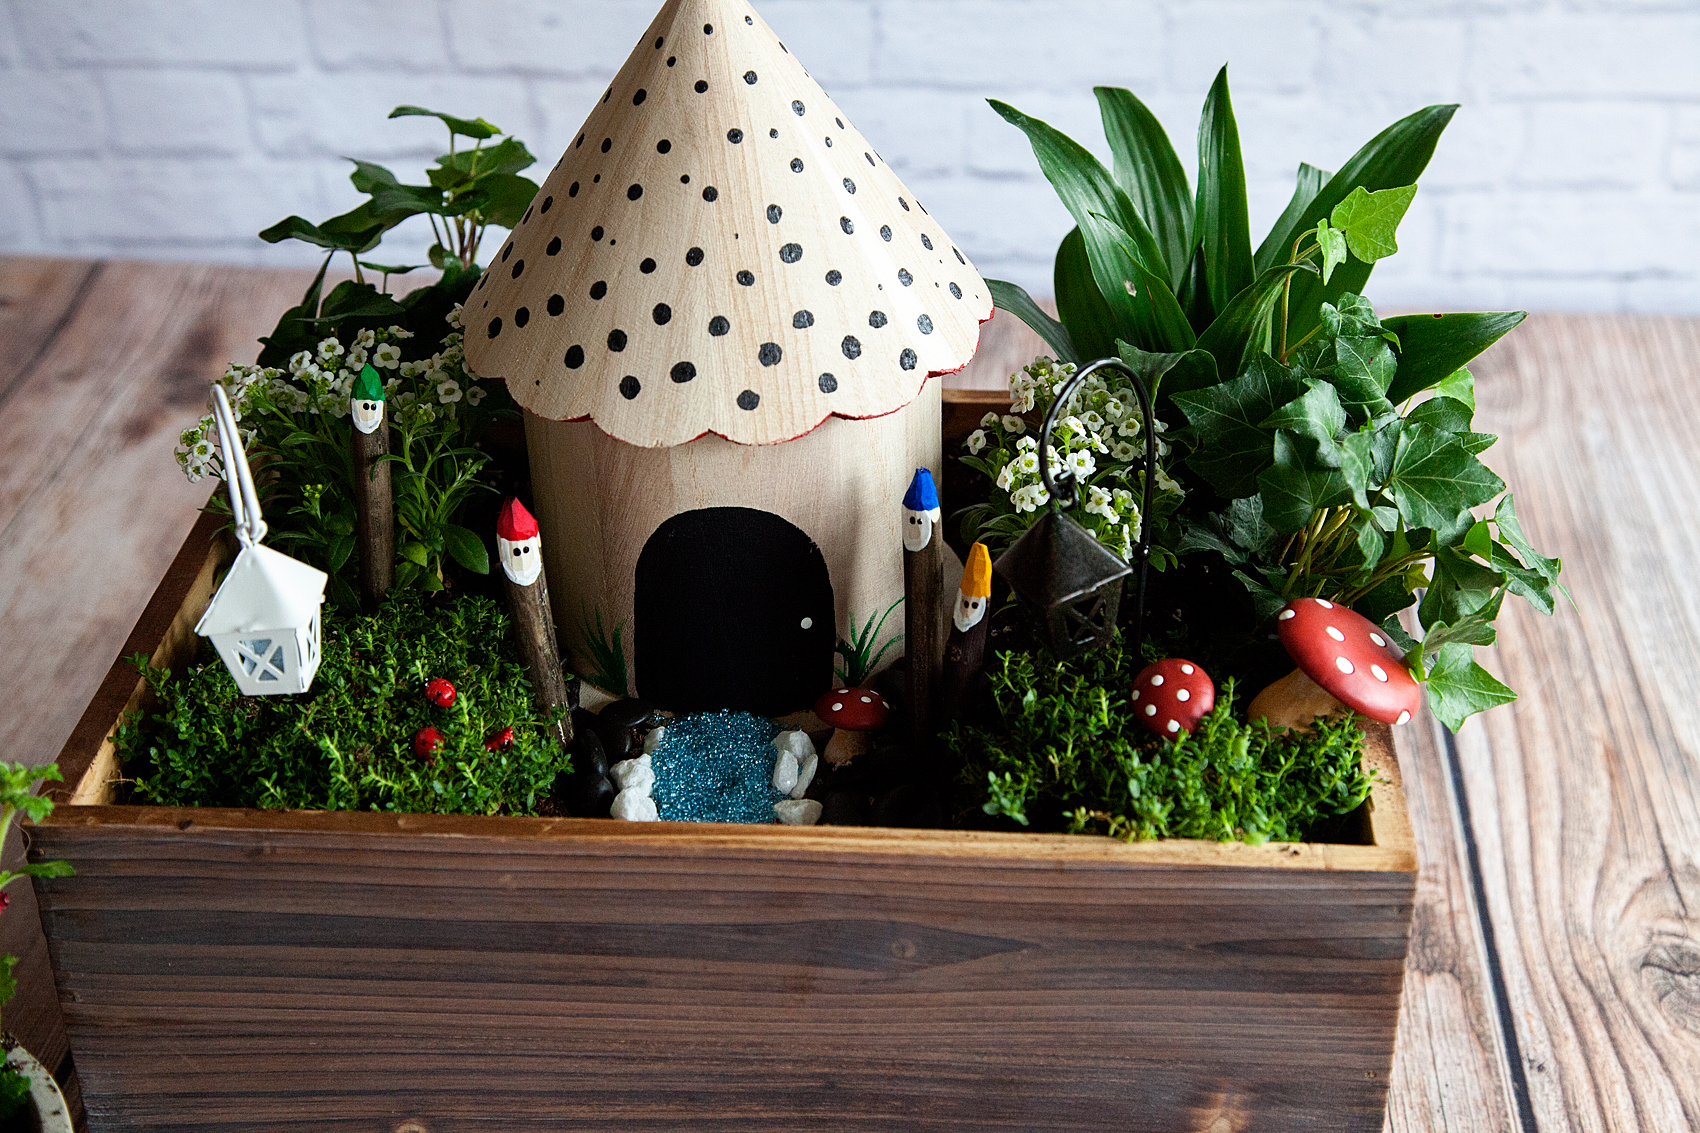
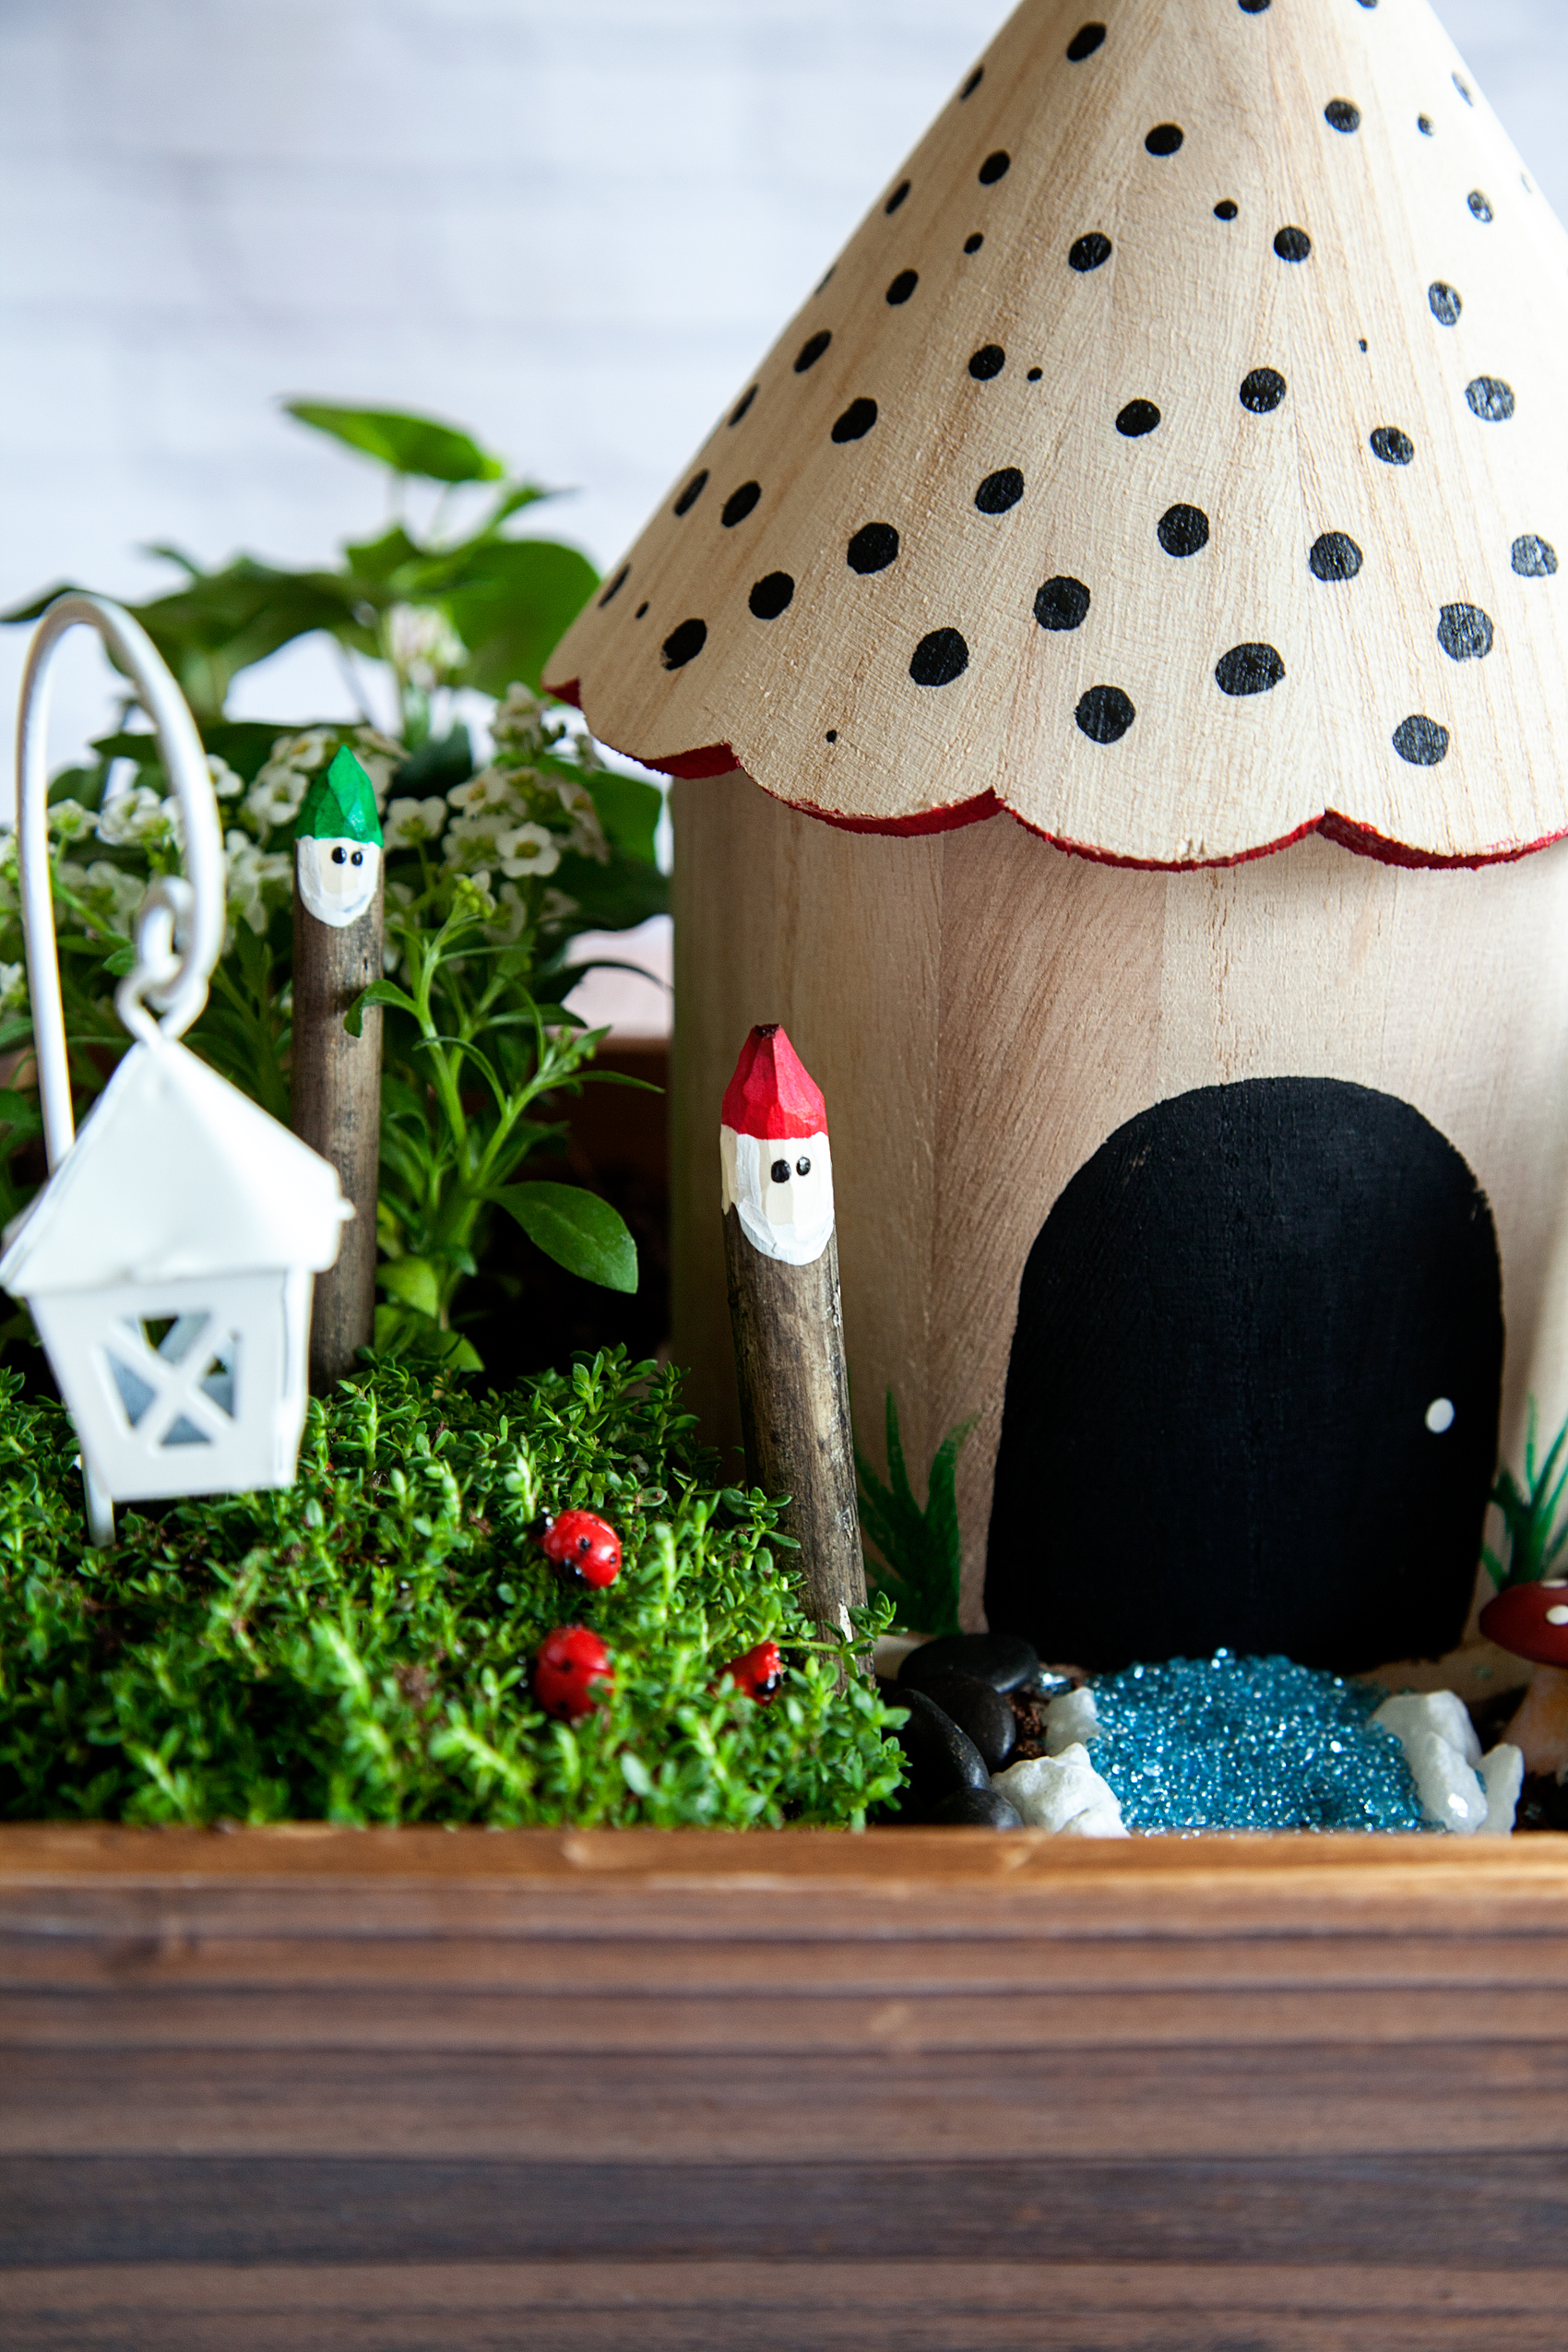
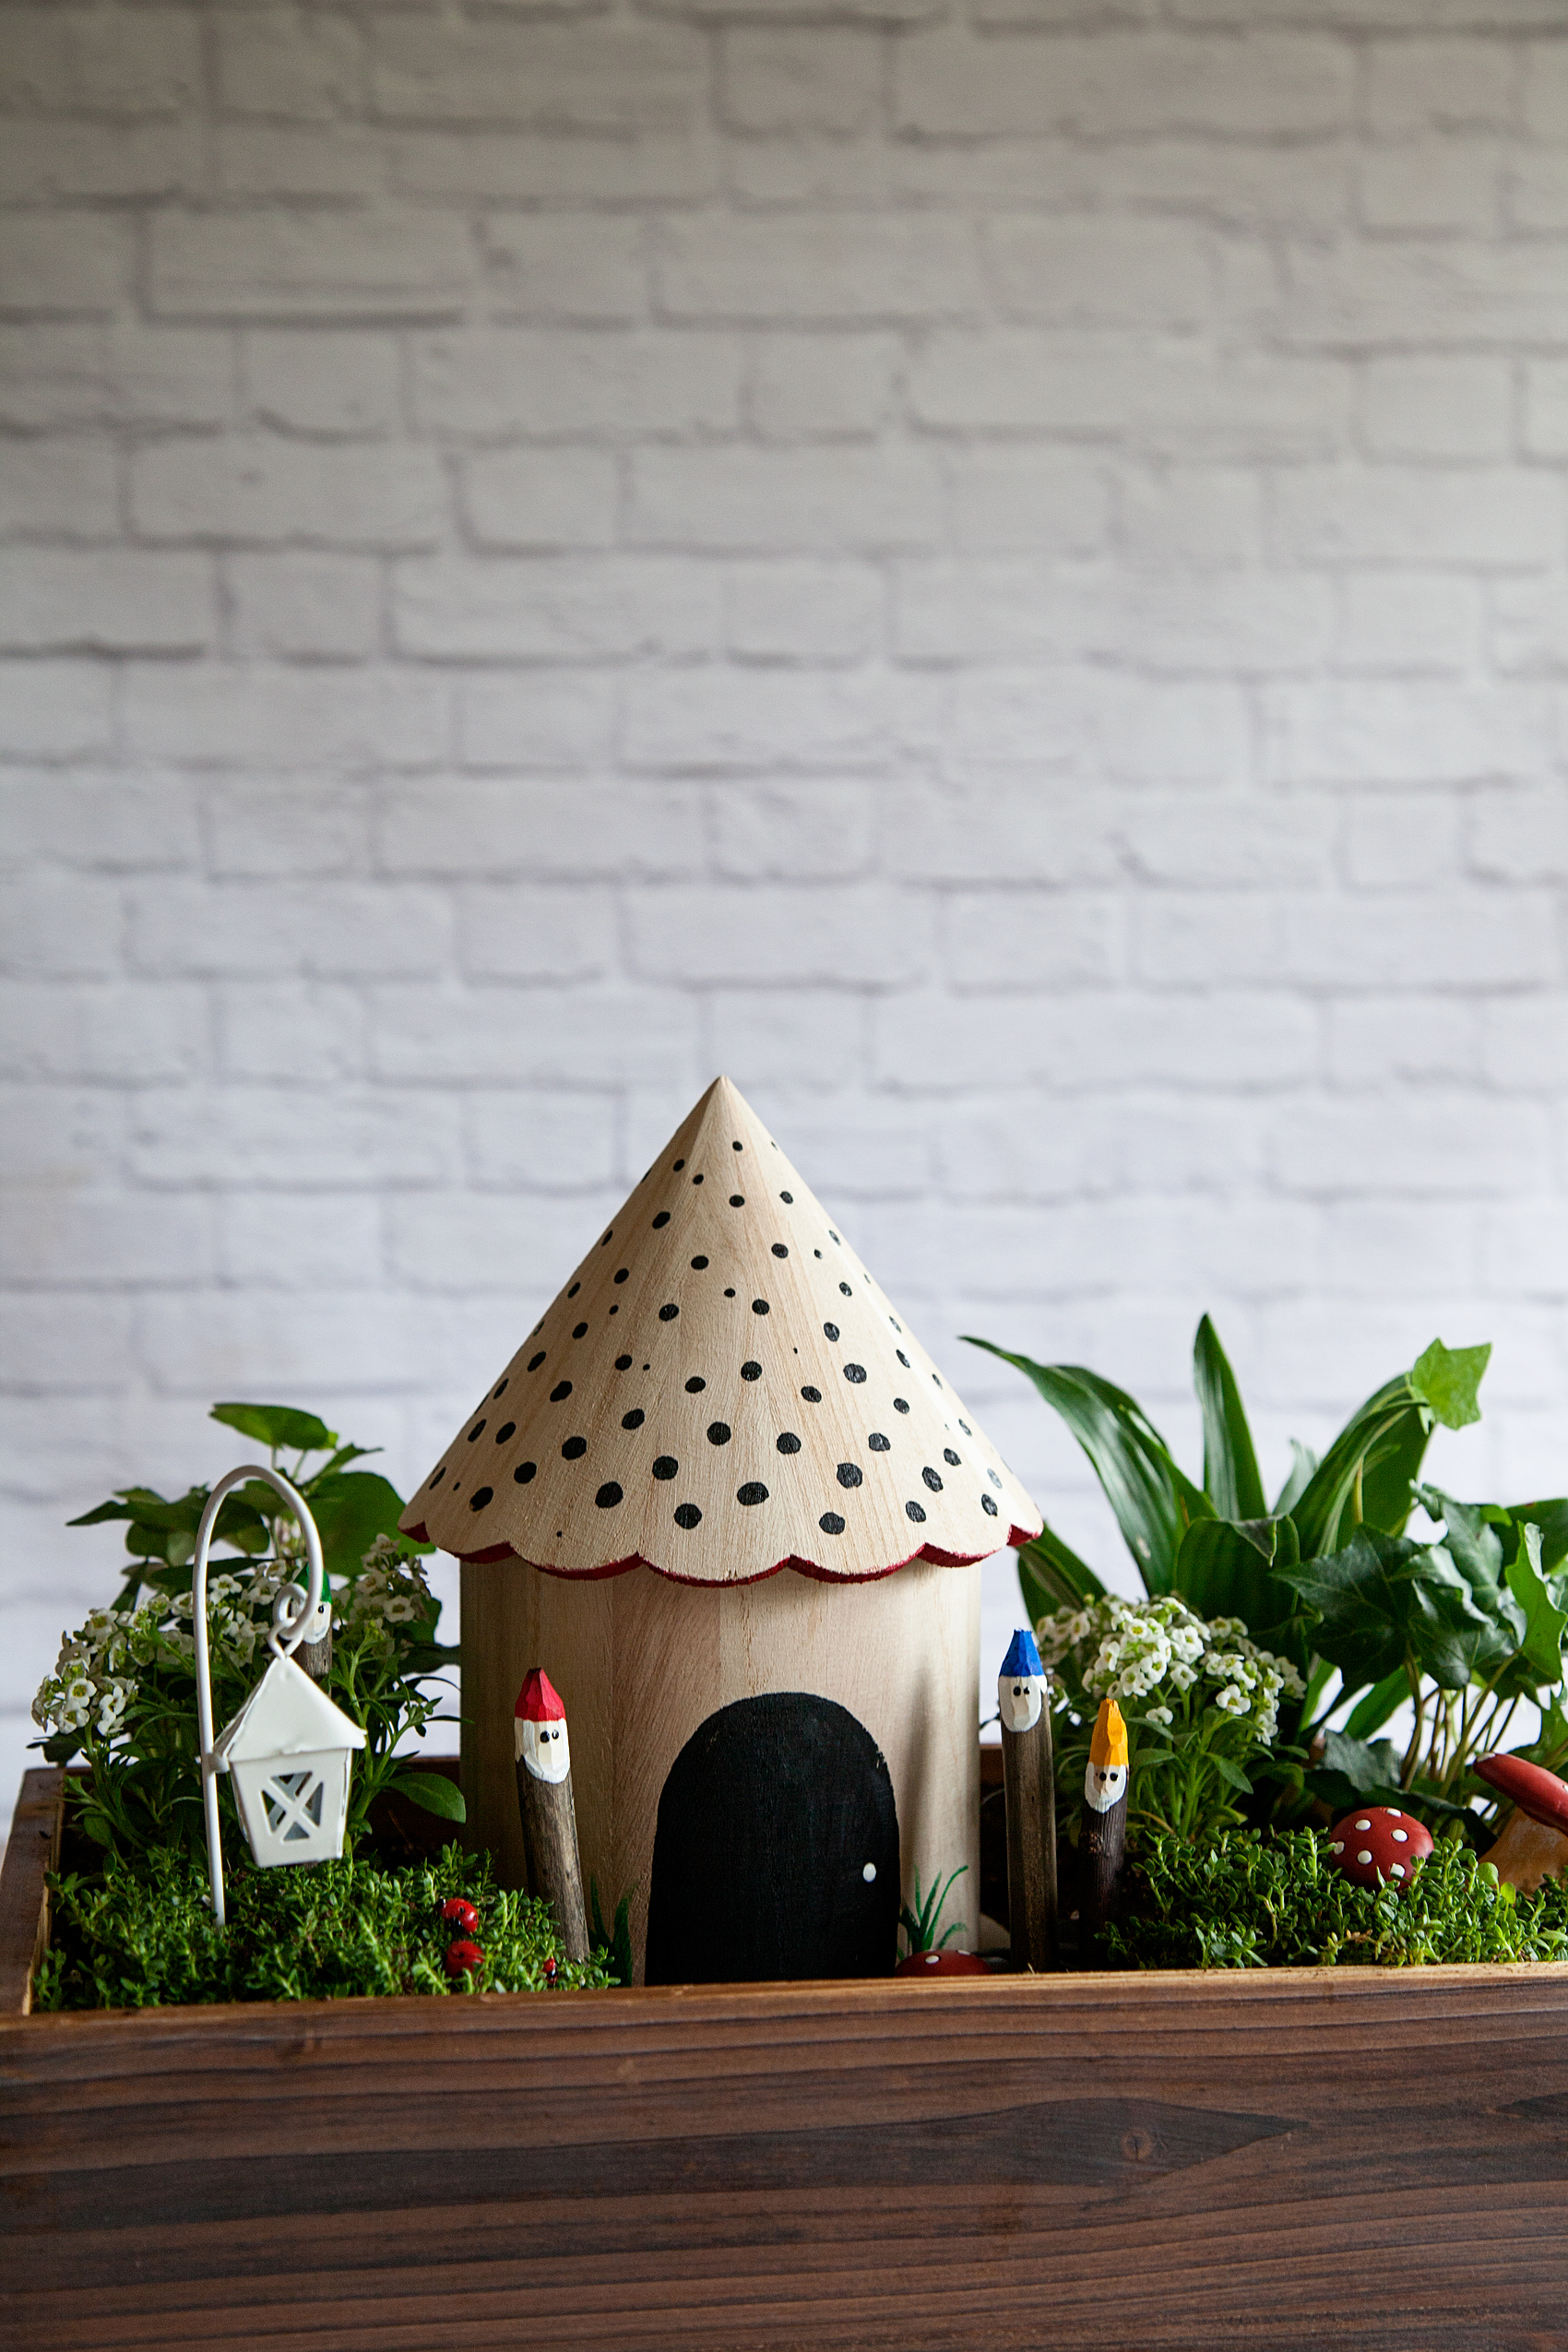
A Gnome Garden is the perfect project for the entire family! With a little imagination, a good container, plants, some sticks from your yard and a little DecoArt Patio Paint,  you can transform a simple garden into a gnome wonderland. Come learn how…Gnome Gardens are a fun trend that the whole family can participate in. Create your own Gnomes with some sticks and @decoart Patio Paint.

This Gnome Garden post brought to you by DecoArt

I have always been fascinated by gardening. Gardening is in my gene pool. I have a sister with a degree in horticulture & landscape design (gardening) and a mother who adores gardening. I SHOULD be an amazing gardener, right?

Well… I’m getting there. To be completely honest, that darn gardening gene is taking awhile to really kick into gear.  Every spring I bring home a new set of, what my husband likes to refer to as, “this years sacrifices!” What?

I’ve tried and tried for a few years to maintain some plants in my home and finally, I feel like I can mange some simple plant care. However, I am no expert. What I love to do is, create with my family and a gnome garden is PERFECT for that.

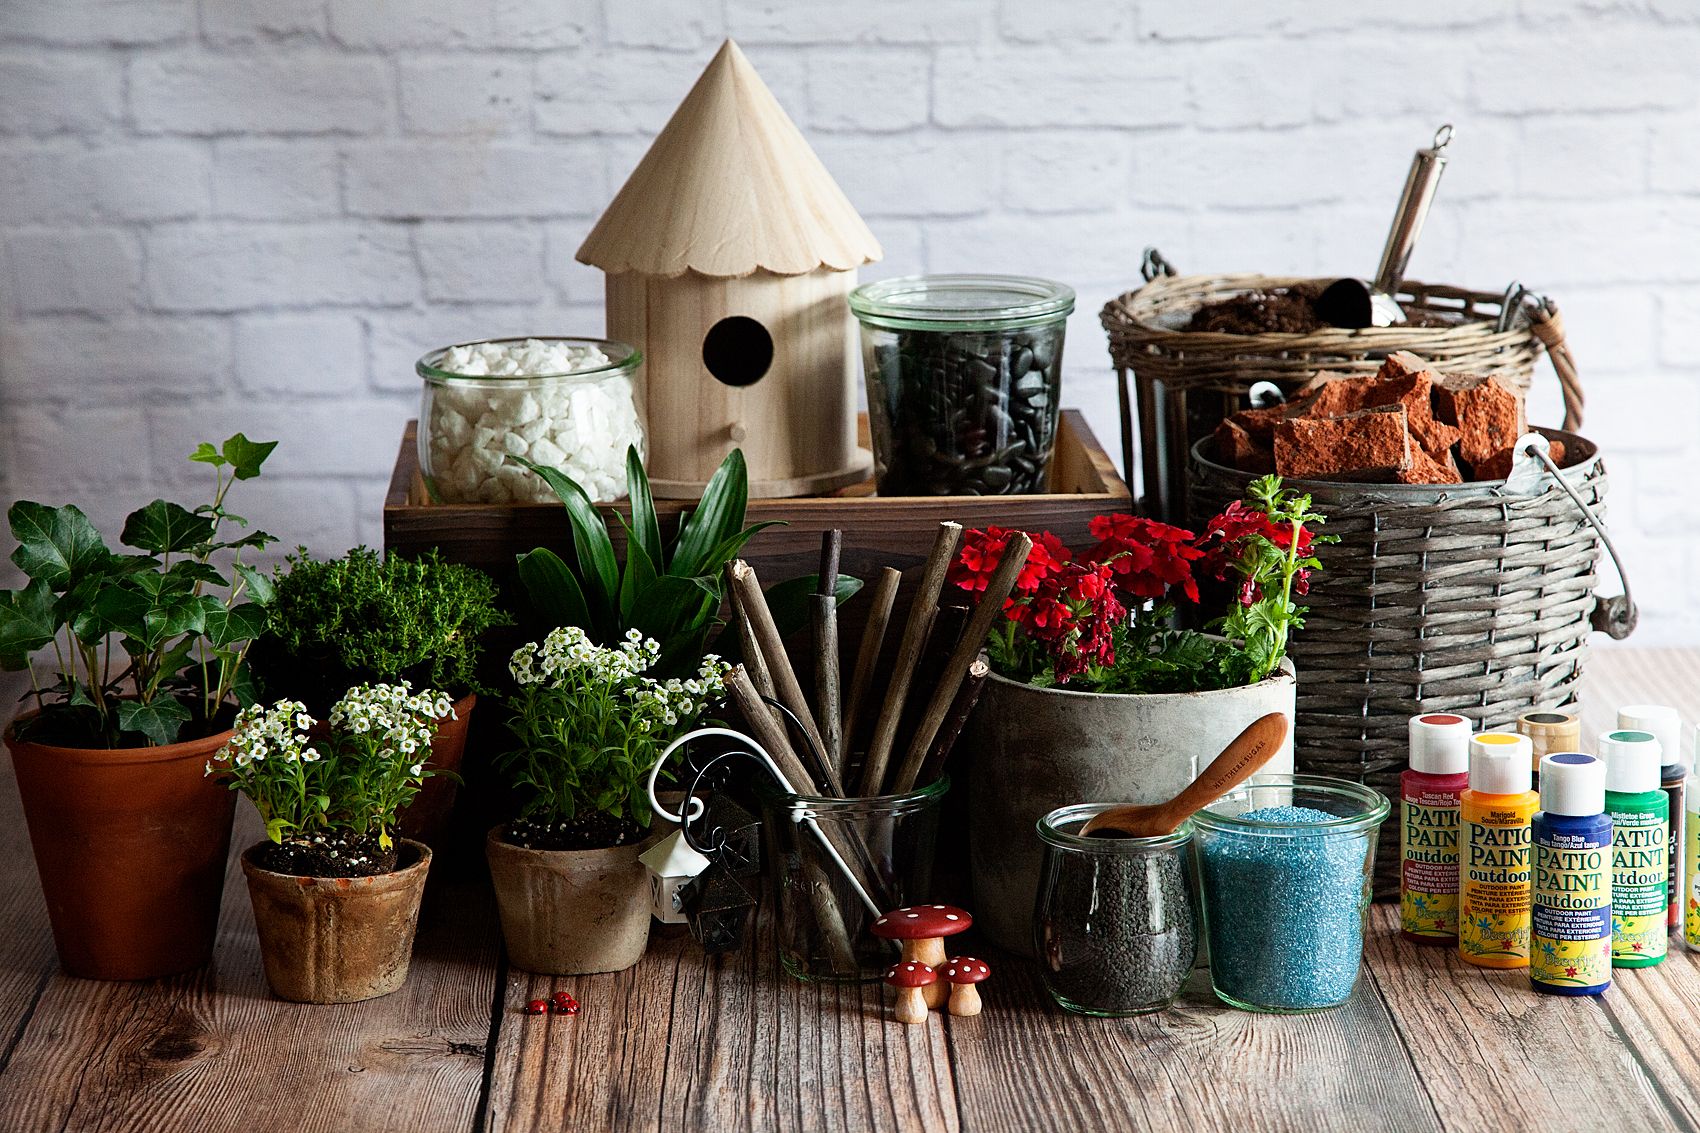
Gnome and Fairy Gardens are becoming all the rage these days. If you walk into Michaels right now, they have a whole section dedicated to these fun gardens with all kinds of gnomes and their accessories. I decided it would be fun to create a gnome garden together with the family using some budget friendly items like sticks from the backyard as our gnomes & a raw wood bird house that I found at Michaels as their cute home. Here’s what you’ll need to make one with your family…

Gnome Gardens are a fun trend that the whole family can participate in. Create your own Gnomes with some sticks and @decoart Patio Paint.

Gnome Garden Supply List

  • Garden container
  • rocks
  • soil
  • 7-8 small plants
  • 4-5 sticks roughly 6 inches tall
  • DecoArt Patio Paint
    • Suggested Colors
    • Tuscan Red
    • Marigold Yellow
    • Tango Blue
    • Mistletoe Green
    • Cloud White
    • Wrought Iron Black
  • Small round tip paint brush
  • Small flat tip paint brush
  • pencil
  • a sharp whittling knife
  • jar of water
  • paper towels
  • small decorative rocks
  • colored decorative sand
  • garden accessories

gnome-garden

Why Patio Paint is Perfect for Gardens

Not all paint is created equal. Some paint is more durable than others and that’s alright, every type of paint has it’s purpose. What you are looking for with this project is a highly durable paint that is non-toxic, water based and adheres nicely to things that will likely be outdoors or will endure repeated watering like this project. The DecoArt Patio Paint is PERFECT for this! Here are the specifics…

  • No sealer required for a durable, long-lasting finish
  • Weather-proof
  • Satin finish
  • Scuff-resistant
  • Superior coverage
  • Will not crack or peel
  • Water-based and non-toxic
  • Easy to clean
  • Made in the USA

How to Create a Gnome Garden

Here’s a quick video to show you how easy it is to create a special gnome garden of your own…

Gnome Garden from Heather Thoming on Vimeo.

Isn’t that easy and fun for the family? Here’s the step by step…

  1. Place rocks at the bottom of your container. This helps with drainage for your plants. Plants love water, but they typically don’t like to sit in it all of the time. You’ll need to make sure they have proper drainage.
  2. Pour in your potting soil. Fill your container about 3/4 full.
  3. Plant your plants in the container with the lower plants in front and the taller toward the back. Keep in mind, you are trying to set a scene. If you are wondering what plants to use and how to maintain them, here’s a good article from the Empress of Dirt.
  4. Paint your birdhouse. Keep it simple or go crazy… This is your design. I wanted to keep our simple. We painted the door on the back of the bird house and added dots to the roof with a nice red peek-a-boo trim around the scalloped edge of the roof. I used the tip of the brush handle to create the dots on the roof.
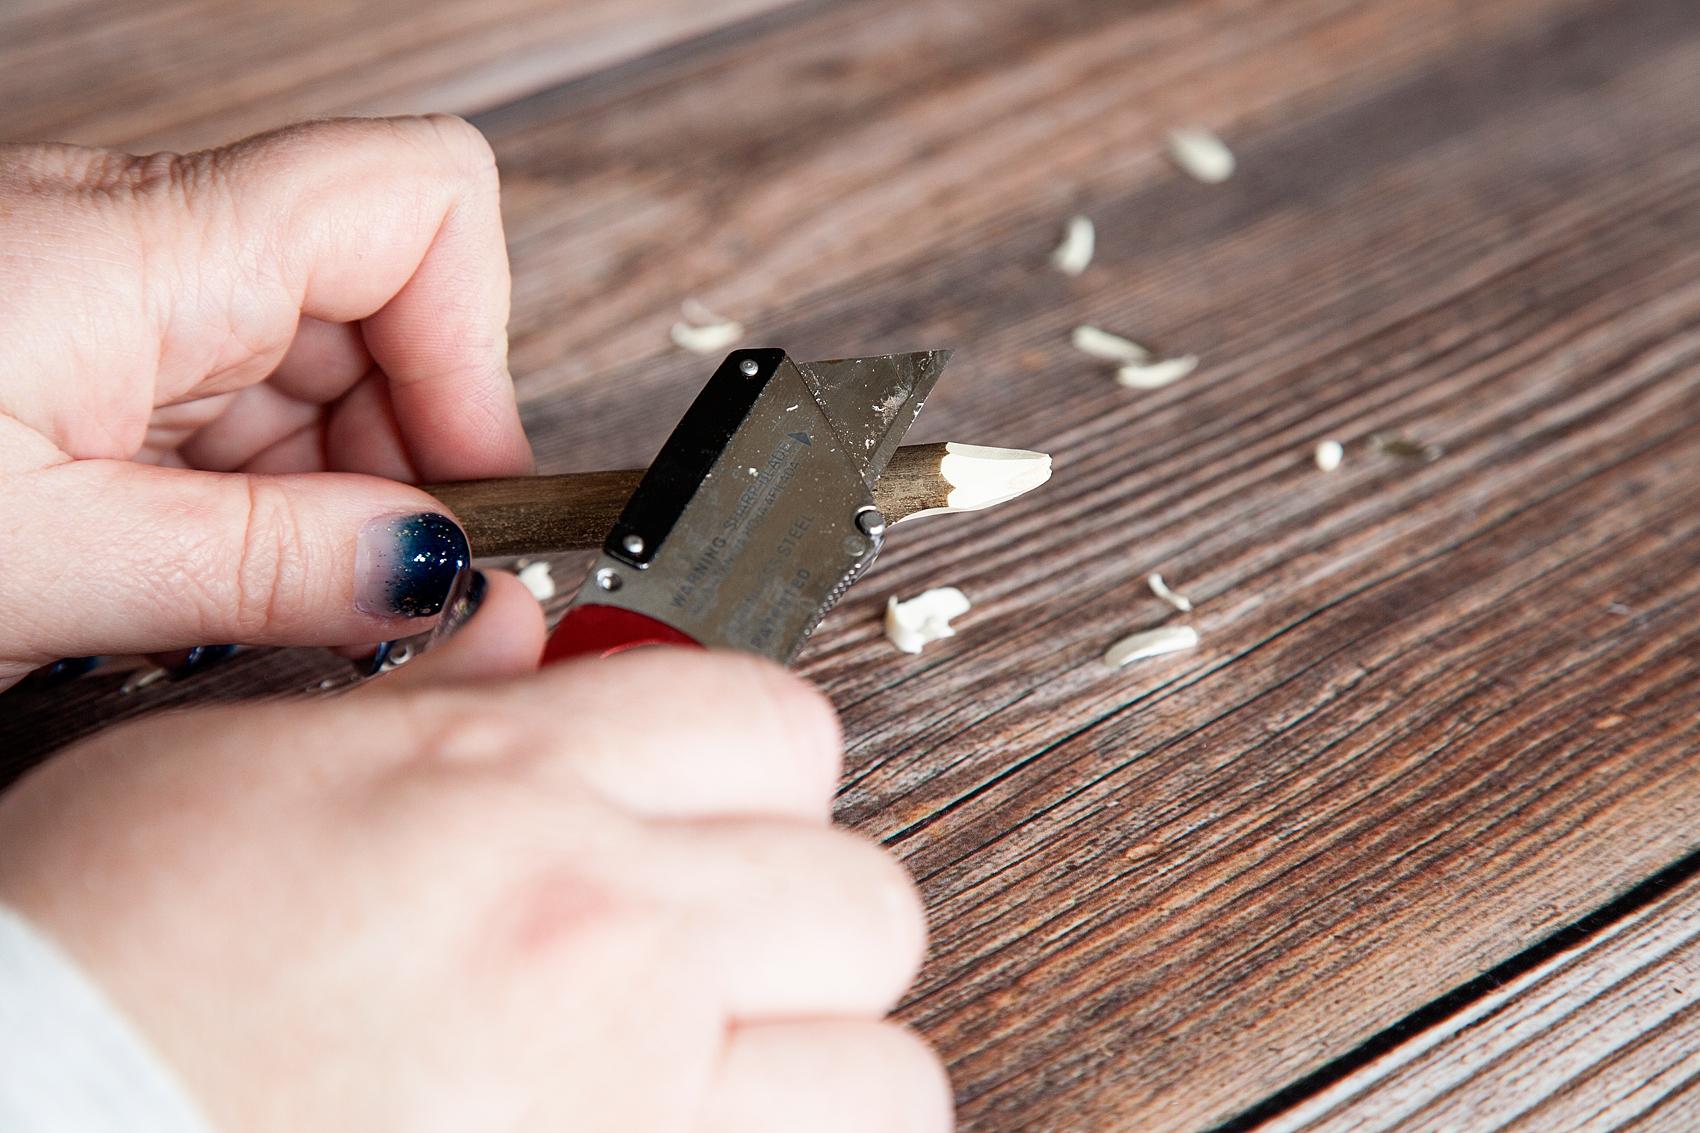
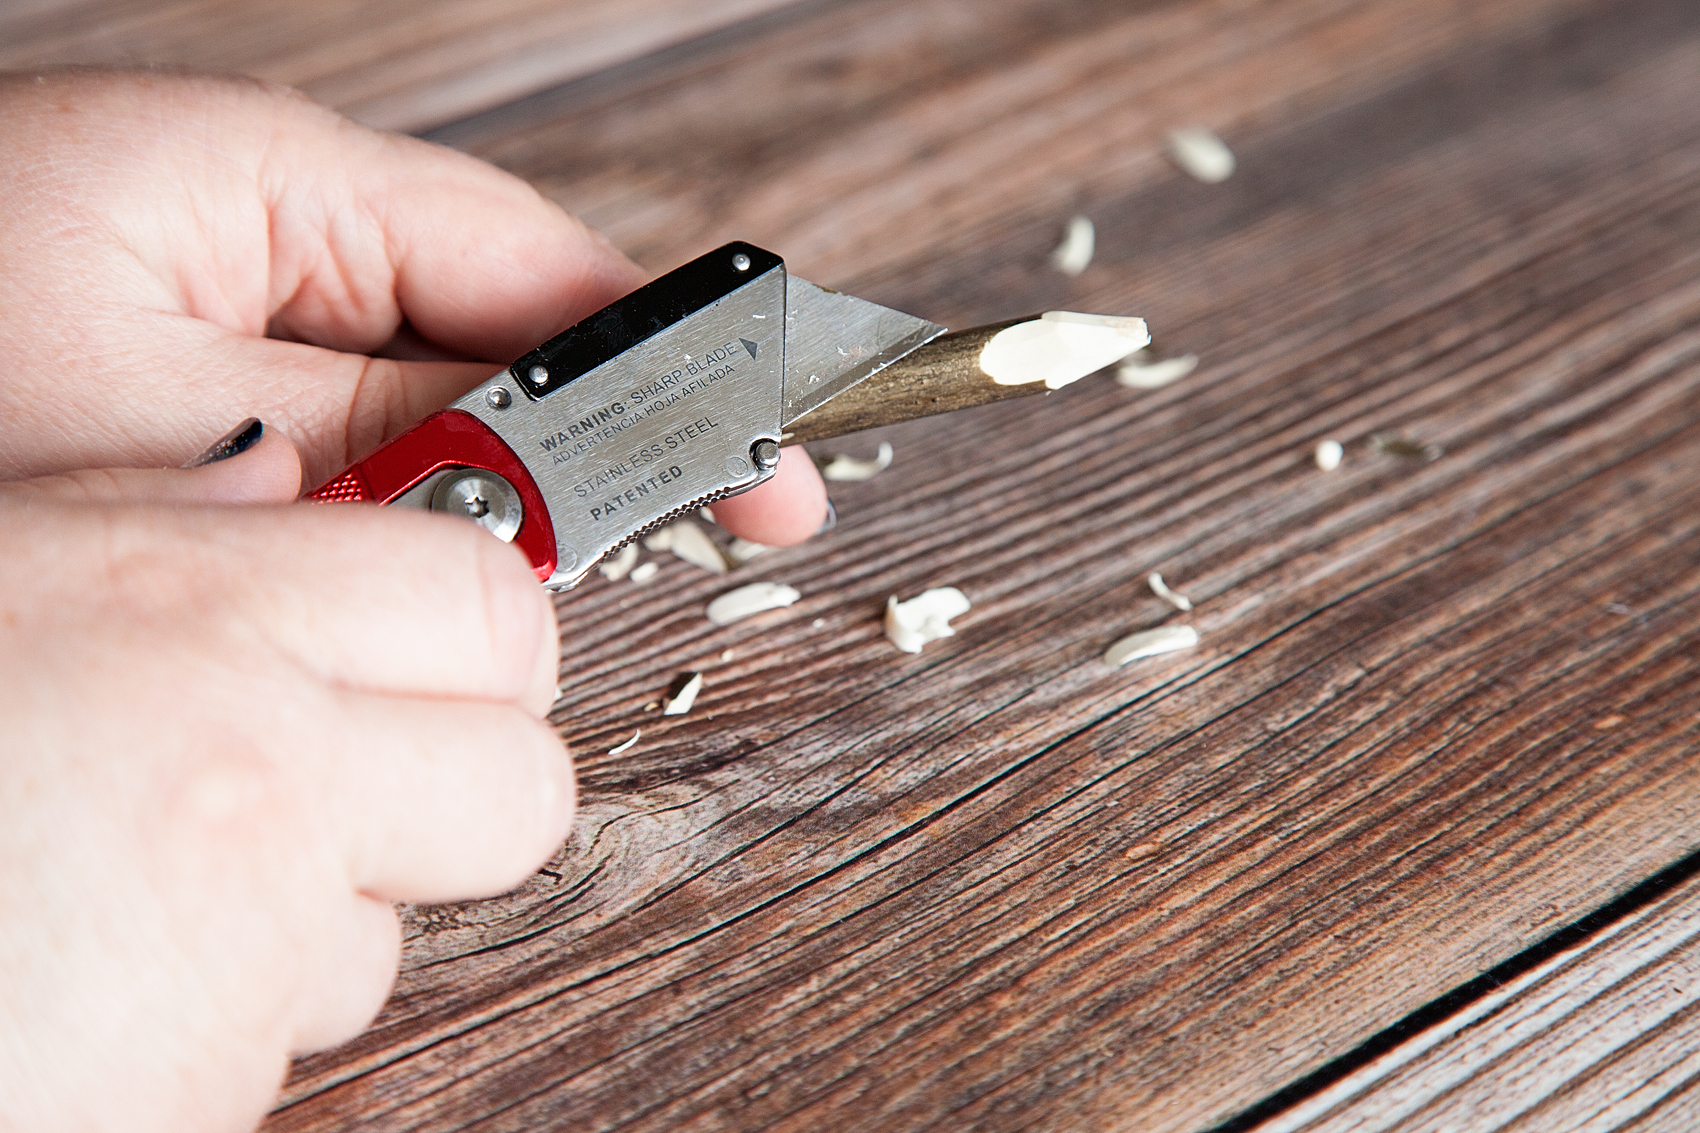
  5. ADULT TASK • Whittle the end of your branches into a tip like a pencil. The top portion of the tip will be your gnomes hat. Keep in mind this task either needs to be done by an adult OR supervised by an adult. Gnome Gardens are a fun trend that the whole family can participate in. Create your own Gnomes with some sticks and @decoart Patio Paint.
  6. On one side of your stick, whittle a “U” shaped section for the face of your gnome.Gnome Gardens are a fun trend that the whole family can participate in. Create your own Gnomes with some sticks and @decoart Patio Paint.
  7. Using the DecoArt Patio Paint and your small flat brush, paint on your gnomes hat and let dry.
  8. Take the white paint and paint on your gnome’s beard. Basically in a “U” shape following the line of the face that you whittle in before. Set aside and let dry. Refer to video for more details on how to paint your gnome.
  9. Using a sharped pencil, dip your pencil tip into the black paint and gently place one gnome eye. Reapply the paint to your pencil tip and create another eye. Dipping into the paint twice will help to create eyes that a similar in shape and size. Set aside and let dry.
  10. Once dry, name your cute little little gnomes! Ours are Max (red), Sven (yellow), Einar (green) & Ole (blue). Then place them into your gnome garden.Gnome Gardens are a fun trend that the whole family can participate in. Create your own Gnomes with some sticks and @decoart Patio Paint.
  11. Using the small rocks and colored sand, create a walkway in front of the house.

Gnome Gardens are a fun trend that the whole family can participate in. Create your own Gnomes with some sticks and @decoart Patio Paint.

Summer Crafting with the Kids

0 · May 1, 2016 · 1 Comment

+ This Summer Crafting with the Kids post brought to you by Michaels +

Easy-DIY-Pom-Poms--2

You guys… Summer is almost here!!

No more school!

No more car pool!

No more early mornings!

Well at least for a couple of months anyway. Now the challenge is how to entertain the family during the fun, lazy days of summer. Did you know that Michaels has you covered, they offer free classes in their stores! You can try out a new craft skill for just the cost of supplies.

49216_MS_MM_May Challenge_l

 Just because school will be out for the summer, doesn’t mean that  learning stops.

You can sign your kiddos up for a class or you can take a little time for yourself and learn a new skill.

Another great way to explore your creativity is by trying out a craft kit. Michaels has everything from sewing kits to art kits and everything in between.

My daughter Emily and I decided it would be fun to take one of their kits for a test drive.

Easy-DIY-Pom-Poms--1

 Emily picked the Craf-Tastic™ Pom Pom Kit, we’re kind of obsessed with pom poms here at our house. This kit was cool because it had the promise of teaching us how to make pom poms really quick. We were intrigued.

I’ve made all kinds of poms, but this was Emily’s first rodeo so this kit was perfect!

Easy-DIY-Pom-Poms--4

 The directions were fantastic and Emily who is 11 easily figured everything out without any help from Mom.

Easy-DIY-Pom-Poms--6

Easy-DIY-Pom-Poms--8

Easy-DIY-Pom-Poms--10

Easy-DIY-Pom-Poms--12

Easy-DIY-Pom-Poms--14

Easy-DIY-Pom-Poms--15

 We loved how the kit came with EVERYTHING you need for a fun afternoon of crafting and Emily loved that she could do it all on her own.

Easy-DIY-Pom-Poms--16

 We decided that it would be fun to add some silly eyes onto the poms to create some little fuzzy friends…

Easy-DIY-Pom-Poms--20

Easy-DIY-Pom-Poms--19

This kit was worth every penny… Emily and I had a ball creating together without all the hassle of trying to pull together all the supplies on our own. Total summer win in my books!

Here are some more fun idea from the other Michaels Makers.

An InLinkz Link-up


Airheads Drink Gems

0 · Nov 13, 2015 · Leave a Comment

+ This Airheads Drink Gems post brought to you by Airheads. All thoughts, ideas and opinions are my very own. +

Air-Heads-Drink-Gems-from-WhipperBerry

Picture this scene… You have a house full of 10 and 11 year old girls. They are looking for something fun to do.

You are scrambling to find something “cool” to do that won’t embarrass your daughter and force your family to enter the Middle School Protection Program and relocate the entire family to Cleveland (sorry friends in Cleveland… I’m sure it’s a lovely city! I just needed to pick a place.) They are hungry and thirsty and things are starting to escalate… Your “cool” factor is dropping dramatically.

You’ve never been there? Boy, I have! I have three girls and the last one just started Middle School this year and the fun has started all over again. Take it from and experienced tween Mom… You need to stock-up on Airheads so that you can up your “cool” factor higher than you can even imagine!

Airhead-Drinks-from-WhipperBerry-9

 If you have a room full of restless kiddos, pull out your Airheads, some cutting boards, rolling pins and some small cookie cutters or cupcake decorating tips and let them go to town.

You’ll be the coolest Mom in town if you teach them how to make Airhead Drink Gems. They will LOVE it, plus it will kill some time before you have to come-up with some other non-cringe worthy activity.

Here’s how you can look like a rockstar…

Airhead-Drinks-from-WhipperBerry-1

I used a fondant rolling pin, but any kind will work. Unwrap 3-4 Airheads of the same color, place them in a microwave safe bowl. Microwave for 5-8 seconds to soften them up. Kneed them in your hand to work them together. Lay them on a cutting board and then use small cookie cutters or a large cupcake decorating tip to cut out your shapes.

All you need to do is gather some clear class cups or jars and then affix them to the side of the glass.

Airhead-Drinks-from-WhipperBerry-8

They are easy to affix… All you need to do is slightly dampen a paper towel. Just like you would dampen a stamp, lightly r ub one side of your shape on the paper towel, slightly dampening it. Place it on the side of the glass and voilá, you’ve created your first Airhead Drink Gem!

Drink-Decor-with-Air-Heads-from-WhipperBerry-2

Let them go to town designing their own glasses, they’ll love it!

Drink-Decor-with-Air-Heads-from-WhipperBerry-3

Once they are finished you can add some clear soda or seltzer water to the glass and watch the dr  ink take on the color of the gems. This is RIGHT DOWN THEIR ALLEY! You’re officially a ROCK STAR!

If you want to be extra cool… You can help them make their own Airheads Straw as well.

Drink-Decor-with-Air-Heads-from-WhipperBerry-5

You can make all kinds of stuff with Airheads! For more fun ideas on how to craft with Airheads visit and follow them on Pinterest. To learn more about Airheads candy visit their website and follow them on Facebook, Twitter, Instagram, and YouTube!

Yes, even YOU can be a cool mom with Airheads!

Disclaimer // This post is sponsored by Airheads. All thoughts, ideas & opinions are my very own.

Airhead-Drinks-from-WhipperBerry-6

Rosie the Riveter Costume

27 · Oct 1, 2015 · 6 Comments

+ This Rosie the Riveter Costume Post brought to you my Michaels Craft Stores +

Rosie-the-Riveter-Costume-from-WhipperBerry-2

You guys, I’m so excited… Halloween is right around the corner!!

I have a love/hate relationship with Halloween. I’m not a fan of the macabre scene, full of blood and gore, but I do love all of the fun creative ways to dress-up for the holiday. I love coming up with fun ideas for costumes with the family. I like to keep things simple, I don’t want to spend a ton of time or money on costumes for sure.

This months Michaels Maker’s Challenge was to create a simple DIY Halloween Costume.

_01190_MAKERS_0929_l

My daughter and I thought it would be fun to put together a quick costume with the iconic Rosie the Riveter as our muse. I have always LOVED this graphic.

rosie-the-riveter-poster-s

Rosie the Riveter Costume Materials

Here’s what you will need to make this simple costume.

Supplies-for-Rosie-the-Riviter-Costume

  • Elmer’s foam core board
  • Red and white polka dot fabric – available in store at Michaels, not online
  • Blue vinyl
  • 1 1/2 inch navy ribbon
  • Utility knife
  • Silhouette CAMEO – Not a deal breaker, but nice.
  • Blue button down shirt

Instructions

This is one of those costumes that really takes minutes if you have a Silhouette cutting machine. If not, NO WORRIES. It will take a little bit longer but you can still do it. With the silhouette all you need is to download this file that I created, and you can cut the image out of vinyl for your poster.

We-Can-Do-It-Poster-for-Silhouette-CAMEO-or-Portrait

The poster board is 20×30 and this will fit perfect to the top of the board.

We-Can-Do-It-poster

You will need to weed your vinyl, than place some transfer tape on top of it. I used the transfer tape to hinge the top of the vinyl transfer to the top of the board. Then I pulled the backing off the vinyl and with the hinge, laid the vinyl down right in the perfect spot.

Rosie-the-Riveter-Poster-from-WhipperBerry

Now, hindsight being 20/20… I would have either laid down some white vinyl or spray painted the top of the board white first. That would make the letters white, but I’m not too worried about that.

Rosie-the-Riveter-Costume-from-WhipperBerry-3

Next, I used a utility knife to cut some slits into the board right where I wanted to place the ribbon to create a kind of backpack effect. That way she could wear the board on her back with ease. I used navy ribbon so that it would blend in with the shirt and just tied it in cute bows on the back of the board.

Rosie-the-Riveter-Costume-from-WhipperBerry-5

It works perfect! Now all you have to do it tie-up your hair with the red & white polka dot fabric and you’re all set!!

Rosie-the-Riveter-Costume-from-WhipperBerry-4

It’s SUPER simple and so fun! What are your Halloween costume plans? Need some fun ideas? The rest of the 49 other Michaels Makers have been hard at work creating some fun ideas for you. You can check them out here!

An InLinkz Link-up


Disclaimer // I am a member of the Michaels Makers Crew and received store credit in order to create my project.

  • « Go to Previous Page
  • Page 1
  • Interim pages omitted …
  • Page 8
  • Page 9
  • Page 10
  • Page 11
  • Go to Next Page »

Primary Sidebar

Heather from Whipperberry
Hello... my name is Heather and I'm the creator of WhipperBerry a creative lifestyle blog packed full of great recipes and creative ideas for your home and family. I find I am happiest when I'm living a creative life and I love to share what I've been up to along the way... Come explore, my hope is that you'll leave inspired!

Footer

  • Privacy Policy
  • Crafts
  • Food
  • Gifts
  • Holidays
  • Home
  • Mom Life
  • Recipes
  • Travel

Copyright © 2026 · Seasoned Pro