• Skip to primary navigation
  • Skip to main content
  • Skip to primary sidebar
  • Skip to footer

Whipperberry

WhipperBerry • Your Home For Creative Inspiration

  • Home
  • Recipes
    • Starters
    • Easy Weeknight Dinners
    • Main Dish
    • Salads
    • Side Dish
    • Soups & Stews
    • Desserts
    • Breakfast
    • Miscellaneous
  • Tutorials
    • Creative Crafts
    • DIY Decor
    • Fabric Crafts
    • Food How-To
    • Jewlery
    • Paint Projects
    • Paper Art
    • Party Styling
    • Photography and Graphic Design
    • Silhouette
  • Holidays
    • Easter
    • Mother’s Day
    • Father’s Day
    • 4th of July
    • Halloween
    • Thanksgiving
    • Christmas
    • Valentine’s Day
  • Gift Ideas
    • Gifts For Everyone
    • Gifts for Dad
    • Mother’s day
    • For The Girls
    • For The Kids
    • Teacher Gift Ideas
    • Christmas
  • Printables
    • Holiday
    • Gift Idea
    • LDS Primary
  • Travel
  • About
    • Terms
  • Contact
  • Nav Social Menu

    • Facebook
    • Instagram
    • Pinterest
    • RSS
    • Twitter

Christmas

Stylish Christmas Neighbor Gifts + Free Printable Gift Tags

2 · Dec 1, 2015 · 1 Comment

+ This Stylish Christmas Neighbor Gifts post is brought to you by Michaels +

Michaels-Christmas-Neighbor-Gifts-1

One of my favorite things to do is creating fun new little ways to show your friends and neighbors how much they mean to you during the holidays. It doesn’t need to cost a lot, nor does it have to take a whole lot of time & effort.

This month my Michaels Makers Challenge was to create three different, simple gifts that would be perfect for friends, neighbors, teachers, the mail man, the bus driver, your hair stylist… Basically anyone. Challenge accepted!

I went to Michaels and found some fun mugs and cute cups to create some easy, fun gifts. Then I created some stylish tags to add to the mugs and cups.

WhipperBerry-Christmas-Tags

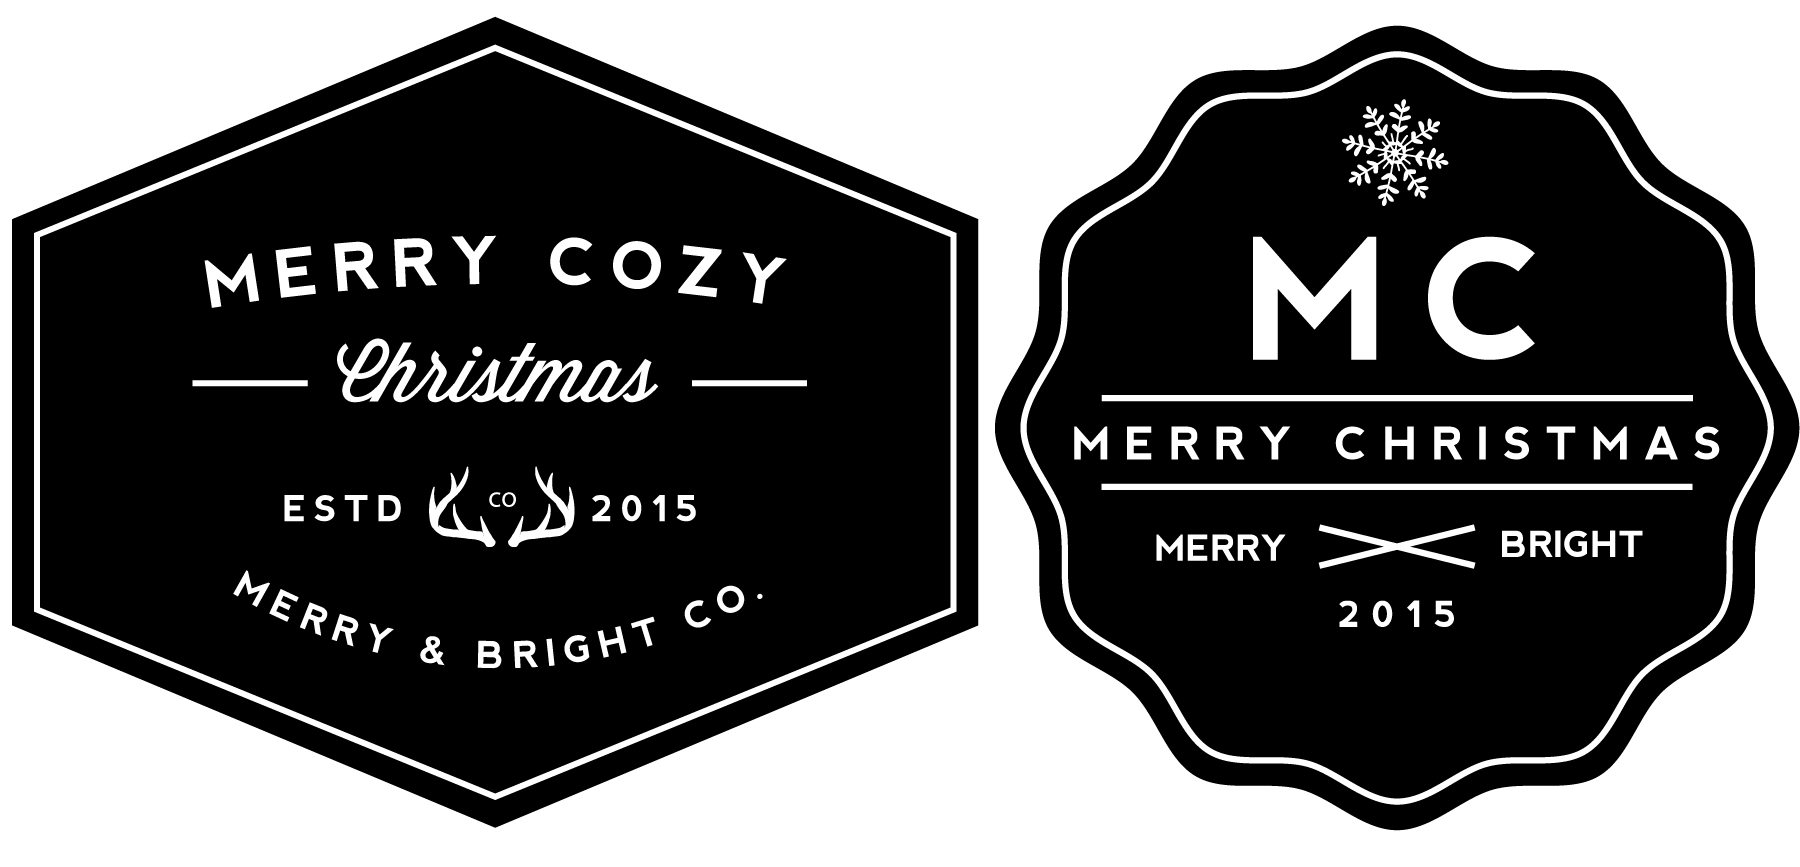
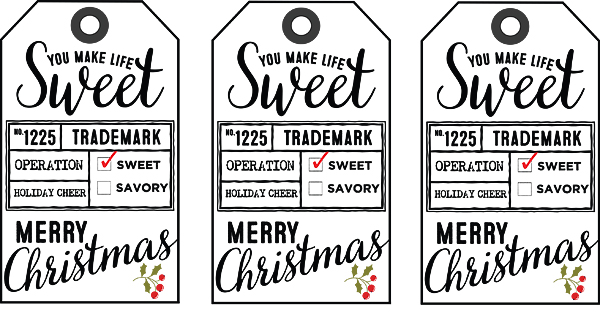
You can download the free printable gift tags HERE

You can print them on white label paper or you can print them on Printable Gold Foil from Silhouette (I love this stuff!) You can find it at Michaels too.  All you need to do is download the PDF file and print out your labels…

Christmast-Neighbor-Gifts-from-WhipperBerry-1

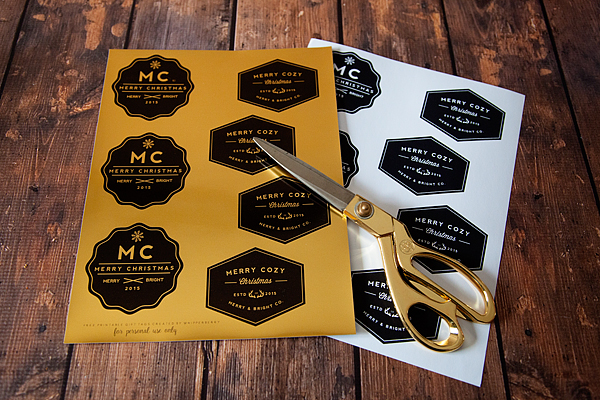
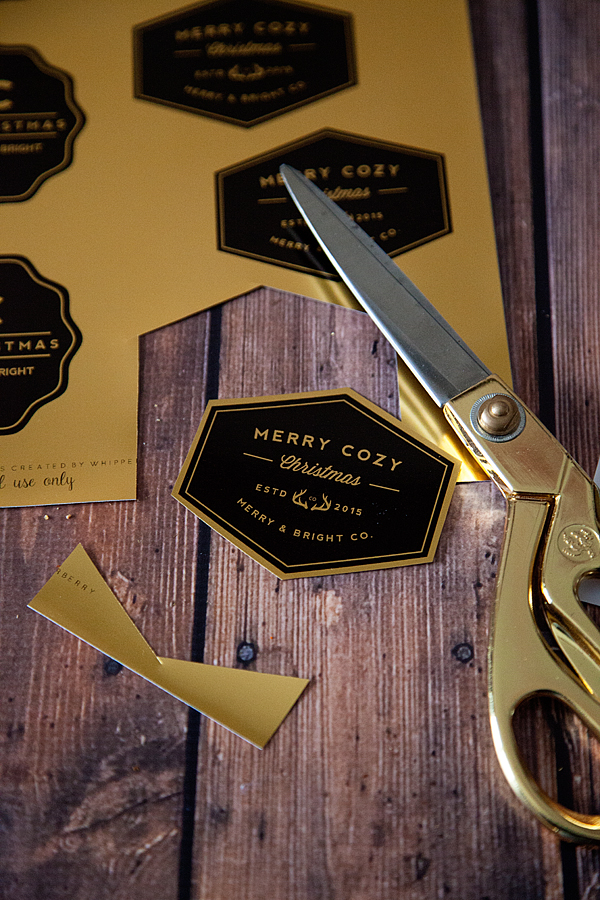
I’m cutting these out with just a simple pair of scissors, no cutting machine required.

Christmast-Neighbor-Gifts-from-WhipperBerry-2

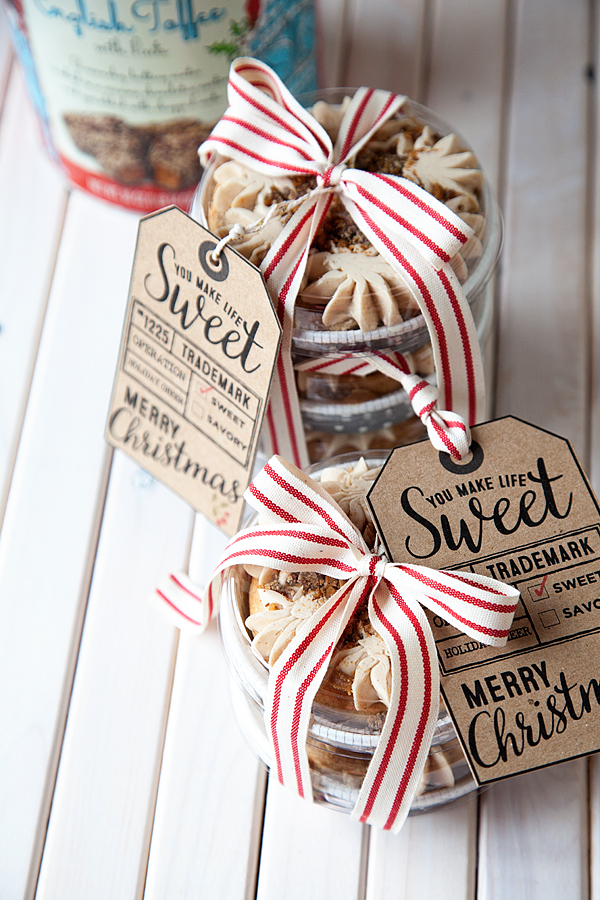
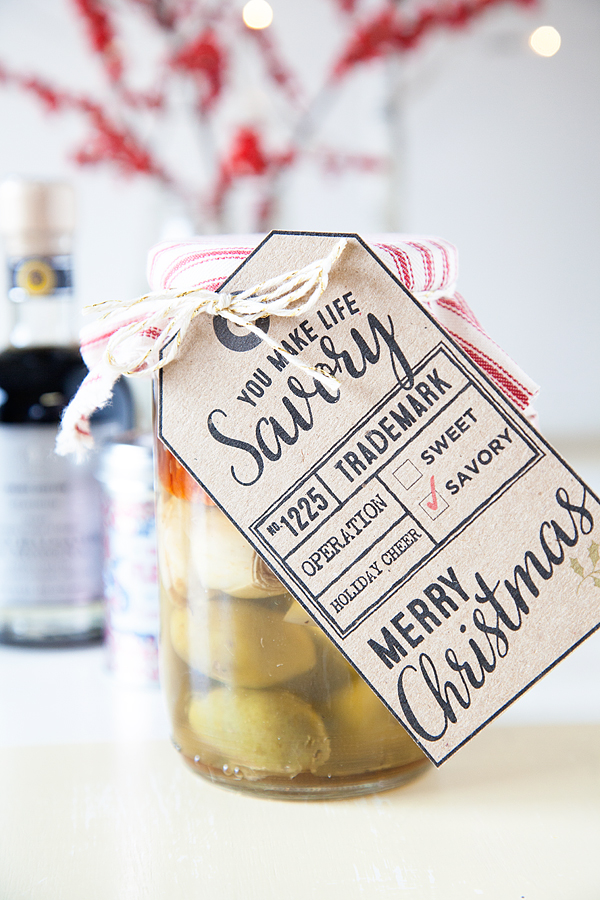
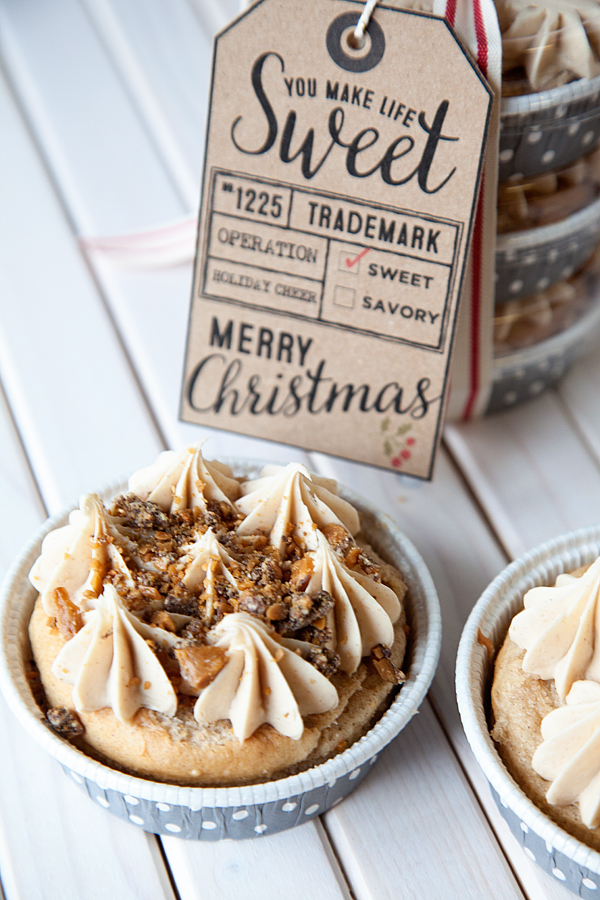
Now, I know that a lot of people love their sweets when it comes to Christmas, but not everyone appreciates ALL of those sweets.   I thought I would come up with a non-sweet gift that will still be a fun gift to receive.

Christmast-Neighbor-Gifts-from-WhipperBerry-5

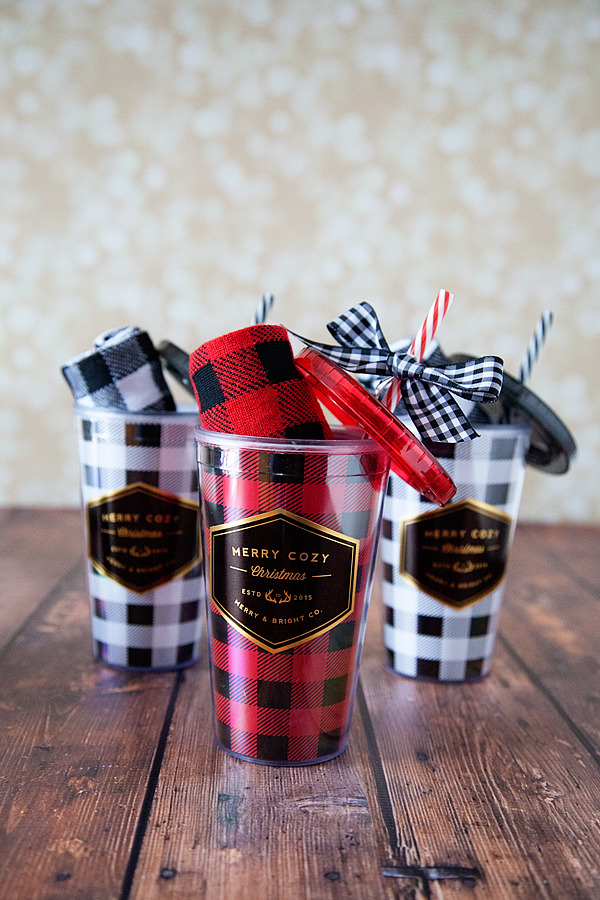
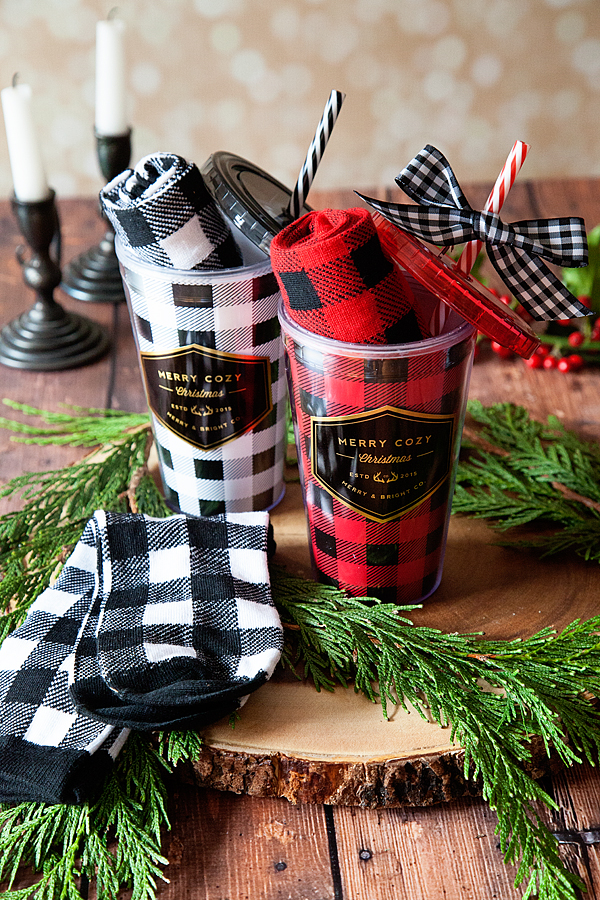
Everyone’s in love with the Buffalo Check this year and Michaels is right on trend with these fun cups. They even have some awesome Buffalo Check socks in the dollar section… PERFECT! I placed some matching socks into the cute cups and added the “Merry Cozy Christmas” Label on the front of the cup… 1st gift finished! Can’t get any easier than that!

Michaels-Christmas-Neighbor-Gifts-3

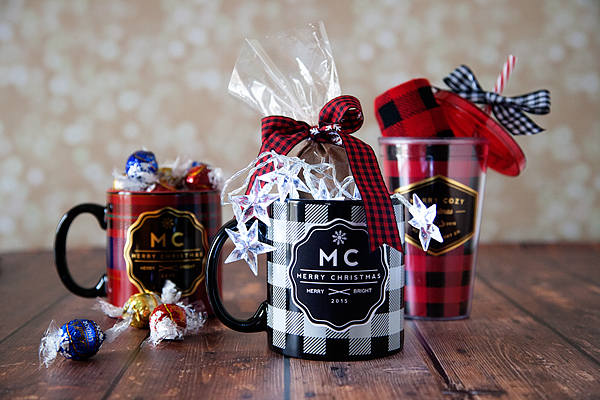
Next up, the classic hot cocoa mug with a cute little twist.

Michaels-Christmas-Neighbor-Gifts-2

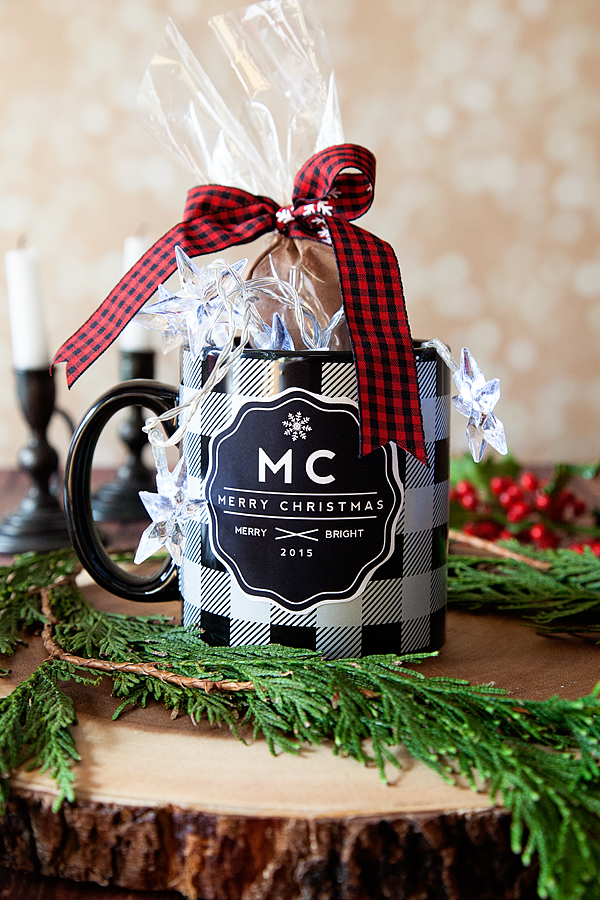
I filled a large cone shaped cellophane bag with some hot chocolate mix and tied it with some buffalo check ribbon. I put it into a large buffalo check mug and then I added a cool battery powered set of star lights to the mug to add a little whimsical element. I love how it turned out…  2nd gift complete!

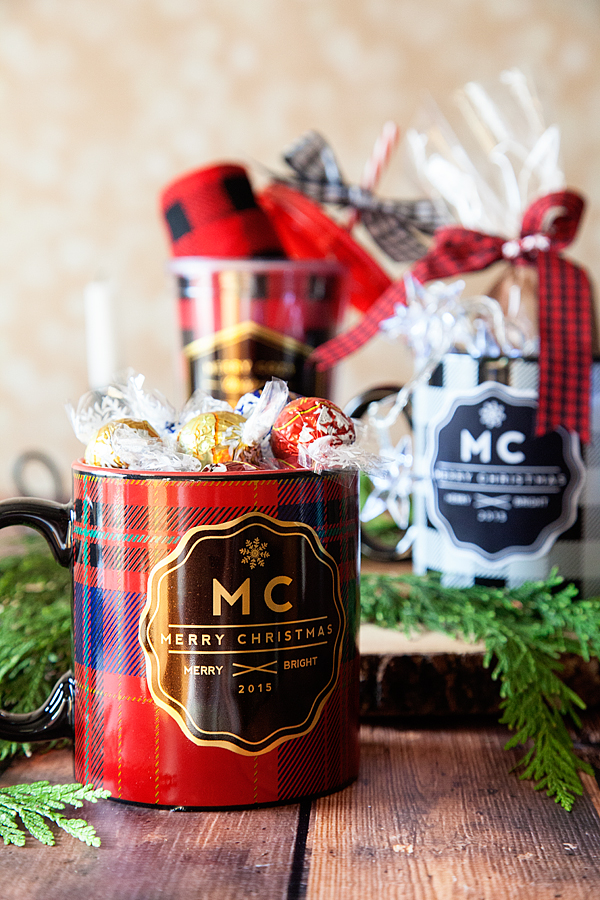
Last but not least I found another mug at Michaels that’s a great plaid mug. I noticed some Lindor Truffles up at the front of the store that matched the plaid pattern on the mug. I thought it would be a PERFECT pairing with the plaid mug.

Michaels-Christmas-Neighbor-Gifts-7

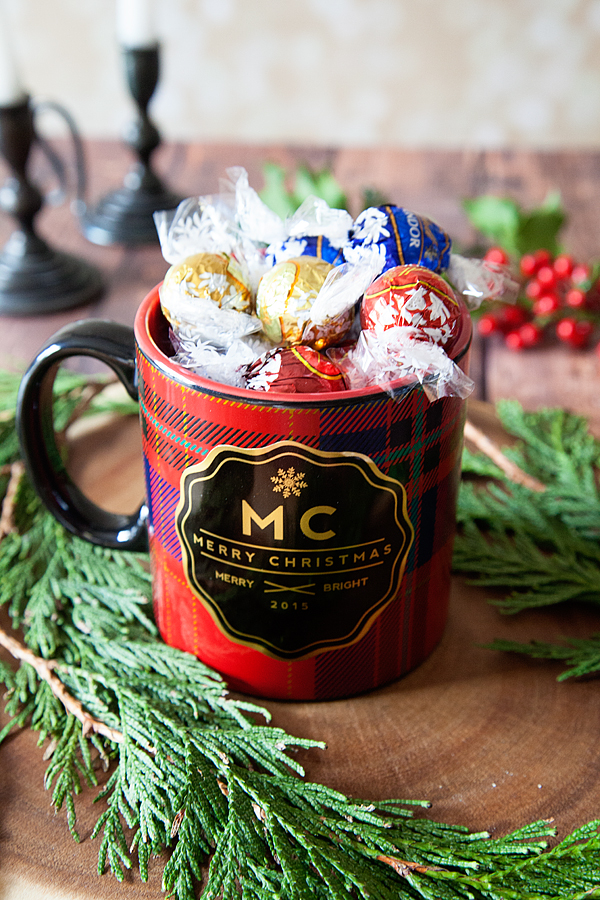
Adding the gold foil gift tag just makes it look so classy!

Michaels-Christmas-Neighbor-Gifts-6

3rd gift down and it didn’t take any time at all. All three are great, stylish gifts that anyone would love!

Christmast-Neighbor-Gifts-from-WhipperBerry-8

Michaels has tons of holiday project ideas and instructions on Michaels.com, including gift wrapping, home décor, last minute gift ideas, hostess gifts and more. Don’t forget The Glue String, Michaels blog full of even more great ideas for the season.

12735_SO_1201_Dec_Michaels_Makers_m

Simple Kid Friendly DIY Christmas Village

3 · Nov 28, 2015 · Leave a Comment

WhipperBerry-Christmas-Village

Who’s looking for something fun & simple to do this Christmas? Something even the kiddos will love!

This year, I’m looking to simplify. I want to simplify everything, the gift giving, the message, the decor. I want the Holidays to be more about the family and the true meaning of Christmas. Several years ago my family spent a month in Germany in December and we had a chance to enjoy a European Christmas that was simply magical. For the Germans the holiday is all about nature, simplicity & family. We fell in love! Ever since then I have wanted to create more of an old-world Christmas experience and this year is finally the year… I’m so excited!!

It’s all starting with my simple kid-friendly DIY Christmas Village. I wish I could take all of the credit for this, but I can’t. I was inspired by a friend of mine here in Lincoln from Little Red Cabin. She has this beautiful shop where she sells simple, yet stunning decor items for the home. She used to sell these Christmas Villages in her shop but she no longer carries them, therefore I had to make one of my own and of course put my WhipperBerry spin on them. It’s really quite simple, you only need a few items.

Christmas Village Supplies

WhipperBerry-Christmas-Village-5-1

2×2 Select Pine Board

BB Frösch Chalk Paint Powder

Behr Premium Plus Sample Pots FLAT – Mink & Decorator White

Krylon Premium Metallic Spray Paint – Copper Foil

DIY Christmas Village Instructions

The trickiest thing with this project is getting access to a saw. If you don’t have a saw, hit up your neighbors or family members. I’m sure someone has something you can use. I have a Rigid 10 inch Sliding Compound Miter Saw and it works like a dream for this project, but it isn’t the only saw that will work.

How-to-cut-WhipperBerry-Christmas-Village

All you need is to be able to cut at an angle for this little village. There is no rhyme or reason when you’re cutting the little buildings. I made the little buildings roughly 3-4 inches tall, with all different types of angles for their roofs. I mostly used a 30-40˚ angle when cutting to tops of my buildings.

WhipperBerry-Christmas-Village-4

The only one that needs to be exact is the larger building in the center that you place your stencil on. For that one I used a 35˚ cut and made sure both sides of the building were the same hight.

Sand your blocks if needed. My wood cut so nice that I didn’t really need to sand them at all.

Now it’s time to paint your village. I knew that I wanted to keep some natural wood, Faux Stain some building with BB Frösch & then spray some of the buildings with copper spray paint for a metallic accent. I’ve see others use puffy paint for these kinds of projects but I liked the spray paint instead. If you have kids creating these then you can use puffy paint instead because they love it.  I wrote a post about how to make your own puffy paint too!

WhipperBerry-Christmas-Village-colors

Faux Staining & Painting with BB Frösch Chalk Paint Powder

This to me is my favorite part… I LOVE working with Chalk Paint! I use BB Frösch Chalk Paint Powder when I’m crafting. Typically Chalk Paint is too expensive for crafting, but not when you use BB Frösch. I mix the chalk paint powder with a sample pot of Behr Premium Plus Flat paint from Home Depot. The BB Frösch turns the regular paint into CHALK PAINT for a fraction of the cost.

It’s so easy to mix-up your chalk paint, here’s a quick video showing you how to do it.

For the White buildings, I just brush on the Decorator White BB Frösch Chalk Paint and because it’s has the all-natural mineral additives, it dries super quick! I don’t really bother to wax these guys, they don’t really need it. Plus, I like the look of the flat finish.

Now for the Faux Stain… You use this technique that I created when you want to see the natural wood come through. Traditionally people would use Stain for this, but I use BB Frösch because it’s so much easier. You can visit this post on WhipperBerry to learn how to Faux Stain.

Faux-Stain-BB-Frösch-Chalk-Paint-Powder

I love how the faux stain turns out for this Christmas Village. I use the color MINK from Benjamin Moore for most of my Faux Staining. YES, I use the sample pots of Behr at Home Depot, but they have the color recipe for the Benjamin Moore colors in their computer. Just ask for Benjamin Moore Mink and they will be able to look it up.

Copper Buildings

Now for the copper, I use Krylon’s Premium Metallic Spray Paint in Copper Foil. It’s super simple and adds that little pop of copper that is so hot right now.

WhipperBerry-Christmas-Village-6

Just spray paint a couple of your buildings for that accent color.

Spray-Paint-some-sections-of-the-Christmas-Village

Stencil

Now for the stencil…I’ve used a Swiss Cross, but you can use whatever you like. A star, snowflake, heart… Whatever you come-up with really. I cut my stencil out of vinyl on my Silhouette CAMEO but you can either buy a pre-made stencil or create one of your own.

I put the two pieces of cut wood together and then place the stencil on top.

Stenciling-WhipperBerry-Christmas-Village

Then paint with your desired color. ALSO, don’t forget that you can use both the positive and negative parts of the stencil. That way you don’t have to waste anything!

IMG_5997

Peel-off the vinyl once it is dry and voilá… You have a stylish decorated building for your set.

WhipperBerry-Christmas-Village-1

You can also drill a hole into one of your buildings and add a star. I just glued a star ornament from Michaels to the top of a dowel and it fit perfect with the village.

I love this simple decor that is kid friendly. So many Holiday decorations are breakable and we’re constantly following the kiddos around telling them not to touch… With this simple Christmas Village they can touch and play with it all they want!

+ This was originally a guest post on 30 Handmade Days +

Old World Charm Christmas Tree

2 · Nov 1, 2015 · 3 Comments

+ This Old World Charm Christmas Tree post is brought to you by Michaels +

Old-World-Christmas-Charm-Tree-from-WhipperBerry

A few years ago my family was lucky enough to spend the month of December in Germany and France. We fell in love with the way they celebrate Christmas in Europe. They keep it simple, natural and all about family. I was enchanted with all of the simple decor that our friends in Germany used to decorate their homes.

Every year when the kiddos and I bring out the Christmas decorations we’ve always felt a little let-down, it just didn’t have that magical old world feel. It has been my dream to bring that same feeling to our home here in Lincoln.  This year is the year! I have been working on all kinds of fun simple projects to bring that old world charm to our home for the holidays.

The very first project and the heart of the Holiday home is the Christmas Tree.

Classic-Christmas-Tree-from--WhipperBerry-6

I started with the 7.5 ft Hartford Pine Christmas Tree from Michaels and then I found some fantastic natural wood elements that are perfect to create that rustic European look.

Classic-Christmas-Tree-from--WhipperBerry-12

I added all kinds of texture with sprigs of berries and pine cones, perfect for that old world look. Michaels has these fun metal ornaments that you can decorate with all kinds of goodies. I wanted to keep the natural feel so I glued some wooden snowflakes in some and added some buffalo check ribbon to a few and it looked perfect.

Classic-Christmas-Tree-from--WhipperBerry-10

I even drilled some holes in some candles from Michaels and fed some floral wire through the hole and wired them onto the tree to get that true old world feel. We won’t light them of course, they are just there for the effect.

Classic-Christmas-Tree-from--WhipperBerry-11

I LOVE how this simple tree turned out. At the base of the tree I added a sign that I had painted to add a little pizzaz before the tree gets filled with presents.

Classic-Christmas-Tree-from--WhipperBerry-8

So what’s your dream Christmas? Do you like old and rustic or are you all glitter and glam?

  Inspired to start decorating your own tree? Make sure you visit Michaels’ blog, The Glue String, to see the other 49 Michaels Makers’ dream holiday trees that were created this year.

  • From now until November 14, you can get FREE shippingon all Christmas trees that are 6ft or taller on Michaels.com!
  • If you’re just getting started on your holiday decor, you can also check out some of the ornament projects and tutorials available on Michaels.com.

Disclaimer // This post is brought to you by Michaels however, all thoughts and ideas are my very own.

An InLinkz Link-up


English Toffee Cinnamon Bun Sweet Cake + Easy Neighbor Gift

18 · Dec 17, 2014 · 3 Comments

+ English Toffee Cinnamon Bun Sweet Cake post brought to you by Pillsbury Baking +

English-Toffee-Cinnamon-Bun-Sweet-Cake-from-WhipperBerry

We’re hitting crunch time friends! Christmas is about a week away. Have you figured out what you are giving your neighbors and friends this Christmas season? I have a super easy and super sweet gift idea for you… English Toffee Cinnamon Bun Sweet Cakes!

Cinnamon-Christmas-Cake-7

Uh yes… YUM!!

This is just a simple and scrumptious box cake mix and prepared frosting from my favorite folks at Pillsbury Baking. They have done all the hard work of making it perfect… All you have to do is bake it and make it look amazing!

Here is what you need…

Cinnamon-Christmas-Cake-2-2

Yep, that’s it. Well… You will need eggs and oil for the cake, but other than that, this is it.

I also found these great baking cups at Target that come with a clear lid. Super Cute and easy to use. You can find it in the baking section at Target.

Target-Baking-Cups-with-Lid

Mix up your cake according to the package directions and fill you baking cups 1/2 way.

cinnamon-bun-cake

Place in a 350˚ oven for 19-20 minutes.

Remove from oven and let cool. If you would like a flat top to decorate, carefully cut-off the dome with a serrated knife.

Using a Jumbo Closed Star Decorating Tip, and a pastry bag… Pipe some simple stars on the top of your little sweet cakes.

Cinnamon-Christmas-Cake-4

Next, in a Ziplock bag, add some English Toffee. Using something heavy item like a rolling pin or meat tenderizer, take out some aggression and crush your toffee. Sprinkle on top of the sweet cakes and you’re finished!

All you need to do now is package your sweet treats.

I place the lid on the sweet cakes and then wrap with a ribbon. Then I add a fun gift tag that I created for this Holiday Season. 

You-make-Life-Sweet-Gift-Tag

You can download the gift tag HERE

I’ve printed the tag on kraft paper, but you can use whatever you like. All I did was tie it onto a stack of sweet cakes and we were ready for delivery!

Cinnamon-Christmas-Cake-1

It can’t get any easier than that. The cool thing is you can customize it for each family.

One box of cake mix will make 10 little sweet cakes. You will need two cans of frosting for that application. Stack them in 2’s and 3’s and it’s a fun new way to share some Christmas Cheer!

Cinnamon-Christmas-Cake-10

For a Savory gift tag option… Check-out this post.

Savory-Christmas-Gifts-5

How fun will it be to combine the two?!

Disclaimer // This post is sponsored by Pillsbury Baking. All thoughts, ideas and opinions are my very own. However, I want you all to know that I will never promote a product or company that I do not love and use in my normal day to day life.

  • « Go to Previous Page
  • Page 1
  • Interim pages omitted …
  • Page 6
  • Page 7
  • Page 8
  • Page 9
  • Page 10
  • Interim pages omitted …
  • Page 21
  • Go to Next Page »

Primary Sidebar

Heather from Whipperberry
Hello... my name is Heather and I'm the creator of WhipperBerry a creative lifestyle blog packed full of great recipes and creative ideas for your home and family. I find I am happiest when I'm living a creative life and I love to share what I've been up to along the way... Come explore, my hope is that you'll leave inspired!

Footer

  • Privacy Policy
  • Crafts
  • Food
  • Gifts
  • Holidays
  • Home
  • Mom Life
  • Recipes
  • Travel

Copyright © 2026 · Seasoned Pro