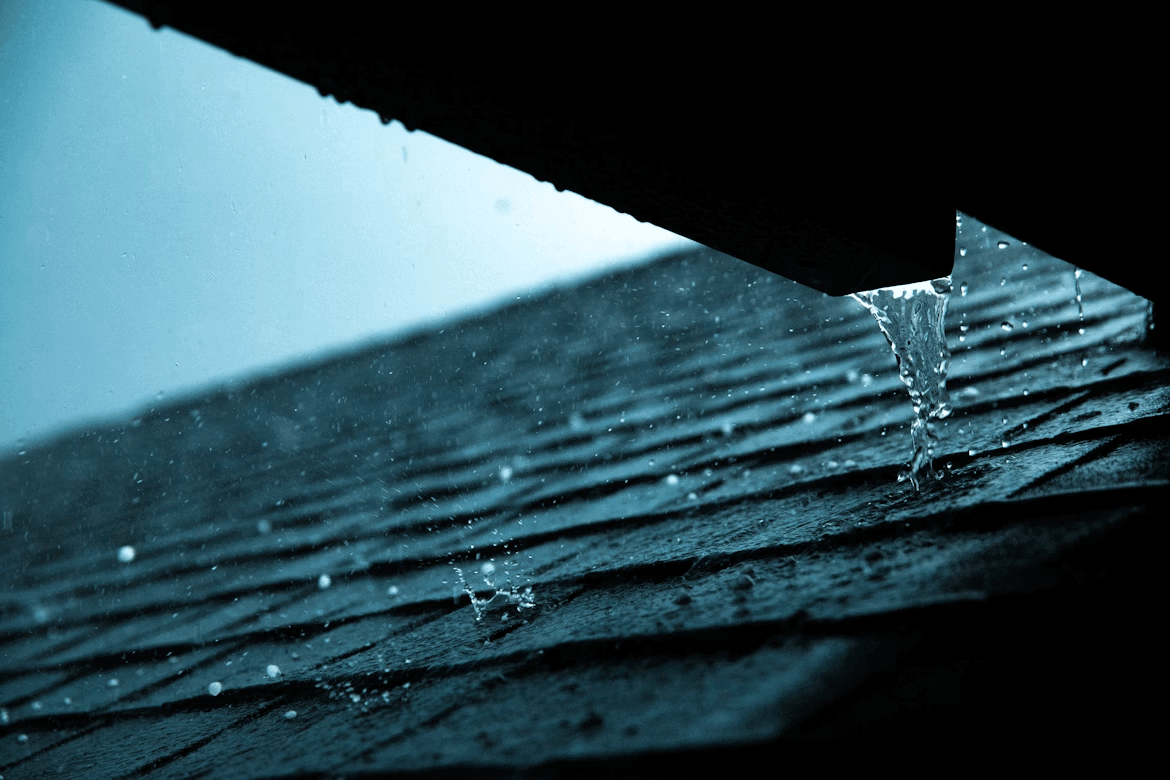
• Skip to primary navigation
  • Skip to main content
  • Skip to primary sidebar
  • Skip to footer

Whipperberry

WhipperBerry • Your Home For Creative Inspiration

  • Home
  • Recipes
    • Starters
    • Easy Weeknight Dinners
    • Main Dish
    • Salads
    • Side Dish
    • Soups & Stews
    • Desserts
    • Breakfast
    • Miscellaneous
  • Tutorials
    • Creative Crafts
    • DIY Decor
    • Fabric Crafts
    • Food How-To
    • Jewlery
    • Paint Projects
    • Paper Art
    • Party Styling
    • Photography and Graphic Design
    • Silhouette
  • Holidays
    • Easter
    • Mother’s Day
    • Father’s Day
    • 4th of July
    • Halloween
    • Thanksgiving
    • Christmas
    • Valentine’s Day
  • Gift Ideas
    • Gifts For Everyone
    • Gifts for Dad
    • Mother’s day
    • For The Girls
    • For The Kids
    • Teacher Gift Ideas
    • Christmas
  • Printables
    • Holiday
    • Gift Idea
    • LDS Primary
  • Travel
  • About
    • Terms
  • Contact
  • Nav Social Menu

    • Facebook
    • Instagram
    • Pinterest
    • RSS
    • Twitter

Home

7 Smart Moves Texas Families Can Make After a Property Tax Assessment Notice Arrives

0 · May 7, 2026 · Leave a Comment

For many Texas families, owning a home is one of the biggest investments they make. So when a property tax assessment notice arrives with a higher-than-expected value, it can feel stressful and confusing. A sudden increase may affect your monthly budget and future family plans, especially when you are already balancing everyday expenses.

The good news is that homeowners have options. In Texas, a Texas property tax appeal can be filed if the assessed value does not appear accurate. Taking time to review your notice carefully can help you avoid unnecessary costs and make informed decisions for your household. Here are several practical steps families can take after receiving a property tax assessment notice in Texas.

Property Tax Assessment

1.Review the Notice for Accuracy

Start by checking every detail listed in your assessment notice in Texas. Property size, features, and condition should match your actual home. However, even a small error can raise your assessed value and increase your tax bill. Therefore, take time to verify each entry carefully and compare it with your records.

This step helps identify mistakes early and gives you a clear understanding of your property data. Accurate details form the base of a fair assessment and support any future action you may take.

2. Compare Your Property With Nearby Homes

Look at similar properties in your area across Texas to see how your value compares. Sales data from nearby homes can reveal if your assessment seems higher than expected. Hence, this comparison helps you understand your property’s position within the local market.

A clear difference in values may indicate an issue with your assessment. Reviewing similar homes provides useful insight and supports your next steps. This process also helps you gather relevant data if you decide to move forward with a review.

3. Check Market Trends in Texas

Market trends play an important role in property values across Texas. A rise in demand can increase assessments even when your property remains unchanged. However, these shifts may not always reflect your property’s actual condition.

Therefore, reviewing recent market activity helps you understand why your value may have changed. A clear view of trends allows you to judge if your assessment seems fair. Staying informed about local conditions supports better decisions and helps you respond with clarity.

4. Confirm Eligibility for Exemptions

Certain exemptions can reduce your property tax burden in Texas. These benefits may apply to homeowners, seniors, or specific property types. So, review your records and confirm that all eligible exemptions are included.

Missing an exemption can increase your tax bill without a clear reason. Therefore, checking eligibility is an important step after receiving your notice. This action can lower your costs without the need for further processes and helps ensure that your tax bill reflects accurate benefits.

property tax

5. Gather Evidence to Support Your Case

Strong evidence helps support your position if you question your assessment. Documents such as photos, repair records, and recent sales data can show the true value of your property. However, incomplete or unclear information may weaken your case.

Therefore, gather accurate and detailed records before taking the next step. Organized evidence helps present a clear argument and improves your chances of a fair review. This preparation ensures that your claim is supported by reliable information.

6. File an Appeal Within the Deadline

Timing plays a key role when you decide to challenge your assessment in Texas. Missing the deadline can prevent your case from moving forward. Hence, review your notice quickly and act within the given timeframe.

A Texas property tax appeal allows you to present your concerns and request a reassessment. Filing on time ensures that your case receives proper attention. This step keeps your opportunity active and supports a fair review of your property value.

7. Consider Professional Guidance if Needed

Some cases may require expert support to handle complex details. Limited time or lack of knowledge can make the process difficult to manage alone. Therefore, professional guidance can provide clarity and direction.

Experts understand local rules in Texas and know how to present strong cases. Their support can improve your chances of a better outcome. Seeking help at the right time ensures that each step is handled correctly and reduces stress during the process.

Final Words

Managing a home comes with many responsibilities, and property taxes are an important part of protecting your family’s investment. After receiving a property tax assessment notice in Texas, taking time to review the details and understand your options can make a big difference for your household budget.

From checking for errors to filing an appeal when needed, each step helps homeowners feel more confident and prepared. With the right information and a thoughtful approach, Texas families can make smarter decisions and keep their finances on track for the future.

The Restaurant Design Trend Quietly Taking Over Home Dining Rooms Right Now

0 · May 6, 2026 · Leave a Comment

Home dining rooms are beginning to feel less like a showroom and more like the nicest table at a favorite neighborhood eatery. That transition came quietly. It did not include a single viral furniture piece or a designer asking everyone to throw away their formal dining sets.

It snuck in through subtler decisions, such as a curving bench against the wall, a café-style round table near the kitchen, dark pendant lighting, upholstered chairs that encourage longer conversations, and mixed seating that appears to have been purchased in stages.

For many years, the dining room was expected to behave. It featured a matching table and chairs, reliable lighting, and an air of occasion that often made the place feel too formal for regular use. Families passed it more frequently than they utilized it. Guests appreciated it, but no one really settled in.

That is why the language of restaurant design is showing up inside private homes. People are not copying restaurants directly. They are borrowing the feeling of a space that invites comfort, movement, conversation, and repeated use.

Homeowners are now borrowing the emotional intelligence of restaurant designers. They desire dining areas that are intimate, adaptable, warm, and functional. They want home dining rooms that are suitable for morning coffee, schoolwork, takeaway nights, vacation dinners, wine with friends, and quiet Sunday lunches. In other words, they want the dining room to cease acting and begin living.

home dining rooms

The End of the Untouched Dining Room

The old formal dining room had a strange problem: it was designed to be impressive, but not necessarily inviting. Everything matched. Everything had its place. The table was large enough for events that happened only a few times a year, while the everyday meals moved to the kitchen island, the sofa, or anywhere else that felt easier.

Restaurant-inspired design changes that relationship completely.

A restaurant does not have the luxury of creating a room that looks beautiful but feels stiff. Every seat has to earn its place. Every corner has to support movement, comfort, visibility, and atmosphere. When that thinking enters the home, the dining room becomes less precious and more practical.

The trend is not about literally copying a restaurant. Nobody needs a host stand near the entry or a service station beside the sideboard. The deeper idea is about designing for actual behavior. Where do people naturally gather? How long do they sit? Does the lighting in the room flatter the room after sunset? Can someone slide in easily with a plate? Does the space feel special without feeling untouchable?

That is why banquettes, benches, bistro tables, café chairs, wall seating, and layered lighting are appearing in homes that once would have chosen a traditional dining set by default.

Why Restaurant Seating Feels So Right at Home

The biggest change is in the seating. Homeowners are shifting away from the strict group of six matching chairs, opting for combinations that seem more personal. One side of a bench. With upholstered chairs on the ends. Slim wood chairs at the table. A curved banquette in a corner. The effect seems familiar because restaurants have indoctrinated us to regard mixed seating as comfort rather than compromise.

The shape of the seats at a restaurant affects the mood before the first order is placed. A booth is private. Banquettes are social. A circular table is for discussion. It’s a fun, casual setup at bar height. Today, homeowners are employing those same signals for dining rooms, breakfast nooks, and open-plan kitchen areas.

This is especially helpful in smaller homes, apartments, and townhouses, where every square inch counts. A built-in bench or banquette can be placed against a wall to provide the illusion of more space while providing ample seating for guests. It also softens the area, especially when combined with cloth, leather, textured cushions, or warm wood.

And there’s a psychological reason it works, too. One of the easiest ways to make customers feel cared for is through restaurant seating. A booth surrounds the body. The backrest is curved for support. A padded bench encourages people to linger. When those nuances enter the home, dinner becomes less of a scheduled routine and more of a tiny daily ritual.

The Café Corner Becomes the New Dining Room

One of the strongest versions of this trend is the rise of the café corner. Instead of building the room around a large rectangular table, homeowners are creating smaller, more atmospheric dining zones. A round table beside a window. Two comfortable chairs under a pendant light. A bench tucked into a kitchen corner. A narrow table placed against a wall with art above it.

The effect is immediate. The room feels more intimate, more European, and more useful.

A café-style dining corner does not need much space to feel complete. In fact, part of its charm is scale. It understands that most meals are not grand events. They are breakfasts before work, quick lunches, late-night snacks, and slow conversations that happen without planning.

A few details make the look work especially well:

  • A round or small rectangular table that keeps conversation close
  • Upholstered, wood, or metal seating with a commercial-inspired feel
  • Warm pendant lighting is placed low enough to create an atmosphere
  • Wall art, mirrors, or shelving that gives the area personality
  • Durable surfaces that can handle daily use without looking fragile

This is where restaurant design becomes quietly powerful. It teaches the home that a dining space need not be large to feel important. It only has to feel intentional.

Lighting Is Doing More Emotional Work

Restaurant designers know lighting better than virtually anyone. Bad lighting can make fine cuisine look flat, great furniture look cold, and a bustling space feel uncomfortable. A well-placed light may turn a plain table into a place to go.

That lesson is being learned in home dining rooms.

Layered lighting is replacing or softening bright overhead lamps. In the room, pendant lights, sconces, shaded lamps, dimmers, and warmer bulbs are becoming key. Rather than uniformly lighting the entire space, homeowners are generating pockets of warmth around the table.

That restaurant-like glow influences behavior. People are living longer. The food looks better. The conversations seem calmer. Even a weeknight supper can feel like it’s in a more thoughtful time of day.

This is important since dining rooms are no longer judged on how they look at midday. They operate in the evening, when the house is slowing down, and the room has to carry the vibe. A great chair or table might disappear in terrible lighting, but even modest pieces of furniture can look elevated when the lighting is soft, focused, and warm.

home dining furniture

Durability Is Becoming Part of the Look

For a long time, home dining furniture leaned heavily on appearance. The question was simple: Does it match the room? Restaurant-inspired design adds a better question: can it survive the way people actually live?

That is why durable finishes, easy-clean upholstery, metal frames, solid wood, laminate tops, and commercial-style construction are finding their way into residential spaces. Homeowners are tired of furniture that looks delicate, scratches easily, stains quickly, or feels too fragile for children, pets, guests, and daily meals.

Restaurant design makes durability look stylish instead of purely practical. A metal chair can feel graphic and modern. A wood table with a sturdy base can feel grounded. A vinyl or performance-fabric seat can look polished while still being easy to wipe down. A pedestal table can improve movement in a compact room.

The home dining room is becoming less about preserving furniture and more about using it to its full potential. That is a major cultural change. People want homes that support hosting, remote work, family routines, hobbies, and casual gatherings. Dining furniture now has to carry more of that weight. It cannot only be beautiful on delivery day. It has to keep showing up.

The New Dining Room Feels Collected, Not Matched

Perhaps the most charming part of this trend is its rejection of perfect matching. Restaurant-inspired homes often feel layered, as if the pieces came together over time. A vintage-style chair beside a modern table. A built-in bench with loose cushions. A sculptural pendant over a simple top. A dark wood finish paired with lighter upholstery. This collected look feels more human.

Restaurants have long used this approach to create mood. The best spaces rarely feel like every item came from one catalog page. They mix texture, height, color, material, and shape to create memory. Homes are now doing the same because people want dining rooms with character, not just coordination.

That does not mean the room should feel random. The strongest spaces still have a clear visual thread. Maybe it is a warm wood tone, a repeated metal finish, a shared color palette, or a balance between soft and structured pieces. The goal is not disorder. The goal is personality. A dining room should look like people belong there before they even sit down.

A More Useful Kind of Beauty

The restaurant design trend that is sweeping home dining rooms isn’t truly about restaurants. It is about function, comfort, and environment, finally becoming part of what homeowners find beautiful.

A space used every day has a certain kind of elegance. It transports coffee cups, dinner plates, laptops, flowers, birthday cakes, school papers, and late-night talks. It varies with the hour. It invites people in rather than instructing them to behave around the furniture.

That is why this tendency is likely to continue. It solves an actual problem. It restores the dining room’s original purpose.

The most desirable home dining rooms right now don’t feel formal, frozen, or overly adorned. They feel alive. They incorporate the comfort of a beloved café, the intimacy of a booth, the functionality of professional furnishings, and the rich light of a well-designed restaurant.

For homeowners, this could be the most important lesson. The greatest dining room is not one that is reserved for exceptional occasions. It is the one who elevates regular meals into something worth sitting down for.

Budget-Friendly Home Ideas That Don’t Feel Like Compromises

0 · May 4, 2026 · Leave a Comment

Your home is your sanctuary. More importantly, if you own it, it is your equity. Done right, you can transform your home so that it grows with you and your needs. In fact, upgrading and updating your space is by far one of the best ways to get the most out of your property. Moving often comes with high costs and fees, and unless you are downsizing or moving to a far more affordable area, it could put you in a worse situation.

As a mom, I know how important it is for a home to grow with your family without stretching your budget too thin. The good news is you do not have to move or spend a fortune to make your space feel fresh and functional. With a few thoughtful updates, you can create a home that feels beautiful, organized, and just right for your everyday life.

Budget-Friendly Home Ideas

First-Up, Understand Your Budget

Before we get into the home upgrades and home ideas that don’t feel like compromises, you first need to outline your budget. Yes, your budget will, first and foremost, be what you have in savings. That being said, there are a few home upgrades that where it will make sense to take out a Home Equity Line of Credit (HELOC) instead.

You’d want to get in touch with providers like Achieve to get a HELOC to free up equity in your home to:

  • Add an extension
  • Convert the attic space into a bedroom
  • Renovate to your taste
  • Invest in renewable energy solutions

Budget-Friendly Home Ideas

Now that you know you do have options for big-scale, big-budget upgrades, let’s get into the small improvements that can help you take either those upgrades or your existing home further without compromise:

Add Custom Storage Everywhere

The biggest reason people feel constrained in their homes is that they don’t have enough space. Before you commit to the high cost of moving or selling at a loss, it’s a good idea to invest in custom storage. Every closet should have shelves, drawers, hooks, and rails. You should look to add shelves to every nook (or a full custom cupboard).

You can add these features on a tight budget as well if you’re handy, and use Ikea closet solutions to give yourself the storage you need to feel like you can breathe in your space again.

Improve the Paint

Some homes just need a new lick of paint to feel fresh and new again. If you really want to transform the space with a luxury finish, however, buy or rent a wall sander and sand between paint layers. Finish it off with a watered-down top coat that really seeps into any remaining texture. This will give you that luxury finish.

Budget-Friendly Home Ideas for improvement

Change Out Your Furniture

If you’ve brought old furniture into your new space, there’s a chance it just doesn’t fit. If that’s the case, sell it, and find something that works with the space you now have. A dining table that’s too big for your dining room is always going to cause a headache. Replacing it with something smaller will help everything feel balanced and even more luxurious.

Treat Yourself to High-End Finishes

One final way you can make any home feel beautifully luxurious without breaking your budget is just to change out the fixtures. New handles, new taps, and new lights can slowly be replaced with more luxury, creative, or beautiful alternatives that help make your space feel beautiful without compromise.

Final Thoughts

Creating a home you love does not have to mean big renovations or a huge budget. Little changes can go a long way in making your space feel more comfortable, organized, and truly yours.

By focusing on simple upgrades that fit your lifestyle, you can build a home that works for your family today and still grows with you over time. It is all about making thoughtful choices that bring both function and joy into your space.

How to Clean a Sand Filter Pump Without Replacing Filter to Keep Your Backyard Pool Clear

0 · Apr 30, 2026 · Leave a Comment

Keeping the backyard pool clean can feel like a full-time job, especially when the water suddenly turns cloudy for no clear reason. Before you assume something is broken, it is often just a dirty sand filter that needs a little attention.

Many pool owners think they need to replace the filter when performance drops, but that is rarely true. With a simple cleaning routine, you can bring your sand filter pump back to life and enjoy clear water again without spending extra money.

This guide walks you through each step in a simple, manageable way so you can get your pool back to looking fresh and ready for family time.

backyard pool

What You Need Before You Start Cleaning

Before you touch your sand filter pump, it pays to get organized. Jumping straight into the process without the right tools or knowledge can lead to missed steps, water mess, or even minor damage to your system. Take a few minutes to prepare, and the whole job becomes much smoother.

The Tools and Supplies You Should Have Ready

You do not need anything fancy to clean a sand filter pump. Most of what you need is probably already in your garage or laundry room. Here is what to gather before you start:

  • A garden hose with good water pressure
  • A chemical filter cleaner or degreaser (liquid or powder form)
  • A bucket for mixing or rinsing
  • Safety gloves and eye protection
  • A wrench or filter key for removing the lid or drain cap
  • A flat surface or tarp to work on if you plan to remove internal parts

If you own a sand filter pump like this or a similar multi-port valve system, check your product manual first. Some models have specific valve settings or pressure release steps that differ slightly from standard setups. Knowing your specific sand filter pump’s design ahead of time prevents unnecessary confusion mid-task.

sand filter pump for backyard pools

Photo: VEVOR

Understanding How Sand Filters Get Dirty

Sand filters trap debris, algae, oils, and fine particles as water passes through the sand bed. Over time, this buildup does not just slow filtration: it also creates channeling, where water finds narrow paths through the clogged sand rather than flowing evenly. The result is poor water clarity, even though the pump appears to run fine.

Two main types of buildup affect sand filters. The first is physical debris like leaves, dirt, and insects. The second is chemical buildup from body oils, sunscreen, and calcium deposits. Physical debris responds well to backwashing alone, but chemical buildup requires a dedicated filter cleaner to break it down properly.

Safety Checks to Complete Before You Begin

Safety is not optional here. A pressurized filter system that is opened without proper preparation can release water forcefully or damage the multiport valve. Before you do anything else, turn off the pump completely at the power source. Do not simply switch it to a low setting.

Next, release the air pressure from the filter tank. Most tanks have a small air relief valve on top. Open it slowly until you hear the pressure hiss out, then close it again. After that, set your multiport valve to the correct position for the task you are about to perform. If you are backwashing first, set it to BACKWASH. If you are adding a chemical soak, you will set it to FILTER or RECIRCULATE depending on your system. Double-check that all hose connections are secure before you proceed.

Step-by-Step Process to Clean Your Sand Filter Pump

Now that your tools are ready and your safety checks are complete, it is time to move through the cleaning process itself. Each step builds on the last, so follow the order closely for the best results.

Step 1: Backwash the Filter to Remove Loose Debris

Backwashing is the first and most direct way to flush out accumulated debris. It reverses the flow of water through the sand bed, which lifts and expels trapped particles out through the waste line.

To start, attach your backwash hose to the waste outlet so dirty water does not flood your yard or pool area. Then set your multiport valve to the BACKWASH position and turn the pump back on. Run it for two to three minutes or until the sight glass (the small clear window on the valve) shows clear water instead of murky brown or gray water.

Once the water runs clear, turn the pump off again. Move the valve to RINSE and run the pump for about thirty seconds to resettle the sand bed. Skip this rinse step, and you risk sending loosened debris back into your pool. After the rinse, turn the pump off and move on to the next step.

Step 2: Apply a Chemical Filter Cleaner for a Deep Soak

Backwashing handles the physical debris, but it does not touch the oils, scale, and fine organic matter embedded in the sand. For that, you need a chemical soak.

Most filter cleaners come with instructions for either a direct-add method or a pre-mix method. For the direct-add approach, set your valve to FILTER, pour the recommended dose of cleaner into the skimmer basket, and let the pump circulate it for about an hour. Then turn the pump off and let the cleaner sit in the sand bed overnight if possible, or for at least eight hours. This soak time allows the chemical to break down stubborn buildup that a backwash alone cannot reach.

After the soak, set the valve back to BACKWASH and run the pump again for two to three minutes to flush out the dissolved grime. Follow this with another thirty-second RINSE cycle. At this point, your sand bed should be significantly cleaner, and your filter flow rate should improve noticeably.

Step 3: Inspect the Multiport Valve and Reassemble the System

The sand itself is not the only part of your filter that collects grime. The multiport valve, the laterals inside the tank, and the pressure gauge all deserve a quick check while you have the system in maintenance mode.

Look at the pressure gauge first. A clean, properly functioning filter typically operates between 8 and 15 PSI, depending on your system. If the gauge still reads high after the cleaning steps above, you may have a partial blockage in the laterals, which are the spoke-like tubes at the bottom of the sand tank that distribute water. In that case, you can remove the sand, rinse the laterals with a hose, and reinstall.

For the multiport valve, inspect the O-ring or gasket under the lid. If it looks cracked, flat, or brittle, replace it before you seal everything back up. A worn O-ring causes air leaks and pressure loss, which directly affects how well your filter cleans the water. Once everything looks good, reassemble the system, prime the pump, and restart it to confirm normal operation.

Conclusion

Taking care of your sand filter pump is one of those small home maintenance tasks that makes a big difference in how your backyard feels. A quick backwash and an occasional deep clean can keep your pool water clear and inviting all season long.

With a little routine care every few weeks, you can avoid bigger problems and spend more time enjoying the pool with your family instead of fixing it. A clean filter means less stress, clearer water, and more relaxing days at home.

  • « Go to Previous Page
  • Page 1
  • Page 2
  • Page 3
  • Page 4
  • Page 5
  • Page 6
  • Interim pages omitted …
  • Page 76
  • Go to Next Page »

Primary Sidebar

Heather from Whipperberry
Hello... my name is Heather and I'm the creator of WhipperBerry a creative lifestyle blog packed full of great recipes and creative ideas for your home and family. I find I am happiest when I'm living a creative life and I love to share what I've been up to along the way... Come explore, my hope is that you'll leave inspired!

Footer

  • Privacy Policy
  • Crafts
  • Food
  • Gifts
  • Holidays
  • Home
  • Mom Life
  • Recipes
  • Travel

Copyright © 2026 · Seasoned Pro