• Skip to primary navigation
  • Skip to main content
  • Skip to primary sidebar
  • Skip to footer

Whipperberry

WhipperBerry • Your Home For Creative Inspiration

  • Home
  • Recipes
    • Starters
    • Easy Weeknight Dinners
    • Main Dish
    • Salads
    • Side Dish
    • Soups & Stews
    • Desserts
    • Breakfast
    • Miscellaneous
  • Tutorials
    • Creative Crafts
    • DIY Decor
    • Fabric Crafts
    • Food How-To
    • Jewlery
    • Paint Projects
    • Paper Art
    • Party Styling
    • Photography and Graphic Design
    • Silhouette
  • Holidays
    • Easter
    • Mother’s Day
    • Father’s Day
    • 4th of July
    • Halloween
    • Thanksgiving
    • Christmas
    • Valentine’s Day
  • Gift Ideas
    • Gifts For Everyone
    • Gifts for Dad
    • Mother’s day
    • For The Girls
    • For The Kids
    • Teacher Gift Ideas
    • Christmas
  • Printables
    • Holiday
    • Gift Idea
    • LDS Primary
  • Travel
  • About
    • Terms
  • Contact
  • Nav Social Menu

    • Facebook
    • Instagram
    • Pinterest
    • RSS
    • Twitter

Lifestyle Crafts

Fun LED Glove Ideas You Can Try at Home

0 · Apr 2, 2026 · Leave a Comment

As a mom who loves simple crafts and creative projects, I am always looking for new ways to make everyday moments feel a little more fun.

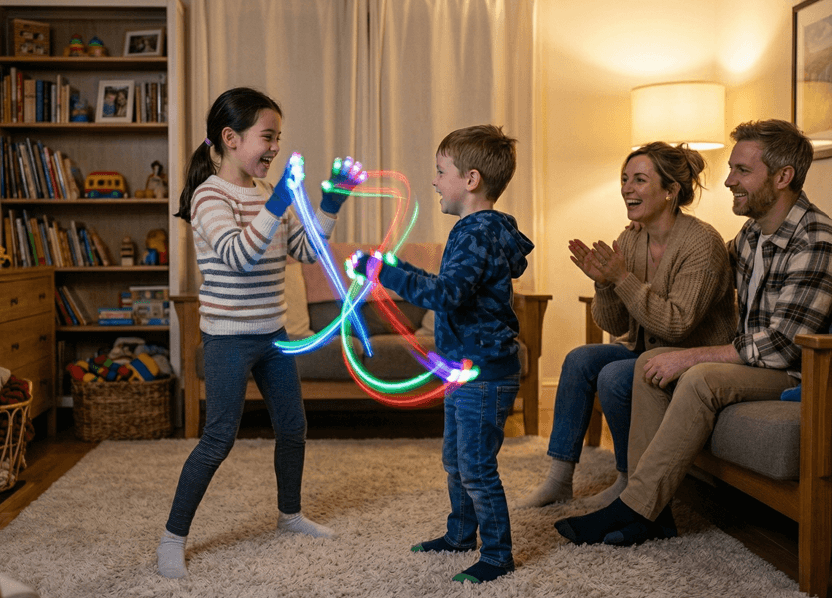
LED gloves turned out to be one of those unexpected finds. What started as a fun accessory quickly became a creative activity we could enjoy at home. With just a bit of space and some music, they can turn simple hand movements into colorful light patterns.

Whether you are looking for a unique DIY activity, a creative break, or something new to try with your family, LED gloves offer an easy way to explore movement, light, and imagination together.

Fun LED Glove Family Activities

Where Movement Meets Light

Gloving is all about timing and control. Each flick, wave, and transition is synced to music, but it is also something you can explore at your own pace at home.

LED gloves turn your hands into light sources. With different colors and patterns, they create trails and shapes that change as you move. Slow movements create smooth, flowing lines. Faster motions create quick flashes and accents. As you try different movements, you start to see how even small changes can completely shift the effect.

While many people first notice gloving at an EDM event, it is just as fun to bring that creativity into your own space. You do not need a crowd or a big setup. A dim room, a bit of music, and a few simple movements are enough to get started.

At home, gloving becomes more personal and hands-on. You can experiment freely, try new patterns, and build your own style without pressure. It can feel less like a performance and more like a creative project you can keep improving over time.

Some people enjoy sharing simple light shows with family or filming short clips to see how their movements look. Others use it as a way to relax and focus. However you approach it, gloving is a flexible activity that fits easily into everyday life.

Learning gloving as a creative outlet

Getting into gloving might seem intimidating at first, especially when you see experienced performers moving with precision. But like most creative skills, it starts with simple patterns.

You don’t need to master everything at once.

Begin with basic finger rolls, simple waves, or controlled isolations. From there, you build muscle memory. Your hands start to move more naturally, and your timing improves. Using LED gloves during this process adds an extra layer of feedback. You can see your movements more clearly, which helps you refine them. Over time, what felt mechanical starts to feel expressive.

Beyond festivals: everyday creativity

While LED gloves are closely tied to EDM culture, they’re not limited to it. People are finding ways to incorporate them into different creative spaces:

  • Filming short-form content or reels
  • Experimenting with light painting photography
  • Adding visual elements to dance practice
  • Enhancing cosplay or character styling with dynamic light effects
  • Creating ambient visuals for small gatherings or intimate events
  • Practicing mindfulness or flow-based movement as a form of stress relief

In these contexts, gloving becomes less about performance for a crowd and more about personal exploration. You can try new patterns, test different color combinations, and see how light interacts with your environment—all without the pressure of an audience.

DIY projects and customization

One of the more interesting aspects of LED gloves is how customizable they can be.

Depending on the set you choose, you can adjust color modes, program specific light sequences, and sync patterns to different moods or songs.

For those who enjoy tinkering, this opens up a range of DIY possibilities. You’re not just using the gloves—you’re shaping how they behave.

Some people even take it further by modifying their setups or combining LED gloves with other wearable tech. It becomes less about a single accessory and more about building a system that reflects your style.

Traveling with light

Bringing a creative tool with you when you travel changes how you experience a place. Packing LED gloves might not be the first thing that comes to mind, but they can add a unique layer to your trips.

Imagine: Practicing gloving on a quiet beach at night. Or filming light patterns against city skylines. Or maybe sharing a spontaneous light show with new friends.

Because they’re compact, LED gloves are easy to carry. And since they don’t rely on a specific setting, you can use them almost anywhere. They turn ordinary moments into something a bit more memorable. And in case you’re planning to make your travel worth sharing, here are some tips.

The balance between skill and expression

What makes gloving interesting is the balance it requires. On one hand, there’s technique—precision, timing, control. On the other, there’s expression—how you interpret the music, how you choose to move.

LED gloves sit right at that intersection. They reward practice, but they also encourage individuality. Two people can perform the same basic pattern and still look completely different.

That’s where personal style comes in – the pace of your movements, the way you transition between patterns, the color choices you make.

Keeping it approachable

It’s easy to look at advanced performances and feel like you’re far behind. But the reality is, everyone starts somewhere. You don’t need perfect technique to enjoy LED gloves. You just need curiosity and a willingness to try.

Set aside a few minutes:

  • Put on music you enjoy
  • Experiment with simple movements
  • Pay attention to how the light responds

That’s enough to get started. Over time, those small sessions add up. Your hands become more comfortable, your movements more fluid. And without realizing it, you’re already practicing gloving.

Final Thoughts

One of the things I love most about LED gloves is how easy they are to turn into a creative activity at home.

You do not need special skills or a perfect setup. Just a few minutes, some music, and a willingness to try something new can go a long way. Whether you are practicing simple movements, experimenting with light patterns, or creating your own mini light show, it is a fun way to spend time together.

If you enjoy DIY projects that spark creativity without a lot of prep, this is definitely one to try. Start simple, have fun with it, and see where your ideas take you.

Big Top with Lifestyle Crafts

0 · Apr 10, 2012 · 3 Comments

I am always so excited when Lifestyle Crafts has a new product release and this new Big Top collection is super fun…


The collection has a playful circus theme with many different elements that can be used for a circus themed event or several elements that have general appeal as well. Here is a sample of some of the dies in the collection…

I fell in love with the hot air balloon and thought it would be a perfect design element for my daughters 5th grade graduation celebration. You know me, I'm a less is more kind of girl. I used Lifestyle Crafts lovely letterpress paper as the base for the card and then the simple, yet stunning hot air balloon coupled with Divine Twine and a stamped, "Up Up and Away" for the fun invitation.

How cute is that? Plus it's so easy to make. Did you know that you can use any of the Lifestyle crafts cutting and embossing products with ANY cutting platform?!  For real!! You don't need to have an Epic Tool or the fabulous Revolution… You can use the Sizzix systems or the Cuttlebug as well. Isn't that great.  I love how they make sure that their fun design elements aren't product specific so that you can have the freedom to use whatever system you already have.  Less clutter in the craft room the better in my mind!!

Lifestyle Crafts has even sweetened the deal for all of you guys!  Did you know that you can get 20% off your entire purchase just by entering WHIPPERBERRY at checkout? This deal is good ANYTIME!! Yep, 24/7, 356 days of the year. You don't have to wait for a special deal, although they have them often and they will even place the 20% ON TOP of the sale price.  Squeal, yea… Gotta LOVE a good deal.

For example… If you don't have a great cutting tool yet, the fabulous Revolution is on sale right now for $59.00 marked down from $89.99.  You can also enter WHIPPERBERRY at checkout to receive an additional 20% off the sale price while supplies last.  Now is a great time to get one of these great tools!

Here are some more of the fun projects that I've made with my Lifestyle Crafts products…


Valentines, Bakery Box, Star Bubble Party Favor

So what do you think?  Do you like the new Big Top collection?  What would you use it for? Come share some of your great ideas!!

Crayon Heart Valentines | Lifestyle Crafts

84 · Jan 10, 2012 · 132 Comments

Valentine's Day is right around the corner and today I thought I would share my "you color my WORLD" Crayon Heart Valentines, made with the new Sweetheart die collection from Lifestyle Crafts and heart shaped crayons made with melted Crayola crayons.

Isn't that fun?  I am always a fan of homemade Valentines for the kiddos classes every year.  It's also a bit of a challenge to make valentines that are fun, colorful and easy on their sugar intake for the day. 

I know this isn't a new idea by far… My neighbor made these heart shaped crayons several years ago after finding this fun idea in Family Fun magazine, but I thought it would be a perfect fit for the new Sweetheart Nesting Hearts from Lifestyle Crafts.  Cutting the hearts was super simple using my Epic three in one tool from Lifestyle Crafts.  The Epic tool cuts, embosses and can create beautiful letterpress projects as well.

But I am getting ahead of myself!  Before we can make the cards we need to make the heart shaped crayons…

You will need to gather all the old crayons in the house… if your house is anything like mine, that won't be a problem.  You can also purchase new crayons as well.  I will have to admit, the new crayons were easier to remove the labels from. I used an X-ACTO knife to make a slit down the length of the crayon to easily remove the labels.  The older crayons took a little more coaxing.

Once you've removed all of the labels, break the crayons into small pieces.  The smaller the better…

I also found that separating them into color families made for the best looking crayons, but that is completely up to you! 

You will need to use a heart shaped silicon baking mold to melt your crayons in.  I found mine at Michaels in the baking section and it worked like a dream.  The girls and I decided that we wanted our crayons to be a little glittery so we added about 1/2 a teaspoon of silver glitter to the bottom of the baking mold. Then we filled the baking mold with the crayons about 1/3 full. The mold I used was pretty deep so depending on what you use you will have to play around with this.

Place in your oven that has been pre-heated to 300 degrees and baked for 15 minutes.  The crayons will become completely liquefied so be careful when you pull them out of the oven.  Carefully place them on the counter to cool.  You want to make sure that you don't move them around too much and mix the colors more than you want.  Wait for about 20 minutes or until the crayon is solid again and then gently remove it from the mold and let cool completely.

I made 57 hearts with the Wilton Mini Heart Mold using approximately 200 crayons.

Now it's time to pull out your Epic Tool to make the heart shaped cards for you to place your new crayons on.  I used two different dies from the new Sweetheart line for this project.  The Nesting Heart and the Nesting Scallop Hearts work beautiful for this card.

I decided that since I wanted the focus to be on the crayons I used a basic white watercolor paper for the base of the card. 

Once I cut out the heart shapes, I used my rolling alphabet stamp to create the fun saying on the card. "Valentine… you color my WORLD"  I just LOVE that look!!

Of course I had to dress up the heart crayons with some Divine Twine from Whisker Graphics. I just wrapped the hearts randomly and tied with a bow or made little twine bundles for the decoration…

This is such a fun project to do with the kiddos.  My girls and I had  ball gabbing while we were prepping the crayons. After that it was a perfect opportunity to have a color class while we created our crayon concoctions.  From start to finish this is an easy and elegant Valentine treat that your little ones {or big ones} will love to share with their friends this Valentine's Day!!

Come back tomorrow I have another fun Anthro inspired Valentine project made with my Sweetheart dies from Lifestyle Crafts!

Here are some more WhipperBerry Lifestyle Craft projects…


Party favors, bakery boxes & bubble party favors  


{Lifestyle Crafts Review} DIY Holiday Gift Tags

0 · Sep 20, 2011 · 7 Comments

Far be it from me to put a rush on things… but whether we like it on not, the HOLIDAYS are around the corner!! My motto this year {yes, I am borrowing it from the Boy Scouts} BE PREPARED. The only way that we are going to be able to create a fun handmade holiday season is to start now and this is the perfect project to get a head start on… Holiday Gift Tags.

How many times have the gift tags become a forgotten item in the holiday decor?  Even worse, you are stuck with a store bought tag when you know that you could make some sooooo much better.

…

Read On →

  • Page 1
  • Page 2
  • Go to Next Page »

Primary Sidebar

Heather from Whipperberry
Hello... my name is Heather and I'm the creator of WhipperBerry a creative lifestyle blog packed full of great recipes and creative ideas for your home and family. I find I am happiest when I'm living a creative life and I love to share what I've been up to along the way... Come explore, my hope is that you'll leave inspired!

Footer

  • Privacy Policy
  • Crafts
  • Food
  • Gifts
  • Holidays
  • Home
  • Mom Life
  • Recipes
  • Travel

Copyright © 2026 · Seasoned Pro