• Skip to primary navigation
  • Skip to main content
  • Skip to primary sidebar
  • Skip to footer

Whipperberry

WhipperBerry • Your Home For Creative Inspiration

  • Home
  • Recipes
    • Starters
    • Easy Weeknight Dinners
    • Main Dish
    • Salads
    • Side Dish
    • Soups & Stews
    • Desserts
    • Breakfast
    • Miscellaneous
  • Tutorials
    • Creative Crafts
    • DIY Decor
    • Fabric Crafts
    • Food How-To
    • Jewlery
    • Paint Projects
    • Paper Art
    • Party Styling
    • Photography and Graphic Design
    • Silhouette
  • Holidays
    • Easter
    • Mother’s Day
    • Father’s Day
    • 4th of July
    • Halloween
    • Thanksgiving
    • Christmas
    • Valentine’s Day
  • Gift Ideas
    • Gifts For Everyone
    • Gifts for Dad
    • Mother’s day
    • For The Girls
    • For The Kids
    • Teacher Gift Ideas
    • Christmas
  • Printables
    • Holiday
    • Gift Idea
    • LDS Primary
  • Travel
  • About
    • Terms
  • Contact
  • Nav Social Menu

    • Facebook
    • Instagram
    • Pinterest
    • RSS
    • Twitter

Easy Weeknight Dinners

Balsamic Chicken Bites Recipe

7 · Jan 21, 2016 · 1 Comment

+ This Balsamic Chicken Bites Recipe is a sponsored post written by me on behalf of Tyson Foods, Inc. All opinions are entirely my own. +

Balsamic Chicken Bites from WhipperBerry

It’s getting EXCITING!!

THE BIG GAME is almost here!

No matter who you are rooting for, the Super Bowl is always a fantastic time to gather with friends and family to enjoy some crazy excitement together and to enjoy some fantastic food!

Whether the game is a wild ride or a blowout, you want to make sure your game time snacks are ON POINT!

The Super Bowl just isn’t the Super Bowl without a scrumptious, tempting spread of all kinds of snackable treats. Just like any event or holiday, you want to make sure you have some great recipes that are tried and true so that you can look like a kitchen ROCKSTAR!

You can find all kinds of fantastic ideas at Talk About Delicious or the Talk About Delicious Game Pinterest Board. It’s packed full of great ideas. Today, I have a tasty recipe for you as well. Our family’s favorite Balsamic Chicken Bites…

WhipperBerry Balsamic Chicken Bites Perfect appetizer for the BIG GAME!

What I LOVE about this little bite sized treat is that it’s on the healthier end of the typical game time snack spectrum and it’s packed full of flavor. It’s also super easy to make, you can even make it a head of time which is fabulous, since you don’t want to be bogged down with food prep when you’re with your friends and the game is on.

I typically head to Walmart to gather all of my supplies. I love using the fresh Tyson® Chicken found in the refrigerated meat section of the store. Then I grab the rest of the ingredients for my marinade, one of the stars of the show.

Ingredients for Balsamic Chicken Bites from WhipperBerry

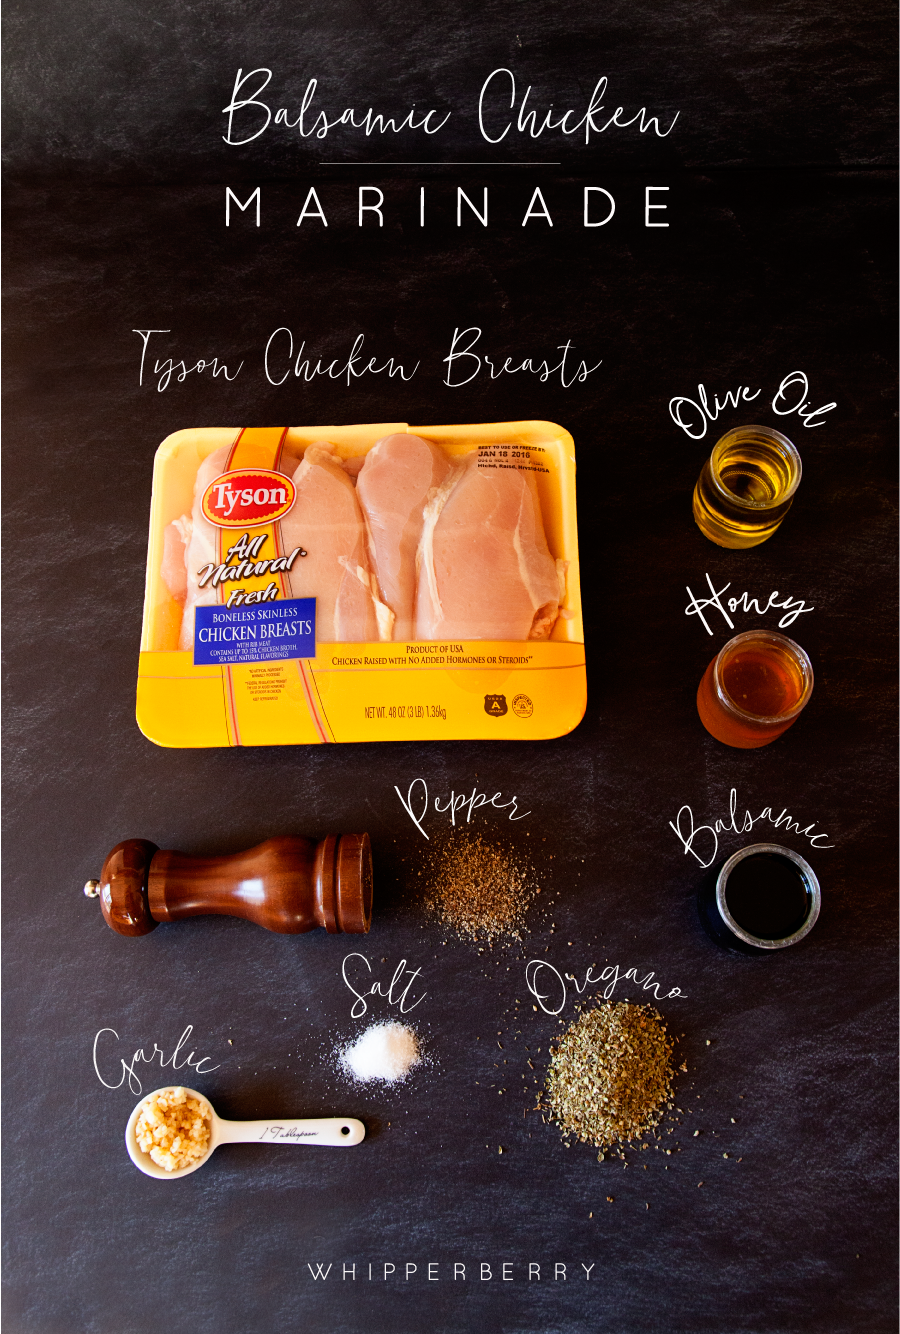
For the chicken marinade you’ll need–

1/4 cup olive oil

1/4 cup honey

1/4 cup balsamic vinegar

1 tablespoon dried oregano

1/4 teaspoon salt & pepper

1 tablespoon minced garlic

Balsamic-Chicken-Bites-4

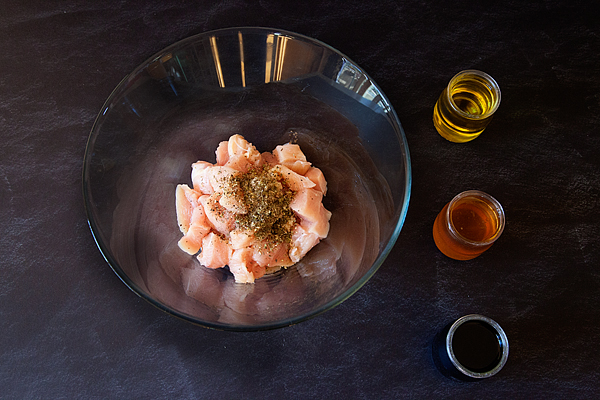
Cut two Tyson® Chicken Breasts into bite-sized pieces and add your dry ingredients.

Balsamic-Chicken-Bites-5

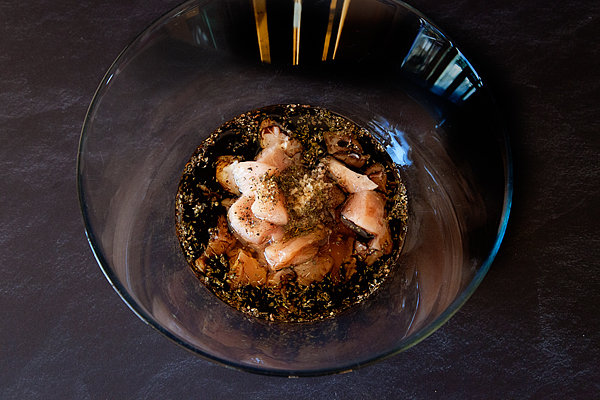
Then add your wet ingredients and mix well. Store in an air tight container or Ziploc bag for at least one hour or up to 4 hours. This is a strong marinade and you don’t want to over do it with those bite sized pieces of chicken.

Now, this marinade is one of my go-to recipes when it comes to making scrumptious chicken meals for the family throughout the year.  When I am using it with whole Tyson® Chicken Breasts, I can marinate it overnight and it will be just fine. I normally serve it with a lovely salad and some French bread and you’re good to go.

Once the chicken is full of that balsamic flavor, you’re ready to cook your chicken. Typically if I am cooking whole breasts, we grill them BUT, since these little gems won’t really work on the grill AND it’s February… I cook them inside either on a cast iron grill pan or a cast iron pan. I LOVE my cast iron cookware, I’ve grabbed most of my pans at Walmart. They are fantastic and you can’t beat the price. I purchased the pan I’m using in the photo below for less than $15!

Balsamic-Chicken-Bites-6

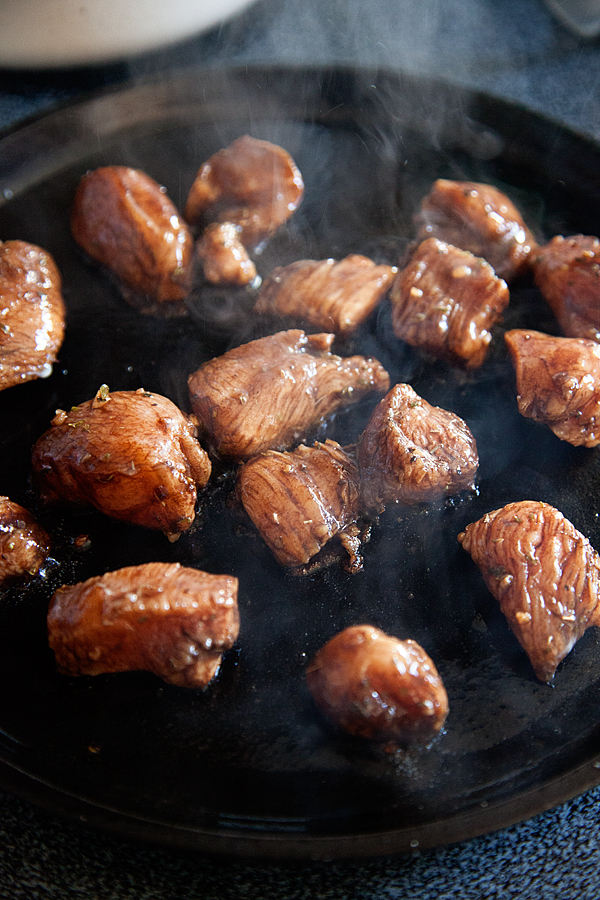
Now these little gems cook pretty quick. I heat-up my pan until it’s screaming hot and then I turn down the temperature to medium. I add a little olive oil to the pan and then place the chicken into the pan making sure not to over crowd them or add too much liquid to the pan. You want to sear them, NOT boil or steam them. I typically cook them in batches. Turn them after 1-2 minutes and continue to do so until you have a good sear on them. Make sure to keep a close watch on them. Because of the high sugar content, they can burn quickly.

These little balsamic chicken gems cook pretty fast, usually 4-5 minutes but you’ll want to check the temperature to make sure they are fully cooked and are safe at 165˚. Remove from pan and set aside until you have finished cooking all of your chicken.

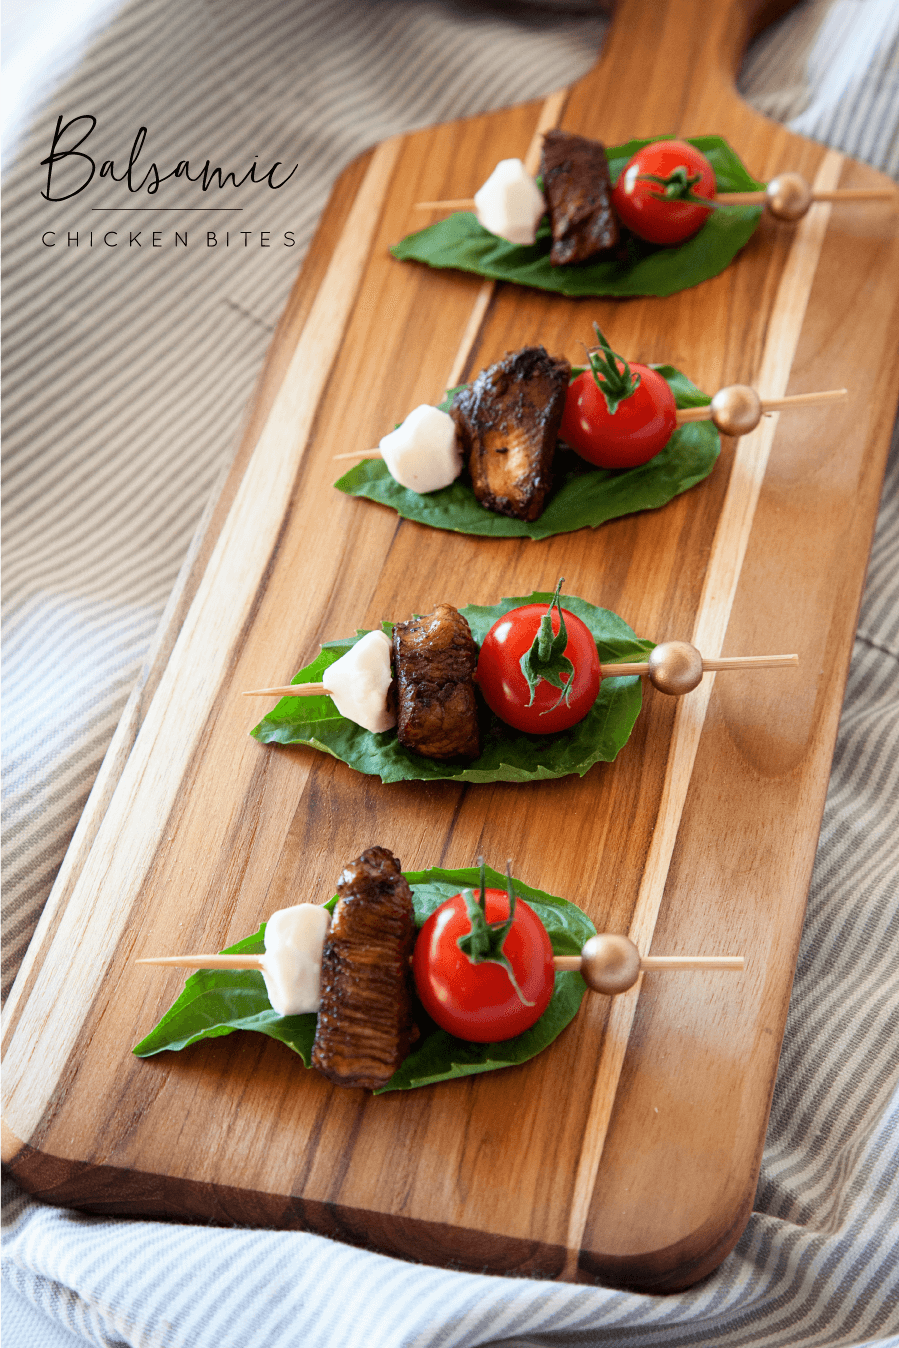
Tyson® Balsamic Chicken Bites

Next, all you need to do is assemble your Balsamic Chicken Bites. You’ll need…

How-to-assemble-Balsamic-Chicken-Bites

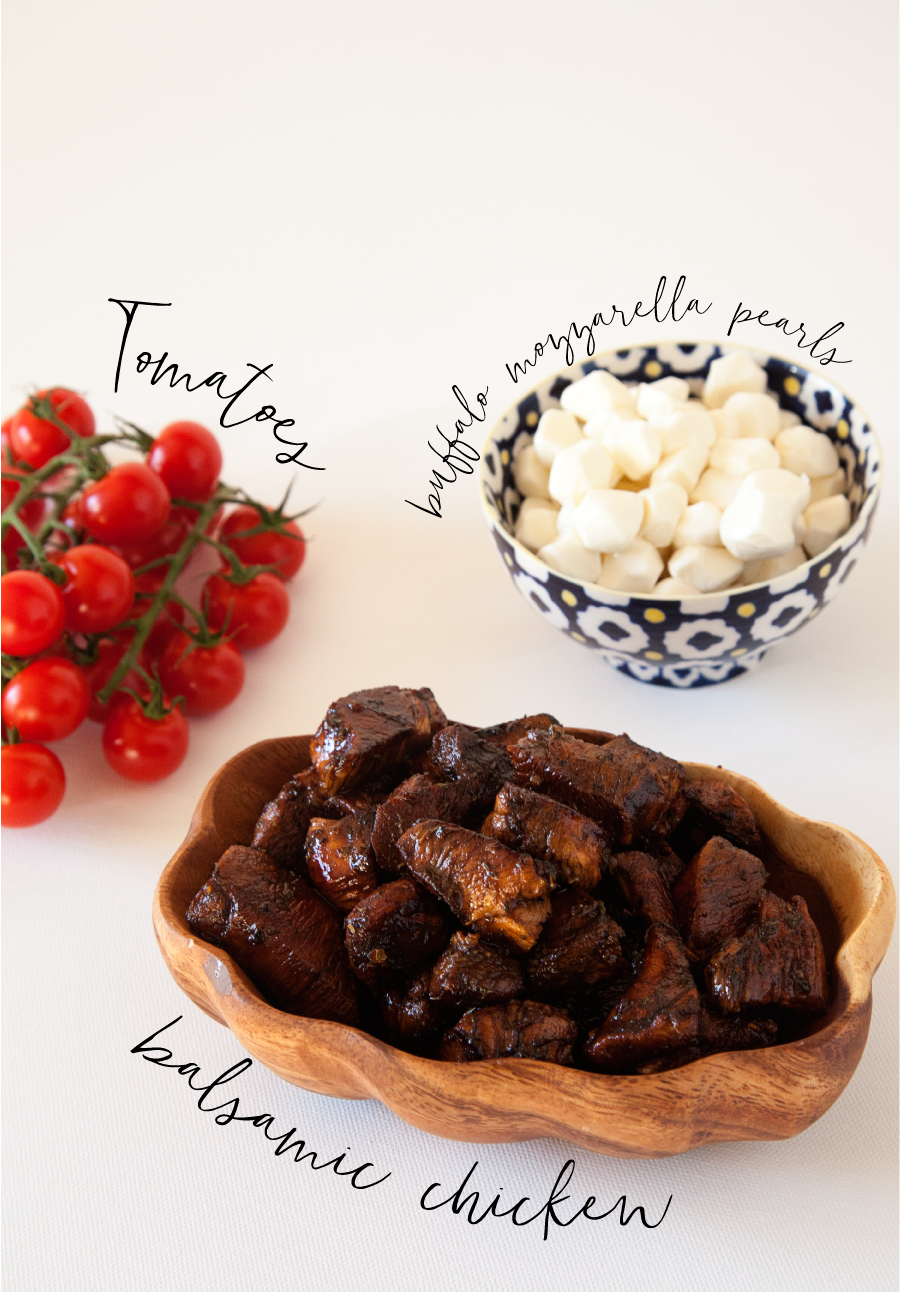
cherry or grape tomatoes

balsamic chicken gems

buffalo mozzarella pearls

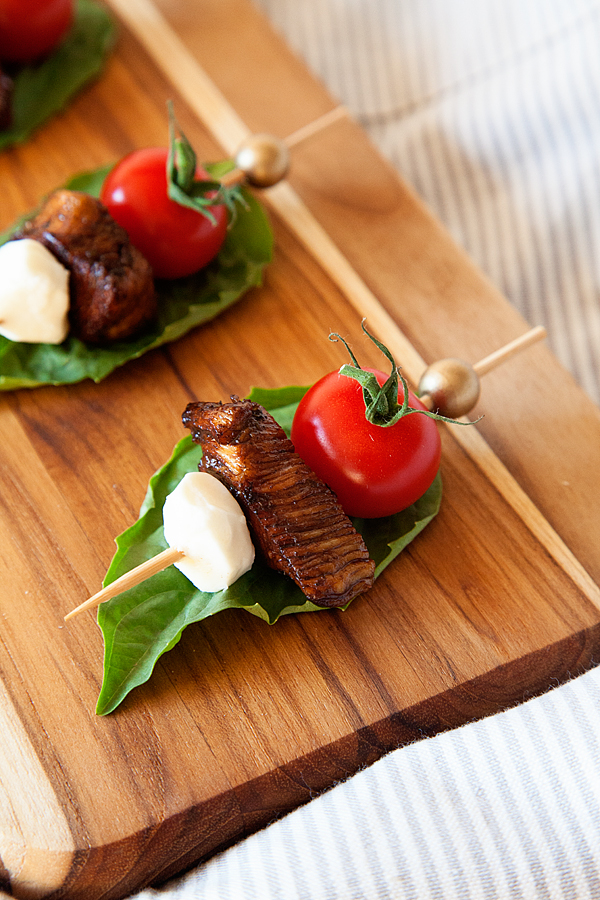
Now, the key to making this appetizer sing is to pair the Balsamic Chicken gems with some scrumptious bite-sized tomatoes like these cherry tomatoes still on the vine or some lovely grape tomatoes. Either one will work really well.

 I use a large toothpick and feed a tomato onto the toothpick followed by a balsamic chicken gem and then cap it with a buffalo mozzarella pearl.

Balsamic-Chicken-Bites-12

It’s super slick. You can either serve the chicken warm or cold. They taste great either way. I like to lay out a few basil leaves to set the Balsamic Chicken Bites on…

Balsamic-Chicken-Bites-13

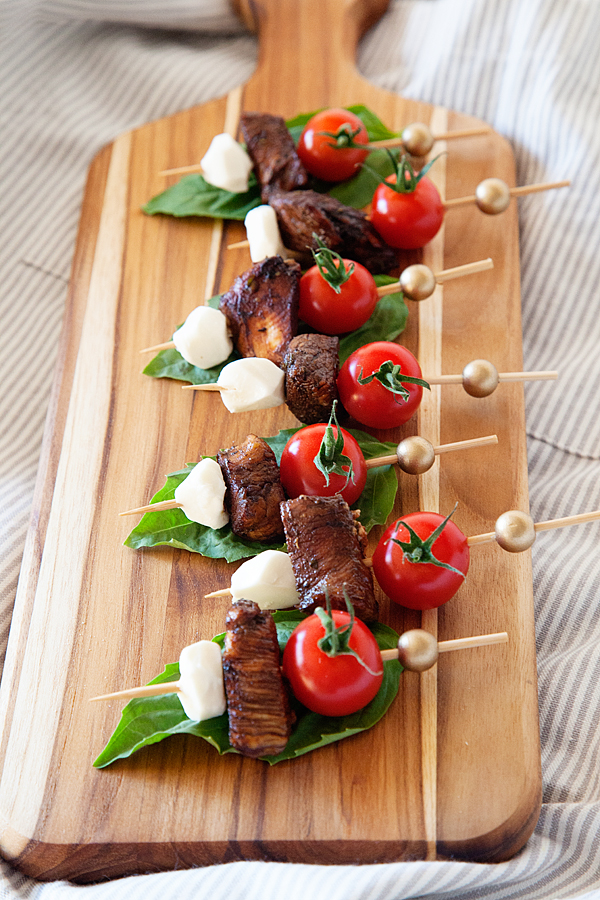
… I love how it adds some lovely color and some fresh vibrant flavors to your Super Bowl spread!

Looking for more GAME DAY ideas? Don’t forget to visit Talk About Delicious for more fantastic ideas and then visit your local Walmart to stock-up on all your game day goodies!

Summer Brunch Recipes // Peas with Bacon Side Dish

4 · Sep 8, 2015 · 1 Comment

Compensation for this post was provided by Unilever via AOL Media.  The opinions expressed herein are those of the author and are not indicative of the opinions or positions of Unilever or AOL.

Who’s ready for a beautiful summer brunch?

Lemon-Drop-Crepes-WhipperBerry

In the last little bit, I’ve shared some of my favorite brunch dishes. First, we have the Lemon Drop Crêpes…

Lemon-Drop-Crepes-by-WhipperBerry-10

Followed by a savory Summer Vegetable Frittata…

Vegetable-Frittata-by-WhipperBerry

Today… To round off the entire meal, I’m sharing a perfect side dish, Peas with Bacon…

Spring-Peas-&-Bacon---WhipperBerry-7

To me, fresh peas just scream summer. I’ve loved peas my whole life. I know they are one of those love-em-or-hate-em foods, but I LOVE them. I have fond memories of my mom giving me little bowls of frozen peas to snack-on while she was making dinner when I was little.

For this menu, I thought a nice peas dish would round out the menu nicely. I’m keeping it simple with just a few basic ingredients.

Peas with Bacon

Spring-Peas-&-Bacon---WhipperBerry-1

1 10 oz. package of fresh or frozen peas

1 tablespoon I Can’t Believe it’s Not Butter®

1/2 of a small white onion diced

3 pieces of thick cut bacon (feel free to substitute with turkey bacon as a lighter option!)

Cut your bacon into small pieces called lardons and cook in a medium sauté pan over medium heat until fully cooked. Remove the bacon and drain the remaining bacon grease. I also wipe the pan out with a paper towel to remove as much of the bacon grease as possible. As much as I love to have the bacon in this and many other dishes, I don’t want to use the bacon grease as the fat to cook my food in. Any kind of animal fat is full of saturated or trans fat that we don’t really need in our diet, but that doesn’t mean that we shouldn’t have any kind of fat.

When I am planning out meals for my family, I look for ways to add good fats to our meals, such as plant-based fats like avocados, sunflower oil, almonds (which contain omega-3 ALA) and salmon (which contain omega-3 EPA/DHA fatty acids). I’ve found one of the easiest ways to incorporate some of those good fats is to use I Can’t Believe It’s Not Butter® to my meal planning. I Can’t Believe It’s Not Butter® has 40% fewer calories and 70% less saturated fat than butter per serving. Not to mention, it has no artificial flavors, no artificial preservatives and no partially hydrogenated oils. It has non-GMO sourced ingredients, it’s cholesterol-free with 0 grams of trans fats per serving plus so much more! Now that’s the kind of good fat that I want my family eating. You can find out all kinds of good stuff about I Can’t Believe it’s Not Butter® HERE.

With all that… I took out as much bacon grease out of my pan as possible and replaced it with I Can’t Believe It’s Not Butter®. I let the I Can’t Believe It’s Not Butter melt in the pan and then add the onion and let it sweat.

spring peas 1 - whipperberry

After a minute or two I add the peas. If you are using fresh peas make sure you steam them first.

spring peas 2 - whipperberry

Sauté the peas for 3-4 minutes in the onion and I Can’t Believe It’s Not Butter add salt & pepper to taste. When the peas are cooked through, add your bacon and give it a toss.

Spring-Peas-&-Bacon---WhipperBerry-4

Add to a serving bowl and top with a dollop of I Can’t Believe It’s Not Butter & chives if you have them on hand…

Spring-Peas-&-Bacon---WhipperBerry-5

This tasty side-dish rounds out our summer brunch menu. All you need to complete the menu is to add some fresh fruit and a tasty drink like my Herbal Tea Lemonade and it will be lovely!

Herbal-tea-lemonade-from-WhipperBerry-8

One serving (1 Tbsp.) contains 295mg of omega-3 ALA, which is 18% of the 1.6g daily value for ALA

I Can’t Believe It’s Not Butter! sources ingredients that are not genetically modified. However, in the field-to-tub journey of making our buttery spread there is some contact with genetically modified vegetable oils, resulting in a small amount in this product.

Vegetable Frittata

0 · Aug 31, 2015 · Leave a Comment

Vegetable-Frittata-by-WhipperBerry

Compensation for this post was provided by Unilever via AOL Media.  The opinions expressed herein are those of the author and are not indicative of the opinions or positions of Unilever or AOL.

Not too long ago, I shared my love of all things brunch!

I shared one of my all-time favorite breakfast treats… Lemon Drop Crêpes.

Lemon-Drop-Crepes---WhipperBerry-9

Little did you know, that post was just the beginning. I’ve been working on creating a fabulous summer inspired brunch menu that is perfect for celebrating this time of year.

I adore summer. There is just something special about this time of year.  The warm weather, trips to the lake, sleeping-in and farmers markets. I LOVE spending the morning at the farmers market and running home with my bounty to create a fun meal for the family.

We love eggs here in our house. We typically have some type of egg dish for dinner at least once a week. Eggs are a fantastic source of protein and paired with good fats, they make for a fantastic meal! When I was working on this summer brunch menu I knew I had to incorporate a tasty egg dish. I came up with a lovely Summer Vegetable Frittata.

Spring-Vegetable-Frittata---WhipperBerry-4

What is a frittata? It’s kind of like an oven baked omelet. You add your favorite ingredients to an oven-safe skillet. Top it with an egg mixture, lightly start the cooking process on the stove and then finish it off in the oven. They are super quick and simple to make.

For this recipe we start with some simple fresh ingredients…

Spring-Vegetable-Frittata---WhipperBerry-1

Summer Vegetable Frittata Recipe

9 eggs

1/3 cup of whipped chive cream cheese

2 tablespoons heavy cream (feel free to substitute with skim milk as a lighter alternative!)

salt & pepper

1 1/2 cups of shredded Italian cheese blend

2 tablespoons + 1/2 teaspoon I Can’t Believe it’s Not Butter®

1/2 small white onion

1 cup asparagus

2 cups grape tomatoes

1 lemon

1 bunch of chives

1 tablespoon feta cheese

When you are putting together a dish like this, you want to make sure that your ingredients are fresh and nutritious . Have you thought much about the fats that you use when cooking lately?

We need some type of good fat in our diet… We ALL do! Good fats are a source of energy and essential fatty acids your body can’t produce on its own. When I was putting together this frittata recipe, I used I Can’t Believe it’s Not Butter® as the fat that I used to sauté my vegetables in.

I tend to stick with I Can’t Believe it’s Not Butter® because I know that it’s provides good fats. It has 40% fewer calories and 70% less saturated fat than butter per serving. Not to mention that it has no artificial flavors, no artificial preservatives and no partially hydrogenated oils. It has non-GMO sourced ingredients and it’s cholesterol free with 0 grams of trans fats per serving.. That exactly what I’m looking for when I’m cooking for my family!

Instructions

Preheat your oven to 350˚.

In a medium sized bowl, add your eggs, cream cheese, heavy cream, salt, pepper and 1 cup of shredded cheese.

Spring-Vegetable-Frittata---WhipperBerry-2

Whisk together and set aside.

In a oven-safe skillet over medium heat, add 2 tablespoons of I Can’t Believe it’s Not Butter®.  Once the I Can’t Believe it’s Not Butter® has melted, add your diced onion and sauté for 3-4 minutes over medium heat. Add the asparagus and cook for another minute and a half.

spring frittata 1 - whipperberry

Next, add 1/2 of your tomatoes and sauté for 1 minute. Reserve the remaining tomatoes for a garnish.

IMG_2386

Pour in the egg mixture and cook just like you would scrambled eggs for 1 minute. This give the frittata a little body and helps the veggies to stay suspended in the dish rather than just fall to the bottom of the pan.

spring frittata 3 - whipperberry

After one minute, add the remaining cheese to the top and place in a 350˚ oven for 15-20 until it look just set.

spring frittata 2 - whipperberry

Remove the frittata from the oven and let rest for 10-15 minutes.

In the meantime, prep your tomato salad garnish. In a small microwave safe bowl, melt a 1/2 teaspoon of I Can’t Believe It’s Not Butter®. This should take no more than 20-30 seconds. Add the remaining halved tomatoes to the bowl along with a tablespoon of fresh squeezed lemon juice, salt, pepper & 1 tablespoon of freshly chopped chives. Once the frittata has rested, add your tomato salad & feta cheese to garnish and serve.

Spring-Vegetable-Frittata---WhipperBerry-8

Spring-Vegetable-Frittata---WhipperBerry-14

Spring-Vegetable-Frittata---WhipperBerry-11

  I Can’t Believe It’s Not Butter! sources ingredients that are not genetically modified. However, in the field-to-tub journey of making our buttery spread there is some contact with genetically modified vegetable oils, resulting in a small amount in this product.

Tomato Galette + Pie Crust 101

3 · Aug 25, 2015 · 1 Comment

Tomato-Galette-from-WhipperBerry-6

Summer just isn’t Summer without a bountiful harvest of tomatoes of all kinds. I know, I know… You’re either a lover or a hater. I find myself in the LOVE category. Salads, tacos, life in general, isn’t complete without tomatoes. The only issue I find is finding the time to try all of the amazing tomato recipes during the summer bounty.

If you’ve been following me for some time, you’ll know that I LOVE pie making. I’ve been good friends with pie crust for some time. Here is a post highlighting all of my favorite pie crust tips and tricks. Some people think that pies are just for the holidays and typically are only for sweet types of pies or galettes. NOT TRUE! It’s also not just for your grandmother’s turkey pot pie. You can make all kinds of savory treats with a mean pie crust. For example, my Tomato Galette.

What’s a galette you ask! Well, it’s a fancy term for a free form pie. You don’t use a pie plate, you just fold up your crust over whatever filling you have and voilá, you have a free form pie. First I start with my crust. I whip that up quickly with a few simple ingredients; flour, Crisco, salt, vinegar, one egg & ice water. The key is to keep all of your ingredients as cold as possible. I use Crisco All-Vegetable Shortening Baking Sticks when I bake and I will cut it up into cubes and then place them into the freezer for 20 minutes so they get nice and cold. Temperature is key to great pie crusts. Butter Flavor and All-vegetable Crisco® Shortening and Baking Sticks deliver higher, lighter-textured baked goods and have 50% less saturated fat than butter and zero grams trans fat per serving.

Tomato-Galette-from-WhipperBerry-1

Once my crust is made, I chill it in the refrigerator for 20-30 minutes while I put together the filling for my galette. First I caramelized onions in Crisco Sauté Solutions Olive Oil Blend Stick with a little salt and a dash of sugar to help them caramelize. Then I mix my cheese filling. That’s a mixture of cream cheese, ricotta, parmesan cheese and some dried Italian herbs. Slice up some tomatoes and you’re all set to assemble. Once it’s baked, I drizzle with some Crisco Extra Virgin Olive Oil, add some fresh basil and it’s all set. Crisco® Extra Virgin Olive Oil uses the highest quality olives available to help enhance your cooking; available in three flavorful varieties 100% Extra Virgin, Pure and Light Tasting Olive Oil.

Here’s a video I put together that will help you make pie crust  your grandmother will love AND you get to see how I put together my tomato galette.

Looking for more great recipe inspiration? Visit The Crisco Heritage Kitchen,  a hub dedicated to all things food, tradition and family, where generations of home cooks can gather and discover tried-and-true recipes that will delight and inspire.

Tomato-Galette-from-WhipperBerry-9

Tomato Galette + Pie Crust 101 Recipe

Tomato Galette + Pie Crust 101
 
Save Print
Prep time
25 mins
Cook time
50 mins
Total time
1 hour 15 mins
 
This simple summer meal is perfect any time of day. Grab some of those amazing summer tomatoes and you'll fall in love! Ingredients
Author: Heather // WhipperBerry
Serves: 8-10
Ingredients
  • Crust
  • 3 cups flour
  • ½ teaspoon salt
  • 1½ cups of Crisco All-Vegetable Shortening Baking Sticks
  • 1 teaspoon white vinegar
  • 1 egg
  • 4-6 tablespoons water
  • Filling
  • 1 small sweet onion
  • 1 tablespoon Crisco Sauté Solutions Olive Oil Blend Stick
  • ½ cup cream cheese
  • ½ cup ricotta
  • ½ cup shredded parmesan
  • 1 teaspoon dried Italian Seasoning
  • 2-3 large tomatoes thinly sliced
  • Crisco Extra Virgin Olive Oil & fresh basil for garnish
Instructions
  1. In a large bowl, add flour, salt and cold Crisco All-Vegetable Shortening Baking Sticks. Use a pastry cutter to cut-in the shortening to the flour.
  2. In a small bowl beat egg and vinegar together and pour into flour mixture.
  3. Gently mix and add ice cold water until your dough just comes together. Be careful not to over mix. Pour out dough onto some plastic wrap and form into a disk. Wrap and place in refrigerator for 20-30 minutes.
  4. While the dough is chilling. Slice onions and caramelize over medium low heat with the Crisco Olive Oil Sauté Stick, salt and sugar. This will take 8-10 minutes. Remove from heat and set aside.
  5. In a medium mixing bowl, mix together the cream cheese, ricotta, parmesan cheese and Italian seasoning.
  6. Cut dough into quarters. Roll one quarter of the dough out on a floured surface into a 10 inch round.
  7. Spread on ½ of the cheese mixture, top with onions and tomatoes. Finish with salt and pepper to taste.
  8. Use the remaining ingredients to make up another galette.
  9. Place in a 375˚ oven for 40-50 minutes.
  10. Remove from oven, let cool for 10 minutes. Drizzle with Crisco Extra Virgin Olive Oil and garnish with fresh basil.
3.2.2925

*Disclosure: As a participant of the Crisco Ambassador Program, I’ve received compensation for my time and product samples for review purposes. Opinions are my own. 

  • « Go to Previous Page
  • Page 1
  • Page 2
  • Page 3
  • Page 4
  • Page 5
  • Page 6
  • Interim pages omitted …
  • Page 11
  • Go to Next Page »

Primary Sidebar

Heather from Whipperberry
Hello... my name is Heather and I'm the creator of WhipperBerry a creative lifestyle blog packed full of great recipes and creative ideas for your home and family. I find I am happiest when I'm living a creative life and I love to share what I've been up to along the way... Come explore, my hope is that you'll leave inspired!

Footer

  • Privacy Policy
  • Crafts
  • Food
  • Gifts
  • Holidays
  • Home
  • Mom Life
  • Recipes
  • Travel

Copyright © 2026 · Seasoned Pro