• Skip to primary navigation
  • Skip to main content
  • Skip to primary sidebar
  • Skip to footer

Whipperberry

WhipperBerry • Your Home For Creative Inspiration

  • Home
  • Recipes
    • Starters
    • Easy Weeknight Dinners
    • Main Dish
    • Salads
    • Side Dish
    • Soups & Stews
    • Desserts
    • Breakfast
    • Miscellaneous
  • Tutorials
    • Creative Crafts
    • DIY Decor
    • Fabric Crafts
    • Food How-To
    • Jewlery
    • Paint Projects
    • Paper Art
    • Party Styling
    • Photography and Graphic Design
    • Silhouette
  • Holidays
    • Easter
    • Mother’s Day
    • Father’s Day
    • 4th of July
    • Halloween
    • Thanksgiving
    • Christmas
    • Valentine’s Day
  • Gift Ideas
    • Gifts For Everyone
    • Gifts for Dad
    • Mother’s day
    • For The Girls
    • For The Kids
    • Teacher Gift Ideas
    • Christmas
  • Printables
    • Holiday
    • Gift Idea
    • LDS Primary
  • Travel
  • About
    • Terms
  • Contact
  • Nav Social Menu

    • Facebook
    • Instagram
    • Pinterest
    • RSS
    • Twitter

Uncategorized

Paracord and Vintage Scarf Ring Necklace

0 · Jun 24, 2013 · 4 Comments

Paracord Necklace // I'm thrilled to show off another couple of members of the the WhipperBerry Creative Team... Shannon & Jen from Eat.Sleep.Make!  Shannon and Jen have a fabulous team blog that is full of all kinds of creative DIY projects, fun fashion ideas and tasty treats. I'm super excited to have them as part of the team!!


Hey new friends!  I'm Shannon from the blogging duo over at Eat. Sleep. Make.  My sis-in-law, Jen, and I, like pretty much every craft blogger out there, are consumed with the "Hey, I can make that" mentality.  Sharing that obsession led us to start our little blog space together and now we are constantly fueling each others' creative fires.

When Heather asked us to be part of the WhipperBerry Creative Team, I think my exact response (to Jen) was, "Duh, of course we'll do it!"  We are excited beyond words at this opportunity to make new friends and challenge ourselves.

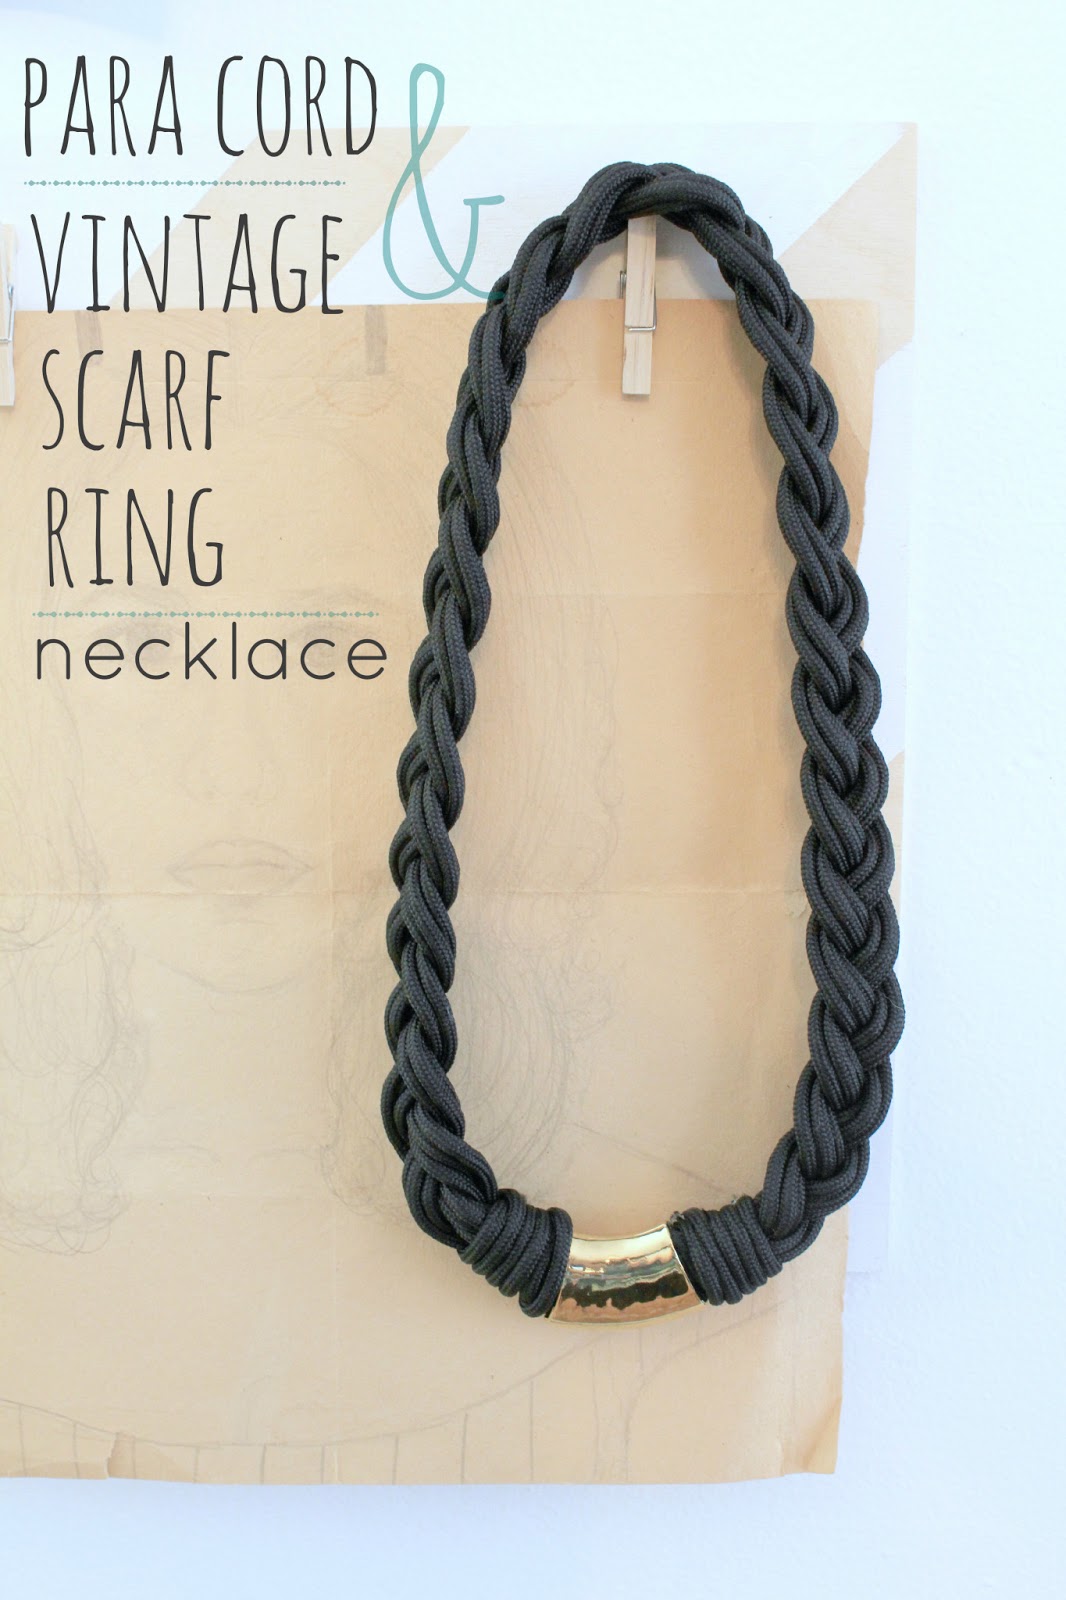
One of the things you'll learn about the two of us over at Eat. Sleep. Make. is that we love going to estate sales.  (We did a whole series about our strategies here.)  So, naturally, many many projects come from our compulsive shopping.  Today, I'm showing you how to make a necklace using para cord from the hardware store and a vintage scarf ring that I got for 25 cents at an estate sale. Yay!

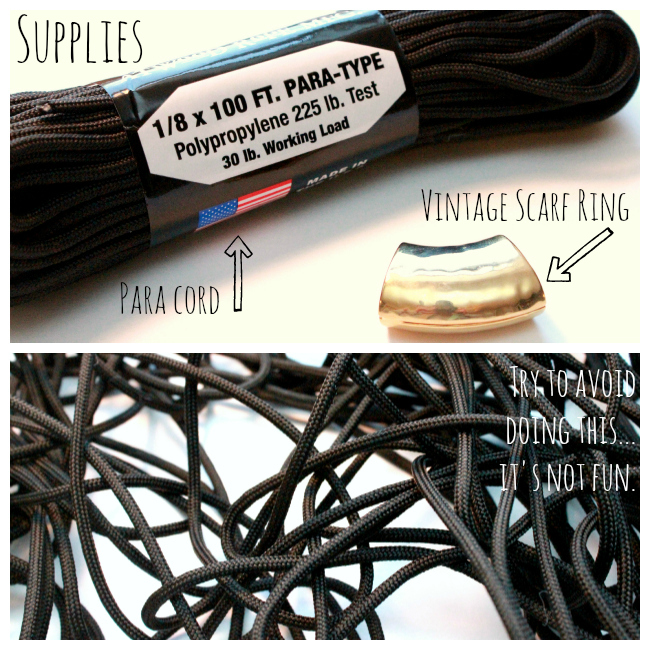
As you can see, my cord got a little tangled.  It took me a good 15 minutes to even find the ends to begin untangling it.


For my necklace I used 6 strands that were 6' long each, folded in half, with a tie around the middle.  That gives 12 – 36" strands to braid.


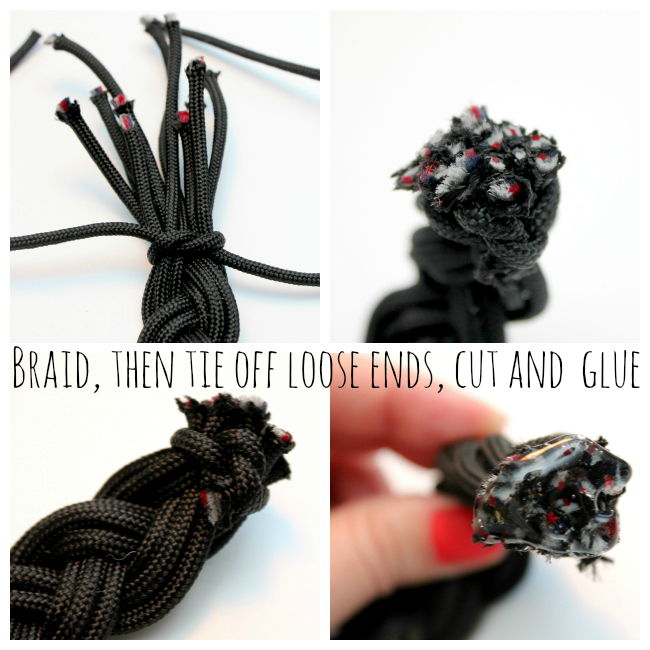
I braided 3 groups of 4 strands to get a thick, sturdy braid.  Once the braid is complete, tie some cord around the end and use a hot glue gun to secure the ends together.

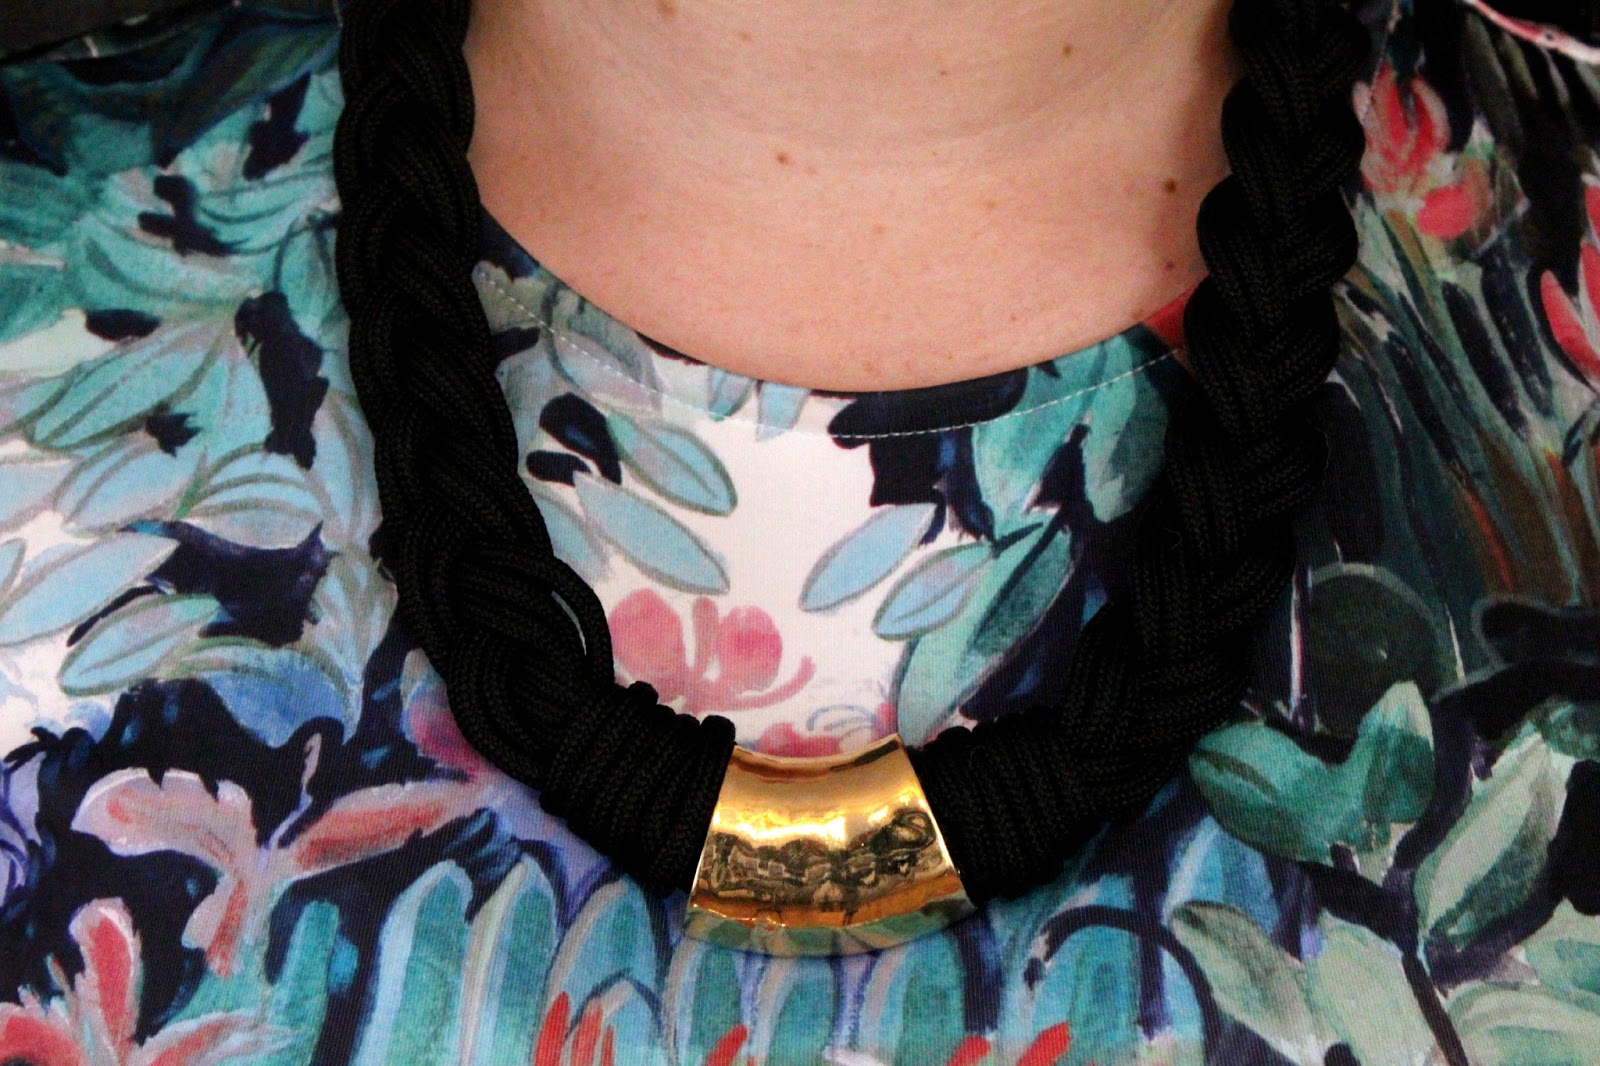
Next, slide your scarf ring on.

The hard part is fixing the 2 ends together.  I used the tie that held the looped ends together and joined the 2 ends.  Use hot glue to secure any pieces you think may come loose.


Slide the scarf ring over the joint to conceal it.  I made sure it wouldn't move by putting some glue inside the ring, then wrapping 5 loops of cord on either side of the ring.


I'm so happy with how this turned out… and even more happy about how many outfits it goes with! You can also make this using copper piping from the hardware store if you don't have a vintage scarf ring!  Use the elbow joint pipes to get some crazy architecture in the necklace.  


Come on over to Eat. Sleep. Make. and check out some of our other projects that we've done.  Here's a few to pique your interest!

Raspberry Watermelon Granita

0 · Jun 19, 2013 · 13 Comments

Raspberry Watermelon Granita // I'm thrilled to have Jenn from Clean & Scentsible, another member of the WhipperBerry creative team here today. She has been a long time contributor to my Friday Flair link party and she always blows me away with her fun idea. I'm so excited to have her on the team

Hello Whipperberry fans! I'm Jenn from Clean and Scentsible and I cannot tell you how excited I am to be contributing to Heather's amazing blog!


Jenn Clean and Scentsible

To me, summertime is all about simplifying things.   We usually only have a few months of nice, warm weather around here so I savor every moment I can get!  This raspberry watermelon granita is one of my favorite summertime treats and is so easy to make.   It does require a bit of patience while it is freezing but it is well worth it!


Raspberry Watermelon Granita

5 cups cubed seedless watermelon

2 1/2 cups fresh or frozen raspberries

1/2 cup sugar

1 envelope unflavored gelatin {1/4 ounce}

1/2 cup cran-raspberry juice cocktail 

Preparation

Puree the watermelon and raspberries in a food processor or blender.  Depending on the size of your blender you may need to do this in two batches.

Combine the sugar and gelatin in a small sauce pan and stir over low heat until gelatin dissolves.  Stir in juice.

Combine about half of the sugar mixture with the puree.  Slowly add the remainder of the mixture to taste depending on how sweet you would like your granita to be.  Remember that it will lose a little of the sweetness once frozen.  

Pour into a 9 x 9 baking pan, cover with foil, and place in freezer.

Freeze for at least 2-3 hours and then use a fork to scrape along the top layers creating an icy texture.  Continue until you start to get close to the less-frozen middle and then place back in the freezer.  Repeat this process until it is all scraped.  Makes about 10-12 servings.

**NOTE: Don't worry if you won't be around to scrape it every couple of hours.  I often just leave it overnight and then scape it in one go – it just requires a little more muscle!  If you only need a couple of servings, just scrape what you need and place the rest back in the freezer.


This keeps well in the freezer as long as you keep it covered.  The kids love it and it is a refreshing, low calorie treat for those hot days!
 
****************
Here are a few other summer projects that I have worked on…
 
Blackberry Cheesecake Pots
 
 
Crab Cupcakes
 
 
Summer Lemonade Bar
 
 
If you have a chance, I would love for you to drop by Clean and Scentsible to say hello!  You can also connect with me here:
 
Facebook / Pinterest / Twitter / Google+ / Instagram

Photobucket

Friday Flair Link Party Edition // Mini Berry Cobbler Edition

1 · Jun 7, 2013 · 30 Comments

Friday Flair Link Party // Happy Friday my favorite friends! I've been living it up here in Colorado for the last week, and we are packing up and heading home this morning. I just love it here, the shops, the food, the people. I even introduced my Mom to IKEA this week. She loved it! The kiddos have had a blast playing with cousins and running around Nana & Papas pretty backyard. It couldn't get any better than this!

I don't know if you happened to check it out earlier this week, but I made a pretty big announcement. WhipperBerry has a new Creative Team! These ladies have been hand picked from from the hundreds of friends who link up to Friday Flair every weeks. I knew that if I decided to start a creative team, I wanted to pull from the wonderful and talented bloggers who have always supported WhipperBerry and Friday Flair especially. Soooo, you never know what may happen from linking up! This week Jesseca from One Sweet Appetite share her Mini Berry Cobblers with us and they just look divine…

mini berry cobblers

img source // mini berry cobblers created by one sweet appetite for whipperberry

That's why I decided to show it off again for this week's inspiration photo! doesn't that just look like the perfect summer desert?! Jesseca is one talented lady!


Let's get the link party started!


 Loading InLinkz …


Heartland Fabric Wall Art // Silhouette Fabric Bundle Promotion

0 · May 23, 2013 · 14 Comments

Silhouette Fabric Bundle Promotion (Affiliate) // Recently, I was given the opportunity to create something with Silhouette's Fabric tools, their Heat Transfer Fabric Interfacing and Fabric Cutting Blade. I was BLOWN AWAY at how well it worked. I decided to really put the Silhouette CAMEO to the test and cut a rather intricate image… The United States, with all of it's jagged coast line and Great Lakes and such. I knew it would be a bit of a challenge. But… With the Silhouette fabric tools, my CAMEO cut the fabric like it was butter…

Heartland Wall Art from WhipperBerry

I am working on a new gallery wall of sorts for my living room and I needed some graphic fabric art for the grouping. I was trying to figure out what to create and then I thought… We just moved smack dab to the middle of this great country, right into the heartland and I thought that would make a great piece. Here is how I made it…

Supplies

  • Fabric – three different colors
  • Silhouette Heat Transfer Clean Cut Fabric Interfacing
  • Silhouette Fabric Cutting Blade
  • Silhouette CAMEO or Portrait
  • Large quilting or embroidery hoop

Instructions

I started my design in my Silhouette software. I found a great image of the United States of America in the Silhouette image store and a heart that would look perfect for this project.

Heartland graphic on the Silhouette Design Software

I wanted to use a large quilting hoop so I made my image rather large. It was almost 12 inches across. You can decide what size you would like yours to be based off of your hoop selection. Next, you need iron your fabric and then add the Silhouette Fabric Interfacing according to the package directions.

Silhouette Heat Transfer Fabric Interfacing and Fabric Cutting Blade Promotion

For this project I used the Clean Cut version of Interfacing, but Silhouette also has a sewable interfacing as well. 

iron Silhouette fabric interfacing onto fabric

Next, I placed the fabric on the Silhouette cutting mat and loaded it into my CAMEO and cut the design. You need to make sure you change out your blade for the fabric blade which is blue rather than black. 

Use the Silhouette fabric blade when cutting fabric

I was sooooo impressed with how the CAMEO cut through the fabric. Check out the lines on the image…

Fabric United States of America cut with Silhouette CAMEO

Aren't they amazing? Look at those intricate little cuts… Next you need to cut out the heart in your second color choice, making sure not to resize it. Once you have both pieces cut all you have to do is iron them onto the base fabric…

iron fabric together

All that's left is to place the fabric into the quilting hoop and trim the edges and your finished!

whipperberry heartland wall art

I love how this turned out. I think I'm going to make them for my family and move the heart around based off of where they live. They will look so cute and are so quick and easy to make!!

Silhouette has a fabulous deal going on this week for their Fabric Tools, the Portrait and the CAMEO. Now would be a great time to either grab a machine or stock-up on all this fabric cutting goodness!!

Silhouette Fabric Bundle Promotion with coupon code

Click HERE to enter the Silhouette Store to take advantage of this AMAZING deal!!

I am also giving away a Silhouette Portrait…

Cut Fabric Like a Pro -- Enter to WIN a Silhouette CAMEO on WhipperBerry #giveaway #silhouetteClick HERE to enter the GIVEAWAY!!


  • « Go to Previous Page
  • Page 1
  • Interim pages omitted …
  • Page 11
  • Page 12
  • Page 13
  • Page 14
  • Page 15
  • Interim pages omitted …
  • Page 83
  • Go to Next Page »

Primary Sidebar

Heather from Whipperberry
Hello... my name is Heather and I'm the creator of WhipperBerry a creative lifestyle blog packed full of great recipes and creative ideas for your home and family. I find I am happiest when I'm living a creative life and I love to share what I've been up to along the way... Come explore, my hope is that you'll leave inspired!

Footer

  • Privacy Policy
  • Crafts
  • Food
  • Gifts
  • Holidays
  • Home
  • Mom Life
  • Recipes
  • Travel

Copyright © 2026 · Seasoned Pro