• Skip to primary navigation
  • Skip to main content
  • Skip to primary sidebar
  • Skip to footer

Whipperberry

WhipperBerry • Your Home For Creative Inspiration

  • Home
  • Recipes
    • Starters
    • Easy Weeknight Dinners
    • Main Dish
    • Salads
    • Side Dish
    • Soups & Stews
    • Desserts
    • Breakfast
    • Miscellaneous
  • Tutorials
    • Creative Crafts
    • DIY Decor
    • Fabric Crafts
    • Food How-To
    • Jewlery
    • Paint Projects
    • Paper Art
    • Party Styling
    • Photography and Graphic Design
    • Silhouette
  • Holidays
    • Easter
    • Mother’s Day
    • Father’s Day
    • 4th of July
    • Halloween
    • Thanksgiving
    • Christmas
    • Valentine’s Day
  • Gift Ideas
    • Gifts For Everyone
    • Gifts for Dad
    • Mother’s day
    • For The Girls
    • For The Kids
    • Teacher Gift Ideas
    • Christmas
  • Printables
    • Holiday
    • Gift Idea
    • LDS Primary
  • Travel
  • About
    • Terms
  • Contact
  • Nav Social Menu

    • Facebook
    • Instagram
    • Pinterest
    • RSS
    • Twitter

Holidays

Valentine’s Day Popcorn Pops

2 · Jan 16, 2014 · 4 Comments

Hello Whipperberry friends!  Jenn here again from Clean and Scentsible.  It seems like Christmas was just yesterday but Valentine's Day will be here before you know it!  Today I'm sharing these fun Valentine's Day popcorn pops with you – they're a quick and easy way to spread a little love!

Valentine's Day popcorn pops with free printables!

Ingredients

  • 8 cups popped popcorn {this is approximately 5 tbsp. of unpopped kernals}
  • 3 cups mini marshmallows
  • 2 tbsp butter
  • 1/4 tsp salt
  • red food coloring
  • 3/4 -1 cup Smarties {these are the Canadian Smarties which are similar to M&Ms in the States!}

Valentine's Day popcorn pops with free printables!

Directions

  • Pop the popcorn and place it in a large bowl {I actually ended up using 2 bowls so I had more mixing space}
  • Heat the marshmallows, butter, and salt in a large heavy saucepan over medium to low heat stirring continuously until the marshmallows are melted.  Add food coloring by drops to make your desired pink color.  I just wanted mine a faint pink so I only used about 5-6 drops.
  • Pour the marshmallow mixture over the popcorn gradually, mixing it well.  You can use a greased spoon to do this but I found that it was easiest to grease my hands with butter to mix. {The butter should help to protect your hands from the heat but make sure it is not too hot!} Add the candy.
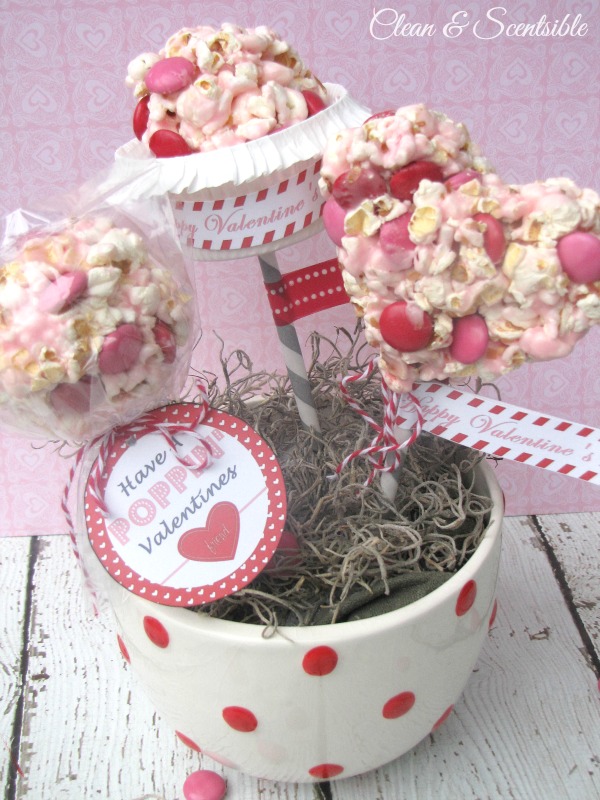
  • Shape into balls or use a heart shaped cookie cutter if you would like to do hearts.  If you are using the cookie cutter, grease the inner borders and press the popcorn inside the cookie cutter until your shape is formed. Press popcorn firmly together once the cookie cutter is removed to hold.
  • Insert sucker sticks.  For mine I used the basic sucker stick and then added a paper straw over top of it to give it extra strength.
  • Wrap each ball in plastic wrap.  Makes approximately 8 {3 inch diameter} balls.

Valentine's Day popcorn pops with free printables!

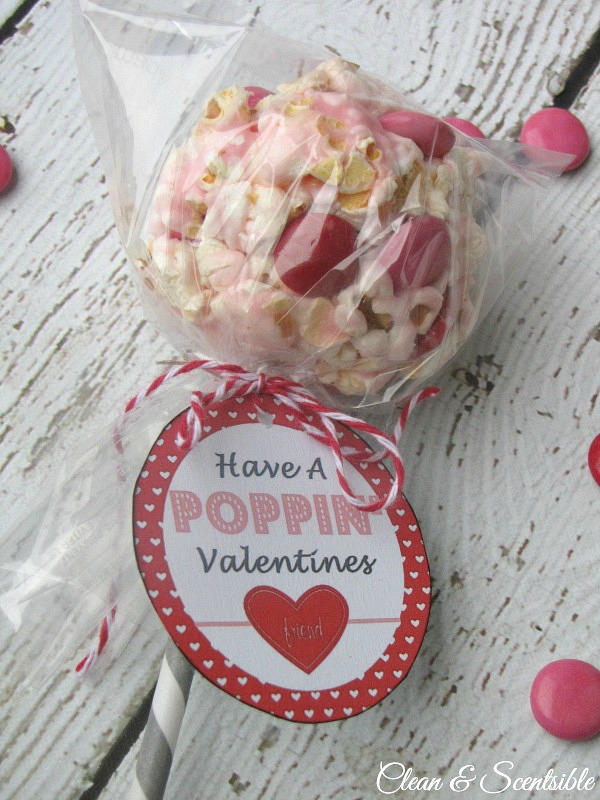
There are lots of fun ways that you could package them up – add some baker's twine, tie them up in a cellophane bag, or add a cupcake liner and some washi tape!  Feel free to get creative – I always find that the packaging is the best part! 🙂

Valentine's Day pops with free printables!

If you would like any of the printables,  just head over to Clean and Scentsible for a free download!

If you are looking for other Valentine's Day ideas, you might also like…

Valentine's Day ideas.

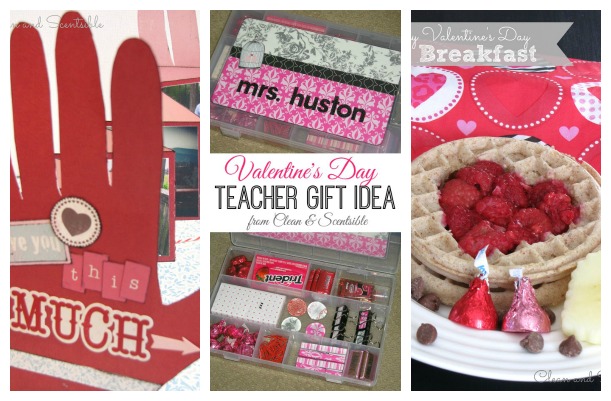
Photo Handprint Card / Valentine's Day Teacher Gift / Quick and Easy Valentine's Day Breakfast

I would also love to have you join me on my Household Organization Diet – a year long project to get organized once and for all!

You can always connect with Clean and Scentsible here: FACEBOOK / PINTEREST / INSTAGRAM / TWITTER

Thanks so much to Heather for having me!  I hope you all have a wonderful Valentine's Day! 🙂

NEW YEAR INSTAGRAM WREATH

0 · Dec 30, 2013 · 3 Comments

Hi Whipperberry friends!  It's Jenn from My Fabuless Life.  I hope your Holidays were wonderful!  Today I'm sharing a quick Memory Wreath I put together with some of my favorite moments (via Instagram) from the past year.  I have a sort of picture addiction and am always running out of space to hang or display more frames, so this is perfect for being able to display LOTS of pictures in a small space!

I started my Instagram wreath with a wire wreath form from the craft store and spray painted it gold.


Then I printed out my favorite Instagrams in black and white.  You can find a free template and tutorial on how to print them yourself here.
 

Once cut, I laid them out on the wreath to get an idea of placement, and then just slipped them between the wire.  I put a little piece of tape of the back of them to hold them in place and then taped some of them directly on.
 

Then I added a few yarn pom poms and that's it!  I plan on keeping this up all year and switching out the pictures periodically.


You Might Also Like:

Free New Year Printables / How To Build A Farm Table / DIY Pom Pom Bookmarks


Simple Taco Hand Pies Recipe

761 · Dec 23, 2013 ·

Holiday entertaining can be a little overwhelming. Especially when you are hosting family or friends for several days. You can’t have a Turkey with all the fixin’s at every meal. That would be way to much work, not to mention hard on the wallet. You need to have a few simple meal options that are quick and still fun for the whole family. This recipe is one that everyone can chip in and help make PLUS my family LOVES them!

Jump to Recipe

Taco Hand Pies with Kraft Shredded Cheese by WhipperBerry-6

Who doesn’t love tacos? With this fun spin on a simple classic recipe, your gathering is sure to be a hit. You can serve taco hand pies as the main dish or make them a little smaller and use as an appetizer for a cocktail party. They are so versatile.  Here is how you make them.

Ohhhh doesn’t that look tasty? Now you can serve with sour cream, salsa and any other taco fixin’s you can think of.

Now, this is the perfect, easy, crowd-pleasing meal to have on hand when you have company in town. The lovely folks at Kraft® are making it even easier on your wallet this holiday season at Target…

From shopping for gifts to planning family dinners, it’s hard to keep up with all your holiday to-dos. This year, Kraft is helping out with great weeknight meals and entertaining ideas to make the season a little bit easier. Plus, Kraft is offering up to $20 in coupons, redeemable exclusively at Target, to make food shopping easier and to help you have a happy holiday season.

Taco Hand Pies

Taco Hand Pies

Who doesn’t love tacos? With this fun spin on a simple classic recipe your gathering is sure to be a hit. You can serve taco hand pies as the main dish or make them a little smaller and use as an appetizer for a cocktail party. They are so versatile. Here is how you make them.
Print Recipe Pin Recipe
Prep Time 45 minutes mins
Cook Time 15 minutes mins
Course Main Course
Cuisine American
Servings 5 Servings

Ingredients
  

  • 1 tbsn Olive Oil
  • 1 Sweet Onion
  • 1 lb. Ground Beef
  • 1 packet Taco Seasoning
  • 1 can fat free refried beans
  • 1 can black beans
  • 1 can drained corn
  • 1 pack Kraft Finely Shreeded Cheese
  • 2 cans Pillsbury Corn Buscuits
  • 1 egg beaten

Instructions
 

  • First, you will need to cut your onion into strips. I cut my onion in half and then cut into strips. In a large skillet add the olive oil and place over a medium high heat. Once the oil is hot add your onions and sauteé for 3-4 minutes until translucent.
  • Add your ground beef, season lightly with salt and pepper. Break-up the ground beef into small pieces and brown. Once the meat has browned, remove excess grease with a spoon and discard. Stir in the taco seasoning over medium heat.
  • Add the refried beans, black beans and corn. Let this mixture come to temperature and the remove from heat.
  • Lightly flour a clean dry surface and roll out your first corn biscuit. Place about a 1/4 to a 1/3 of a cup of the taco meat mixture in on the rolled out biscuit and top with a generous helping of Kraft® Shredded Cheese.
  • Then with a pastry brush, brush on a bit of egg wash along the edge of the biscuit dough. Fold over and seal with a fork.
  • Place on a baking sheet and brush the top of the hand pies with the egg wash. Repeat with remaining biscuits.
  • Bake in a 350˚ oven for 14-15 minutes. Remove from oven and let cool for a few minutes.
Keyword Taco Hand Pies

Three Santa Approved Cookie Recipes and a For Santa Printable Sign

1 · Dec 22, 2013 · 2 Comments

This post brought to you by Pillsbury // It’s almost time my friends… We’ve worked on making goodies for our family and friends and now it’s time to make some cookies for the big guy himself! While you’re planning your cookie-baking day with the kiddos — and maybe even coordinating fun touches like classic bistro aprons for front-of-house teams to bring a cheerful, coordinated vibe to your holiday hosting — we’ve got THREE Santa-approved cookie recipes for you.

#santaapproved cookies from Pillsbury Bakes-4

The kiddos and I have come up with three Santa Approved cookie recipes that are for sure going to be a hit with the big guy and anyone else who has a chance to give them a try. They are so easy to make, they will be a perfect way to bake with the little ones in your life.

#santaapproved cookies from Pillsbury Bakes-7

On the top left spot we have a fabulous Chocolate Candy Cane Cookie. Top right, we have a Dark Chocolate Crinkle Cookie and in the bottom spot, a bit of Egg Nog heaven… Little Egg Nog Bites. Each one of these cookies are high on Santa’s favorite flavors list, so… They should be a big hit! Here are the recipes and a bonus printable For Santa printable sign!

Chocolate Candy Cane Cookie Recipe

#santaapproved cookies from Pillsbury Bakes-1

1 box of Pillsbury Chocolate Peppermint Cookie Mix

1 stick of softened butter

1 egg

1 cup mini chocolate chips

1 container Creamy Supreme® Peppermint Frosting

1 container Holiday Funfetti® Rudolph Red Vanilla

Directions

In a large mixing bowl, mix the Peppermint Cookie Mix according to package directions. Add chocolate chips and 1/2 of the peppermint candy bits and combine.  Scoop into 2 inch size balls and place on a parchment lined baking sheet. Bake in a 350˚ oven for 11 minutes. Remove from oven let cool on pan for one minute and then transfer to a cooling rack.

Once they are completely cool they are ready to decorate. Place the Peppermint Frosting in the microwave for 30 seconds and pour into a Ziploc bag. Cut a SMALL hole in the corner of the bag and drizzle the frosting over the cookies. Repeat with the red frosting. Sprinkle with the remaining peppermint candy bits. Yields 12-14 cookies.

#santaapproved cookies from Pillsbury Bakes-11

Dark Chocolate Crinkle Cookie Recipe

1 box of Pillsbury Dark Chocolate Cake Mix

1/4 cup canola oil

2 eggs

1 cup mini chocolate chips

1 cup powdered sugar

Directions

In a large bowl combine cake mix, oil, eggs & chocolate chips.  Scoop into 2 inch size ball and roll in powdered sugar.

#santaapproved cookies from Pillsbury Bakes-3

Cover with the powdered sugar and place on a baking sheet.

#santaapproved cookies from Pillsbury Bakes-2

Bake at 350˚ for 11 minutes. Remove from oven, let cool for a few minutes on the baking sheet and then place on a cooling rack to cool completely. Yields 14-16 cookies.

#santaapproved cookies from Pillsbury Bakes-8

Little Egg Nog Bites Recipe

1 box of Pillsbury Traditional Sugar Cookie Mix

1 stick of softened butter

1 egg

2 teaspoons rum extract

1/2 teaspoon of freshly grated nutmeg

2 teaspoon of pumpkin pie spice

1 cup sugar

Directions

In a large bowl combine cookie mix, butter, egg, rum extract, 1/4 a teaspoon of nutmeg and 1 teaspoon of pumpkin pie spice.  Set aside.

In a small bowl combine the sugar and remaining nutmeg and pumpkin pie spice, mix well.

Roll cookie dough into 1 inch size balls and roll in spiced sugar mixture. Place on a cookie sheet and bake in a 350˚ oven for 8 minutes. Remove from oven and let cool on baking sheet for one minute then transfer to cooking rack to cool completely. Yields 24-30 small cookies.

#santaapproved cookies from Pillsbury Bakes-9

Free “For Santa” Printable Sign

Now, you need to have a nice sign to label Santa’s cookies! I have created a simple one for you to use. All you need to do is click on this link and down load the PDF file. The directions are on the printable sheet.

For Santa Printable Sign

for santa sign from whipperberry

Now, you should be all set… You have three different fabulous and easy cookie recipes and a printable sign for Santa. You will for sure be on his Nice List this year!!

Disclaimer // I am on the Pillsbury Celebrations Starter crew and have received product and compensation for this post. All thoughts, ideas and opinions are 100% my own. ©/® The J.M. Smucker Company. Pillsbury is a trademark of The Pillsbury Company, LLC, used under license. 

Faux Fireplace // Turn a Cork Board into a Chalkboard

15 · Dec 20, 2013 · 3 Comments

The post brought to you by DecoArt //  We have moved TWICE in the last year.  Yea, good times! Along with new homes, we have also become renters for the first time ever. We decided that when we moved the family to Nebraska that we weren't in a huge hurry to buy a new place. We wanted to rent for a while to see if the Cornhusker state stuck, 'cause… You never know. To be honest,  I'm kind of loving renting right now. If something breaks, I don't have to figure out how to fix-it… I have a lovely landlord who takes care of it. One thing I don't like, being stuck with less than ideal style choices in the house.  

We were super excited to have a fireplace and a mantel for the first time in a while. However, our landlord had recently added a weird fake electric fire insert to the fireplace and totally ruined the whole look and feel of the thing. I scratched my head trying to figure out how to still decorate the fireplace without the dorky insert killing the whole effect. I decided to cover it with a chalkboard and create my own faux fireplace!

Faux Fireplace with DecoArt Chalkboard Paint by WhipperBerry-2

Now, of course I can't find a chalkboard that will fit just right for the size and shape that I was looking for, but that's NO PROBLEM with the Americana Chalkboard paint from DecoArt. You can make ANYTHING into a chalkboard! 

Americana Chalkboard Paint from DecoArt

I found a cork board at Target that was perfect. The size, the shape and even the frame were perfect… The question, how well will cork work as a chalkboard? The answer, amazingly well! Here is how I made it…

Supplies

Cork board

Americana Chalkboard paint – Black

Americana Multi-Surface Satin – Black

Sponge roller

Sponge brush

Chalk

Pencil sharpener

Directions

Now, this is the easiest pant project EVER!! Take your cork board and lay on a flat surface. Gather your supplies…

Americana Paint from DecoArt

Start with the Mulit-Surface satin. You don't even need a paint bowl, just pour a bit of paint on the board and roll-out.  Cover the whole cork board…

Just squeeze paint right onto the corkboard

use a roller to apply chalkboard paint

I used my foam brush to do the edging. Once that paint was dry, (it only took about 20-30 minutes) I repeated the process with the Americana Chalkboard Paint. I made sure the whole board was covered and then let it dry.

you now have a lovely chalkboard

Now this is the hard part… Even though the paint is dry, you need to wait for two days before you season your chalkboard. Your paint needs time to cure and to fully set, so give it time to do just that. After two days, you then need to season your chalkboard.

you will need to season your chalkboard

What is seasoning? When you use a chalkboard, you don't want to have ghost images left behind when you erase them. If you draw or write on a chalkboard before it has been seasoned little particles of chalk will fill in what ever holes are in the board. Little minuscule holes that you can't see, but the chalk undoubtedly will find, move in and never leave! In order to avoid that, you rub chalk all over the board and "season" it. That way you fill in any possible holes before you write on it and thus prevent any ghost images left behind.

season the chalkboard with chalk

Place the piece of chalk on it's side and rub all over the board. Then with a paper towel, rub the chalk into the board.

wipe off chalk with paper towel

Now, your chalkboard is ready to use. I commissioned my talented daughter Hannah to draw a fire for me. She has WAY more talent than I have when it comes to that kind of work.

WhipperBerry Faux Fireplace

Then all I had to do was place it in front of the fireplace insert and voilá the problem was solved! Now, I have a cute fireplace that I can finally dress up!

Faux Fireplace with DecoArt Chalkboard Paint by WhipperBerry-new

I placed a few birch logs that I bought at Michaels in front to add to the illusion. I think it turned out super CUTE!!

Faux Fireplace with DecoArt Chalkboard Paint by WhipperBerry-1

The "May your Days be Merry & Bright" hand painted sign was created by At Home with K, she is a local artist here in Lincoln and her work is SUPER CUTE!! You should check her out. 

I made the stockings myself and even though it's a little late for this year, I will post a tutorial and you can save it for next year if you are interested. They turned out super fun and you won't believe what I made them out of. 

Disclaimer // I am part of the DecoArt Core Blogger Group. I received product and payment for this post. 

  • « Go to Previous Page
  • Page 1
  • Interim pages omitted …
  • Page 18
  • Page 19
  • Page 20
  • Page 21
  • Page 22
  • Interim pages omitted …
  • Page 37
  • Go to Next Page »

Primary Sidebar

Heather from Whipperberry
Hello... my name is Heather and I'm the creator of WhipperBerry a creative lifestyle blog packed full of great recipes and creative ideas for your home and family. I find I am happiest when I'm living a creative life and I love to share what I've been up to along the way... Come explore, my hope is that you'll leave inspired!

Footer

  • Privacy Policy
  • Crafts
  • Food
  • Gifts
  • Holidays
  • Home
  • Mom Life
  • Recipes
  • Travel

Copyright © 2026 · Seasoned Pro