• Skip to primary navigation
  • Skip to main content
  • Skip to primary sidebar
  • Skip to footer

Whipperberry

WhipperBerry • Your Home For Creative Inspiration

  • Home
  • Recipes
    • Starters
    • Easy Weeknight Dinners
    • Main Dish
    • Salads
    • Side Dish
    • Soups & Stews
    • Desserts
    • Breakfast
    • Miscellaneous
  • Tutorials
    • Creative Crafts
    • DIY Decor
    • Fabric Crafts
    • Food How-To
    • Jewlery
    • Paint Projects
    • Paper Art
    • Party Styling
    • Photography and Graphic Design
    • Silhouette
  • Holidays
    • Easter
    • Mother’s Day
    • Father’s Day
    • 4th of July
    • Halloween
    • Thanksgiving
    • Christmas
    • Valentine’s Day
  • Gift Ideas
    • Gifts For Everyone
    • Gifts for Dad
    • Mother’s day
    • For The Girls
    • For The Kids
    • Teacher Gift Ideas
    • Christmas
  • Printables
    • Holiday
    • Gift Idea
    • LDS Primary
  • Travel
  • About
    • Terms
  • Contact
  • Nav Social Menu

    • Facebook
    • Instagram
    • Pinterest
    • RSS
    • Twitter

Crafts

Jeweled Mini Christmas Wreath with Styled by Tori

1 · Nov 6, 2012 · 7 Comments

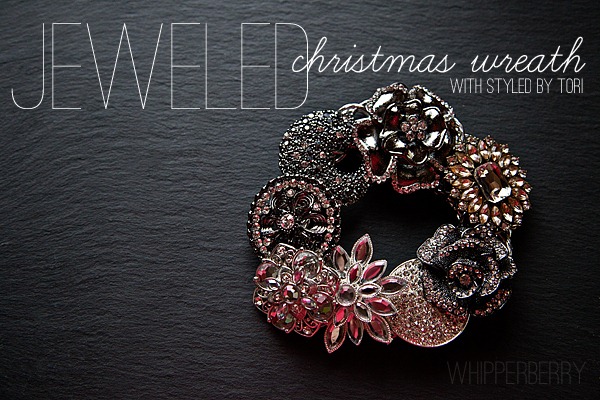
It’s beginning to look a lot like Christmas… well not really. But it’s GO TIME for holiday crafting. I love this time of year, it’s a time to pull the magic back into our lives for a few months and I just love it.  I love that with holiday decorating you can transform your home into a wonderland for just a little bit and show off your fun style for that season.  This year I am loving the possibilities with the Styled by Tori line of custom jewelry and craft elements. I decided to make a Styled by Tori jeweled wreath out of some of the fun necklace pendants in the line along with a necklace bottom to be the foundation for the wreath…

wb 018 copy

This is a cute mini wreath that you can use as a tree ornament or add it as a fun embellishment to your décor. It would make a fabulous gift for your friends or family and it’s super simple to make… I just love how they turned out! Here is what you will need.

styled by tori elements

Supplies for the Mini Jeweled Wreath

  • Heavy gauge aluminum floral wire
  • Light 22 gauge aluminum floral wire
  • Styled by Tori Glitz Necklace Bottom
  • 3-8 Styled by Tori necklace pendants
  • 1 Styled by Tori Chain Connector
  • Needle nose pliers with wire cutting capability
  • E-6000 Glue (optional)

Instructions

To begin, you will need to cut a piece of the heavy gauge floral wire roughly about 12 inches. Then feed it through the necklace bottom and connect the two sides together with the chain connector.

how to make a wreath from a necklace #toristyle

Feed the tails of the wire back through the necklace bottom and trim off any excess.

wb 014

Work it into a nice circle shape.  Next using the light gauge floral wire, begin to attach the necklace pendants onto the wreath form. I chose to use wire rather than glue, because I didn’t want to worry about one of the pendants popping off.  I felt like wire would make a more stable wreath.

wiring the styled by tori elements onto the wreath

For added stability you can add a little E-6000 if you would like.  I wired mine pretty well so I didn’t feel the need to add the glue.

At this point you are the designer.  You can fill the entire wreath with pendants like this…

wb 022

Or you can use just a few to accent the necklace bottom wreath like this…

elegant wreath ornament from styled by tori elements

Either way, it makes a lovely little accent piece for your holiday décor.  You could even add a ribbon and use it to decorate some gifts if you like.  Wouldn’t that make for a stunning gift box? What do you think? How would you use your jeweled mini wreath?

Heather copy

Discloser Statement

Cute Little Spooky Spiders for Halloween Decor

52 · Oct 29, 2012 · 9 Comments

Looking for a fun, last minute Halloween idea? Need something simple that takes less than a minute to make? How about a cute little spooky spider to add to your Halloween décor…

spooky spiders copy

For a few years I’ve seen those metal spider leg cupcake holders that you use to add a little creepy crawly to your Halloween cupcakes and thought… It would be so fun to make something with those cute legs rather than just a cupcake.  Then it hit me… why not take a black Christmas ornament, turn it upside down onto the legs and add some googlie eyes. How cute will that be. Here’s what you will need…

supplies for a spooky spider

  • Black Christmas ornaments (I used the glitter kind, but it doesn’t matter)
  • Spider cupcake holders
  • Large self-adhesive google eyes

All you have to do in invert the Christmas ornament onto the cupcake holder like this…

how to make a cute spider

No need to glue them together if you don’t want.  I decided that I wanted to keep my options open, so I didn’t glue them together. I have commitment issues. Then you can place the eyes wherever you see fit and voila, your done!  Now all you have to do is find some fun spots to place these cute little creepy crawlies.

cute little spooky spider display from whipperberry

I used mine in this year’s Halloween mantle and just fell in love with these little buggers. Take that… a Halloween craft in less than a minute! What’s your favorite quickie holiday craft?

Heather copy

Polka Dot Jars

15 · Aug 21, 2012 · 19 Comments

Polka Dot Jars // If you have followed WhipperBerry for any time at all, you know I love my jars. I love to bake with jars, decorate with jars, organize with jars… you name it, I ADORE jars.  This week I found another fun, yet simple way to dress up my jars with DecoArt Glass Paint …

Polka Dot Jars copy

Isn’t this a fun way to dress up your jars for an event? It couldn’t be simpler with DecoArts Glass Paint 3D Frost Gloss Enamels…

Deco Art Glass Paint

DecoArt sent me a bunch of their glass paint to take for a spin. I was madly getting ready for my last minute trip to Hawaii, so I didn’t have a ton of time to create a painted masterpiece.  I did however have just enough time to dress up a jar and then I had a thought… This would be so fun for a birthday party or shower, basically any type of event where you would like to add a little playful fun element to the party. The nice part it hardly takes any time at all to create these fun polka dot jars.

Supply List

  • Ball quilted 8 oz. jelly jars
  • DecoArt 3D Frost Gloss Enamels {you can find this at Michaels over with the glass vases and stuff. Isn’t that cool… the glass paint has it’s very own section!!}
  • Mason daisy drinking lids
  • Stripped straws

Instructions

  1. Make sure your jars are clean inside and out. Wipe down the outside of the jar with alcohol to prepare it for the paint.
  2. Select your 3D Frosted Gloss Enamel color and using the handy tip just start placing dots at the tip of every diamond on the quilted glass jar.
  3. Let dry completely, this takes a few hours or best over night.
  4. Fill with your party beverage, screw on the lid and top it off with the fancy straw. 
  5. Line up your jars on a table or tray and your guests will be amazed!!

How easy is that!! Seriously, you could get a whole parties worth of jars painted in no time at all.  Give it a go and let me know what you think!

If you are looking for more glass painting projects, DecoArt has created a fabulous site for their Glass Painting Program that you should check out.  It has all kinds of project ideas, product information and videos!!

Heather copy 

Arrow Baby Blanket with Ink Effects

0 · Jul 11, 2012 · Leave a Comment

You have to come check out how I made this fun arrow baby blanket with DecoArt's new Ink Effects paint. Click on over to see my review!

  • « Go to Previous Page
  • Page 1
  • Interim pages omitted …
  • Page 33
  • Page 34
  • Page 35
  • Page 36
  • Page 37
  • Interim pages omitted …
  • Page 43
  • Go to Next Page »

Primary Sidebar

Heather from Whipperberry
Hello... my name is Heather and I'm the creator of WhipperBerry a creative lifestyle blog packed full of great recipes and creative ideas for your home and family. I find I am happiest when I'm living a creative life and I love to share what I've been up to along the way... Come explore, my hope is that you'll leave inspired!

Footer

  • Privacy Policy
  • Crafts
  • Food
  • Gifts
  • Holidays
  • Home
  • Mom Life
  • Recipes
  • Travel

Copyright © 2026 · Seasoned Pro