• Skip to primary navigation
  • Skip to main content
  • Skip to primary sidebar
  • Skip to footer

Whipperberry

WhipperBerry • Your Home For Creative Inspiration

  • Home
  • Recipes
    • Starters
    • Easy Weeknight Dinners
    • Main Dish
    • Salads
    • Side Dish
    • Soups & Stews
    • Desserts
    • Breakfast
    • Miscellaneous
  • Tutorials
    • Creative Crafts
    • DIY Decor
    • Fabric Crafts
    • Food How-To
    • Jewlery
    • Paint Projects
    • Paper Art
    • Party Styling
    • Photography and Graphic Design
    • Silhouette
  • Holidays
    • Easter
    • Mother’s Day
    • Father’s Day
    • 4th of July
    • Halloween
    • Thanksgiving
    • Christmas
    • Valentine’s Day
  • Gift Ideas
    • Gifts For Everyone
    • Gifts for Dad
    • Mother’s day
    • For The Girls
    • For The Kids
    • Teacher Gift Ideas
    • Christmas
  • Printables
    • Holiday
    • Gift Idea
    • LDS Primary
  • Travel
  • About
    • Terms
  • Contact
  • Nav Social Menu

    • Facebook
    • Instagram
    • Pinterest
    • RSS
    • Twitter

In a Jar

DIY Chalk Paint Halloween Apothecary Jars with BB Frösch Chalk Paint Powder

5 · Oct 29, 2014 · Leave a Comment

+ Guest Post by BB Frösch Master Jonelle Morris from Chalk-a-Lot +

Glass-bottles-after

EEK! It’s almost Halloween! I’m not one for the guts and gore of the holiday, but I do love me some fun Halloween decor. I have wanted to make an apothecary display for a few years now, but never got around to it thinking, “oh that will take too long,” or “that will be too expensive,” or “I wouldn’t make it look good.”

Well, since I have joined the BB Frösch team, I have been trying all sofrts of things I never thought I would do. I set out to good ol’ Michaels to see if they had any glass bottles I could turn into something amazing, and as luck would have it, they did!

Glass-bottles-before

And the best part, each one was a $1.29 or under—score! But my luck didn’t run out there. Most of their Halloween stuff was 50-60% off, so therefore I made my whole display with what I purchased at Michaels, plus a couple small things I already have for….drumroll….$25! Double score!

I wanted some of the bottles I made to be black, and thought I would put the “BB Frösch bonds to virtually anything” claim test. I started out with my plain glass bottles and put a quick few coats of BB Frösch chalk paint with some leftover black paint I had from another project. BB Frösch isn’t just for furniture!

BB Frosch Products-26

And when I say quick, I mean quick. Three coats on those four bottles took me about 25 minutes, drying time included. I then took a wet rag to wet distressed the tops and corners of the bottles to create a more authentic vintage look. I chose to leave the other bottles clear, so I could put some water with food coloring inside.

Apothecary-display

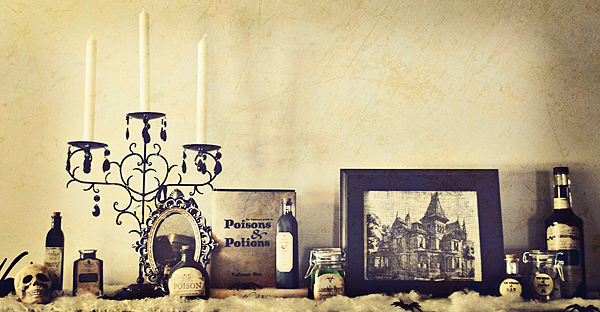
Then, because I am cheap 🙂 I searched for free vintage apothecary labels online and found some awesome options! I printed them off on regular paper and Modge Podged them under and on top of the label.
I used the labels found here:

Two Crafty Paws

Love Manor

The Graphics Fairy

For some other wonderful options you can go here:
Lil’Luna

Soap Deli News

The Graphics Fairy

Pen & Paper flowers

The Idea Room

Then to complete my display, I printed a beautiful, but slightly creepy picture of an old Victorian house (that was most likely haunted) on burlap.

Frame

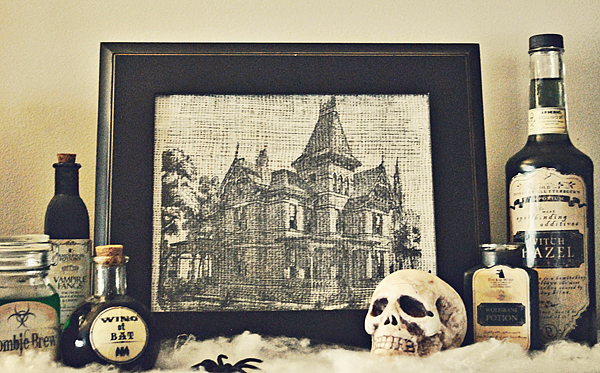
Yes, you read that right, I printed on burlap, as in on my home inkjet computer.

Print-on-burlap

Amazing! You can find this easy to follow tutorial on Domestically Speaking.  It seriously took me about 10 minutes. The graphic I used as well as several other vintage halloween images can be found on The Graphic’s Fairy.

There, I did something I never thought I could do, and quickly and inexpensively! Happy Halloween!

Funfetti Bold Strawberry Shortcake

0 · Apr 8, 2014 · 3 Comments

// This post brought to you by the new vibrant Pillsbury Funfetti® Cake Mixes //

Pillsbury-Funfetti-Strawberry-Shortcake-#gobold-#whipperberry

I LOVE going BOLD! I LOVE finding something a little different… I LOVE standing out in a crowd!

Who doesn’t really? We all like to feel like a STAR at times…

Even on those normal, hum drum days…

When the day is normal, the meal is just your typical fair and there is nothing special to celebrate… You CAN add a little FLAIR and turn something typical, into something Funfettilicious!

Our family LOVES strawberry shortcake and we are always looking for fun new “cake” options. We’ve tried several different types of cake from sponge to pound and almost everything in-between! The folks at Pillsbury made my day when they released their new Funfetti® line of cake mixes and bold frostings.

Pillsbury-Funfetti

So many fun colors to play with… Immediately I thought of creating a BOLD Strawberry Shortcake with the Vibrant Green Cake Mix…

I knew that the bold green color would look amazing with the strawberries and the cream, together they could turn a normal dessert into something extra special!

Pillsbury-Funfetti-Strawberry-Shortcake-#gobold-#whipperberry-6

What I really love about these new products is how it make baking even more fun with your kiddos! My little guy, Gage and I worked on this project together. It was so fun to open the cake mix together and to our surprise the mix was blue. I thought this would be a fun opportunity for a little kitchen magic so I took a video of the two of us mixing the cake…

Bold Strawberry Shortcake from Heather Thoming on Vimeo.

 We had so much fun making this dessert for the family and couldn’t wait to share our goodies. We decided to make it two ways. I found these super cute baking cups from Target that are quite a bit larger than a cupcake liner. They are actually baking cups and create the cutest single serving little cake… We mixed up our cake batter…

Pillsbury-Funfetti-Strawberry-Shortcake-#gobold-#whipperberry-1

Then poured it into our cake molds…

Pillsbury-Funfetti-Strawberry-Shortcake-#gobold-#whipperberry-2

And baked them for about 19 minutes. We pulled them from the oven and let them cool for 20-30 minutes and then we got to work building our strawberry shortcakes.  First we made our simple Strawberry Shortcake by just topping a few of the single serving cakes with some strawberries and fresh whipped cream…

Pillsbury-Funfetti-Strawberry-Shortcake-#gobold-#whipperberry-4

Then for a couple more, we decided to make Strawberry Shortcake parfait’s or we could also call them a trifle. No matter what you want to call it… They turned into beautiful, layered strawberry goodness in just a few simple steps.

Pillsbury-Funfetti-Strawberry-Shortcake-#gobold-#whipperberry-10

Gage and I tore up the cake into bite sized pieces and simply layered cake, strawberries, fresh whipped cream, cake, strawberries and topped it all off with a nice dollop of whipped cream.

Pillsbury-Funfetti-Strawberry-Shortcake-#gobold-#whipperberry-11

You know what one of the perks is to helping Mom? You get the first taste…

Bold-Strawberry-Shortcake

To quote Gage, “This is TASTY!”

So… How are YOU going to GO BOLD? Check out all of the fun colors you have to choose from…

Pillsbury-Funfetti

Visit Pillsbury Baking for all kinds of fun ideas on how to turn the everyday into something special! You can even enter to win a Pillsbury Baking Prize Pack!

Disclaimer // This is a sponsored post. I did receive product and payment for this post. However, all thoughts, ideas and opinions are all my own! ©/® The J.M. Smucker Company. Pillsbury is a trademark of The Pillsbury Company, LLC, used under license.

LDS Primary Singing Time // Wiggle Worm Jar

120 · Mar 5, 2014 · 8 Comments

// LDS Primary Singing Time Wiggle Worm Jar //

wiggle-worms-from-#whipperberry

I have been madly working on getting some fun activities together for my new calling at Church. To back up a bit… I am a member of the Church of Jesus Christ of Latter-Day Saint (the Mormons) and we all have different responsibilities that we take on to help the organization of the church. I am currently serving in Primary which is our children’s organization. I am in charge of singing time, which is the best time of all if you ask me. Because of that, I am currently working on some projects to prepare for Primary and I thought I would share then for all my Primary Chorister friends out there. Here’s my post last week on this month’s song, “I Stand All Amazed.” I am working on the rest of the verses for this next Sunday so stay tuned.

Today I’m sharing my take on the Wiggle Worm Jar. This isn’t a new idea, I’m not sure who came up with originally, but I LOVE it!  Many times during singing time the kiddos get a little restless and need a little wiggle song to help them get through Primary.  If I see them wiggling around and having a hard time paying attention, I pull out my wiggle worm jar.  This jar is full of cute little worms with fun songs attached to them like, Popcorn Popping, Head, Shoulders, Knees and Toes, If you’re Happy and You know it and such. These cute little worms are soooo easy to make! Here is what you will need…

Wiggle Worm Jar Supplies

  • Patterend Paper 4 – 12×12 sheets,  I used some paper for the Hey Girl Basic Grey Paper Pack
  • Large craft sticks
  • Elmer’s Glue Stick
  • Wiggle Eyes
  • Elmer’s Mini Glue Spots
  • Black Sharpie Pen
  • Cricut Explore (optional)

Instructions

Take your four 12×12 sheet of paper and cut a bunch of circles roughly 1 1/2 inches in diameter. I used my Cricut Explore to cut the circles. I know that this machine isn’t available until March 15th and this project is by no means a reason to run out and buy one. You can cut your circles what ever way you would like. If you have a personal cutting machine like the Cricut or Silhouette great, if not… You can trace your circles and cut them by hand. Either way works just fine.

Like I said before, I used my Cricut Explore and it worked super slick…

Cut-circles-for-wiggle-worms-with-Cricut-Explore

I used the Design Space and created 24 circles and then sent them to the preview screen to make sure everything was set properly…

Cut-circles-with-Cricut-Explore

Once I made sure everything looked right and the dial on the Explore was set to card stock, I sent it to the Cricut to cut…

Cutting-circles-with-Cricut-Explore

I loaded the mat and cut away…

reverent-snuggle-bugs-and-wiggle-worms-from-#whipperberry-15

Within just a few minutes I had 24 circles…

reverent-snuggle-bugs-and-wiggle-worms-from-#whipperberry-16

I repeated the cutting process three more times and then I was ready to build my cute little worms…

reverent-snuggle-bugs-and-wiggle-worms-from-#whipperberry-5

I added some glue to 3/4 of one side of the craft stick and then laid out my circle to look like a wiggly worm…

reverent-snuggle-bugs-and-wiggle-worms-from-#whipperberry-8

Then I flipped the stick over and glued the 2nd circle on the flip side…

reverent-snuggle-bugs-and-wiggle-worms-from-#whipperberry-9

Add glue to the 2nd circles and pinch the two circle together. Let dry for a few minutes and then using the mini glue spots, add the wiggle eyes and draw a cute little mouth with the sharpie…

reverent-snuggle-bugs-and-wiggle-worms-from-#whipperberry-10

Now all you need to do is select a handful of songs and using a sharpie, write the name and page number of the song on the bottom of the stick…

reverent-snuggle-bugs-and-wiggle-worms-from-#whipperberry-11

I added a vinyl name to the jar and voilá, you have your Wiggle Worm Jar.

reverent-snuggle-bugs-and-wiggle-worms-from-#whipperberry-21


I also have a fun new idea for Reverent Snuggle Bugs that I will share soon… Same idea, just reverent songs to help the Primary kiddos settle down after you’ve gotten all the wiggles out.

reverent-snuggle-bugs-from-#whipperberry

Sweet & Savory Christmas Gift Idea // Compound Butter

36 · Dec 18, 2013 · 6 Comments

Sweet & Savory Christmas Gift from WhipperBerry-8

I love the long seated tradition of entering the kitchen at this time of year to create all kinds of goodies to share with family and friends. I also LOVE receiving these gifts every year. You can always feel the love that goes into each and every recipe that is shared. One thing I DON'T love is how frantic and hurried the season has become. Sometimes we just don't have time to bake for days and days in order to put together these treasured gift plates.

Another issue I have have… Sometimes, we get sugar overload with all of these scrumptious goodies. For the last several years, I have tried to find some savory goodies along with the sweet to give as holiday neighbor gifts. This year, my favorite sweet & savory gift for the season is compound butter. What is compound butter you ask? Well, it is butter combined with any of a number of tasty additions that can be used in various different ways in the kitchen. I am particularly fond of any type of berry butter, the ever popular honey butter and the luscious roasted garlic butter. All of these can be used on breads, French toast, crêpes, pancakes, used in sauces and even used to enhance many types of meats. I decided this year, that I am going to give little gift baskets with some homemade compound butter along with some bread…

Sweet & Savory Christmas Gift from WhipperBerry-1

Don't you worry, these butters are a snap to make AND you can even use store bought bread if you aren't the baking type. I am going to give you three quick butter recipes along with the fabulous printable that you can use to label your jars and your gift container if you like. 

Berry Butter Ingredients

4 sticks of softened unsalted butter

1 jar of Smucker's Orchard's Finest preserves (you can use any kind you like, for this one I used cranberry raspberry preserves)

1 tablespoon honey

1/4 teaspoon citric acid

Berry Butter Directions

Berry Butter with Smucker's Orchard's Finest-1

In the bowl of an electric mixer, add your softened, room temperature butter, the Orchard's Finest preserves, honey & citric acid. Why do I use citric acid? I like to add a bit of a tart kick to the butter without adding the liquid from the lemon. The liquid can cause issues with the consistency and I have found that citric acid is a perfect solution. You can get the hit of tart flavor without the consistency issues. I found citric acid at my local market in the canning section. If you can't find it, you can always order it online.  I LOVE it and use it in all kinds of recipes.

Once you have all your ingredients in your mixer, turn your mixer on high and whip the butter for several minutes. Once it has whipped well and is nice and fluffy, take your mixture and add it to your sterilized 4 ounce Ball jars.  Fill to the top and place the lid on tight. Store in the refrigerator until ready to serve. This recipe also can be stored in the freezer really well.

Honey Butter Ingredients 

4 sticks of softened unsalted butter

1 cup honey

Honey Butter Directions

In the bowl of an electric mixer, place softened room temperature butter and honey. Whip on high for several minutes until light and fluffy. Once finished, carefully spoon into sterilized 4 ounce ball jars and replace the lid. Store in the refrigerator until ready to use. This butter also freezes well.

Roasted Garlic Butter

I have a fabulous recipe for Roasted Garlic Butter over at WhipperBerry that you should check out. I also, show you how to roast your own garlic and everything!

WhipperBerry Roasted Garlic Butter

Savory & Sweet Christmas Gift

Now this is where it gets fun… I LOVE packaging! To me the way you dress-up a gift is just as important as the gift. Now, I used my favorite 4 ounce Ball jars for the butter on purpose. With these jars I can create a lovely FREE printable label for everyone to use. 

Sweet & Savory Christmas Gift from WhipperBerry-5

Aren't they fun?! Now… I have created a couple of different ways to use these free printable labels.

Silhouette Print & Cut Users

If you are a Silhouette User, you can download the Silhouette Studio file, print them with your printer and cut out with your CAMEO or Portrait. I used the Printable Gold Foil for mine, but you could use anything that you want. Card stock, printable sticker paper or even printable kraft paper. Use whatever you feel comfortable with. Click HERE to download the Silhouette Studio Label file. 

Printable Users

Now, if you would like to print and cut your labels on your own… No worries, I have you covered too! Click HERE to download the free PDF for you to use for your special gift. Just print as many sheets as you would like on whatever paper you would like, cut out the labels and affix them to your jars and gift container.

Gift Container

I found my container at Target in their seasonal decor section. I would love to link to it, but I can't seem to find it on their web site. You'll just have to look at your local store. You can also use any type of container that will fit your butter selection and the bread your choose. You could use an inexpensive gift bag and it would look fabulous!!

All in all, I am in LOVE with this gift idea and I hope that it sparks some creativity for your holiday gift giving this year.  You know… not all homemade holiday gifts have to be sweet! I know some of us would love some savory treats as well!


  • « Go to Previous Page
  • Page 1
  • Page 2
  • Page 3
  • Page 4
  • Page 5
  • Page 6
  • Go to Next Page »

Primary Sidebar

Heather from Whipperberry
Hello... my name is Heather and I'm the creator of WhipperBerry a creative lifestyle blog packed full of great recipes and creative ideas for your home and family. I find I am happiest when I'm living a creative life and I love to share what I've been up to along the way... Come explore, my hope is that you'll leave inspired!

Footer

  • Privacy Policy
  • Crafts
  • Food
  • Gifts
  • Holidays
  • Home
  • Mom Life
  • Recipes
  • Travel

Copyright © 2026 · Seasoned Pro