• Skip to primary navigation
  • Skip to main content
  • Skip to primary sidebar
  • Skip to footer

Whipperberry

WhipperBerry • Your Home For Creative Inspiration

  • Home
  • Recipes
    • Starters
    • Easy Weeknight Dinners
    • Main Dish
    • Salads
    • Side Dish
    • Soups & Stews
    • Desserts
    • Breakfast
    • Miscellaneous
  • Tutorials
    • Creative Crafts
    • DIY Decor
    • Fabric Crafts
    • Food How-To
    • Jewlery
    • Paint Projects
    • Paper Art
    • Party Styling
    • Photography and Graphic Design
    • Silhouette
  • Holidays
    • Easter
    • Mother’s Day
    • Father’s Day
    • 4th of July
    • Halloween
    • Thanksgiving
    • Christmas
    • Valentine’s Day
  • Gift Ideas
    • Gifts For Everyone
    • Gifts for Dad
    • Mother’s day
    • For The Girls
    • For The Kids
    • Teacher Gift Ideas
    • Christmas
  • Printables
    • Holiday
    • Gift Idea
    • LDS Primary
  • Travel
  • About
    • Terms
  • Contact
  • Nav Social Menu

    • Facebook
    • Instagram
    • Pinterest
    • RSS
    • Twitter

In a Jar

Homemade Mixed Berry Swirl Ice Cream Recipe

13 · May 30, 2018 · 2 Comments

It’s ICE CREAM and BERRY Season!!!! I’m not sure if I could be any more excited! I have a great love of both so this is by far my favorite flavor time of year. It’s time to whip up a batch of Mixed Berry Swirl Ice Cream.

+ This post is brought to you by Ball® Fresh Preserving Products by Newell Brands +

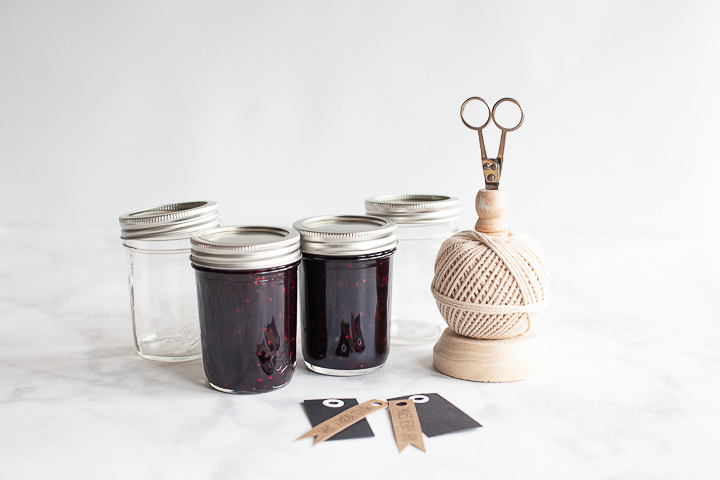
Mixed Berry Jam Recipe

Last year, I was super honored to be invited to Newell Brands’ Ball® Fresh Preserving test kitchens to learn how to make Mixed Berry Jam, and the rest my friends, has been history. I’ve been a canning fool ever since. Jams, peaches, pickles, pickled jalapeños… Let’s just say that 2017 was the year of preserving in the WhipperBerry household much to the joy of my family. We’ve all fallen in love and are so excited for this year’s preserving season to kick-off.

This last weekend I whipped up a small batch of the Ball® Mixed Berry Jam recipe so that I could then use it as a scrumptious addition to some homemade ice cream I was planning on making. This jam recipe really couldn’t be any easier. It’s a great recipe to start with and I love that you can make it in small batches AND have total control over how much sugar you add. You don’t have that opportunity with commercially prepared jams. I had the opportunity to learn from Newell Brands’ Ball® canning experts just how easy this jam is to make.

Now that I’ve hopefully peaked your interest, you can find the full Mixed Berry Jam recipe over on FreshPreserving.com. I’m also sharing my label design for those who might want to use that as well.

Mixed Berry Jam Jar Labels - whipperberry

Mixed Berry Swirl Ice Cream Recipe

Here my friends… Is the star of the show, my mixed berry swirl ice cream recipe. Let’s just say, it’s divine.

EASY Homemade Mixed Berry Swirl Ice Cream Recipe • WhipperBerry

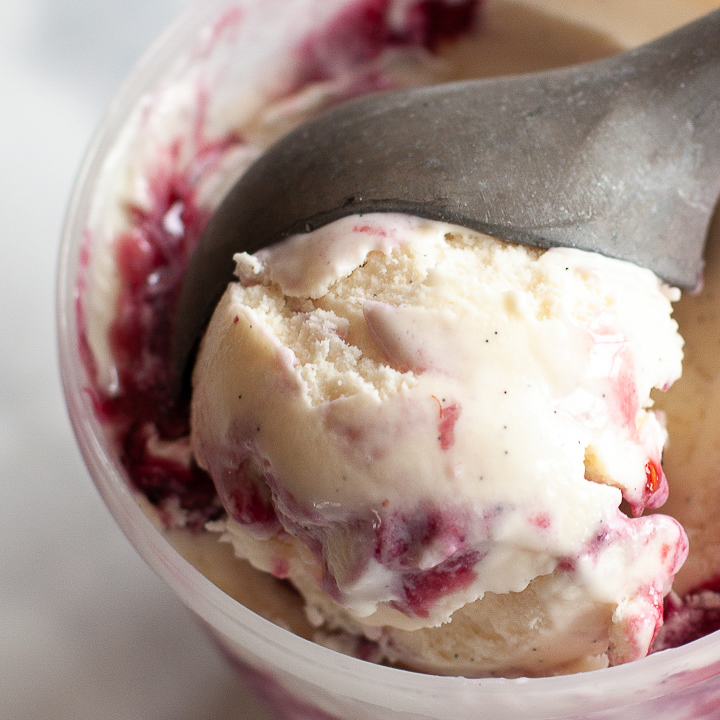
It’s creamy with that sweet and tart flavor of the berries. Being that it’s homemade, it has a totally different luscious texture that your taste buds are going to fall head over heels for. Commercial ice cream makers whip a lot of air into their ice cream which is a process that the home cook doesn’t have the equipment to do. Therefore, homemade ice cream has the taste and texture more like premium ice cream or gelato… WHICH I LOVE!

Another thing that makes this ice cream a little different is that it is made without eggs. I KNOW! I was shocked when I found this recipe as well. I grew up in a family that liked to make homemade ice cream every once in a while and the ice cream base recipe always called for egg yolks. In my mind, that’s what made it so decadent. In reality, the egg yolks not only made it dreamy but, it also helps to stop the formation of ice crystals which is very important in ice cream making. Without the eggs, what is going to stop the formation of ice crystals then?

Mark Bittman, the award-winning author of the How to Cook Everything Series, sings the praises of this type of ice cream base in his New York Times article where I originally found the recipe for a simple vanilla ice cream. This recipe calls for a cornstarch slurry and cream cheese to help with the formation of ice crystals. Becuase this isn’t a traditional custard base, it makes this recipe a lot easier to make and also very forgiving. Therefore, if this is your first rodeo with the ice cream maker, this recipe is perfect!

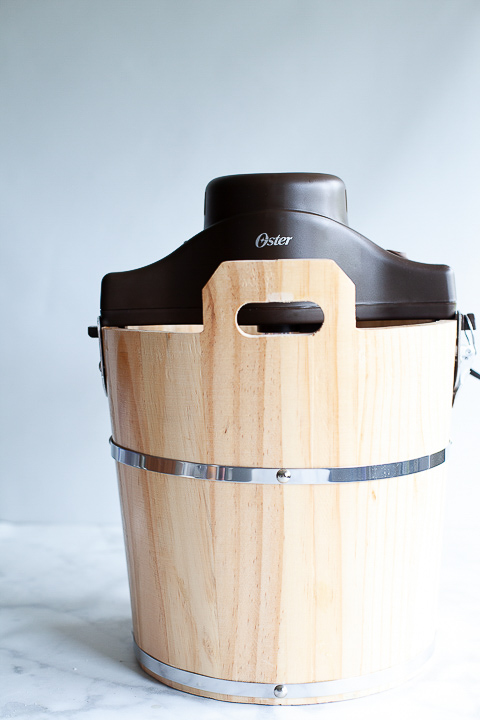
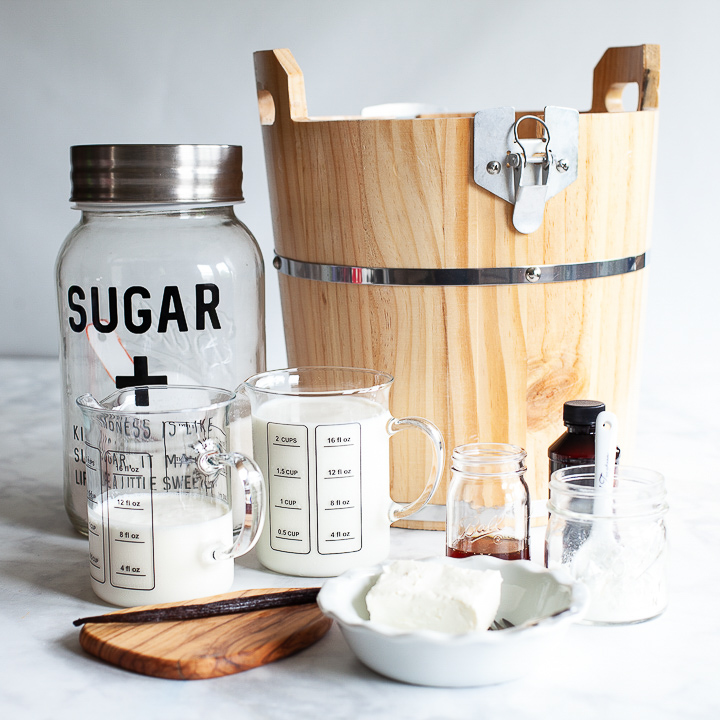
Ice Cream Making Supplies

When it comes to ice cream making, you need to be prepared with a few supplies that make the process a whole lot easier.

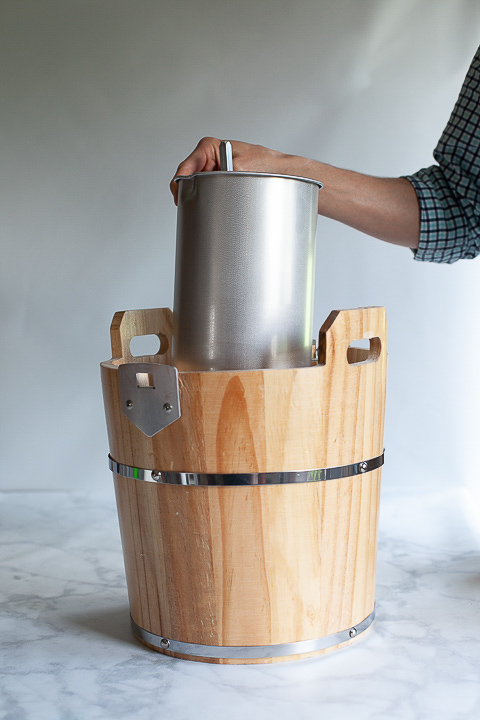
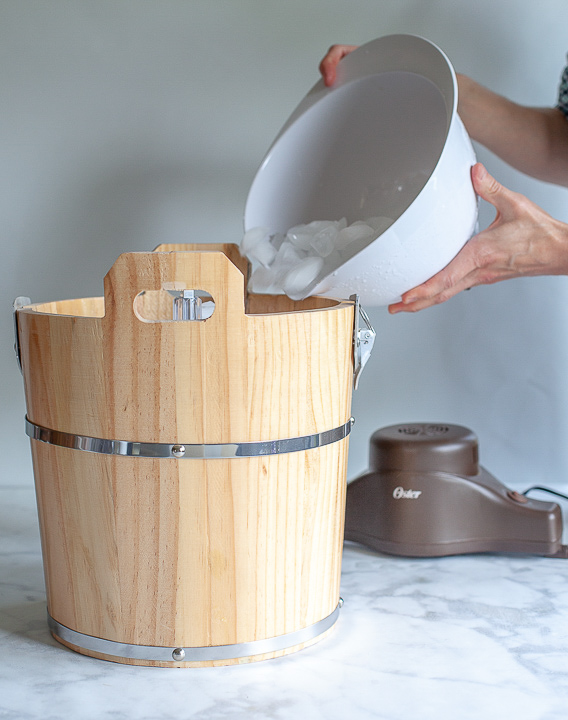
  •  Ice cream maker – I’m a traditional girl and I love the classic wooden bucket ice cream maker. When I was a girl, I think my parents used the old hand crank ice cream maker to keep us kiddos under control during the summer. We had to sit there and crank the machine for 40 minutes or longer, which kept us kiddos occupied for a while. Luckily, we also have the charm of those classic wooden bucket ice cream makers with an electric crank so no more tired arms!The classic wooden bucket ice cream maker with all the charm of yesterday but with the modern electric crank - whipperberry
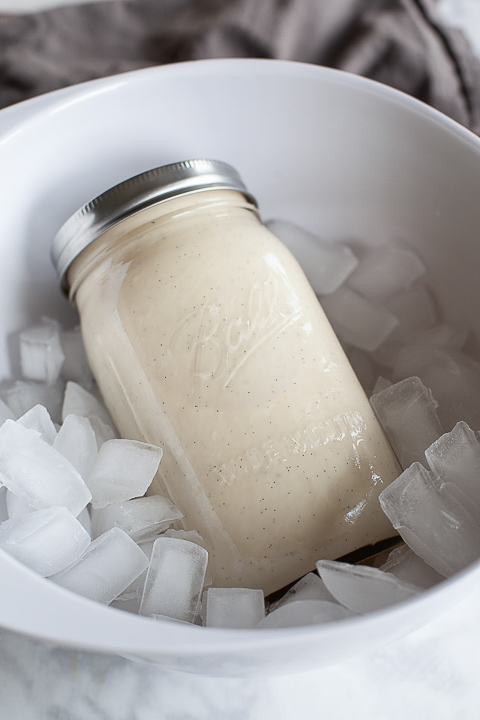
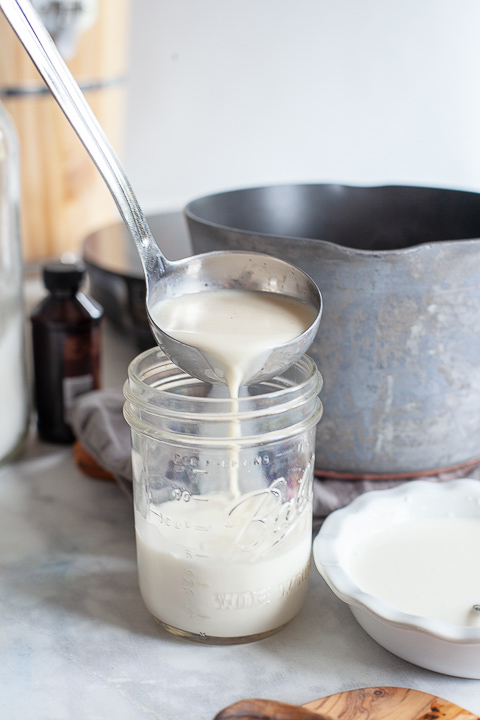
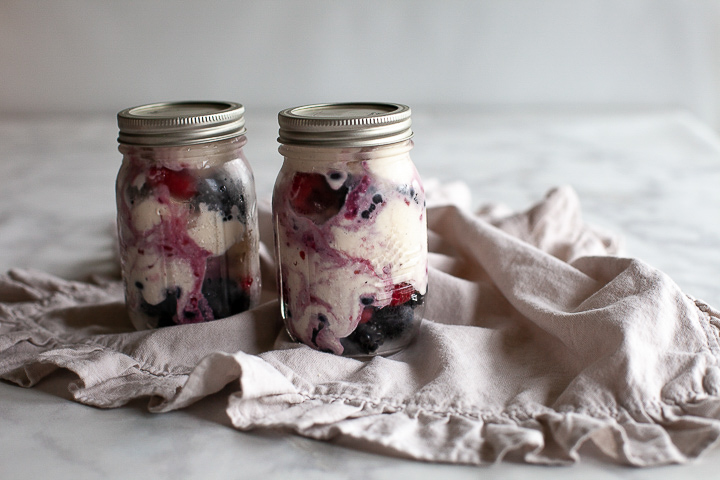
  • Ice cream base storage – this ice cream base recipe makes exactly a quart of the base. Naturally, a Ball® Quart Wide-Mouth Jar is the perfect way to store your ice cream base. However, to avoid thermal shock, you’ll want to make sure you invert the jars and then warm them by running under hot water before you ladle the hot ice cream base into the jar.  Make sure to dry the inside of the jar before adding the the ice cream base.Quickly chill your ice cream base in a @ballcanning quart jar in a ice bath - whipperberry
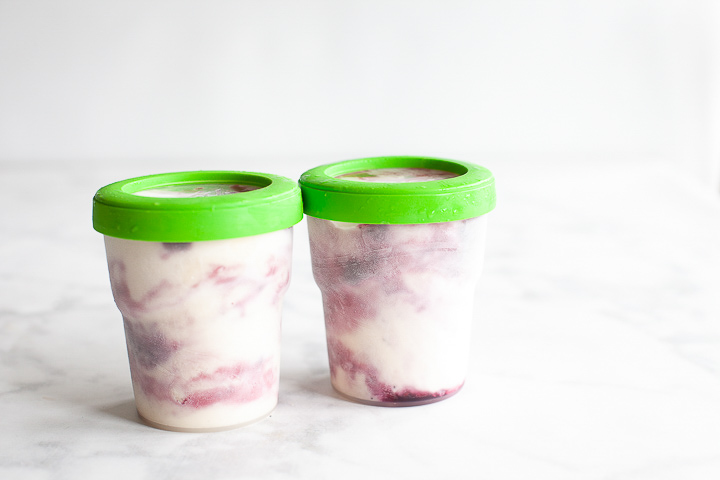
  • Ice cream storage container– Glass jars ARE NOT the best option when it comes to storing your ice cream due to the nature of freezing. However, Ball® Plastic Freezer Jars with special snap-on lids work great!

Instructions

Before you can start your ice cream, you’ll need to make up a small batch of the mixed berry jam. You can find that recipe at the top of this post. Make sure to allow for the jam to fully cool and jell before you add it to your ice cream.

This is one of those recipes that the kiddos can help with from start to finish and they will love making real ice cream.

2 votes

Print

Mixed Berry Swirl Ice Cream

Prep 30 mins

Cook 45 mins

Inactive 24 hours

Total 25 hours, 15 mins

Author Heather Thoming • WhipperBerry

Yield 4-5 servings

This ice cream is so fantastic and super easy to make. All you need are a few ingredients and you'll be whisked back to your childhood!

Ingredients

  • 2 1/4 cups whole milk, divided
  • 5 teaspoons cornstarch
  • 2 ounces cream cheese, very soft
  • 1/4 teaspoon fine salt
  • 1 cup heavy cream
  • 2/3 cup granulated sugar
  • 2 tablespoons honey
  • 1 vanilla bean, optional
  • 1 teaspoon vanilla extract
  • 4 tablespoons of mixed berry jam

Instructions

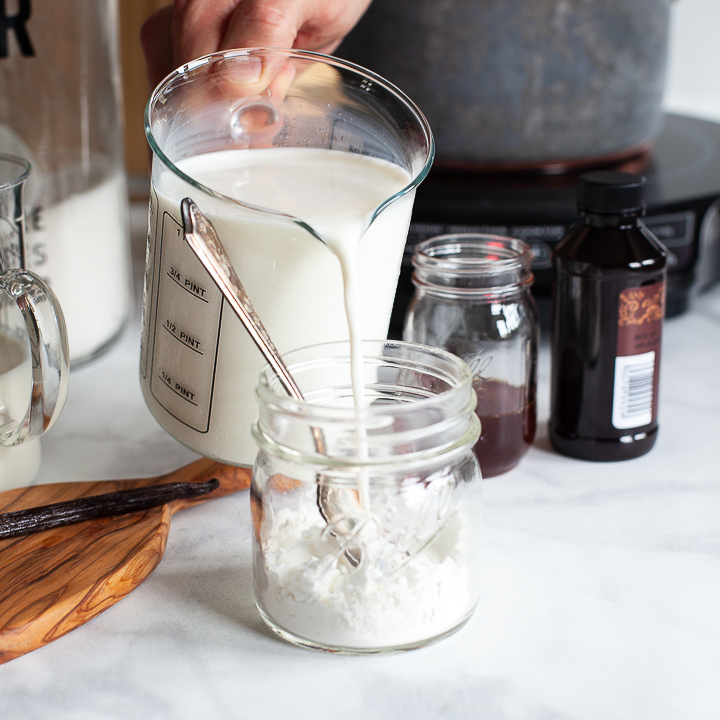
  1. Make the cornstarch slurry- Place a 1/4 cup of the milk and cornstarch in a small bowl and whisk until the cornstarch is fully dissolved. 
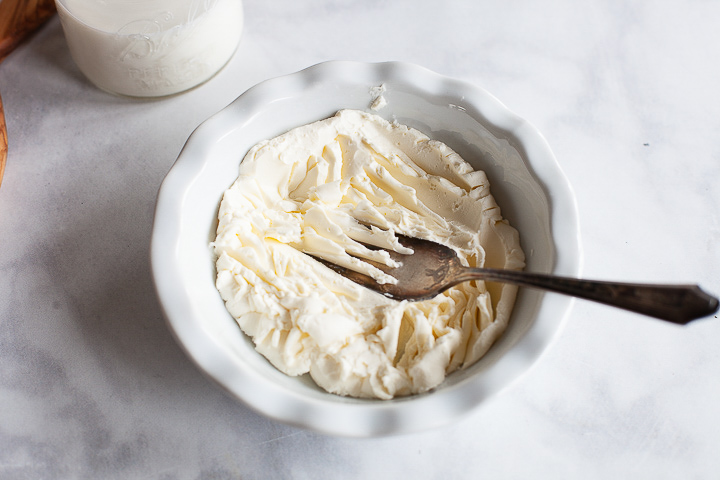
  2. Smooth out the cream cheese - Place the cream cheese and 1/4 cup of the milk in another small bowl and whisk until smooth then, whisk in the salt. 

  3. Simmer the milk - Place the remaining 1 3/4 cups milk, sugar, cream along with the honey in a medium saucepan and whisk to combine. (If you are using a vanilla bean) Lay the vanilla bean flat on a cutting board and slit it open lengthwise. Use the tip of the knife to scrape all the vanilla beans into the saucepan, then toss in the whole vanilla bean pod. 
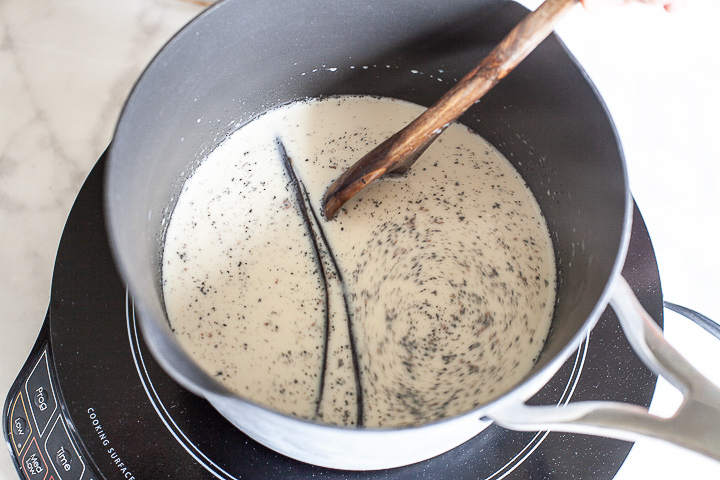
Bring to a simmer over medium heat, whisking frequently. Reduce the heat and simmer for 4 minutes. Remove from the heat. 

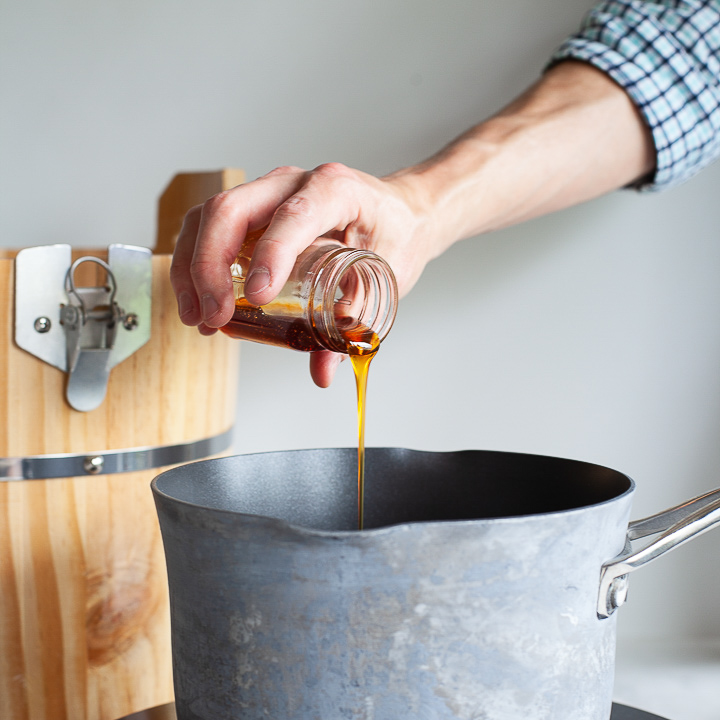
  4. Thicken the ice cream base -  Whisk about 1/2 cup of the hot milk mixture into the cornstarch slurry. Slowly pour this back into the hot milk, whisking constantly. Return to the medium heat and cook, whisking frequently, until it comes to a boil. 
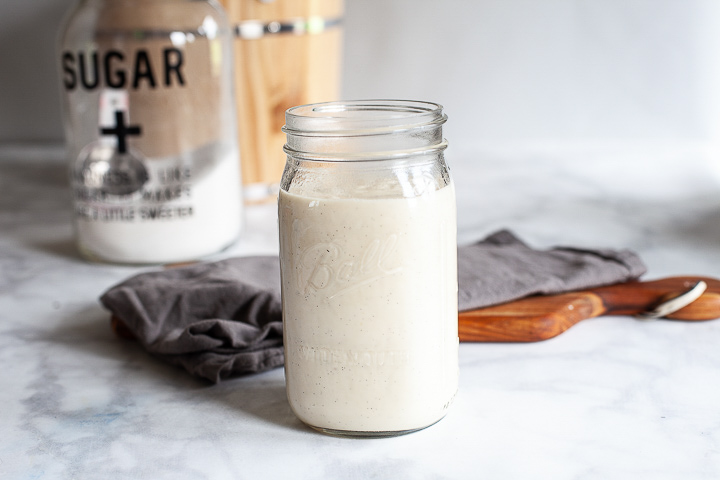
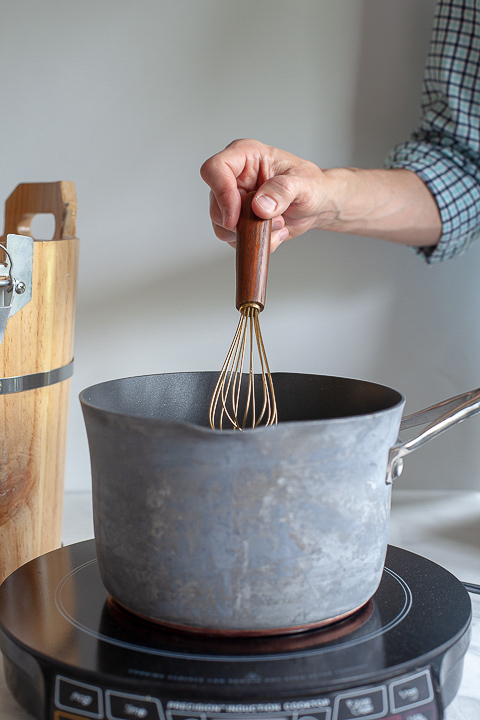
Boil for 1 minute, then remove from the heat. Whisk in the cream cheese mixture. Remove the vanilla bean husk. Whisk in the vanilla extract.  

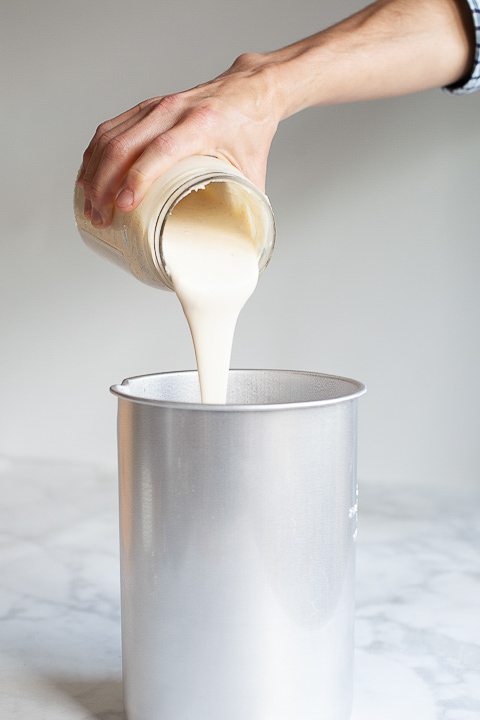
  5. Chill the ice cream base - Chill this ice cream base for at least 4 hours or overnight in the refrigerator. If you are in a hurry, you can also pour your ice cream mix into a quart jar and submerge it in an ice water bath. (Remove the lid of the jar being careful to not get any water into the jar.) Stir every few minutes until the ice cream base is nice and chilled. This will cool your base very fast and very thoroughly.  Quickly chill your ice cream base in a @ballcanning quart jar in a ice bath - whipperberry

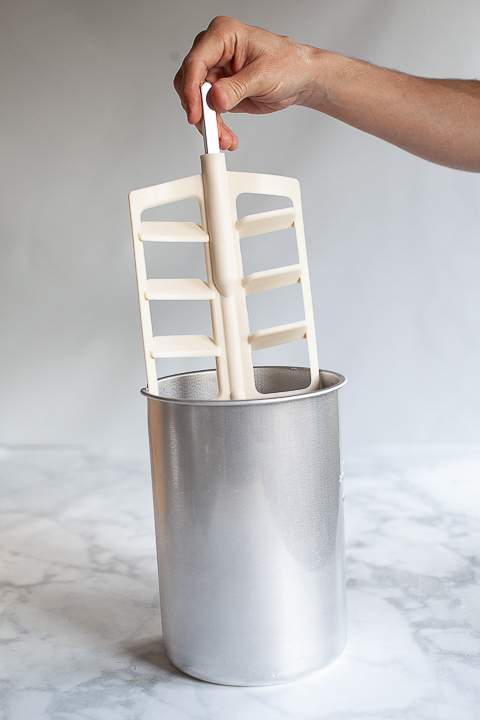
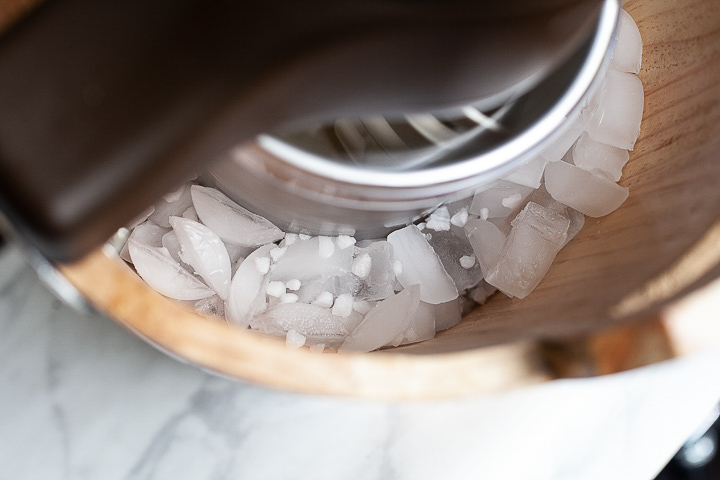
  6. Churn the ice cream base - The goal of churning the ice cream is to freeze the base while stirring the ice cream constantly so that large ice crystals don't form in the ice cream. You will need to follow the instructions for your ice cream maker for this step.  

  7. 10. Stir in mixed berry jam - No matter what kind of ice cream maker you use, the freshly churned ice cream will still be very soft and even runny after it has been churned. 

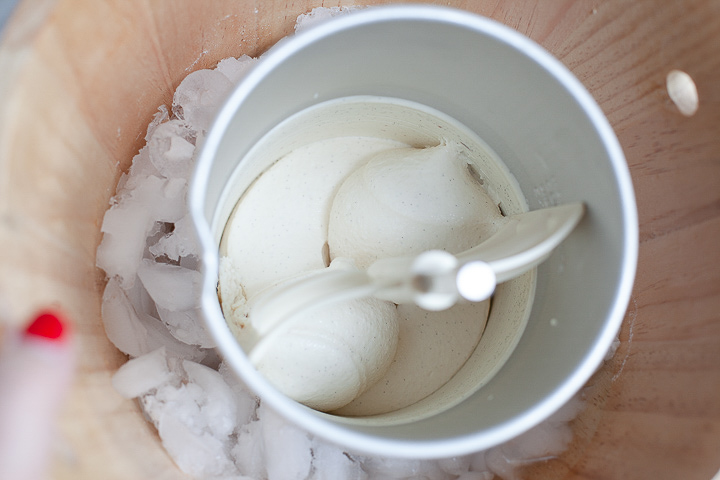
    Adding the jam is best done AFTER you have finished with the ice cream maker. I actually borrowed a trick from Starbucks and swirled the jam onto the inside of the plastic jar before I even put the ice cream in the jar.  Then, I filled the plastic jar half way and put a spoonful of jam on the top. I filled the plastic jar the rest of the way, leaving about 3/4 of an inch at the top of the jar to allow for expansion. Then I added another spoonful of jam. Then I took a knife and gently stirred the ice cream in ONE figure eight pattern. You want this ice cream to be swirled not totally stirred in. 

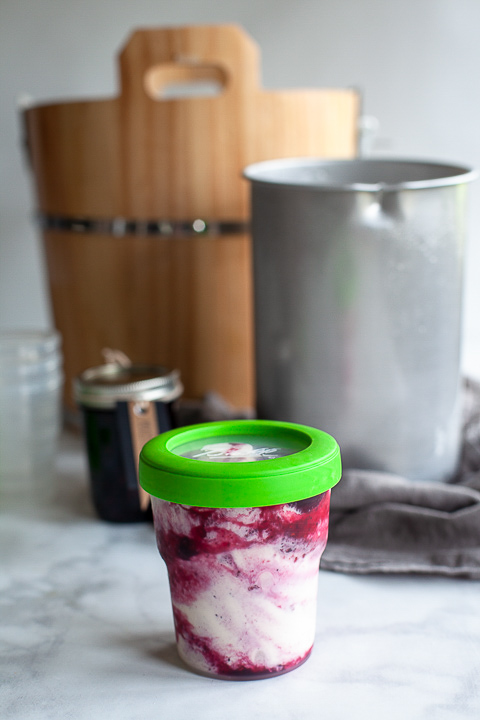
  8. Harden the ice cream in the freezer -  In order to get that scoopable texture, and to let the flavors bloom, it's best to freeze the ice cream for at least a few hours before eating.  EASY Homemade Mixed Berry Swirl Ice Cream Recipe • WhipperBerry

Notes

Storage -  The ice cream can be stored in the freezer for up to 2 months. Keep the plastic wrap or waxed paper pressed against the surface at all times to keep ice crystals from forming.

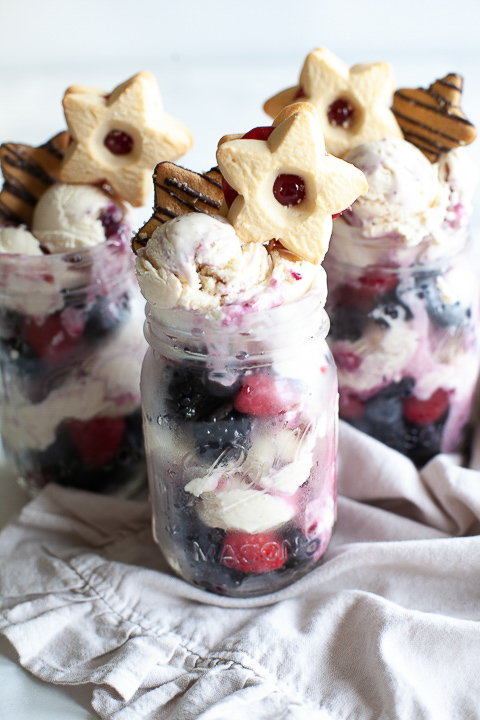
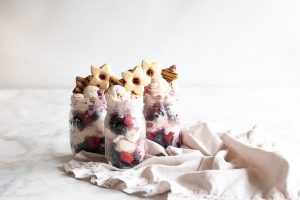
Serving - This ice cream is best served after it has been out of the freezer for a few minutes and had some time to thaw a little bit. I like to serve it in the NEW Ball® Stars and Stripes Keepsake Jars. I layer the ice cream with fresh berries and then top it all off with some fun cookies.

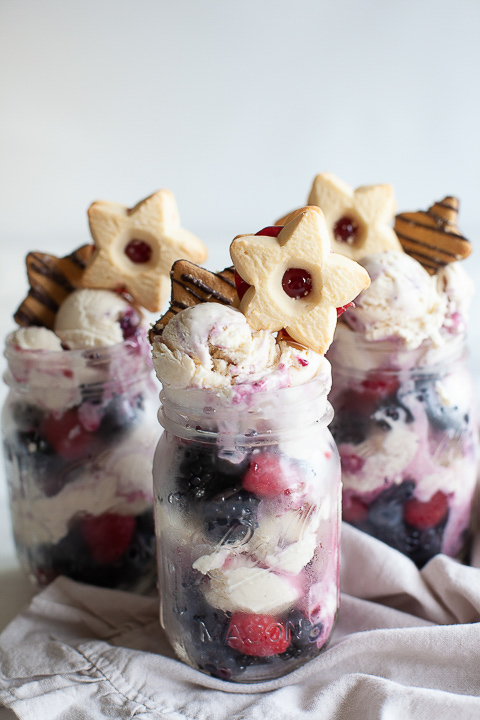
You can even send them home with your friends or give as a quick gift for a neighbor in these great jars.

Courses Dessert


Disclosure +  I am a paid partner for Newell Brands, makers of Ball® Fresh Preserving Products. However, all thoughts and opinions expressed are entirely my own. 


SaveSave

SaveSave

SaveSaveSaveSave

SaveSave

SaveSaveSaveSave

SaveSave

SaveSave

SaveSave

Spa Inspired Holiday Survival Kit with Buffalo Check Jars

26 · Dec 5, 2017 · 1 Comment

With the craziness of the Holidays, who couldn’t use a spa inspired holiday survival kit? It’s full of homemade sugar scrub, shower bombs in stylish Buffalo Check Ball Jars, one of my favorite Yankee Candles®, even a cute little Ball® jar filled with matches. It turned out so cute, come learn how to make some kits of your own to give give to friends and family this Christmas. You could even use it as a Secret Santa gift!

+ This post brought to you by the folks at Newell Brands, makers of Ball® Fresh Preserving Products + Create this fun and stylish spa inspired Holiday Survival Kit full of spa goodies in Buffalo Check Ball Jars, a Yankee Candle and the cutest little Ball match jar + free printable tags for each item in the kit created by WhipperBerry

I know when I’m working preparing all of the Holiday magic that comes this time of year, I can easily get a little run down. Nothing major, nothing a nice aromatic bath with some candles couldn’t cure. With that thought in mind, I thought it would be fun to put together this Holiday season to give to my friends, neighbors, teachers… Basically, anyone who could use a little pick-me-up as well.Create this fun and stylish spa inspired Holiday Survival Kit full of spa goodies in Buffalo Check Ball Jars, a Yankee Candle and the cutest little Ball match jar + free printable tags for each item in the kit created by WhipperBerry

Sharing Jars

I love the mission of the Ball® Sharing Jar. When you purchase the Sharing Jars your purchase will benefit Feeding America® – the nation’s largest domestic hunger-relief organization. For every package of Sharing Jars purchased, Newell Brands will donate 4 meals*! I LOVE it when I can help support a worthy cause when buying stuff I would normally buy any way.

*Newell Brands® will donate $0.36 per package of Sharing Jars sold, up to $150,000 provided to Feeding America®.  $1 helps provide 11 meals secured by Feeding America® on behalf of local member food banks.

Sugar Scrub Recipe

Before you can start assembling your Holiday Survival Kit, you’ll need to mix-up some simple sugar scrub. This couldn’t be any easier. You can mix this by hand or with a mixer. Either way is totally fine. Here’s what you’ll need.

  • 2 cups sugar
  • 1/4 cup coconut oil
  • 10 drops of peppermint essential oil

Add sugar to your mixing bowl and slowly add your coconut oil until you get the desired consistency. I don’t like to add any food coloring because I don’t like to add extra chemicals and keep things natural. Plus, you don’t want to accidentally spill on something and have the color transfer.

Finish up by adding the essential oils and package in your Ball® Sharing Jar.
Sweet Winter Sugar Scrub from WhipperBerry

Shower Bomb Recipe

The shower bombs take a little more patience. These little guys are very similar to the Snowball Bath Bombs I made the other day. They are made with baking soda and you want to make sure you don’t activate it while you are in the process of mixing up your shower bombs.

  • 1 cup baking soda
  • 1/2 cup citric acid
  • 1/2 cup corn starch
  • 2-3 tablespoons water
  • 3o drops peppermint essential oil

In the bowl of a stand mixer, add baking soda, citric acid and corn starch. Put water and essential oil into a small spray bottle and slowly spray dry mixture while mixing on low. Continue adding water/oil mixture until you achieve a nice wet sand consistency. DO NOT rush this process.

Add mixture to a silicon mold like the one below and press firmly.

10519856_2

Let mixture sit in mold for 4-5 minutes and then carefully unfold. Let the shower bombs sit on a flat surface overnight to dry.

Fill the other sharing jar with the shower bombs and attach printable tag to jar.

Love the Buffalo Check trend? Yep, me too! I thought it would be fun to use some of the Ball® Giving Jars to create some Buffalo Check Jars to use as gifts this Holiday Season. Here's how you can make some of your own.

Buffalo Check Jars

These buffalo check jars are a true gem! I have a feeling I’ll be using these year-round. Here is a quick post to show you how to make them.

Love the Buffalo Check trend? Yep, me too! I thought it would be fun to use some of the Ball® Giving Jars to create some Buffalo Check Jars to use as gifts this Holiday Season. Here's how you can make some of your own.

Printable Gift Tag

If you know me at all, you know I LOVE to design all kinds of printable. These may be some of my favorite thus far.holiday survival kit printable from whipperberry-100

You can download the tags HERE

Match Jar

Alright, I am so in love with this little, itty-bitty Mini Ball® Storage Jars. They are only 4 oz. and they are just too darn cute!

cute little Ball Match Jar from WhipperBerry

They are the perfect size for a little match jar for your Holiday Survival Kit. I filled the jar with matches, thenI cut a strip of the matchbox striker and glue it to the side of the jar.

Ball-Buffalo-Plaid-Holiday-Survival-Kit-via-WhipperBerry-066

I also cut some vinyl on my Cricut that looks super fun on the jar…

keep a little fire burning match jar-100

You can download the cut file HERE

Holiday Survival Kit Assembly

Now, all you need to do is assemble your spa inspired Holiday Survival Kit…

Love the Buffalo Check trend? Yep, me too! I thought it would be fun to use some of the Ball® Giving Jars to create some Buffalo Check Jars to use as gifts this Holiday Season. Here's how you can make some of your own.

I grabbed a Yankee Candle® Small Tumbler Candle to go with my match jar and a little box and I assembled my Survival Kit with he printable tag glued on the front of the box. I also tied the gift tags on the jars with some leather that I bought at my local craft store. Now, it’s giving time!

Secret Santa

I am super excited this year to participate in the Ball® Home Canning Products Secret Santa Program! Their lovely crew assigned me to an amazing talented blogger, Almost Makes Perfect. I adore her style and was thrilled to send my Spa Inspired Survival Kit to her. I can’t wait to see what she thinks of it.

I was lucky enough to receive a Ball Secret Santa gift from Jamie of C.R.A.F.T. She sent me this cute little candy jar set…

Ball-Secret-Santa-Jars_

How fun is that? Adding some twigs as antlers and a belt to the jar to look like Santa. Honestly guys, creating with Ball® Canning Jars is so much fun! What can you guys think-up for this Holiday Season?

Disclosure +  I am a paid partner for Newell Brands, makers of Ball® Fresh Preserving Products. However, all thoughts and opinions expressed are entirely my own. 

How to Paint Buffalo Check Jars

3 · Dec 5, 2017 · Leave a Comment

Love the Buffalo Check trend? Yep, me too! I thought it would be fun to use some of the Ball® Sharing Jars to create some Buffalo Check Jars to use as gifts this Holiday Season. Here’s how you can make some of your own.

+ This post brought to you by the folks at Newell Brands, makers of Ball® Fresh Preserving Products +

Love the Buffalo Check trend? Yep, me too! I thought it would be fun to use some of the Ball® Giving Jars to create some Buffalo Check Jars to use as gifts this Holiday Season. Here's how you can make some of your own.

Ball® Sharing Jars

This project looks a bit challenging, but truly it’s not! All you need are some of those fabulous Ball® Sharing Jars and some paint and you can create this trendy look for yourself.

I love the shape of the Sharing Jars and I love the mission. When you purchase the Sharing Jars your purchase will benefit Feeding America® – the nation’s largest domestic hunger-relief organization. For every package of Sharing Jars purchased, Newell Brands will donate 4 meals*! I LOVE it when I can help support a worthy cause when buying stuff I would normally buy any way.

* Newell Brands® will donate $0.36 per package of Sharing Jars sold, up to $150,000 provided to Feeding America®.  $1 helps provide 11 meals secured by Feeding America® on behalf of local member food banks.

Buffalo Check Jars

I’m a huge fan of the Buffalo Check trend and can’t get enough of it right now. Pretty much everyone I know feels the same way so, I thought a stylish Buffalo Check Jar would be the perfect gift for friends and family for Christmas this year. I’ve filled them with all kinds of stuff; candy, bath scrubs, shower bombs, soup starters, cookie kits, all kinds of stuff. Of course after the jars are painted, you can no longer preserve in them but, they’re great for everything else. Here’s how to make them.

Materials

  • Ball® Sharing Jars
  • Americana Decor Chalky Paint in Everlasting, Yesteryear & Carbon
  • sponge paint brush
  • 1/4″ flat head paint brush
  • 240 grit sandpaper
  • Americana Decor Clear Crème Wax
  • lint free cloth

Instructions

To begin, make sure you have washed and dried your jars. Then paint a couple of layers of the white (Everlasting) chalky paint onto the jar with the sponge brush. You can use your favorite kind of chalk paint here.

Love the Buffalo Check trend? Yep, me too! I thought it would be fun to use some of the Ball® Giving Jars to create some Buffalo Check Jars to use as gifts this Holiday Season. Here's how you can make some of your own.

Love the Buffalo Check trend? Yep, me too! I thought it would be fun to use some of the Ball® Giving Jars to create some Buffalo Check Jars to use as gifts this Holiday Season. Here's how you can make some of your own.

Don’t worry about brush strokes, they will get smoothed out in the finishing process at the end. Let dry, ideally for a few hours or overnight.

Next, you’ll use the 1/4″ flat paint brush to paint the gray (Yesteryear) stripes onto the jar.

Love the Buffalo Check trend? Yep, me too! I thought it would be fun to use some of the Ball® Giving Jars to create some Buffalo Check Jars to use as gifts this Holiday Season. Here's how you can make some of your own.

You will loosely use the lines on the jars as guides. I really didn’t want a precise looking check wanting it to look more free form or hand painted. I didn’t want this project to become to crazy with measuring every little detail and taping the jar to get perfect lines. This to me makes the project so much more enjoyable and I love the look.

Start at the top points of the lines in the Sharing Jar and use your 1/4 inch brush line to create the stripes. Three stripes around the jar and then a vertical stripe in the center of the flat sections of the sharing jar. Let dry completely.

Love the Buffalo Check trend? Yep, me too! I thought it would be fun to use some of the Ball® Giving Jars to create some Buffalo Check Jars to use as gifts this Holiday Season. Here's how you can make some of your own.

Now, you’ll use the black (Carbon) paint to paint on the black section of the check in the intersections of the gray stripes. Again, let paint dry completely. It would be best at this stage to let the paint cure overnight. It will help the paint adhere to the glass much better.

Love the Buffalo Check trend? Yep, me too! I thought it would be fun to use some of the Ball® Giving Jars to create some Buffalo Check Jars to use as gifts this Holiday Season. Here's how you can make some of your own.

Love the Buffalo Check trend? Yep, me too! I thought it would be fun to use some of the Ball® Giving Jars to create some Buffalo Check Jars to use as gifts this Holiday Season. Here's how you can make some of your own.

Once the paint is dry, you will use the sand paper to smooth and distress the paint. Be careful not to attach the jar with a little too much vigor. You don’t want to sand the paint right off the jar. Using a soft hand, smooth the dry paint, (this will remove the brush strokes) and then carefully distress the high points of the jar.

Love the Buffalo Check trend? Yep, me too! I thought it would be fun to use some of the Ball® Giving Jars to create some Buffalo Check Jars to use as gifts this Holiday Season. Here's how you can make some of your own.

Once this step is complete, you’ll want to wipe down the jars with a damp cloth to remove any of the remaining dust. Then you’ll use your lint free cloth to wipe on some of the wax to seal the paint onto the jar. Use the lint free cloth to then wipe off any excess wax and buff the wax.

Now, you’re finished! You have the cutest Buffalo Check Jars ready to fill with whatever you like.

Love the Buffalo Check trend? Yep, me too! I thought it would be fun to use some of the Ball® Giving Jars to create some Buffalo Check Jars to use as gifts this Holiday Season. Here's how you can make some of your own.

I created a fun Holiday Survival Kit and filled the jars with a homemade sugar scrub, some shower bombs and included a Yankee Candle® along with the cutest little match jar ever… You’ll have to check it out. It even comes with free printable gift tags.

Love the Buffalo Check trend? Yep, me too! I thought it would be fun to use some of the Ball® Giving Jars to create some Buffalo Check Jars to use as gifts this Holiday Season. Here's how you can make some of your own.

Disclosure +  I am a paid partner for Newell Brands, makers of Ball® Fresh Preserving Products. However, all thoughts and opinions expressed are entirely my own. 

Halloween Bat Jars

9 · Oct 4, 2017 · Leave a Comment

Chalky Finish Halloween Bat Jars • Have fun creating spooky Halloween decor with these Americana Decor Chalky Finish Ball Jars filled with creepy bats. Decorate your mantle or use them as a table centerpiece. Either way, they will add some stylish fun to your Halloween decoration game.

Chalky Finish Bats in a Jar • Have fun creating spooky Halloween decor with these Americana Decor Chalky Finish Ball Jars filled with creepy bats. Decorate your mantle or use them as a table centerpiece. Either way, they will add some stylish fun to your Halloween decoration game.

+ This post is brought to you by the amazing folks at DecoArt +

I LOVE, love, love creating simple and, (strange as it may seem,) elegant Halloween decor. I’ve said it before, I don’t really go for the macabre but, I do love a good bat or six flying around the room. This year I thought it would be fun to use two of my favorites and create spooky mantle decor OR a centerpiece for our Halloween gatherings.

Not All Jars are Created Equal • What Jars Are Fun to Use

We’ve all seen those classic chalk painted jars used for everything under the sun. They are great but, they can be even better when you use the NEW Ball jars that have a little flair to them. The have a new Spiral Jar, a Giving Jar and a little Mini Ball Jar. All three of these jars have something fun to add to the chalk paint jar scene. The Spiral jar has great spiral lines with a somewhat hour glass shape, PERFECT for a chalky finish. The giving jar has great lines and, can we swoon over the cute mini mason jar! That would be perfect for a place card at a Halloween dinner party.

Chalky Finish Halloween Bat Jars • Have fun creating spooky Halloween decor with these Americana Decor Chalky Finish Ball Jars filled with creepy bats. Decorate your mantle or use them as a table centerpiece. Either way, they will add some stylish fun to your Halloween decoration game.

The Benefits of Chalky Finish Paint vs. Typical Acrylic Paint

These fun new jars are a match made in Heaven when it comes to the DecoArt Americana Decor Chalky Finish paint. The two main benefits to using chalk type paint for this application is:

  1. Dry time– Chalk or mineral type paint has a super speedy dry time which is fabulous when you are wanting to a quick project. Whether big or small, furniture or jars, you want to move quickly and not have to sit around literally watching the paint dry.
  2. Manipulatable – With a chalk based paint like the Americana Decor Chalky Finish paint, once the paint is dry, that’s when the magic happens. You can use sand paper or even a wet cloth to play with the paint giving it a nice worn look. With typically acrylic paint you wouldn’t be able to do that. It would just become a sticky mess. The paint would gum up in your sand paper and the result wouldn’t be consistent.  And really, chalk painted projects are far more interesting than just your basic flat paint job. They have character!

Supplies Needed for the Halloween Bat Jars

Chalky Finish Halloween Bat Jars • Have fun creating spooky Halloween decor with these Americana Decor Chalky Finish Ball Jars filled with creepy bats. Decorate your mantle or use them as a table centerpiece. Either way, they will add some stylish fun to your Halloween decoration game.

  • Ball Jars- Spiral, Giving Jar & Mini Jar –
  • DecoArt Americana Decor Chalky Finish Paint – Everlasting
  • DecoArt Americana Decor Satin Enamels – Classic Black
  • Chalk paint brush
  • FloralCraft Dry Foam Mug Plugs
  • Wire cutters
  • Black Aluminum Floral Wire
  • Hot glue gun – I LOVE my cordless Ryobi Glue Gun
  • 220 grit Sand paper
  • Round pencil or pen
  • Bats
  • lint free cloth to protect your surface

I actually purchased most of my supplies here from Michaels or Target. I’ve found Target has the best selection for the Ball jars at a good price. The bats are a chipboard bat from the Martha Stewart Crafts line at Michaels but, you can totally make your own bats out of black paper as well. If you have a Cricut machine it would be a snap!

Instructions for the Halloween Bat Jars

Chalky Finish Halloween Bat Jars • Have fun creating spooky Halloween decor with these Americana Decor Chalky Finish Ball Jars filled with creepy bats. Decorate your mantle or use them as a table centerpiece. Either way, they will add some stylish fun to your Halloween decoration game.

Place a lint free cloth or paper down on your surface to protect it from the paint.

You will begin by painting your first coat of paint with the Classic Black Americana Decor Satin Enamel. Now, I want these jars to look rough and not polished at all. I don’t mind brush strokes or a rough edge at the top. I actually purposefully created a feathered look at the top with my brush.

Chalky Finish Halloween Bat Jars • Have fun creating spooky Halloween decor with these Americana Decor Chalky Finish Ball Jars filled with creepy bats. Decorate your mantle or use them as a table centerpiece. Either way, they will add some stylish fun to your Halloween decoration game.

Chalky Finish Halloween Bat Jars • Have fun creating spooky Halloween decor with these Americana Decor Chalky Finish Ball Jars filled with creepy bats. Decorate your mantle or use them as a table centerpiece. Either way, they will add some stylish fun to your Halloween decoration game.

I turned them upside down and let them dry for an hour or two. You don’t want the paint to be tacky at all when you move onto the next coat.

Once your black layer is dry after an hour or two, you’ll paint on your white layer with the Americana Decor Chalky Finish in Everlasting (white.) I left about a 1/2 to a 1/4 inch section at the top of the black. That way a little more of the black paint is showing through. Again, I kind of feathered the top with my brush.

Chalky Finish Halloween Bat Jars • Have fun creating spooky Halloween decor with these Americana Decor Chalky Finish Ball Jars filled with creepy bats. Decorate your mantle or use them as a table centerpiece. Either way, they will add some stylish fun to your Halloween decoration game.

PRO TIP: For the white layer, I found a thicker application of the paint is best. I wouldn’t go so far as to do two coats. Just paint it on a little heavy.

Chalky Finish Halloween Bat Jars • Have fun creating spooky Halloween decor with these Americana Decor Chalky Finish Ball Jars filled with creepy bats. Decorate your mantle or use them as a table centerpiece. Either way, they will add some stylish fun to your Halloween decoration game.

Then I set them aside to dry again. This time I didn’t have to wait too long. The Chalky Finish paint dries super quick even if it is layered on rather thick.

Then I took the 220 grit sand paper and LIGHLY swipe the paint on the jar with a flat hand. You don’t want to attack it like a jack hammer. You want to lightly distress the high points of the jar so that it look natural.

Chalky Finish Halloween Bat Jars • Have fun creating spooky Halloween decor with these Americana Decor Chalky Finish Ball Jars filled with creepy bats. Decorate your mantle or use them as a table centerpiece. Either way, they will add some stylish fun to your Halloween decoration game.

If you don’t want to worry about paint dust from the sandpaper, you can distress your jar with a wet cloth. Just make sure not to get the paint too wet. It will pull large areas of paint off the jar if it is not done carefully.

Now, put the floral foam into the jars. You may need to cut down the foam in order for it to fit into the jar.

Chalky Finish Halloween Bat Jars • Have fun creating spooky Halloween decor with these Americana Decor Chalky Finish Ball Jars filled with creepy bats. Decorate your mantle or use them as a table centerpiece. Either way, they will add some stylish fun to your Halloween decoration game.

It’s time to add your bats! You have several different choices for wire. If you are using a lighter, cardstock type paper for your bats, you’ll be able to use a 24 gage wire like the one pictured above. If you are using chipboard bats, you might opt for a heavier wire like the black aluminum decorative wire that I used.

Have fun twisting and curling the wire to create fun lines and swirls just like the swirls on the jar! I used some jewelry making tools along with a circular pen to create the twists and turns in my wire.

I hot glue the wire to the back of the bats and then arrange them in the jars sticking the wire into the floral foam to keep them in place.

Chalky Finish Halloween Bat Jars • Have fun creating spooky Halloween decor with these Americana Decor Chalky Finish Ball Jars filled with creepy bats. Decorate your mantle or use them as a table centerpiece. Either way, they will add some stylish fun to your Halloween decoration game.

Doesn’t the jar look fun with the distressed swirls?!

I love how these turned out and can’t wait to make a few more to dress up our home for Halloween. It would be fun to make some jars with ghosts and such… Ahhh, fun!

Chalky Finish Halloween Bat Jars • Have fun creating spooky Halloween decor with these Americana Decor Chalky Finish Ball Jars filled with creepy bats. Decorate your mantle or use them as a table centerpiece. Either way, they will add some stylish fun to your Halloween decoration game.

  • « Go to Previous Page
  • Page 1
  • Page 2
  • Page 3
  • Page 4
  • Page 5
  • Page 6
  • Go to Next Page »

Primary Sidebar

Heather from Whipperberry
Hello... my name is Heather and I'm the creator of WhipperBerry a creative lifestyle blog packed full of great recipes and creative ideas for your home and family. I find I am happiest when I'm living a creative life and I love to share what I've been up to along the way... Come explore, my hope is that you'll leave inspired!

Footer

  • Privacy Policy
  • Crafts
  • Food
  • Gifts
  • Holidays
  • Home
  • Mom Life
  • Recipes
  • Travel

Copyright © 2026 · Seasoned Pro