• Skip to primary navigation
  • Skip to main content
  • Skip to primary sidebar
  • Skip to footer

Whipperberry

WhipperBerry • Your Home For Creative Inspiration

  • Home
  • Recipes
    • Starters
    • Easy Weeknight Dinners
    • Main Dish
    • Salads
    • Side Dish
    • Soups & Stews
    • Desserts
    • Breakfast
    • Miscellaneous
  • Tutorials
    • Creative Crafts
    • DIY Decor
    • Fabric Crafts
    • Food How-To
    • Jewlery
    • Paint Projects
    • Paper Art
    • Party Styling
    • Photography and Graphic Design
    • Silhouette
  • Holidays
    • Easter
    • Mother’s Day
    • Father’s Day
    • 4th of July
    • Halloween
    • Thanksgiving
    • Christmas
    • Valentine’s Day
  • Gift Ideas
    • Gifts For Everyone
    • Gifts for Dad
    • Mother’s day
    • For The Girls
    • For The Kids
    • Teacher Gift Ideas
    • Christmas
  • Printables
    • Holiday
    • Gift Idea
    • LDS Primary
  • Travel
  • About
    • Terms
  • Contact
  • Nav Social Menu

    • Facebook
    • Instagram
    • Pinterest
    • RSS
    • Twitter

Halloween

Rosie the Riveter Costume

28 · Oct 1, 2015 · 6 Comments

+ This Rosie the Riveter Costume Post brought to you my Michaels Craft Stores +

Rosie-the-Riveter-Costume-from-WhipperBerry-2

You guys, I’m so excited… Halloween is right around the corner!!

I have a love/hate relationship with Halloween. I’m not a fan of the macabre scene, full of blood and gore, but I do love all of the fun creative ways to dress-up for the holiday. I love coming up with fun ideas for costumes with the family. I like to keep things simple, I don’t want to spend a ton of time or money on costumes for sure.

This months Michaels Maker’s Challenge was to create a simple DIY Halloween Costume.

_01190_MAKERS_0929_l

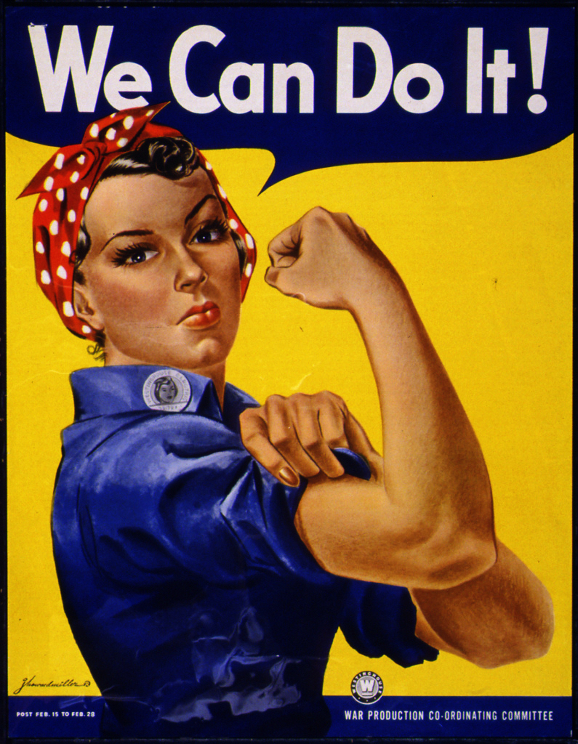
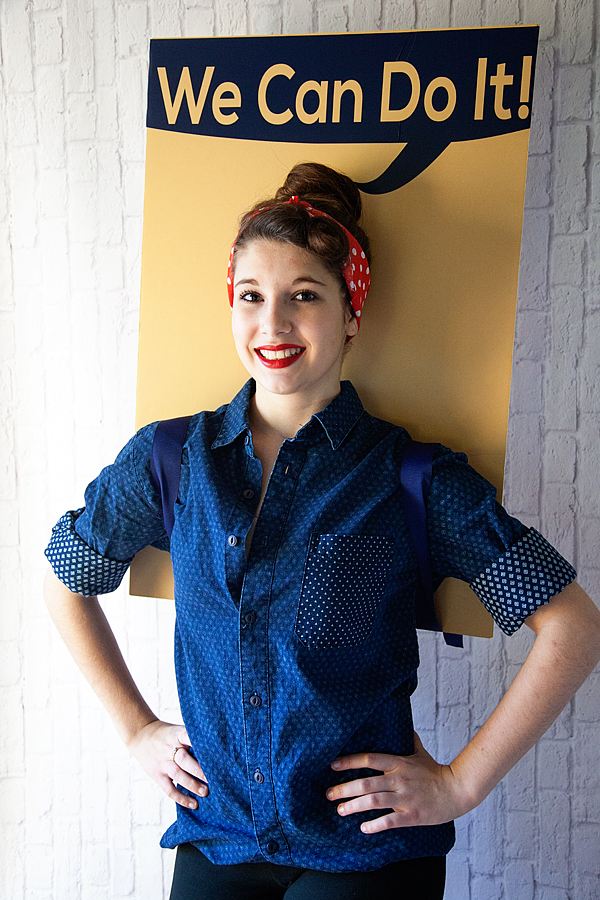
My daughter and I thought it would be fun to put together a quick costume with the iconic Rosie the Riveter as our muse. I have always LOVED this graphic.

rosie-the-riveter-poster-s

Rosie the Riveter Costume Materials

Here’s what you will need to make this simple costume.

Supplies-for-Rosie-the-Riviter-Costume

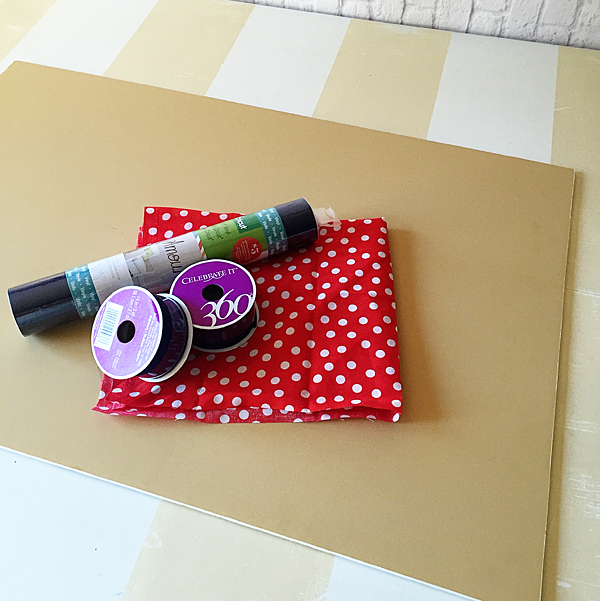
  • Elmer’s foam core board
  • Red and white polka dot fabric – available in store at Michaels, not online
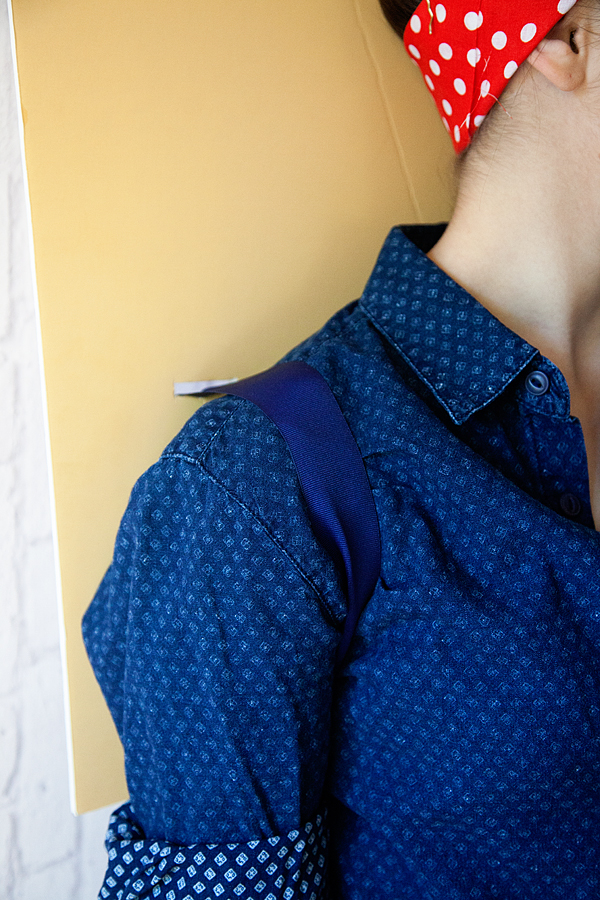
  • Blue vinyl
  • 1 1/2 inch navy ribbon
  • Utility knife
  • Silhouette CAMEO – Not a deal breaker, but nice.
  • Blue button down shirt

Instructions

This is one of those costumes that really takes minutes if you have a Silhouette cutting machine. If not, NO WORRIES. It will take a little bit longer but you can still do it. With the silhouette all you need is to download this file that I created, and you can cut the image out of vinyl for your poster.

We-Can-Do-It-Poster-for-Silhouette-CAMEO-or-Portrait

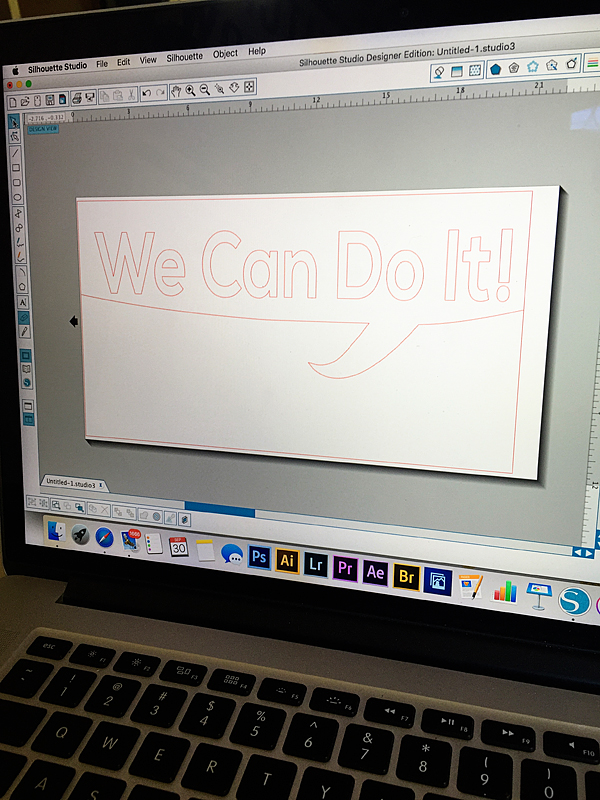
The poster board is 20×30 and this will fit perfect to the top of the board.

We-Can-Do-It-poster

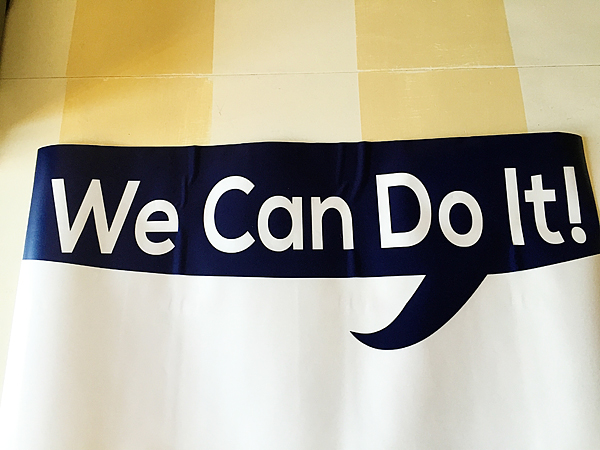
You will need to weed your vinyl, than place some transfer tape on top of it. I used the transfer tape to hinge the top of the vinyl transfer to the top of the board. Then I pulled the backing off the vinyl and with the hinge, laid the vinyl down right in the perfect spot.

Rosie-the-Riveter-Poster-from-WhipperBerry

Now, hindsight being 20/20… I would have either laid down some white vinyl or spray painted the top of the board white first. That would make the letters white, but I’m not too worried about that.

Rosie-the-Riveter-Costume-from-WhipperBerry-3

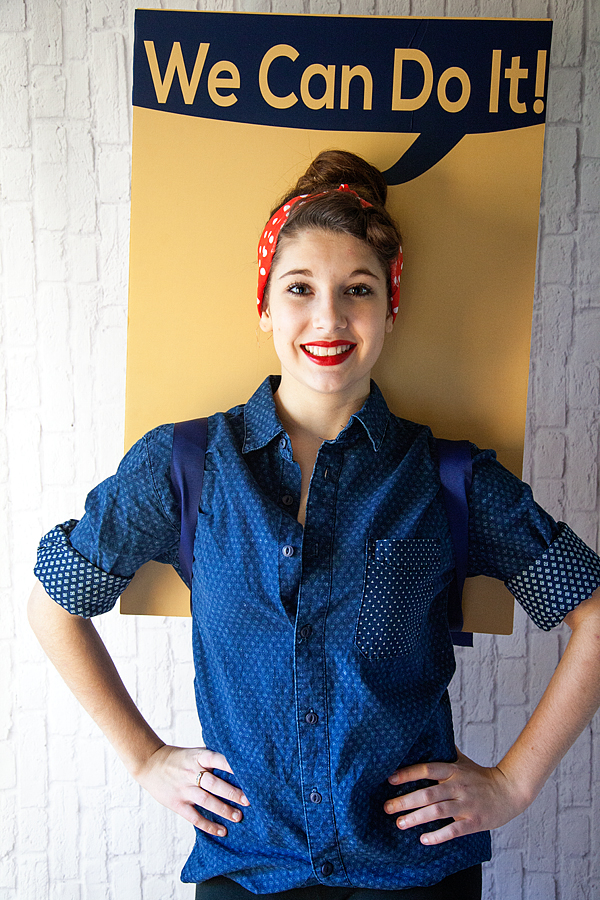
Next, I used a utility knife to cut some slits into the board right where I wanted to place the ribbon to create a kind of backpack effect. That way she could wear the board on her back with ease. I used navy ribbon so that it would blend in with the shirt and just tied it in cute bows on the back of the board.

Rosie-the-Riveter-Costume-from-WhipperBerry-5

It works perfect! Now all you have to do it tie-up your hair with the red & white polka dot fabric and you’re all set!!

Rosie-the-Riveter-Costume-from-WhipperBerry-4

It’s SUPER simple and so fun! What are your Halloween costume plans? Need some fun ideas? The rest of the 49 other Michaels Makers have been hard at work creating some fun ideas for you. You can check them out here!

An InLinkz Link-up


Disclaimer // I am a member of the Michaels Makers Crew and received store credit in order to create my project.

Halloween Tree Decorating

5 · Sep 25, 2015 · Leave a Comment

Whipperberry-Halloween-Tree-from-Treetopia-6

I’ve tried something new this year for Halloween… Have you ever decorated a Halloween tree before?

I know the trend is picking-up steam and people are doing all kinds of cool things for Halloween. I’ve teamed up with a handful of talented bloggers for a fun Halloween tree blog hop and GIVEAWAY! You need to run over and check-out Jennifer Perkins, Cathie Filian, Tried & True, My Paper Crane! Their trees are also so fun!! Hang tight and I’ll have the giveaway info at the bottom of the post.

I had a ball decorating this beautiful white tree from Treetopia with  black, white & gold glam for Halloween.  I LOVE how it looks with my Jack O’ Lope display that I created a few weeks ago… The tree adds a beautiful new element to the room that I just adore!

Whipperberry-Halloween-Tree-from-Treetopia-5

I’ve alway been in love with black & white decor when it comes to decorating for Halloween and knew that I wanted to carry that through with this tree. I found some fun large & small pumpkins at Target that were perfect. I was planning on painting my own, but these were already so cute I caved and bought them instead.

Whipperberry-Halloween-Tree-from-Treetopia-2

I added some beautiful fox masks from JoAnn that I fell in love with.

Whipperberry-Halloween-Tree-from-Treetopia-3

I also added more of my favorite black & white dice that I made a few weeks back and some apothecary jars from Target. I was looking for some kind of black filler to add some dimension to the tree and couldn’t find exactly what I was looking for. I wanted something that looked kind of like feathers mixed with spooky foliage. Weird, I know. I looked all over the place for the right look. I finally found a wreath in the Halloween section at Target and it was perfect. I deconstructed the wreath and used it as my tree filler. LOVE IT!

Whipperberry-Halloween-Tree-from-Treetopia-6

I also absolutely love my white tree from Treetopia, it looks perfect up against my black chalkboard wall for Halloween. It’s the Whisper White Cashmere Tree and it is fabulous. I’ve wanted a white tree for awhile now and I’m just so darn picky I couldn’t find one that I liked. They always looked so cheap. This one is nice and full and looks beautiful. I was so impressed with how easy the tree was to set-up. It has an extra long cord with and on/off foot peddle for ease of use. It also has a plug at the top of the tree to plug-in a tree topper if you have one of that sort, BRILLIANT!

The folks at Treetopia are giving away some fun trees for Halloween, Head over to their Facebook page for all the details!

Details // This post was sponsored by Treetopia however, I had a ball decorating this tree and wouldn’t have shared with you if I didn’t truly love the product!

Pumpkin Halloween Decorations + The Jack O’ Lope

4 · Sep 1, 2015 · 5 Comments

Crafting-with-pumpkins-from-Michaels-Craft-Stores-by-WhipperBerry-2

Guys I’m so excited… We are heading into my favorite time of year!

AUTUMN!!

And with Autumn comes all kinds of fun decorating… Back-to-School, Fall, Apples, Pumpkins and Halloween to name a few. I am thrilled to be one of this year’s Michaels Makers and this months challenge is PUMPKINS.

00000_SO_0901_MIC_MAKERS_l

I’ve always loved pumpkin Halloween decorations and I decided to take kind of a silly route with my challenge and make my version of the Jack O’ Lope…

Crafting-with-pumpkins-from-Michaels-Craft-Stores-by-WhipperBerry-7

I thought it turned out fun! It was so easy to put together, I just gathered a few supplies at Michaels Craft Stores. Did you know that Michaels is carrying HALF pumpkins?! No more will we need to pull out the heat knife to try and cut our craft pumpkins in half. We can buy them that way now! Well played Michaels, you always know what we need.

I found this great chalk board at Michaels (I couldn’t find it online, but it is in stores) and thought it would be fun to add some antlers to my half pumpkin for a fun wall piece for my Halloween display, to make a Jack O’ Lope of sorts.

First, I seasoned my chalk board to give it that worn in look.

How to season a chalkboard

I crushed a little chalk and then rubbed it all over the board with a cloth or paper towel.

Season your chalkboard

That way it looks more like a used chalk board rather than a black sign.

Then I hot glued some antlers that I had hanging around onto the board…

Glue antlers onto chalkboad

Then, I glued the half pumpkin in place right on top of the antlers.

Crafting-with-pumpkins-from-Michaels-Craft-Stores-by-WhipperBerry-5

It fits perfect!

Next, I set-out to create a fun Halloween display to show-off my Jack O’Lope.

I grabbed some of Heidi Swapp Marquee Bats (sorry, they aren’t online but they are in-store) and spray painted them black with Krylon Chalkboard Spray Paint.

spray-paint-your-Heidi-Swapp-Marquee-Bats

Then I added some paper wall bats that are also available in-store.

Crafting-with-pumpkins-from-Michaels-Craft-Stores-by-WhipperBerry-8

I added a Halloween printable that I created last year, I still LOVE it!

Boo-to-You-Free-Halloween-Printable-from-WhipperBerry

You can download it HERE.

To fill-out the scene, I added some more pumpkins to the drawer of my buffet…

Crafting-with-pumpkins-from-Michaels-Craft-Stores-by-WhipperBerry-4

I wrapped one with a pumpkin sleeve from the Martha Stewart Halloween collection at Michaels. They look really cool and are an easy way to dress-up any pumpkin.

Last but not least and made another set of large dice to use as decor this time. I just love how they fill-in the scene with a little more whimsy. These are super easy to make and are fun to have on hand for all kinds of things. I LOVE my new black set for Halloween!

Crafting-with-pumpkins-from-Michaels-Craft-Stores-by-WhipperBerry-6

All together, I think it makes a pretty fun scene for the season. My kiddos think it ‘s pretty cool anyway.

Crafting-with-pumpkins-from-Michaels-Craft-Stores-by-WhipperBerry-2

How do you like to decorate with pumpkins? Do you like to decorate for fall, or do you jump right into Halloween like we prefer to do?

Michaels is having a great sale on the crafting pumpkins this week, 40% off… Run and grab some quick before they disappear!

Disclaimer // I am a member of the Michaels Maker crew, this is not a paid position but I do receive store credit in order to create projects for the Michaels Makers program.

00000_SO_0901_MIC_MAKERS_s

DIY Chalk Paint Halloween Apothecary Jars with BB Frösch Chalk Paint Powder

5 · Oct 29, 2014 · Leave a Comment

+ Guest Post by BB Frösch Master Jonelle Morris from Chalk-a-Lot +

Glass-bottles-after

EEK! It’s almost Halloween! I’m not one for the guts and gore of the holiday, but I do love me some fun Halloween decor. I have wanted to make an apothecary display for a few years now, but never got around to it thinking, “oh that will take too long,” or “that will be too expensive,” or “I wouldn’t make it look good.”

Well, since I have joined the BB Frösch team, I have been trying all sofrts of things I never thought I would do. I set out to good ol’ Michaels to see if they had any glass bottles I could turn into something amazing, and as luck would have it, they did!

Glass-bottles-before

And the best part, each one was a $1.29 or under—score! But my luck didn’t run out there. Most of their Halloween stuff was 50-60% off, so therefore I made my whole display with what I purchased at Michaels, plus a couple small things I already have for….drumroll….$25! Double score!

I wanted some of the bottles I made to be black, and thought I would put the “BB Frösch bonds to virtually anything” claim test. I started out with my plain glass bottles and put a quick few coats of BB Frösch chalk paint with some leftover black paint I had from another project. BB Frösch isn’t just for furniture!

BB Frosch Products-26

And when I say quick, I mean quick. Three coats on those four bottles took me about 25 minutes, drying time included. I then took a wet rag to wet distressed the tops and corners of the bottles to create a more authentic vintage look. I chose to leave the other bottles clear, so I could put some water with food coloring inside.

Apothecary-display

Then, because I am cheap 🙂 I searched for free vintage apothecary labels online and found some awesome options! I printed them off on regular paper and Modge Podged them under and on top of the label.
I used the labels found here:

Two Crafty Paws

Love Manor

The Graphics Fairy

For some other wonderful options you can go here:
Lil’Luna

Soap Deli News

The Graphics Fairy

Pen & Paper flowers

The Idea Room

Then to complete my display, I printed a beautiful, but slightly creepy picture of an old Victorian house (that was most likely haunted) on burlap.

Frame

Yes, you read that right, I printed on burlap, as in on my home inkjet computer.

Print-on-burlap

Amazing! You can find this easy to follow tutorial on Domestically Speaking.  It seriously took me about 10 minutes. The graphic I used as well as several other vintage halloween images can be found on The Graphic’s Fairy.

There, I did something I never thought I could do, and quickly and inexpensively! Happy Halloween!

  • « Go to Previous Page
  • Page 1
  • Page 2
  • Page 3
  • Page 4
  • Page 5
  • Interim pages omitted …
  • Page 8
  • Go to Next Page »

Primary Sidebar

Heather from Whipperberry
Hello... my name is Heather and I'm the creator of WhipperBerry a creative lifestyle blog packed full of great recipes and creative ideas for your home and family. I find I am happiest when I'm living a creative life and I love to share what I've been up to along the way... Come explore, my hope is that you'll leave inspired!

Footer

  • Privacy Policy
  • Crafts
  • Food
  • Gifts
  • Holidays
  • Home
  • Mom Life
  • Recipes
  • Travel

Copyright © 2026 · Seasoned Pro