Pineapple Suprise Cake // Who's ready for a trip to the tropics? Not that I'm complaining about the cold weather… I'm actually kind of liking it. I'm a winter girl at hear, however… I also, love to escape to the tropics every once in a while. I have a few recipes that can definatley help with that. One of them is one of my husband's favorites… A tropcial Pineapple Surprise Cake. It's actually Pineapple Upside Down Cake that I of course had to create a "in a jar" version.

I played around a bit, added a couple of ingredients and left it right-side up. I know… SHOCKER! Adding it to the JAR genre makes for a fun presentation.
Pineapple Surprise Cake Recipe
Ingredients:
- 1/4 cup butter
- 1 cup brown sugar
- 6 slices pineapple
- 6 maraschino cherries without stems
- 1 1/3 cup AP flour
- 1 cup sugar
- 1 cup sweetened coconut (3/4 cup for the cake and 1/4 cup for garnish)
- 1/3 cup Crisco
- 1/2 teaspoon baking powder
- 1/2 teaspoon salt
- 2 teaspoons of vanilla extract
- 3/4 cup heavy cream
- 1 egg
Directions:
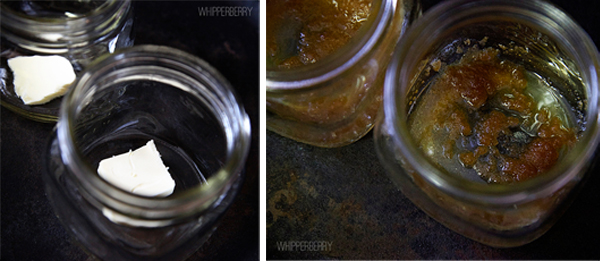
Turn on oven to 350 degrees and prepare the jars. You will need 6 clean jars. Spray each jar with cooking spray and set aside while you make the cake batter.
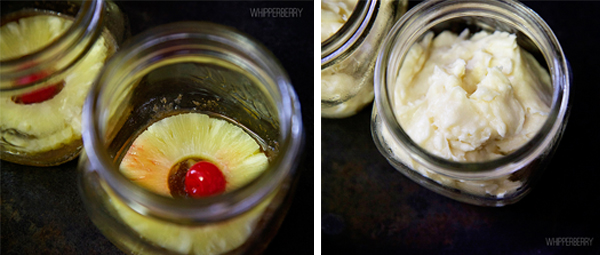
Sift the flour, sugar, baking powder, and salt into a large mixing bowl. Add coconut and mix for a few seconds in order for the coconut to be covered with the flour mixture. Add the Crisco and mix for 30 seconds. Add vanilla, cream, and the egg and mix on high for 2 minutes.
Add a pat of butter to the jars and place in the oven. Once the butter is melted add a tablespoon of brown sugar to the jar and mix with the butter.
Add a ring of pineapple and a cherry to the bottom of the jar and then fill the jar half way with cake batter.
Place the jars on a cookie sheet and place in the oven. Bake for 30-35 minutes at 350 degrees or until the top of the cake is slightly brown. Remove from the oven and let cool. Now you can make the coconut whipped cream to top off the surprise cake!!
Coconut Whipped Cream Recipe
- 2 cups heavy whipping cream
- 2 teaspoons coconut extract
- 1/4 cup powdered sugar
Pour cream into a chilled mixing bowl and mix on high for 1 minute. Add coconut extract and slowly add powdered sugar while the mixer is on low. Return the mixer to high until the cream becomes stiff. Keep a close eye on it. If it is over beaten it will become butter.
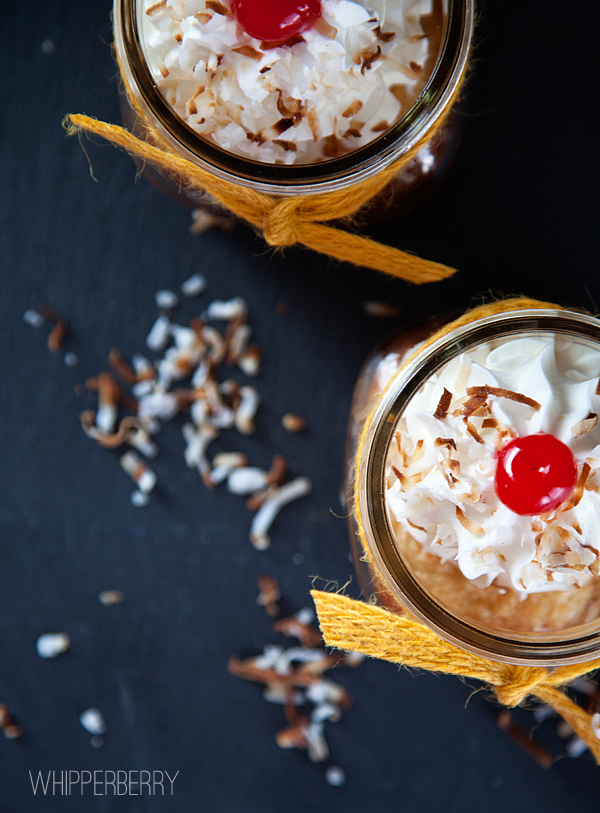
Prepare your Jars for Presentation
One of the things that makes desserts in jars so appealing is how you can decorate the jar for your guests. For this cake, I just tied a yellow jute ribbon around the jar to dress it up a bit. Then pipe the whipped cream on top with a star tip to give it a little pizzazz.
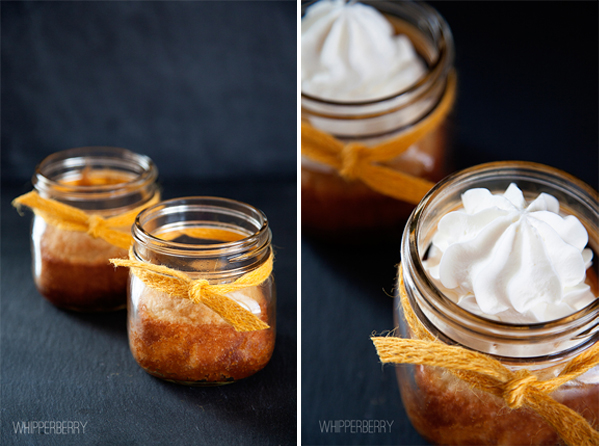
Ahead of time, toast up the 1/4 cup of the sweetened coconut in the oven under the broiler. Keep a close eye on it, it only takes a few minutes. Let cool. When you are ready to serve your cake sprinkle the coconut on top and place a cherry on top and voila, you have a lovely tropical treat to drive away the frozen winter (for a little bit at least!)