• Skip to primary navigation
  • Skip to main content
  • Skip to primary sidebar
  • Skip to footer

Whipperberry

WhipperBerry • Your Home For Creative Inspiration

  • Home
  • Recipes
    • Starters
    • Easy Weeknight Dinners
    • Main Dish
    • Salads
    • Side Dish
    • Soups & Stews
    • Desserts
    • Breakfast
    • Miscellaneous
  • Tutorials
    • Creative Crafts
    • DIY Decor
    • Fabric Crafts
    • Food How-To
    • Jewlery
    • Paint Projects
    • Paper Art
    • Party Styling
    • Photography and Graphic Design
    • Silhouette
  • Holidays
    • Easter
    • Mother’s Day
    • Father’s Day
    • 4th of July
    • Halloween
    • Thanksgiving
    • Christmas
    • Valentine’s Day
  • Gift Ideas
    • Gifts For Everyone
    • Gifts for Dad
    • Mother’s day
    • For The Girls
    • For The Kids
    • Teacher Gift Ideas
    • Christmas
  • Printables
    • Holiday
    • Gift Idea
    • LDS Primary
  • Travel
  • About
    • Terms
  • Contact
  • Nav Social Menu

    • Facebook
    • Instagram
    • Pinterest
    • RSS
    • Twitter

Starter

German Ham and Cheese Garlic Toast // GIVEAWAY

16 · May 27, 2014 · 6 Comments

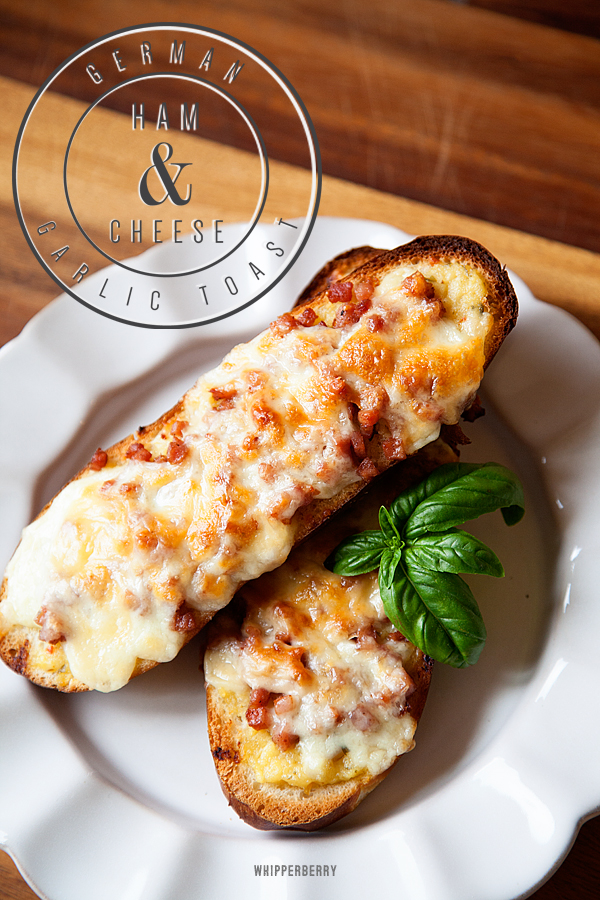
This post brought to you by the Panasonic FlashXpress™ Toaster Oven// A few years ago, our family traveled to Germany and one of the first meals I had there was a simple ham & cheese toast from one of the local bakeries. We had stopped at the Rhine Neckar Zentrum (Mall) in Viernhiem for dinner, my husband and the girls decided to eat at KFC and I just couldn’t swallow the idea of eating American food while in Germany. I mean really?

I set out on a hunt for a more “German” quick bite to eat while the family was eating their “American” chicken. I found a little bakery inside the mall there and had the most interesting, simple meal. It was a loaf a good German bread cut in half with some type of garlic spread, diced ham and lots of  sharp melted cheese. It was simple and boy was it tasty!

Ham-and-Cheese-Toast-WhipperBerry

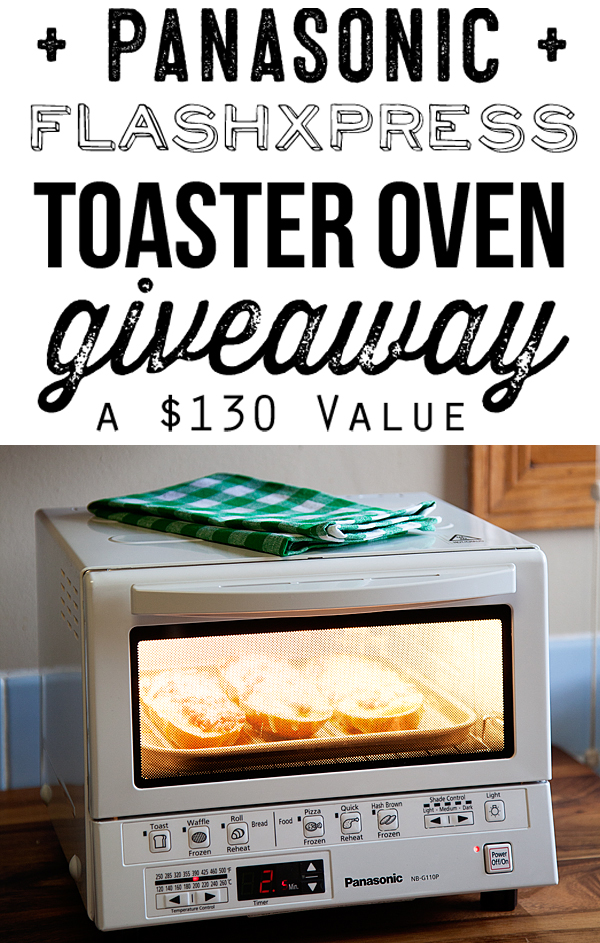
 Recently, the folks at Panasonic asked it I would be interested in trying out their FlashXpress™ Toaster Oven and to develop a quick, in a flash meal with the FlashXpress™ and I immediately thought of my first German meal. It would be perfect in a toaster oven! Of course I said yes, and set out to recreate one of my favorite quick German meals.

Ham-and-Cheese-Toast-2

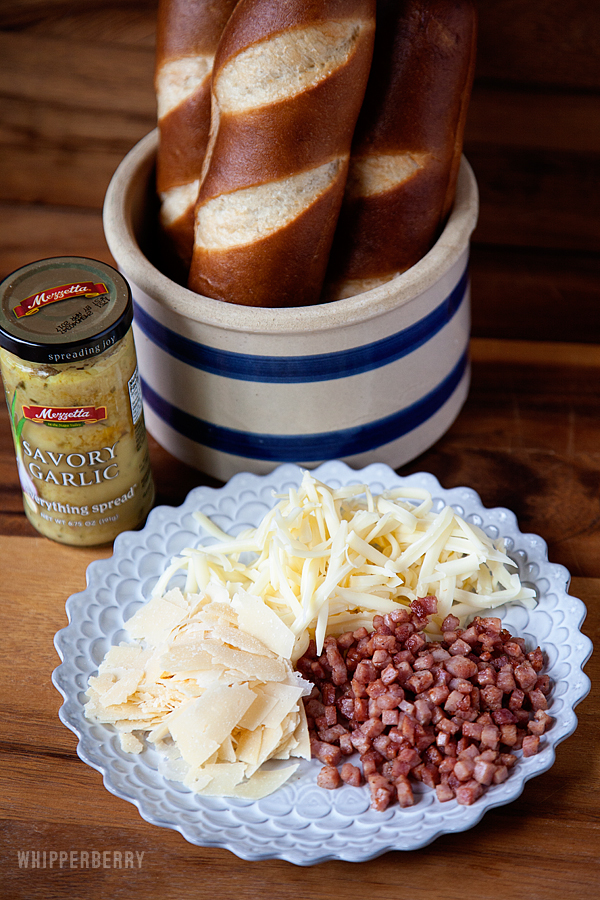
 Once I found a good garlic spread it was super simple to recreate. I used Mezzetta’s Savory Garlic Everything Spread which is SUPER tasty.  I spread that on some good bread that I found in the bakery at Super Target, topped that with some diced ham that I sautéed in a little bit of butter, shredded sharp cheddar cheese and a little parmesan cheese.

Ham-and-Cheese-Toast-3

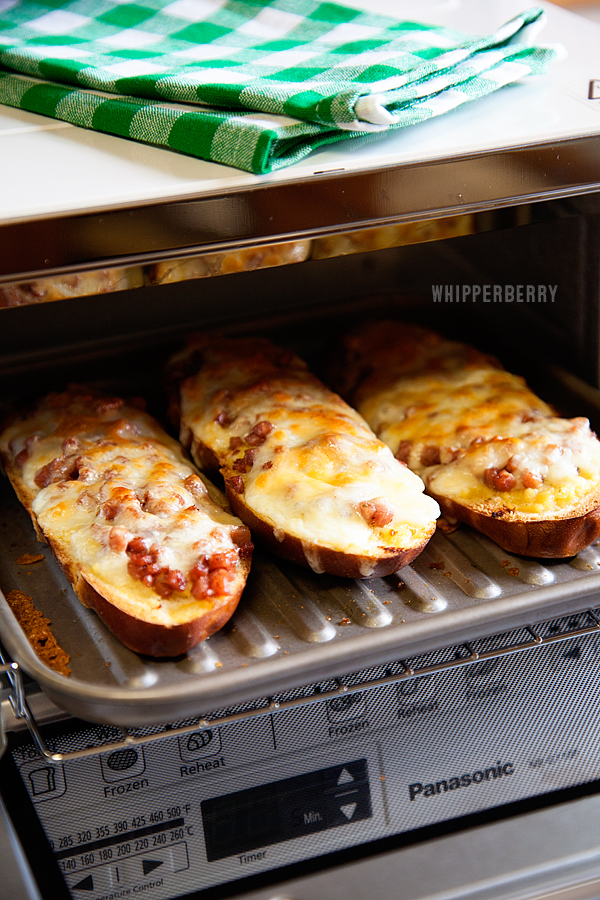
 Popped it into the Panasonic FlashXpress™ Toaster oven and within 10 minutes I had a perfect quick meal for the family, in a flash!

Ham-and-Cheese-Toast-4

The nice thing… I didn’t have to heat up my oven and my kitchen at all and the ham and cheese garlic toast turned out perfect!

Ham-and-Cheese-Toast-6

I will have to admit, when I was approached by Panasonic to do this post I was going to turn it down. I didn’t want one more thing cluttering up my counter tops. I mentioned it to my husband and he flipped… He’s been wanted to get a toaster oven for some time and I just wouldn’t jump on board. I have never had a toaster oven and I just didn’t understand the magic that you can create in this little toasting machine.

This one especially is compact, it doesn’t take up much space, you can get it in white or silver and it has some of the best infrared technology around. I especially love that the rack is designed to pull out when you open the door, making retrieving your food easier and safer.  It has several presets or you can just use the temperature and time controls. It’s super easy to use and clean and I will have to admit… I use it ALL THE TIME now! I hardly ever use my microwave anymore. I’ve been making homemade croutons, baking cookies and of course making toast of all kinds. I have been TOTALLY converted!

The folks at Panasonic would love to giveaway a FlashXpress™ to one of YOU!!

Panasonic-FlashXpress-Giveaway-on-WhipperBerry

All you have to do is follow the direction in the Rafflecopter box below…

a Rafflecopter giveaway

Disclaimer // This is a sponsored post. I received a Panasonic FlashXpress™ Toaster oven to review along with funds to create a recipe. All thoughts, ideas and opinions are my very own.

Zucchini Hummus Recipe

3 · Apr 30, 2014 · 3 Comments

// Zucchini Hummus Recipe brought to you by Pompeian Olive Oil //

Zucchini-Hummus-with-Pompeian-Varietals-Collection-Olive-Oil-3

A few months ago, I had the exciting opportunity to travel to Israel to go on a food tour of that amazing country.  Our first full day there, we were on a quest to find the best hummus in the country. Now hummus in Israel is a BIG deal! Here in America  when we get hungry we head out to some fast food joint and grab a burger to eat on the go. In Israel, they have little hummus huts and that’s where everyone goes when they want to grab a quick bite to eat.  Our quest took us to Jaffa…

jaffa israel

… Just outside of Tel Aviv. Here is where the famous Abu Hasan Hummus hut is located, hidden within the winding streets of this ancient city.

Abu_Hassan Humus Hut

Abu Hassan is famous for one thing… Hummus! That’s about all they make and they make it well. Everyday people line up outside this little hole in the wall shop to get their hummus and when the hummus pot is empty, the shop closes for the day, so you have to get there early!

abu hasan humus

Abu Hasan’s hummus is unlike any hummus I have ever tried in the US. It’s rich and creamy with a flavor that just grabs you and then haunts you forever. They top the hummus with chickpeas, garlic, paprika, parsley and then they float a full flavored olive oil on top. It’s truly an amazing culinary experience.

When I returned home, all I could think about was that hummus. What I would give for one more taste of that magical creation. I TRIED to recreate it with a few tricks that I learned while in Israel and it was good, but not Abu Hasan good.  So, I kind of gave up my quest until the other day.

This last week I spent some good quality time with Aimée and Bettijo from Paging Supermom, while we were attending SNAP, the creative blog conference.  While we were sitting at Café Rio in the Salt Lake City Airport, Aimée mentioned one of her favorite recipes and it kind of blew my mind… Zucchini Hummus! Yea, that’s what I said… Zucchini Hummus, for real?

I have heard of making hummus out of white beans instead of chickpeas, but I have never heard of making it with zucchini! I was intrigued and had to give this new idea a go. I did a little research and then put into practice the hummus tricks I learned in Tel Aviv at the Dan Gourmet School of Culinary Arts and came up with my recipe for Zucchini Hummus.

Now, one of the keys to this tasty and good for you treat is the olive oil. For this application, you need a good, full flavored olive oil that is fruity and can hold up to the bold flavors from the garlic and cumin. I used a fabulous full flavored olive oil from Pompeian’s Varietals collection. The magic of the premium Varietals collections is that each type of oil is pressed from one single type of olive. I used the Koroneiki oil which is from the first cold press of the Koroneiki olive.

Pompeian Olive Oil

It’s bold and fruity with a peppery finish that is just perfect for my zucchini hummus. I used it in the hummus as well as floating some on top as a flavor booster as well as a garnish.

Zucchini Hummus

I was BLOWN AWAY when I tasted it for the first time. It truly took me back to Israel. It’s not Abu Hasan, but to me it’s a fresher, even healthier way to savor the flavors of one of my favorite place. Here is how you make it…

Zucchini Hummus
 
Save Print
Prep time
3 mins
Cook time
5 mins
Total time
8 mins
 
This fresh take on humus will blow you away and have you constantly coming back for more!
Author: Heather // WhipperBerry
Recipe type: light meal
Cuisine: Israeli
Serves: 6-8
Ingredients
  • 1 cup Tahini
  • 2 medium zucchini
  • 1 lemon
  • ½ teaspoon citric acid
  • 2 tablespoons of garlic paste
  • 1 teaspoon cumin
  • ½ teaspoon sea salt
  • ¼ teaspoon pepper
  • 1 tablespoon of Pompeian Varietials Koroneiki Olive Oil
Instructions
  1. Peel and chop your zucchini and add to the bowl of your food processor.
  2. Juice your lemon and add half of the lemon juice to start to the zucchini.
  3. Add the tahini, citric acid, garlic paste, cumin, sea salt and pepper and blend slowly adding the olive oil while blending.
  4. Taste the hummus and see if the seasoning needs some adjustment. You may need to add a little more of the reserved lemon juice or possibly salt. You can tweak it to your taste.
  5. Garnish with a drizzle of olive oil.
  6. Serve with veggies and pita chips or use as an addition to salads or sandwiches.
3.2.2310

Disclaimer // This post is sponsored by Pompeian, I received product and payment for this post.

Agave Chicken Lettuce Wraps

1 · Feb 11, 2014 · 4 Comments

Agave Chicken Lettuce Wraps // Maybe you have heard of agave syrup, but haven't taken the leap of trying it yet! I am like you, and probably wouldn't have, had I not visited a spa that served lettuce wraps with it as a dressing. After having those tasty lettuce wraps, I had to come home and try to recreate that amazing taste, and I knew the key was the Agave syrup. These healthy wraps are easy to make, only use a few ingredients and are delicious. 

Agave Chicken Wraps

Ingredients:

2 Chicken breasts, cooked and cubed

1/4 cup chopped fresh cilantro

1/2 cup roughly chopped pecans

1/2 lemon juiced

2-3 tbs agave syrup

Lettuce (Bib, Boston or Butter lettuces work great)

Pecans

Cook your chicken breasts your preferred way and let cool. Placing them in a casserole dish with a sprinkle of salt and pepper is the easiest and then either bake in the oven or microwave, depending on what dish you have.

Once cooled and cubed, place your chicken chunks in a bowl. Mix remaining ingredients in and then lastly, add the splash of lemon before refrigerating.

This salad mixture is best served cold, spooned into leaves of your favorite lettuce.

 Agave Chicken Lettuce WrapsAgave Chicken Lettuce Wraps (2)

When serving, you can add a drizzle of the agave syrup to the plate for presentation. 

Feel free to change ingredients based on your taste! 

Also consider adding:

-chopped cucumber

-diced green onion

-pomegranate seeds

-sesame or chia seeds


I'm super excited to welcome the newest member of the WhipperBerry Creative Team, Stephanie from Life Created! She is an incredibly talented food photographer with all kinds of goodies over at her blog. You should take a second to run over and check it out!!

Baked Sriracha Wings

1 · Jan 28, 2014 · 6 Comments

Wings are pretty much one of my favorite foods on the planet, so the Superbowl, which basically screams for wings is prrreetttyy much one of my favorite days of the year.  I’m a 49ers girl, born and raised, so this year’s game is a little depressing at our house.
I found this recipe in our local newspaper a couple of years ago with the title “Best Buffalo Wings,” and since they were made with Sriracha (is there anything that Sriracha doesn’t make better?) I decided we’d give it a try.  They really are THE BEST wings! We make them any chance we get!

I’m a baked, not fried, gal when it comes to wings.  I use (or I should say, my husband uses–he’s the one that always cooks these) Alton Brown’s recipe for Baked Chicken Wings, with a few slight variations. These come out crispy, just like a fried wing, but with less fat (because it drips off) and minus all of that mess from frying.  Keep in mind, I’m not calling these low fat, they’re still wings, but it’s less than the fried deal for sure.

You can head over to my blog and find my other favorite wing recipe: Maple Teryaki Wings.


Baked Sriracha Wings
 
Save Print
Prep time
45 mins
Cook time
10 mins
Total time
55 mins
 
I found this recipe in our local newspaper a couple of years ago with the title "Best Buffalo Wings," and since they were made with Sriracha (is there anything that Sriracha doesn't make better?) I decided we'd give it a try. They really are THE BEST wings! We make them any chance we get!
Author: Heather // WhipperBerry
Recipe type: Starters
Cuisine: American
Serves: 6
Ingredients
  • 3 lbs chicken wings & drums thawed
  • 4 TBSP Sriracha
  • 2 TBSP butter
  • 2 TBSP finely chopped cilantro + extra for garnish
  • 4 TBSP salt
  • 2 TBSP honey
  • 1 TBSP reduced sodium soy sauce
Instructions
  1. Place a 6 quart saucepan with a steamer basket and 3 inches of water in the bottom, over high heat, cover and bring to a boil.
  2. Place wings in steamer basket, cover, reduce heat to medium and let steam for about 15 minutes or until wings are completely cooked. (Wings can go in frozen, but will need to steam longer to cook.)
  3. Meanwhile, in a small saucepan, melt butter and whisk in Sriracha, salt, honey, soy sauce and cilantro. Check heat level of the sauce. If it's too spicy, add honey. Keep sauce warm over low heat until ready to pour over wings.
  4. Preheat oven to 425 degrees.
  5. Remove wings from the basket lay wings out on a greased cooling rack, placed on a baking sheet and refrigerate for at least 30 minutes (up to an hour), until wings are cool and dry.
  6. Remove wings from refrigerator and place in the oven (still on cooling rack/cookie sheet) and bake for approximately 10 minutes–until crispy.
  7. Remove wings from the oven, toss in sauce and garnish with cilantro.
3.2.2310
  • « Go to Previous Page
  • Page 1
  • Interim pages omitted …
  • Page 4
  • Page 5
  • Page 6
  • Page 7
  • Page 8
  • Go to Next Page »

Primary Sidebar

Heather from Whipperberry
Hello... my name is Heather and I'm the creator of WhipperBerry a creative lifestyle blog packed full of great recipes and creative ideas for your home and family. I find I am happiest when I'm living a creative life and I love to share what I've been up to along the way... Come explore, my hope is that you'll leave inspired!

Footer

  • Privacy Policy
  • Crafts
  • Food
  • Gifts
  • Holidays
  • Home
  • Mom Life
  • Recipes
  • Travel

Copyright © 2026 · Seasoned Pro