• Skip to primary navigation
  • Skip to main content
  • Skip to primary sidebar
  • Skip to footer

Whipperberry

WhipperBerry • Your Home For Creative Inspiration

  • Home
  • Recipes
    • Starters
    • Easy Weeknight Dinners
    • Main Dish
    • Salads
    • Side Dish
    • Soups & Stews
    • Desserts
    • Breakfast
    • Miscellaneous
  • Tutorials
    • Creative Crafts
    • DIY Decor
    • Fabric Crafts
    • Food How-To
    • Jewlery
    • Paint Projects
    • Paper Art
    • Party Styling
    • Photography and Graphic Design
    • Silhouette
  • Holidays
    • Easter
    • Mother’s Day
    • Father’s Day
    • 4th of July
    • Halloween
    • Thanksgiving
    • Christmas
    • Valentine’s Day
  • Gift Ideas
    • Gifts For Everyone
    • Gifts for Dad
    • Mother’s day
    • For The Girls
    • For The Kids
    • Teacher Gift Ideas
    • Christmas
  • Printables
    • Holiday
    • Gift Idea
    • LDS Primary
  • Travel
  • About
    • Terms
  • Contact
  • Nav Social Menu

    • Facebook
    • Instagram
    • Pinterest
    • RSS
    • Twitter

Vegitarian

Pickled Tomatoes

28 · May 29, 2014 · 10 Comments

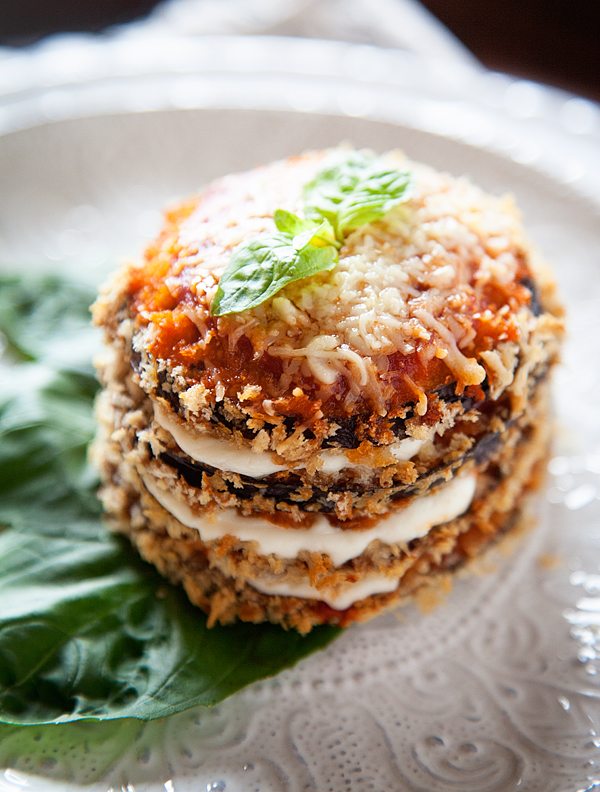
This post brought to you by Pompeian Red Wine Vinegar // I’m a pickle girl… Honestly, I don’t think I’ve met a pickle that I didn’t like.  I love all kinds of pickles not just pickled cucumbers. Have you every tried pickled okra, cauliflower, carrots… they are amazing!  We have a restaurant here in Lincoln called Granite City and they have a steak salad that I ADORE and they have a pickled tomato relish on the salad and it’s divine.  The whole idea intrigued me, so I thought I would try and come up with some pickled tomatoes of my own…

Pickled-Tomato-&-Steak-Salad-with-Pompeian-Red-Wine-Vinegar-#whipperberry-3

I love that I will have tomatoes along with some red onions that are pickled and ready in my fridge at any time. I was one of the kiddos that when my mom made salad or tacos I wouldn’t eat them if they didn’t have tomatoes, it just didn’t seem complete to me. This way I always have tomatoes on hand even when I haven’t made it to the market for a few days. This whole idea is super simple and only takes about 45 minutes to pull together. I used my favorite Pompeian Red Wine vinegar for these pickled tomatoes. You need to check out their whole line of vinegars, they have some amazing flavors!

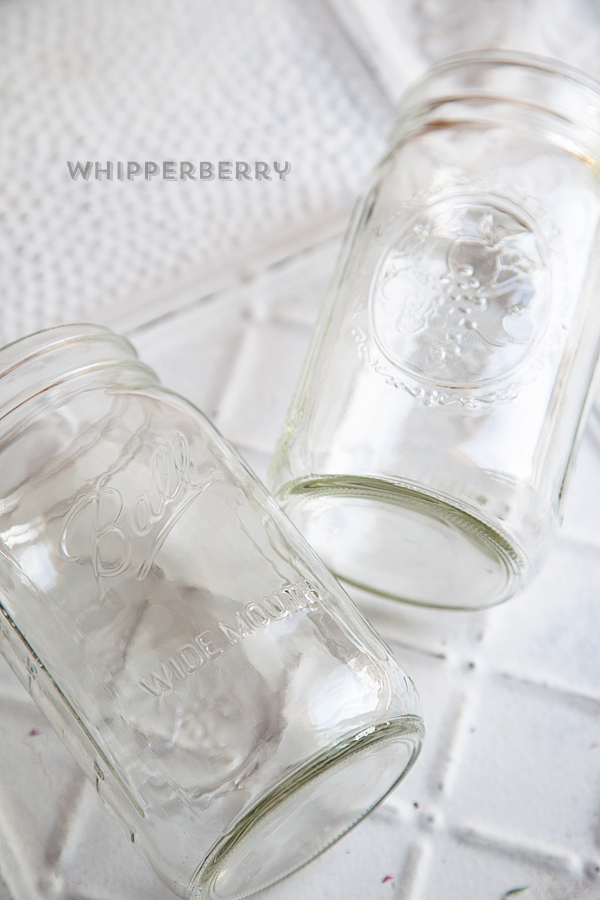
First, I prepared my four 1 quart wide mouth Ball canning jars, by sterilizing them in the dishwasher.

Pickled-Tomato-&-Steak-Salad-with-Pompeian-Red-Wine-Vinegar-#whipperberry-10

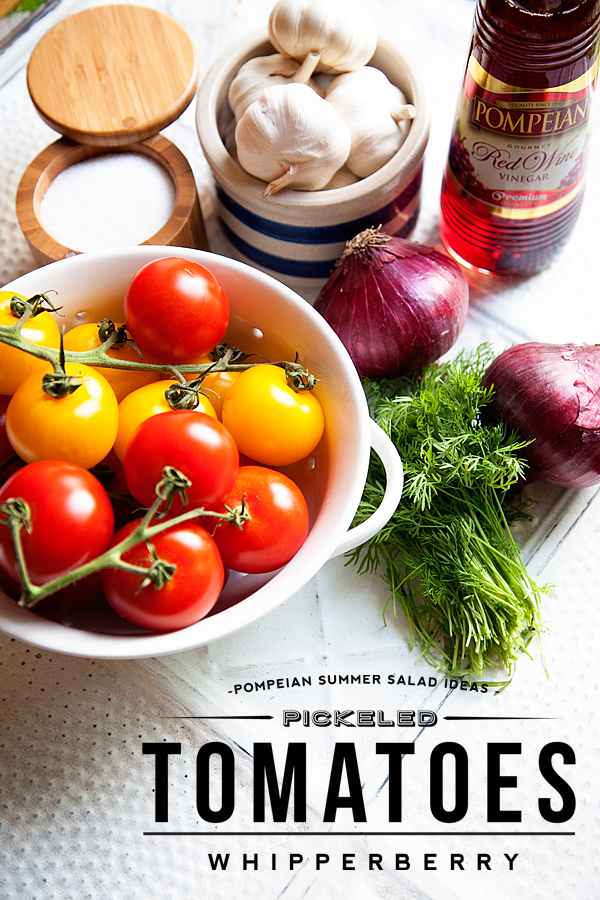
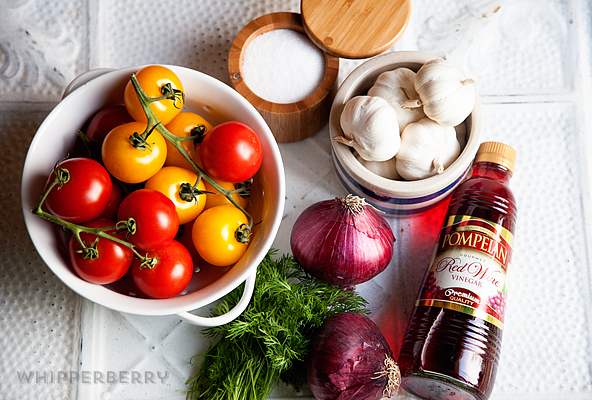
I gathered my simple ingredients, tomatoes, salt, sugar, garlic, Pompeian Red Wine Vinegar, red onion, dill and pepper corns…

Pickled-Tomato-&-Steak-Salad-with-Pompeian-Red-Wine-Vinegar-#whipperberry-1

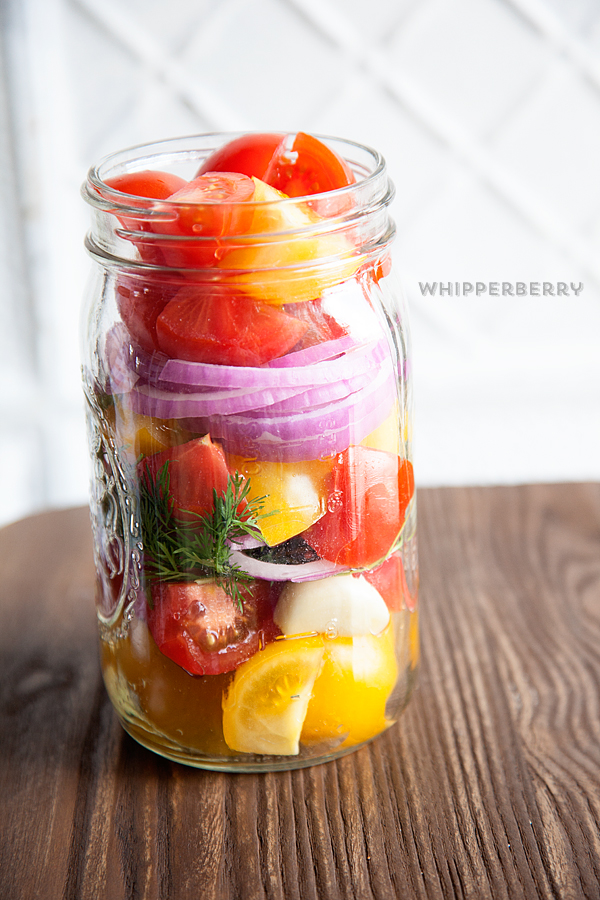
I prepared my pickle brine from the recipe below and while it cooled I prepped my veggies. I cut my tomatoes into large pieces, sliced my onions and peeled the garlic. I layered my veggies in the sterilized jars…

Pickled-Tomato-&-Steak-Salad-with-Pompeian-Red-Wine-Vinegar-#whipperberry-11

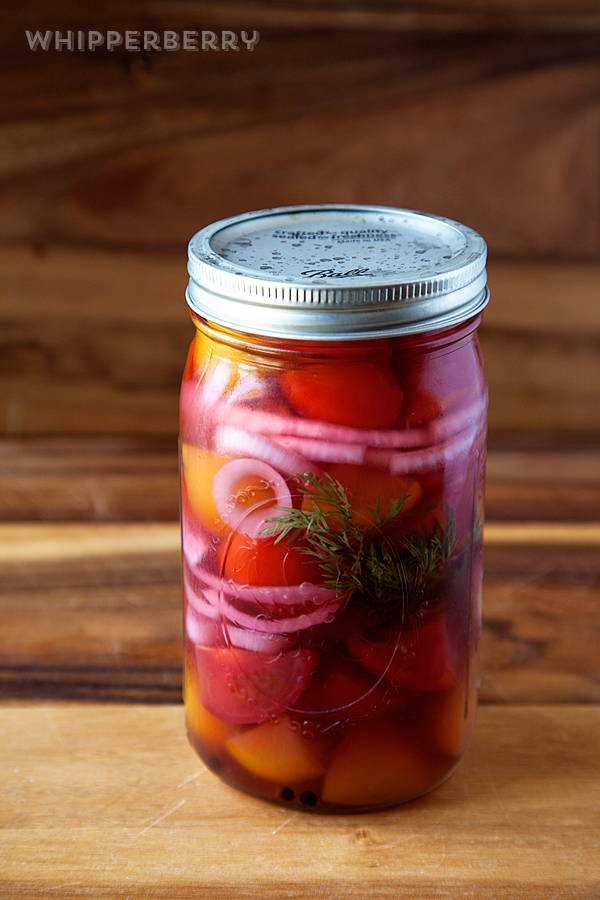
Now, this is a cold pickle so I wanted the brine to be cool, so that it wouldn’t cook the tomatoes. This also means that I just put the pickled tomatoes into the fridge and I don’t go through the whole preserving process. This means that I will have to keep the pickles in the fridge because they have not been officially preserved by the full canning process which kills all the possible bacteria.

The tomatoes will become rather soft, so you may want to use a small grape or cherry type tomato and not cut them for a firmer pickled tomato.

Once the brine is cool, pour it into the jar, seal the jar with the lid and place in the refrigerator. Let the tomatoes “pickle” for a few days and then serve with your favorite salad, cottage cheese, use as a burger topping… the skies the limit!  I will be sharing my copy cat Steak Salad from Granite City in a bit and share how I like to eat my pickled tomatoes.

Balsamic-Steak-Salad-with-Pickled-Tomato-Relish-#whipperberry-2

Pickled Tomatoes
 
Save Print
Prep time
15 mins
Cook time
5 mins
Total time
20 mins
 
These pickled tomatoes are a sure fire way to impress your family and friends this summer!
Author: Heather // WhipperBerry
Recipe type: condiment
Cuisine: American
Serves: 25
Ingredients
  • 3 cups Pompeian Red Wine Vinegar
  • 3 cups water
  • 3 tablespoons salt
  • ⅓ cup sugar
  • 8 garlic cloves
  • 2 tablespoons peppercorns
  • 25-30 medium sized tomatoes
  • 2 red onions
  • 1 bunch of dill
Instructions
  1. Prepare your brine by placing the vinegar, water, salt and sugar into a sauce pan over medium high heat. Heat the brine mixture until the salt and sugar have dissolved about 4 minutes over medium heat stirring occasionally. Let brine cool.
  2. Prepare your veggies by cutting the tomatoes into large pieces and slicing the red onion in onion rings and peeling the garlic. Layer the veggies in your sterilized 1 quart wide mouth Ball canning jars. Pour cooled brine into the jars and place the lid on the jars. Place in the refrigerator.
3.2.2310

Disclaimer // This post is sponsored by Pompeian. I received product and payment for my recipe. However, as always… All thoughts, ideas and opinions are my very own!

Zucchini Hummus Recipe

3 · Apr 30, 2014 · 3 Comments

// Zucchini Hummus Recipe brought to you by Pompeian Olive Oil //

Zucchini-Hummus-with-Pompeian-Varietals-Collection-Olive-Oil-3

A few months ago, I had the exciting opportunity to travel to Israel to go on a food tour of that amazing country.  Our first full day there, we were on a quest to find the best hummus in the country. Now hummus in Israel is a BIG deal! Here in America  when we get hungry we head out to some fast food joint and grab a burger to eat on the go. In Israel, they have little hummus huts and that’s where everyone goes when they want to grab a quick bite to eat.  Our quest took us to Jaffa…

jaffa israel

… Just outside of Tel Aviv. Here is where the famous Abu Hasan Hummus hut is located, hidden within the winding streets of this ancient city.

Abu_Hassan Humus Hut

Abu Hassan is famous for one thing… Hummus! That’s about all they make and they make it well. Everyday people line up outside this little hole in the wall shop to get their hummus and when the hummus pot is empty, the shop closes for the day, so you have to get there early!

abu hasan humus

Abu Hasan’s hummus is unlike any hummus I have ever tried in the US. It’s rich and creamy with a flavor that just grabs you and then haunts you forever. They top the hummus with chickpeas, garlic, paprika, parsley and then they float a full flavored olive oil on top. It’s truly an amazing culinary experience.

When I returned home, all I could think about was that hummus. What I would give for one more taste of that magical creation. I TRIED to recreate it with a few tricks that I learned while in Israel and it was good, but not Abu Hasan good.  So, I kind of gave up my quest until the other day.

This last week I spent some good quality time with Aimée and Bettijo from Paging Supermom, while we were attending SNAP, the creative blog conference.  While we were sitting at Café Rio in the Salt Lake City Airport, Aimée mentioned one of her favorite recipes and it kind of blew my mind… Zucchini Hummus! Yea, that’s what I said… Zucchini Hummus, for real?

I have heard of making hummus out of white beans instead of chickpeas, but I have never heard of making it with zucchini! I was intrigued and had to give this new idea a go. I did a little research and then put into practice the hummus tricks I learned in Tel Aviv at the Dan Gourmet School of Culinary Arts and came up with my recipe for Zucchini Hummus.

Now, one of the keys to this tasty and good for you treat is the olive oil. For this application, you need a good, full flavored olive oil that is fruity and can hold up to the bold flavors from the garlic and cumin. I used a fabulous full flavored olive oil from Pompeian’s Varietals collection. The magic of the premium Varietals collections is that each type of oil is pressed from one single type of olive. I used the Koroneiki oil which is from the first cold press of the Koroneiki olive.

Pompeian Olive Oil

It’s bold and fruity with a peppery finish that is just perfect for my zucchini hummus. I used it in the hummus as well as floating some on top as a flavor booster as well as a garnish.

Zucchini Hummus

I was BLOWN AWAY when I tasted it for the first time. It truly took me back to Israel. It’s not Abu Hasan, but to me it’s a fresher, even healthier way to savor the flavors of one of my favorite place. Here is how you make it…

Zucchini Hummus
 
Save Print
Prep time
3 mins
Cook time
5 mins
Total time
8 mins
 
This fresh take on humus will blow you away and have you constantly coming back for more!
Author: Heather // WhipperBerry
Recipe type: light meal
Cuisine: Israeli
Serves: 6-8
Ingredients
  • 1 cup Tahini
  • 2 medium zucchini
  • 1 lemon
  • ½ teaspoon citric acid
  • 2 tablespoons of garlic paste
  • 1 teaspoon cumin
  • ½ teaspoon sea salt
  • ¼ teaspoon pepper
  • 1 tablespoon of Pompeian Varietials Koroneiki Olive Oil
Instructions
  1. Peel and chop your zucchini and add to the bowl of your food processor.
  2. Juice your lemon and add half of the lemon juice to start to the zucchini.
  3. Add the tahini, citric acid, garlic paste, cumin, sea salt and pepper and blend slowly adding the olive oil while blending.
  4. Taste the hummus and see if the seasoning needs some adjustment. You may need to add a little more of the reserved lemon juice or possibly salt. You can tweak it to your taste.
  5. Garnish with a drizzle of olive oil.
  6. Serve with veggies and pita chips or use as an addition to salads or sandwiches.
3.2.2310

Disclaimer // This post is sponsored by Pompeian, I received product and payment for this post.

Easy Eggplant Parmesan Stacks

1 · Apr 1, 2014 ·

The post brought to you by Ragú® // I LOVE eggplant. One of my favorite meal memories was when my dad went out of town (he’s not a huge fan of eggplant) and my Mom took the opportunity to make Eggplant Parmesan for the first time. I was in my early teens and boy, oh boy… My mind was blown. I had grown up eating pasta, namely spaghetti like most kiddos, but when my mom paired our favorite Ragú® sauce with the lovely breaded eggplant I thought I had gone to heaven. Recently, the folks at Ragú® came to me and asked if I could jazz up the classic eggplant parmesan recipe, I was thrilled! I was for sure up for this challenge.

Eggplant-Parmesan-Stacks-9

I decided to make a healthier version of this tasty meat free dinner. I oven “fried” my eggplant and then stack it with layers of Ragú® Old World Style® Traditional Sauce and fresh mozzarella Cheese. With 11 tomatoes in every jar, Ragú® Old World Style® Traditional Sauce is Ragú® richest, thickest recipe* ever and it’s PERFECT with this recipe!

Easy Eggplant Parmesan Stacks

2 large eggplants

salt & pepper

4 eggs

4 cups unseasoned Panko bread crumbs

cooking spray

24 oz jar of Ragú® Old World Style® Traditional Sauce

2 cups mozzarella cheese

1 cup parmesan cheese

Wash and cut eggplant into 1/2 inch slices.

Place on a baking sheet and generously salt both sides. Let sit for 15 minutes.

This will draw out some excess moisture. After 15 minutes wipe the water and salt off the eggplant slices with a paper towel and set aside.

Meanwhile, set-up a dredging station to prepare the eggplant to oven “fry.” In one bowl crack 4 eggs and whisk. The 2nd bowl will be for the Panko bread crumbs.

Take each eggplant slice and lightly cover with salt and pepper, then cover both sides with the egg wash and then place in the Panko bread crumb bowl, generously covering both sides. Place on a cooling rack on a baking sheet.

Spray the eggplant generously with cooking spray and place in a 425˚ oven for 8 minutes. Remove from oven and turn over each eggplant slice. Spray the eggplant one more time with cooking spray and return to oven for an additional 8-10 minutes. Remove from oven and let cool for a few minutes.

Here’s the fun part. Cover a baking sheet with parchment paper. Now you are going to create towers of eggplant. Lay down a large slice of eggplant. Add a spoonful of Ragú® Old World Style® Traditional Sauce and a slice of mozzarella.

Top that with another slice of eggplant and repeat the process until you have about 5 or 6 layers.

Top with a generous layer of parmesan cheese. Place in a 350˚ oven for 10-15 minutes or until the cheese has melted.

Remove from oven and let cool for a few minutes. Serve warm.

Yields 9 servings

For more easy and delicious Authentic Italian recipe ideas visit Ragú® Facebook page. It’s full of all kinds of tasty weeknight meals that your family and budget will love.

For even more fun you can visit Ragú® Better & Better Sweepstakes. It has a ton of fun prizes that you can enter to win. You could even win a trip to Italy!!

NO PURCHASE NECESSARY.  Legal residents of the 50 United States (D.C.) 18 years and older.  Ends 5/6/14.  To enter and for Official Rules, including odds, alternate method of entry, and prize descriptions, visit www.RaguSweeps.com.  Void where prohibited.

This is a sponsored conversation written by me on behalf of Ragú®. The opinions and text are all mine.

Huevos Rancheros Bake // Recipe

8 · Feb 27, 2014 · 11 Comments

// huevos rancheros bake recipe //

huevos-rancheros-bake-recipe-#whipperberry

I’ve become obsessed with eggs lately. I love how versatile they are, I love how they taste when dressed up, I especially love how they are easy on the grocery budget. I have started making egg dishes a couple of nights a week because they are EASY, inexpensive and the family is still getting a great source of protein without the more expensive meat or poultry options.

As a kid my Mom would make Huevos Rancheros every once in a while and I LOVED it.  The flavor combinations are fantastic.  A typical huevos rancheros recipe has some type of tomato based salsa, fried or poached eggs, tortilla and sometimes cheese on top.  This version is a bit different. It still has eggs and salsa, but I took some liberties when it comes to the tortilla and the cooking method.

The other night we hosted a taco dinner with some family and we ended up with some left over spanish rice. I tend to over do it at times and we had rice for an army.  I had just made a couple of packages of Old El Paso Mexican Rice  and added a can of  Muir Glen Organic Fire Roasted Diced Tomatoes to the pot when I cooked up the rice. You’ll have to adjust the liquid a bit, but it sure makes a lovely mexican rice!

Anyway… I had a bit of left over rice and thought… I could use this as a base for a lovely baked egg dish! That’s how the recipe development started. I wanted something easy to throw together using some simple taco night left overs.  You know those side dishes that we never know what to do with after taco night!  Here is how I layered my egg dish…

huevos-rancheros-bake-recipe-#whipperberry-3

The first layer is the leftover mexican rice, the second layer is just a can of rinsed black beans or refried beans, or any bean dish that you may have left over. Then a layer of your favorite salsa, we like Pace Chunky Salsa,  then top with an egg and some salt & pepper. Super simple and a GREAT way to use up those leftovers!

huevos-rancheros-bake-recipe-#whipperberry-2

Before I placed it in the oven I topped it off with some shredded cheddar cheese and some green onion a perfect way to add a little kick to the dish. After they finished baking, we let them cool for a few minutes and then dove right in. My husband and I had to do a double take. The addition of the egg to these simple ingredients made for a lovely meal, it tasted amazing!! I was thrilled to have a dish that came together so fast, not to mention a dish that the whole family loves and that uses up those pesky taco night left overs… It’s PERFECT!  Here’s the full recipe with all the specifics…

Huevos Rancheros Bake
 
Save Print
Prep time
5 mins
Cook time
20 mins
Total time
25 mins
 
An easy weeknight dinner that capitalizes on those pesky taco night leftovers.
Author: Heather Thoming
Recipe type: Easy Weeknight Dinner
Cuisine: Mexican
Serves: 4
Ingredients
  • baking spray
  • 2 cups mexican rice
  • 1 cup black beans
  • 1 cup salsa
  • 4 eggs
  • 1 cup shredded cheddar cheese
  • ¼ cup sliced green onion
  • salt & pepper
Instructions
  1. For this recipe you can use a number of different baking dishes. You can bake the egg dish in a small baking dish, small oven safe ramekins or even a large muffin tin. Whatever you have on hand really. I've used each method and they all work great.
  2. Preheat the oven to 350˚ and prepare your baking dish or dishes with non-stick baking spray.
  3. Start with the rice layer on the bottom. Smooth it out and add the beans on top of the rice. Then add a nice layer of salsa. At this point, place the dish or dishes in to the oven for 10 minutes to bring up to temperature before added your eggs.
  4. Remove from oven and add your eggs, salt, pepper, cheese and green onion and place back in the oven for an additional 6-10 minutes or until the whites of the eggs have set. You may need to turn in the oven once to promote even baking.
  5. Remove from the oven and let cool for a few minutes, but serve not to long after it comes out of the oven.
3.2.1275
  • « Go to Previous Page
  • Page 1
  • Page 2
  • Page 3
  • Page 4
  • Page 5
  • Go to Next Page »

Primary Sidebar

Heather from Whipperberry
Hello... my name is Heather and I'm the creator of WhipperBerry a creative lifestyle blog packed full of great recipes and creative ideas for your home and family. I find I am happiest when I'm living a creative life and I love to share what I've been up to along the way... Come explore, my hope is that you'll leave inspired!

Footer

  • Privacy Policy
  • Crafts
  • Food
  • Gifts
  • Holidays
  • Home
  • Mom Life
  • Recipes
  • Travel

Copyright © 2026 · Seasoned Pro