• Skip to primary navigation
  • Skip to main content
  • Skip to primary sidebar
  • Skip to footer

Whipperberry

WhipperBerry • Your Home For Creative Inspiration

  • Home
  • Recipes
    • Starters
    • Easy Weeknight Dinners
    • Main Dish
    • Salads
    • Side Dish
    • Soups & Stews
    • Desserts
    • Breakfast
    • Miscellaneous
  • Tutorials
    • Creative Crafts
    • DIY Decor
    • Fabric Crafts
    • Food How-To
    • Jewlery
    • Paint Projects
    • Paper Art
    • Party Styling
    • Photography and Graphic Design
    • Silhouette
  • Holidays
    • Easter
    • Mother’s Day
    • Father’s Day
    • 4th of July
    • Halloween
    • Thanksgiving
    • Christmas
    • Valentine’s Day
  • Gift Ideas
    • Gifts For Everyone
    • Gifts for Dad
    • Mother’s day
    • For The Girls
    • For The Kids
    • Teacher Gift Ideas
    • Christmas
  • Printables
    • Holiday
    • Gift Idea
    • LDS Primary
  • Travel
  • About
    • Terms
  • Contact
  • Nav Social Menu

    • Facebook
    • Instagram
    • Pinterest
    • RSS
    • Twitter

Vegitarian

Vegetable Frittata

0 · Aug 31, 2015 · Leave a Comment

Vegetable-Frittata-by-WhipperBerry

Compensation for this post was provided by Unilever via AOL Media.  The opinions expressed herein are those of the author and are not indicative of the opinions or positions of Unilever or AOL.

Not too long ago, I shared my love of all things brunch!

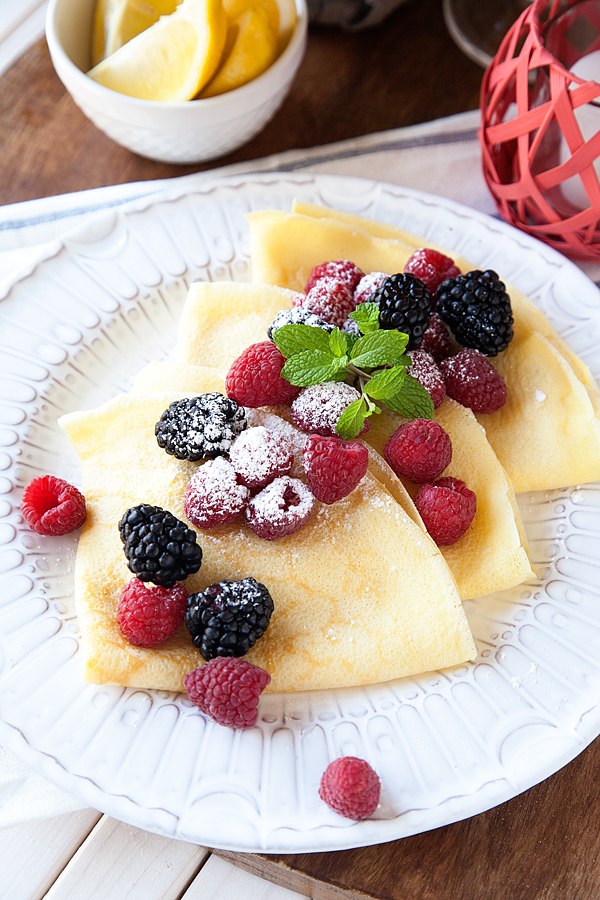
I shared one of my all-time favorite breakfast treats… Lemon Drop Crêpes.

Lemon-Drop-Crepes---WhipperBerry-9

Little did you know, that post was just the beginning. I’ve been working on creating a fabulous summer inspired brunch menu that is perfect for celebrating this time of year.

I adore summer. There is just something special about this time of year.  The warm weather, trips to the lake, sleeping-in and farmers markets. I LOVE spending the morning at the farmers market and running home with my bounty to create a fun meal for the family.

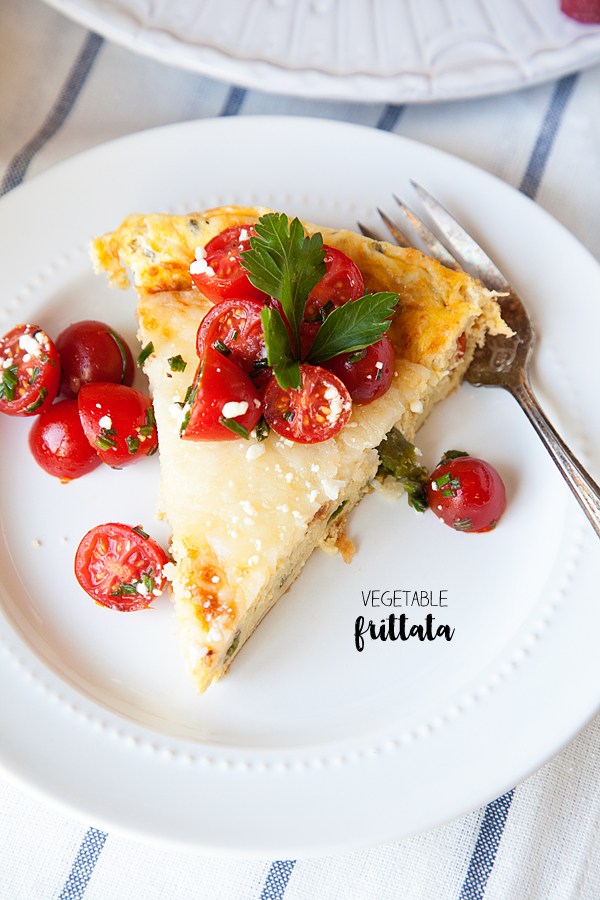
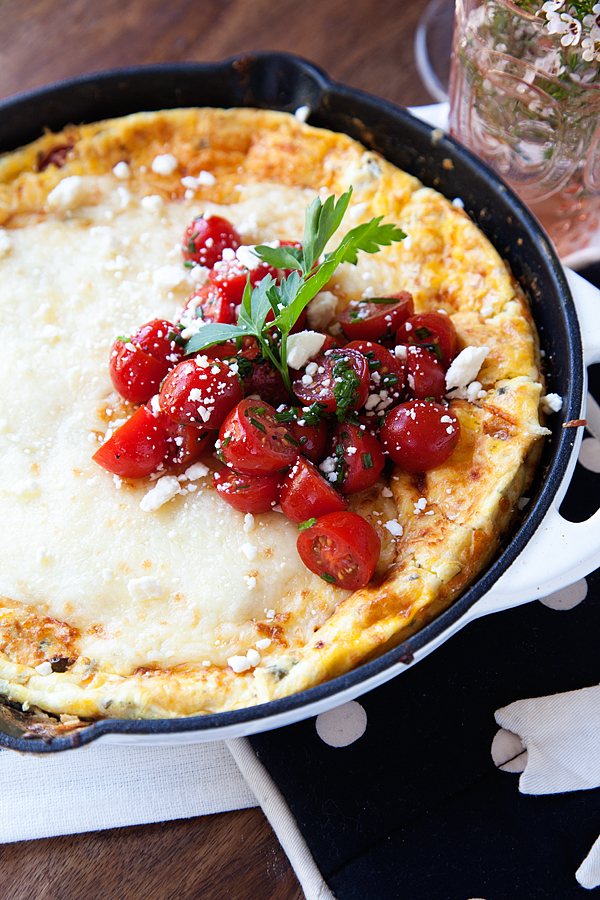
We love eggs here in our house. We typically have some type of egg dish for dinner at least once a week. Eggs are a fantastic source of protein and paired with good fats, they make for a fantastic meal! When I was working on this summer brunch menu I knew I had to incorporate a tasty egg dish. I came up with a lovely Summer Vegetable Frittata.

Spring-Vegetable-Frittata---WhipperBerry-4

What is a frittata? It’s kind of like an oven baked omelet. You add your favorite ingredients to an oven-safe skillet. Top it with an egg mixture, lightly start the cooking process on the stove and then finish it off in the oven. They are super quick and simple to make.

For this recipe we start with some simple fresh ingredients…

Spring-Vegetable-Frittata---WhipperBerry-1

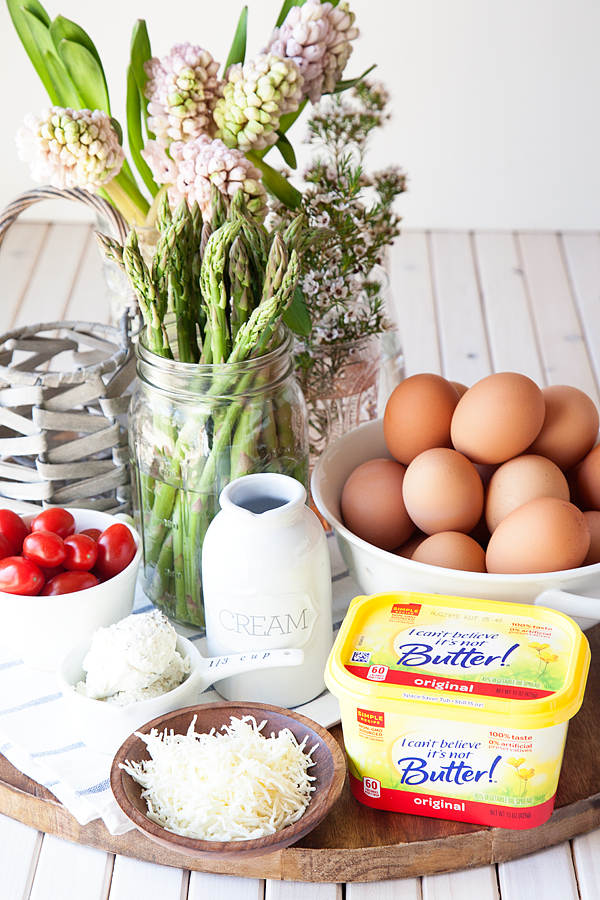
Summer Vegetable Frittata Recipe

9 eggs

1/3 cup of whipped chive cream cheese

2 tablespoons heavy cream (feel free to substitute with skim milk as a lighter alternative!)

salt & pepper

1 1/2 cups of shredded Italian cheese blend

2 tablespoons + 1/2 teaspoon I Can’t Believe it’s Not Butter®

1/2 small white onion

1 cup asparagus

2 cups grape tomatoes

1 lemon

1 bunch of chives

1 tablespoon feta cheese

When you are putting together a dish like this, you want to make sure that your ingredients are fresh and nutritious . Have you thought much about the fats that you use when cooking lately?

We need some type of good fat in our diet… We ALL do! Good fats are a source of energy and essential fatty acids your body can’t produce on its own. When I was putting together this frittata recipe, I used I Can’t Believe it’s Not Butter® as the fat that I used to sauté my vegetables in.

I tend to stick with I Can’t Believe it’s Not Butter® because I know that it’s provides good fats. It has 40% fewer calories and 70% less saturated fat than butter per serving. Not to mention that it has no artificial flavors, no artificial preservatives and no partially hydrogenated oils. It has non-GMO sourced ingredients and it’s cholesterol free with 0 grams of trans fats per serving.. That exactly what I’m looking for when I’m cooking for my family!

Instructions

Preheat your oven to 350˚.

In a medium sized bowl, add your eggs, cream cheese, heavy cream, salt, pepper and 1 cup of shredded cheese.

Spring-Vegetable-Frittata---WhipperBerry-2

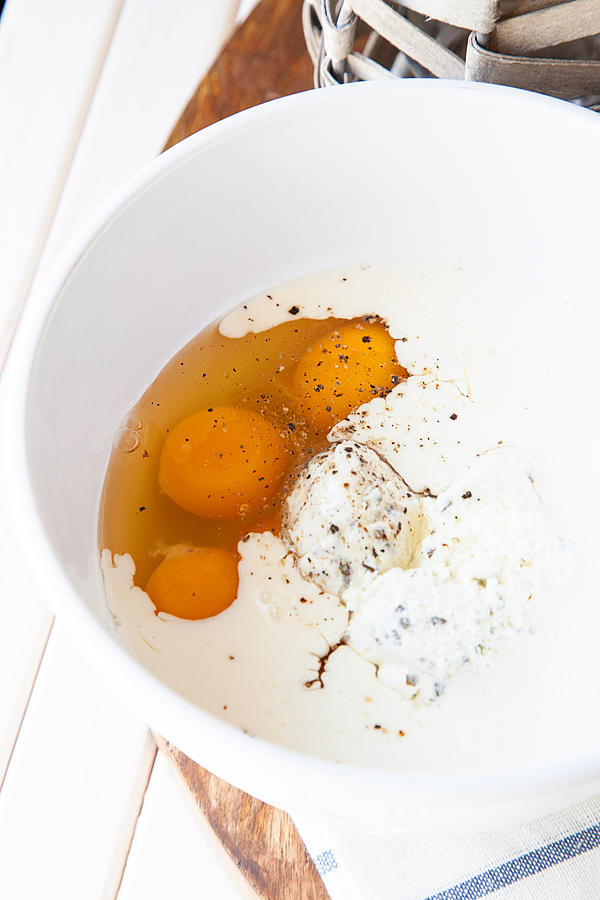
Whisk together and set aside.

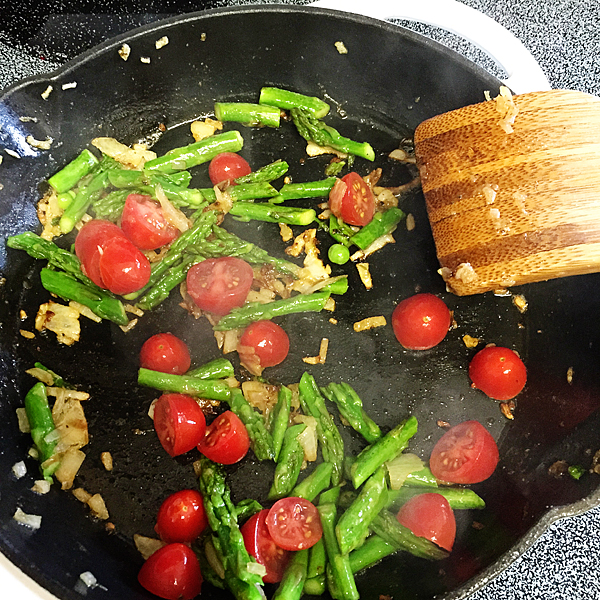
In a oven-safe skillet over medium heat, add 2 tablespoons of I Can’t Believe it’s Not Butter®.  Once the I Can’t Believe it’s Not Butter® has melted, add your diced onion and sauté for 3-4 minutes over medium heat. Add the asparagus and cook for another minute and a half.

spring frittata 1 - whipperberry

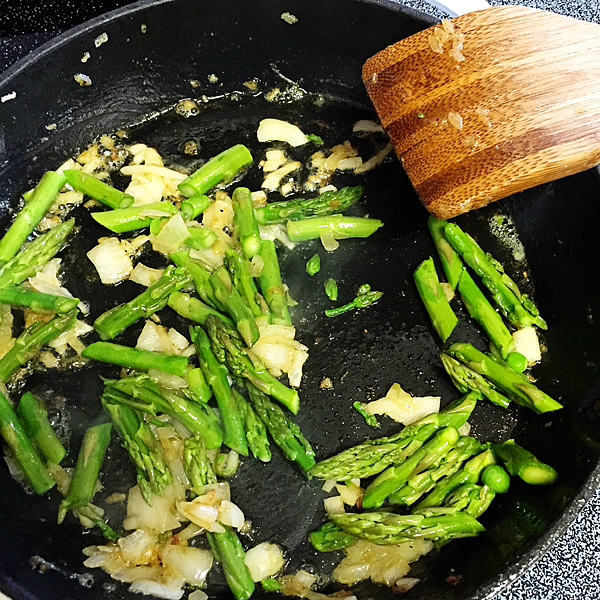
Next, add 1/2 of your tomatoes and sauté for 1 minute. Reserve the remaining tomatoes for a garnish.

IMG_2386

Pour in the egg mixture and cook just like you would scrambled eggs for 1 minute. This give the frittata a little body and helps the veggies to stay suspended in the dish rather than just fall to the bottom of the pan.

spring frittata 3 - whipperberry

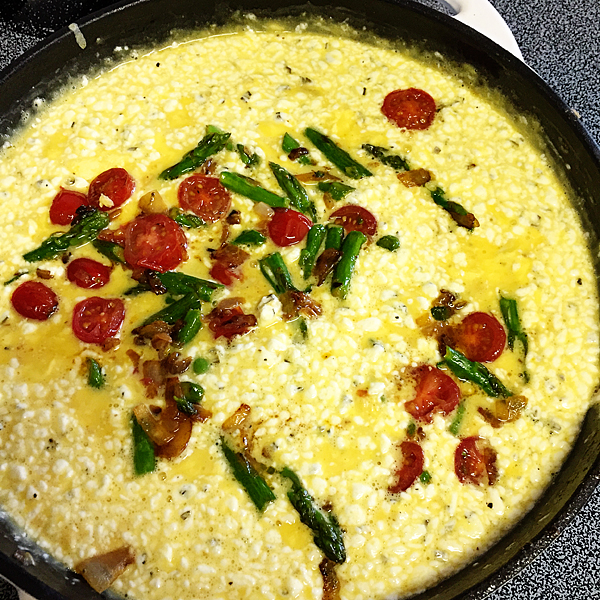
After one minute, add the remaining cheese to the top and place in a 350˚ oven for 15-20 until it look just set.

spring frittata 2 - whipperberry

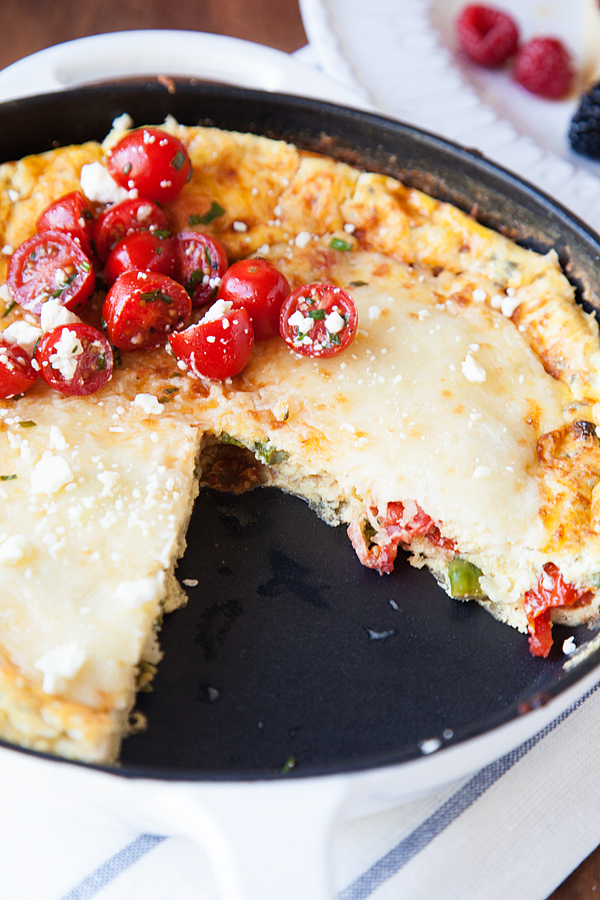
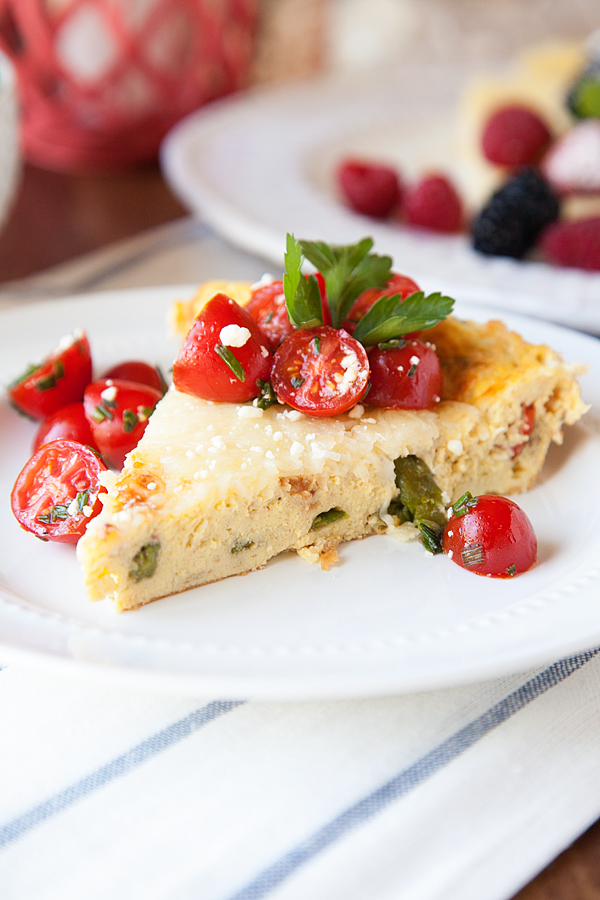
Remove the frittata from the oven and let rest for 10-15 minutes.

In the meantime, prep your tomato salad garnish. In a small microwave safe bowl, melt a 1/2 teaspoon of I Can’t Believe It’s Not Butter®. This should take no more than 20-30 seconds. Add the remaining halved tomatoes to the bowl along with a tablespoon of fresh squeezed lemon juice, salt, pepper & 1 tablespoon of freshly chopped chives. Once the frittata has rested, add your tomato salad & feta cheese to garnish and serve.

Spring-Vegetable-Frittata---WhipperBerry-8

Spring-Vegetable-Frittata---WhipperBerry-14

Spring-Vegetable-Frittata---WhipperBerry-11

  I Can’t Believe It’s Not Butter! sources ingredients that are not genetically modified. However, in the field-to-tub journey of making our buttery spread there is some contact with genetically modified vegetable oils, resulting in a small amount in this product.

Tomato Galette + Pie Crust 101

3 · Aug 25, 2015 · 1 Comment

Tomato-Galette-from-WhipperBerry-6

Summer just isn’t Summer without a bountiful harvest of tomatoes of all kinds. I know, I know… You’re either a lover or a hater. I find myself in the LOVE category. Salads, tacos, life in general, isn’t complete without tomatoes. The only issue I find is finding the time to try all of the amazing tomato recipes during the summer bounty.

If you’ve been following me for some time, you’ll know that I LOVE pie making. I’ve been good friends with pie crust for some time. Here is a post highlighting all of my favorite pie crust tips and tricks. Some people think that pies are just for the holidays and typically are only for sweet types of pies or galettes. NOT TRUE! It’s also not just for your grandmother’s turkey pot pie. You can make all kinds of savory treats with a mean pie crust. For example, my Tomato Galette.

What’s a galette you ask! Well, it’s a fancy term for a free form pie. You don’t use a pie plate, you just fold up your crust over whatever filling you have and voilá, you have a free form pie. First I start with my crust. I whip that up quickly with a few simple ingredients; flour, Crisco, salt, vinegar, one egg & ice water. The key is to keep all of your ingredients as cold as possible. I use Crisco All-Vegetable Shortening Baking Sticks when I bake and I will cut it up into cubes and then place them into the freezer for 20 minutes so they get nice and cold. Temperature is key to great pie crusts. Butter Flavor and All-vegetable Crisco® Shortening and Baking Sticks deliver higher, lighter-textured baked goods and have 50% less saturated fat than butter and zero grams trans fat per serving.

Tomato-Galette-from-WhipperBerry-1

Once my crust is made, I chill it in the refrigerator for 20-30 minutes while I put together the filling for my galette. First I caramelized onions in Crisco Sauté Solutions Olive Oil Blend Stick with a little salt and a dash of sugar to help them caramelize. Then I mix my cheese filling. That’s a mixture of cream cheese, ricotta, parmesan cheese and some dried Italian herbs. Slice up some tomatoes and you’re all set to assemble. Once it’s baked, I drizzle with some Crisco Extra Virgin Olive Oil, add some fresh basil and it’s all set. Crisco® Extra Virgin Olive Oil uses the highest quality olives available to help enhance your cooking; available in three flavorful varieties 100% Extra Virgin, Pure and Light Tasting Olive Oil.

Here’s a video I put together that will help you make pie crust  your grandmother will love AND you get to see how I put together my tomato galette.

Looking for more great recipe inspiration? Visit The Crisco Heritage Kitchen,  a hub dedicated to all things food, tradition and family, where generations of home cooks can gather and discover tried-and-true recipes that will delight and inspire.

Tomato-Galette-from-WhipperBerry-9

Tomato Galette + Pie Crust 101 Recipe

Tomato Galette + Pie Crust 101
 
Save Print
Prep time
25 mins
Cook time
50 mins
Total time
1 hour 15 mins
 
This simple summer meal is perfect any time of day. Grab some of those amazing summer tomatoes and you'll fall in love! Ingredients
Author: Heather // WhipperBerry
Serves: 8-10
Ingredients
  • Crust
  • 3 cups flour
  • ½ teaspoon salt
  • 1½ cups of Crisco All-Vegetable Shortening Baking Sticks
  • 1 teaspoon white vinegar
  • 1 egg
  • 4-6 tablespoons water
  • Filling
  • 1 small sweet onion
  • 1 tablespoon Crisco Sauté Solutions Olive Oil Blend Stick
  • ½ cup cream cheese
  • ½ cup ricotta
  • ½ cup shredded parmesan
  • 1 teaspoon dried Italian Seasoning
  • 2-3 large tomatoes thinly sliced
  • Crisco Extra Virgin Olive Oil & fresh basil for garnish
Instructions
  1. In a large bowl, add flour, salt and cold Crisco All-Vegetable Shortening Baking Sticks. Use a pastry cutter to cut-in the shortening to the flour.
  2. In a small bowl beat egg and vinegar together and pour into flour mixture.
  3. Gently mix and add ice cold water until your dough just comes together. Be careful not to over mix. Pour out dough onto some plastic wrap and form into a disk. Wrap and place in refrigerator for 20-30 minutes.
  4. While the dough is chilling. Slice onions and caramelize over medium low heat with the Crisco Olive Oil Sauté Stick, salt and sugar. This will take 8-10 minutes. Remove from heat and set aside.
  5. In a medium mixing bowl, mix together the cream cheese, ricotta, parmesan cheese and Italian seasoning.
  6. Cut dough into quarters. Roll one quarter of the dough out on a floured surface into a 10 inch round.
  7. Spread on ½ of the cheese mixture, top with onions and tomatoes. Finish with salt and pepper to taste.
  8. Use the remaining ingredients to make up another galette.
  9. Place in a 375˚ oven for 40-50 minutes.
  10. Remove from oven, let cool for 10 minutes. Drizzle with Crisco Extra Virgin Olive Oil and garnish with fresh basil.
3.2.2925

*Disclosure: As a participant of the Crisco Ambassador Program, I’ve received compensation for my time and product samples for review purposes. Opinions are my own. 

Overnight Oatmeal with Cashew Milk

50 · Feb 12, 2015 · 7 Comments

+  Overnight Oatmeal with Cashew Milk brought to you by the folks at Silk +

Overnight-Oats-with-Silk-Cashew-Milk-from-WhipperBerry

We are huge fans of oatmeal here at our house. I think I have talked about it before…

There are days when I think my husband wishes he could eat oatmeal breakfast, lunch & dinner. It’s not that oatmeal is his only true love. He just loves the ease and health benefits from eating his oats.

I, on the other hand, need variety in my life and eating a bowl full of hot oats isn’t always my favorite way to start the day. That is until I discovered overnight oats!! Have you guys tried these before? They are so good! I love that you can eat them hot OR cold and add whatever you want to them.

Overnight-Oats-with-Silk-Cashew-Milk-from-WhipperBerry-9

I especially LOVE making my overnight oatmeal with the creamy, nutty goodness of Silk Cashew Milk. Have you tried Silk Cashew Milk? This stuff is TASTY! It’s creamier than skim milk and has 25% fewer calories. Here’s the skinny about Cashew Milk in a nutshell…

  • 60 calories per serving
  • Creamier than skim milk with fewer calories
  • Made with the special creaminess of cashews
  • 0g saturated fat and cholesterol
  • 50% more calcium than dairy milk
  • Free of dairy, soy, lactose, gluten, casein, egg and MSG
  • Verified by the Non-GMO Project’s product verification program
  • No artificial colors, flavors or funny business

Yep, it’s kind of fabulous! You can sign-up for the Silk newsletter for all kinds of helpful hints and recipes along with super fun contests & giveaways.

How to make overnight oatmeal with Silk Cashew Milk

Overnight-Oats-with-Silk-Cashew-Milk-from-WhipperBerry-1

This process couldn’t be easier. The cool thing is, you can mix up several of these goodies on Sunday and you’re all set for the week.

Gather all of your ingredients

Basic plain Jane rolled oats

Silk Cashew Milk

Vanilla extract

Honey or Brown Sugar

OPTIONAL INGREDIENTS

Chia Seeds

Wheat Germ

Flax Seeds

Almonds

Cashews

Blueberries

Blackberries

Raspberries

You get the idea… Basically whatever you want!

Here’s how you assemble your oatmeal

In a jar, place 1/2 cup of old fashioned rolled oats.

Overnight-Oats-with-Silk-Cashew-Milk-from-WhipperBerry-3

Add any other ingredients like chia seeds, flax seeds, wheat germ and such. I generally add chia seeds and wheat germ.

Overnight-Oats-with-Silk-Cashew-Milk-from-WhipperBerry-4

Top with 1 tablespoon of honey or 1/2 teaspoon of brown sugar. Add some of your favorite berries. We love adding blueberries here at our house. We’ve experimented with frozen blueberries and they are not our favorite in this application. I would opt for fresh if you have some.

Overnight-Oats-with-Silk-Cashew-Milk-from-WhipperBerry-5

Don’t forget to add a splash of vanilla extract.

Pour in 3/4 cup of Silk Cashew Milk.

Overnight-Oats-with-Silk-Cashew-Milk-from-WhipperBerry-6

Check out all those yummy layers…

Overnight-Oats-with-Silk-Cashew-Milk-from-WhipperBerry-7

Place the lid on your jar or container and gently shake up your concoction.

Overnight-Oats-with-Silk-Cashew-Milk-from-WhipperBerry-8

Place in the refrigerator overnight or for at least 6 hours. Your oats will plump-up with all that Cashew Milk goodness and create this lovely treat!

The next morning, you have two choices… Do you want your oatmeal hot or cold?

I generally prefer cold, but my husband likes hot. If you like your’s  hot, take the lid off and place it in the microwave for roughly a minute.

Overnight-Oats-with-Silk-Cashew-Milk-from-WhipperBerry-10

You can either eat it right out of the jar or pour it into a bowl. We like to top ours with chopped almonds, pecans or cashews. Whatever we have on hand and then drizzle with some fresh local honey.

YEP, it’s TASTY!!

This isn’t your grandmother’s oatmeal… It’s sweet, creamy & nutty goodness in a bowl.  It’s like a special treat in the morning rather than another boring old bowl of oatmeal.

My daughter, Hannah has become the expert overnight oatmeal mixer for our family. Each evening she pulls out all of our jars and gets to work putting together our breakfast for the morning. It’s perfect! You don’t have to put any thought into it at all. You just grab your jar out of the fridge and you’re all set!

5.0 from 1 reviews
Overnight Oatmeal with Cashew Milk
 
Save Print
Prep time
5 mins
Total time
5 mins
 
These overnight oats are a perfect morning treat!
Author: Heather // WhipperBerry
Recipe type: Breakfast
Serves: 1
Ingredients
  • ½ cup old-fashioned rolled oats
  • ¾ cup Silk Cashew Milk
  • ¼ teaspoon vanilla extract
  • ½ teaspoon brown sugar OR 1 tablespoon honey
  • OPTIONAL
  • ½ teaspoon chia seeds
  • ½ teaspoon wheat germ
  • ½ teaspoon flax seeds
  • ¼ cup fresh berries (blueberry, blackberry, raspberry or strawberry)
  • chopped nuts
  • honey
Instructions
  1. In a jar or plastic container with a lid, add your oats, cashew milk, vanilla and brown sugar OR honey.
  2. Add any additional optional ingredients like chia seeds or blueberries.
  3. Place the lid on your container and gently shake.
  4. Place jar in the refrigerator overnight or for at least 6 hours.
  5. Remove from refrigerator and top with nuts and drizzle with honey. Serve COLD.
  6. If you would like oatmeal HOT, place in the microwave for roughly a minute and then top with nuts and drizzle with honey.
3.2.2925

This conversation is sponsored by Silk. The opinions and text are all mine.

Fresh Avocado Bites Appetizer

2 · Feb 1, 2015 · 2 Comments

+ This Fresh Avocado Bites Appetizer post brought to you by Avocados from Mexico #FirstDraftEver +

Fresh-Avocado-Bites--3

If I were stranded on a desert island and was given a choice of one fresh food plant to bring with me, I would choose an avocado tree. Yep, I love them that much. As a child I couldn’t get enough of them. Luckily my Grandfather had an avocado ranch and when we visited in the summer I could eat all the avocados a girl could ever want. Those are happy memories!

If I could I would add avocado to almost anything; sandwiches, soups, salad, egg dishes, salsas, smoothies, pastas… you can add it to almost anything! The cool thing is that Avocados from Mexico are available 365 days a year!

img-logo-top-animatedFresh-Avocado-from-Mexico

So, even in these cold dreary months, we can add a FRESH Mexican goodness into our lives.

Did you know that avocados are a FRUIT? Not only that, but they are part of the BERRY family? They are full of all kinds of vitamins and nutrients, plus they are a fantastic source of “good fat.” Yes, our bodies need fat to keep our cells strong, great news for fans of this incredible fruit! For all of the avocados nutritional facts, you can check out this site.

My family adores this fresh avocado salsa that I make for all kinds of dishes. Today, I’m making it for a fun appetizer to share during the Super Bowl.  This is a simple dish that’s easy to whip up and the light, fresh flavors will have your guests coming back for more. Speaking of the Super Bowl… Have you seen the Avocados from Mexico Super Bowl commercial? It’s hilarious!! If you missed it, you can check it out HERE.

First you need to grab some wonton wrappers from the market. Using a mini-muffin pan, place your wrappers into the cup and press them down to create a “cup”. Spray with cooking spray and place in a 350˚ oven for 5-7 minutes, until they are nice and crisp. Remove from oven and let cool.

Baked-Wonton-Wrapper-Cups-from-WhipperBerry

These cups can be made a day or two ahead and stored in an air tight container until you are ready to use them.

Making-fresh-Avocado-Cups

Now’s the fun part, making the fresh salsa… This is super simple!

Cut all of your ingredients into small bite sized pieces. The ingredient list is below.

Fresh-Avocado-Salsa-from-WhipperBerry

Add your lime juice, olive oil and chili powder to the bowl and gently toss.

Fresh-Avocado-Bites--2

Spoon them into your wonton cups and top with the sour cream sauce and serve.

Looking for more avocado fun? Come join me along with Mario & George Lopez, the folks from Avocados from Mexico and a handful of other bloggers as we tweet it up during the Super Bowl today! Follow Avocados from Mexico on Twitter, Facebook, Pinterest & Instagram for all kinds of avocado ideas.

Fresh Avocado Bites Appetizer
 
Save Print
Prep time
10 mins
Cook time
5 mins
Total time
15 mins
 
These fresh avocado bites are a creamy burst of flavor in your mouth, your guests will adore the simple yet complex flavors of this appetizer.
Author: Heather // WhipperBerry
Recipe type: Appetizer
Serves: 48 cups
Ingredients
  • 1 package of wonton wrappers
  • cooking spray
  • 2 ripe avocados
  • 1 cup grape tomatoes
  • 1 tablespoon diced jalapeño
  • ½ a mango diced
  • 1 lime
  • 1 teaspoon olive oil
  • ¼ chipotle chili powder
  • ½ cup green onion sour cream
  • green onion
Instructions
  1. Pre-heat oven to 375˚
  2. Place wonton wrappers in a mini muffin pan and press down to create cups
  3. Spray with cooking spray and bake for 5-7 minutes or until lightly brown and crisp
  4. In a medium size bowl add your diced avocado, diced tomatoes, diced jalapeño, diced mango, juice from one lime, olive oil, chili powder and green onion. Gently stir. You want to make sure you don't mash the avocado.
  5. Spoon avocado mixture into cooled wonton cups
  6. Put sour cream in a squeeze bottle and top avocado bite with a drizzle of sour cream
3.2.2925

Disclosure // This is a sponsored post brought to you by Avocados from Mexico via Mom it Forward. As always… All thoughts, ideas and opinions are my very own.

  • « Go to Previous Page
  • Page 1
  • Page 2
  • Page 3
  • Page 4
  • Page 5
  • Go to Next Page »

Primary Sidebar

Heather from Whipperberry
Hello... my name is Heather and I'm the creator of WhipperBerry a creative lifestyle blog packed full of great recipes and creative ideas for your home and family. I find I am happiest when I'm living a creative life and I love to share what I've been up to along the way... Come explore, my hope is that you'll leave inspired!

Footer

  • Privacy Policy
  • Crafts
  • Food
  • Gifts
  • Holidays
  • Home
  • Mom Life
  • Recipes
  • Travel

Copyright © 2026 · Seasoned Pro