
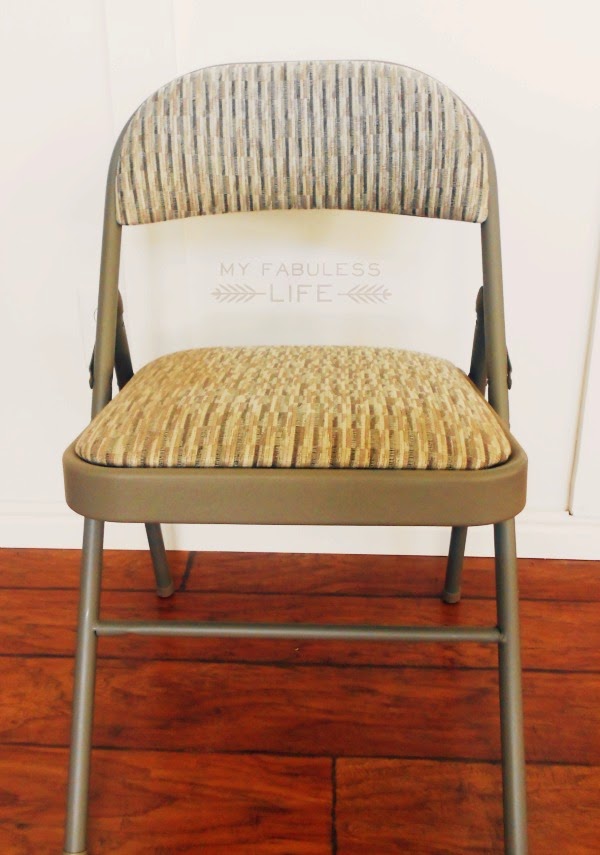
It’s probably no surprise that I love to host parties and gatherings at my house and volunteer my abode for events whenever possible–my husband totally loves it. So this past year, when the parents asked me what I wanted for Christmas, I told them, without skipping a beat, FOLDING CHAIRS! Buuuttt….I feel like nothing puts a damper on my party quite like adding some drab, ugly folding chairs to a perfectly planned table setting. You can imagine the parents’ joy when they granted my Christmas wish and I immediately said, “Oh, I’m so excited! I can’t wait to paint these and recover them.” Queue collective, “Aww, no, don’t do that…they’re perfectly good and new…wait until they’re at least beat up a little….”
I had a little guilt about going against the wishes of the gift-givers, but seriously, these girls were not going to be invited to my parties in this outfit.
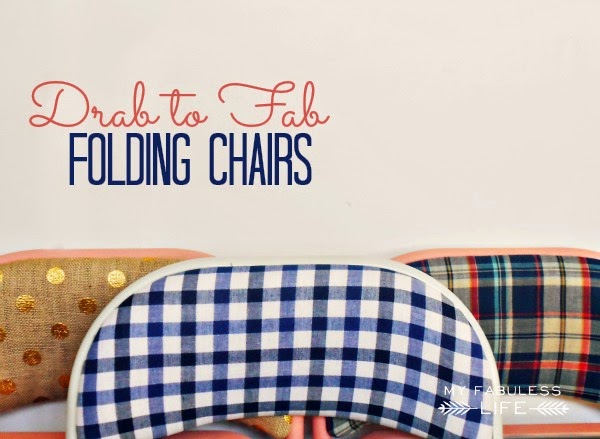
How to Makeover Folding Chairs – Do it Yourself Style
I originally set out to do some vintage florals, but plaids have stolen my heart in a big way lately–for some reason whenever I say this, I hear Tim Gunn in my head talking about menswear. Anyway, I was at Walmart, of all places one day, and found the blue and pink plaid (on the right) in their remnant bin for like $2.00 and knew EXACTLY what I was going to do with the chairs. The gold, polka dot burlap was not in the original plan, but when you find GOLD, POLKA DOT BURLAP (at Joann’s), you USE IT! I may need meetings for this burlap addiction because it is quickly appearing all over my house and I can not get enough.

How to Add Cushions to Metal Folding Chairs
Metal folding chairs are a bit uncomfortable. So, if you don’t already have the one’s with cushions you’ll want to add cushions first. This might seem hard if you want to do it yourself but it’s actually easy! The things you’ll need for adding a cushion are below.
Things You’ll Need to DIY:
Spray paint (about one can for each chair)
Fabric (less than 1/2 yard for each chair)
Staple gun (can be purchased for about $10 just about anywhere that sells basic tools)
(4) 1″ screws for each chair
Start by removing the pads from the chair. On my chairs, the ones on the back just came off by unscrewing three little screws.

The seat cushion was attached with some type of plastic screws so I just clipped the ends off with wire cutters (just something will cut through thick plastic). DON’T TRY TO PULL THEM OUT. They have a flat head that’s attached to the wood under the padding and you’ll just rip a hole through the seat–learned that one the hard way.

Then spray paint the chairs. I used Valspar Brushed Rose and Mellow Spring from Lowe’s. While the paint is drying, you can upholster your cushions.
Just lay the cushion on the fabric, cut a piece of fabric big enough to pull around it, and staple it down right over the top of the existing fabric. Make sure to keep it pulled tight, and if you’re using a fabric with a pattern, keep flipping the cushion over as you go to make sure you’re keeping the pattern straight.
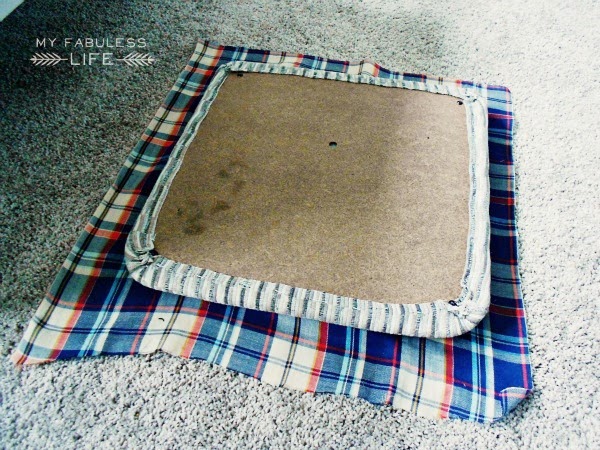
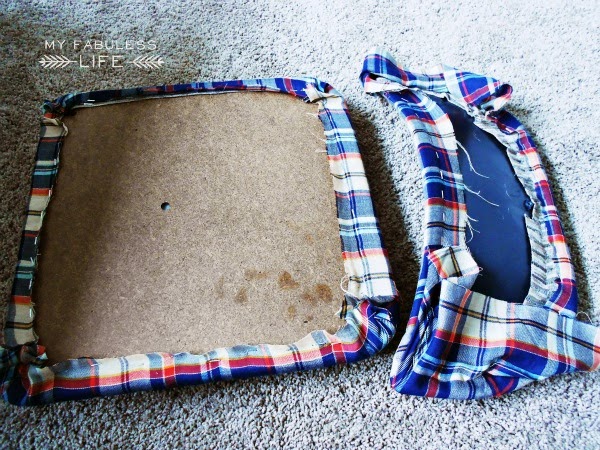
Trim the excess fabric and reattach the cushions. To attach the seat cushions, just drill a new screw up through where the old plastic screw used to be.

And there you have it! Pretty, party-ready chairs! And when they’re this easy, you can change the fabric for every party if you want!


What a great idea! Love how they came out. Esp the gold polka dots…so glam!
That Polka Dot burlap is amazing! I want to go home, throw out all of my half broken dining room chairs and just replace them all with wonderful, pretty folding chairs!!
Ok, I just LOVE these chairs! I have a bunch of folding chairs I TOTALLY need to do this too! Thanks for a great post. Pinning!
Christine 🙂
https://www.myepicureanadventures.com
What if your folding chairs are not padded and metal only? How does one go about making and attaching padding?
I would like to know that too.
Love this idea – I've got some ugly folding chairs in my garage that need a pretty makeover!! Thanks!!
I desperately want to do this to the folding chairs I take to craft shows– they are a boring tawny beige color and could use a little pizzaz! Thank you for the easy tutorial– and for the tip about the plastic screws. I totally would have boffed that part 🙂
LOVE these! So fun and easy to tackle!
These are so fabulous!!! I could see that polka dot one at a wedding! Great job Jenn! 🙂
Girl! You are so creative! I love the chair makeovers!!
I can hardly wait to try this on the ugly folding chairs I have out in the garage. Love the polka dots!
WOW! These chairs look fantastic. Stunning! Amazing! I love the gold polka dot one. It works so well with the coral chairs. I think you did such a gret job with these!
OMG I love this! Especially the pink with burlap/gold polka dots! I need to make a trip to JOANNs to get some!
Wow! I will never pass up a folding chair at a thrift store again. The polka dot burlap chair is amazing!
These are so cool! What an awesome idea..I've always hated boring folding chairs..these are fab! Come link up to centerpiece Wed linky party on my blog. https://thestylesisters.blogspot.com/2013/06/dr-suess-party-and-centerpiece-wednesday.html
Karin
Such a great idea! And they all look SO cute!!
What a GREAT idea! I need some folding chairs, but they are so expensive to buy new (and not very pretty at all!) and usually even less pretty to buy used on craigslist or at a yard sale. I will have to keep an eye out for some used ones, now that I know I can easily make them look great! Thanks for sharing!
So pretty! I am need a couple of folding chairs for the craft shows I do, and I would love to copy your polka dot makeover. What brand/color spray paint was it that you used?
What an amazing transformation and great tutorial. I featured your cute party chairs on Friday Finds today. Thanks!
I have those exact chairs! I would love to try this 🙂 Visiting from TT&J.
I cannot belive hos easy you made it look…I bet even I could do it:) thanks for sharing
These chairs are BEYOND cute! I don't think I could ever hide them away … would have these out all the time! I love all of them, but the burlap and gold polka dot is UHHH-mazing. Thanks for sharing this tutorial … going on my "craft bucket list" now! 🙂 nikki
Cute idea! I can't wait to transform MY folding chairs! Maybe the card table, too!
love them. They're so cute
What an awesome idea! I love the transformation, I also hate using fold out chairs and was considering making slip covers for them, but this is so much funner. If you get a chance, please share this on my linky party: https://suburbsmama.blogspot.com/2013/06/sunday-linky-party-12.html
Love these! I can't wait to find some and try it myself! Thanks for the tip!
I love these, and that gold polka dot burlap? I must get some of that!
Adding my "thanks for the great idea" to the rest of the group!! Definitely on my must-do list for this summer!
These are AWE-some! Pinning!
Oh, wow! This is a simple tutorial, and the best I've seen! This is so cute! Thanks for sharing.
How shabby chic and creative! they turned out great 🙂 Roechelle @ https://www.hugatreewithme.com
How simple, and what a dramatic change!! You should post this on a DIY Party I Co-host every week!! I hope to see ya there, and please leave a comment or two! Because we all love them!!
Shelly- minettesmaze.blogspot.com
This looks awesome!!! We would love it if you would link up at our linky party:
https://www.lifewiththecrustcutoff.com/two-girls-and-a-party-linky-party-20/
Live every Wednesday to Sunday.
Hosted by:
https://www.lifewiththecrustcutoff.com/ Parrish @ Life with the Crust Cut Off
https://thissillygirlslife.com/ Dana @ This Silly Girl's Life
We hope to see you there!
Great job on these! I added this post to my Google+.
No, seriously! Mine are going down (to the paint table) today!!! Love love love it! Thanks for the idea and the tutori
Mary
This is SUCH a great idea and so simple to execute!!! I shared with my readers HERE: https://seektobemerry.blogspot.com/2013/06/thats-decor-able.html. Thanks for the inspiration!!
Love the pink chair with the burlap. What color/brand of spray paint did you use? Thanks!
Oops, sorry! You included that info. Found it! Thanks!
I have seen a lot of chairs redone, but love what you did with the folding chairs. This is the first time I have seen this, and love what you did!
Kim
LilacsNDreams
How long were the screws you used? I'm pretty sure I have the exact chairs you do and want ot re-cover them. But I don't want to use too long of screws and poke a hole in the cover- or the serson who sits on them!!
I have the same question! Please a reply if you have done this- I cut the plastic screws off- wondering if I need to put flat heads on inside of cushions- which would require unwrapping original cushion….
Thank you for explaining how it's done. I am gonna try this at home.
I'm trying this now with my folding chairs and here are some tips:
1) Prime the SOBs. My chairs are black and I'm spray painting them a light yellow. I've gone through a whole can of paint and still the coverage is great. I think if I primed them more, I would have used less paint.
2) I think you should budget a whole can of paint for a chair. Remember, you don't have to paint the surfaces that will be covered by the cushions. You also don't have to paint underneath the chair if you want to save some paint and time.
3) Depending on the weight of your fabric, you may need to get longer screws. I used some nice heavy Dwell upholstery fabric and I definitely need longer screws.
That's awesome! Those look really creative and didn't cost hardly anything. I found several different types of folding chairs here https://www.foldingchairsandtables.com/prodsNew.asp?ID=Folding-Chairs. Those chairs are cheap enough to use whatever money is left over to put towards nifty little designs like that.
Could you please correct the name of the website into the first link so Jenn can get her well deserved credit?
I have been hoping to do this exact same makeover with chairs in the same style but in a drab grey colour. I got as far as taking off the back cushion but was worried about the plastic screws on the seat cushion. Thanks for making the mistake for me! Now I know what to do to get them off. I wanted to cover mine in oil cloth to make them easy to wipe clean. So excited now!
Great post. LOVE thegoldpolka dot burlap the most 😀
These look awesome! Can't wait to try this on my old folding chairs. Any crafters have tips for making diy upholstered cushions onto folding chairs that are plain metal? (i.e. that don't already have a cushion?) too thrifty to get rid of them 🙂
Thanks!
Hi where did you get the folding chairs from? I can’t seem to find good ones anywhere!
Is the burlap itchy? The few times I’ve used it on things, I’ve itched and it doesn’t stay well together either so I’m interested in knowing if when people sit on it if it breaks pieces off and sticks to people’s bottoms?
I LOVE this and just started on my chairs. I have a question: What kind of screws did you use to reattach the seat cushions to the chair? The holes in the wood are bigger than the holes in the metal seat and the screws I bought have nothing to grab on to in the cushion.
Thanks!
Now that it is a couple years out from when you did this project can you fill me in on how well the paint held up especially with the folding up and storing of the chairs. Thank you
Thank you for this post! I had the same chairs but wanted to change them. I followed the instructions to a T and the results were great!
Thank you for this great idea. My chairs, unfortunately, have old, worn cushions as well. How do I replace those? I am a DIY-Newbie.
I have several old vintage folding chairs I want to redo like this. The seat is attached with screws, however, there are no screws on the seat backs. Should I try prying this off?
this is such an amazing project ! i have to great folding chairs i had and wanted to keep and display but they were so bland and ugly and now i will do this ty !
What size staples did you use? I tried some 1/2″ staples we had lying around & they’re definitely too long! Pokey li’l things! 🙂