+ This post brought to you by the JM Smucker’s Co. & The Power of Family Meals, Disconnect to Reconnect + I remember years ago, when the world was just opening up to our new mobile technology. Everyone was so excited to have the ability to connect ANYWHERE. It was revolutionary. I could not wait until I could get my first cell phone. It was a brick, but I carried it proudly and LOVED being able to contact anyone, at anytime and in any place. Then the technology continued to evolve and soon we could text, and then the birth of the smartphone happened. We could access the internet, our email ANYWHERE! It was brilliant.
Then I remember hearing a news story where the experts were saying that because of this new technology, we as humans will forget how to connect on a personal, face to face way. They said that we as a society would become more and more isolated because of this technology. We would forget how to make eye contact, we would forget how to make small talk, we would get sucked more and more into our devices and then society would face a human crisis. My first thought was poppycock! We as humans would never lose our personal connections.
And then as of late, I started observing… I saw people out at restaurants sitting together, not communicating, all of them with their eye glued to the screen of their smartphone. NO INTERACTION AT ALL! It made my heart hurt. Then it started to see it creep into my own family…
We would sit down to meals and my husband and I would be glued to the email inbox on our iPhones, or checking out the latest and greatest Youtube video. As our kiddos got older, they too started to get their own devices, and meal time became a place to sit at the table, eat food and stare at our devices. Minimal talking, and the poor younger kiddos without devices were ignored and bored. It actually shames me to have to say that, I’m embarrassed!
Once I woke-up and realized what was happening, I quickly took matters into my own hands and gently asked the family if we could make a change. At first, I met some resistance… what would we talk about? Ahhh Mom, really? But Honey, I have to stay connected to work. Does this sound familiar?
It took a little time, but we have successfully transitioned to device free meal times! No television, no iPhones, no iPads… just us, and we LOVE it! Our family has taken the pledge at The Power of Family Meals® to EAT SCREEN FREE this Sunday! You can take the pledge as well and join us. To help, I’ve created this free printable to help the family reconnect…
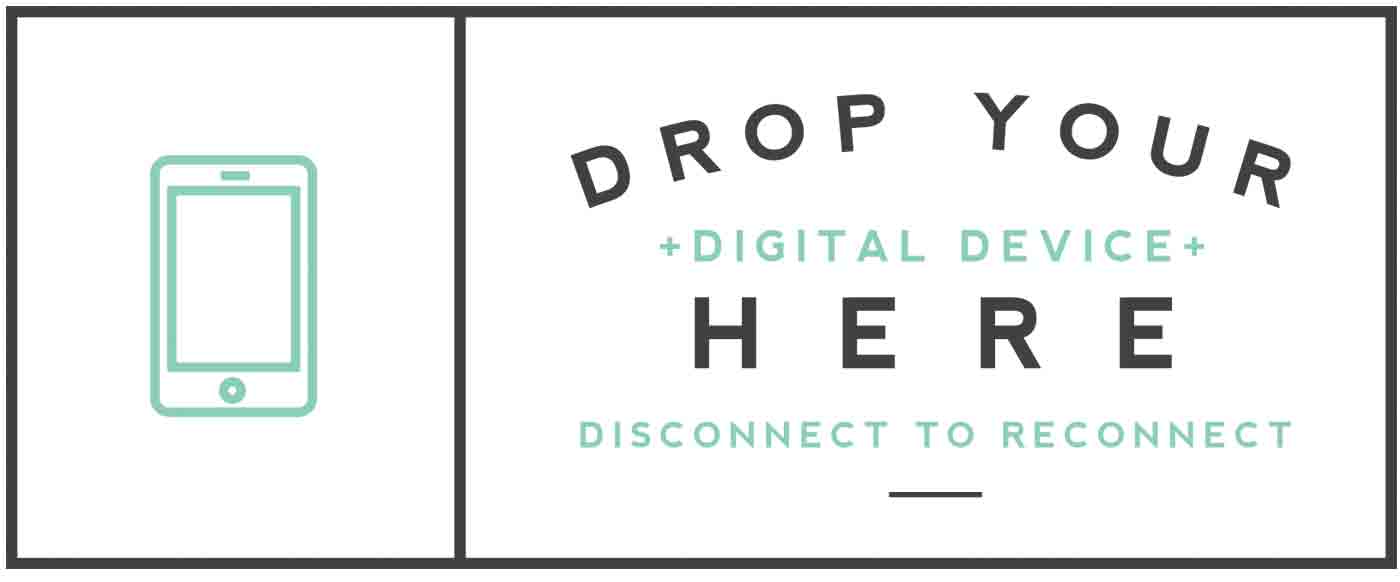
This is a simple printable that you can print, fold in half and place on a tray or basket to encourage your family to drop their digital devices on the tray, away from the table and then join the family for a screen free meal!
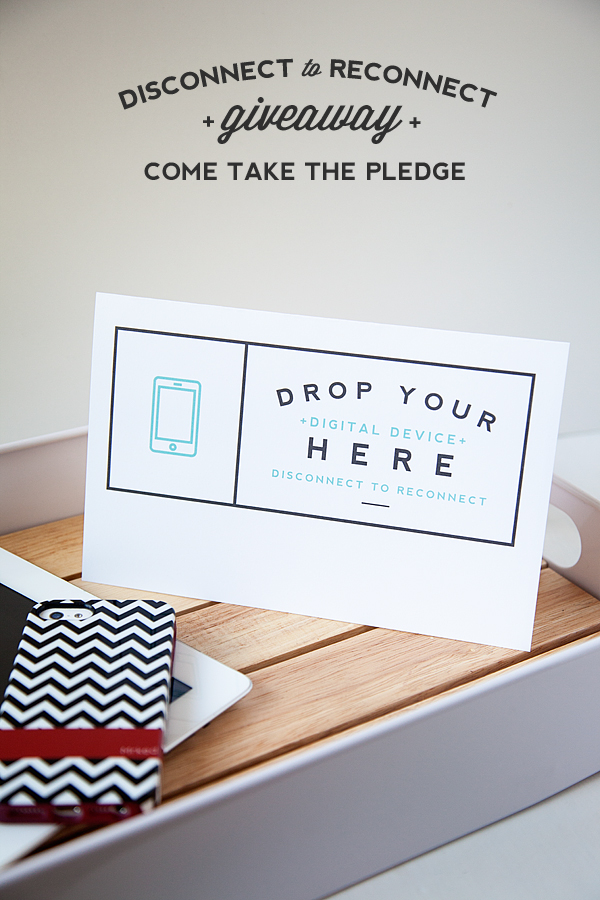
You can download the “Drop your Digital Device Here” by clicking this link
I plan on using this simple sign during our family meals and even when we entertain with family and friends. Hopefully it will encourage even more to take a few minutes to unplug and connect with what really matters.
![]()
Breakfast for Dinner GIVEAWAY
The J.M. Smucker’s Co. has graciously donated a Breakfast for Dinner prize pack valued at $125 for one of you who decides to take the pledge!
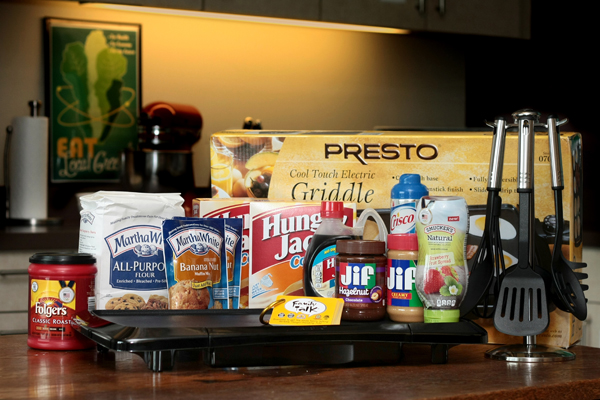
It’s packed full of all kinds of goodies that will get your screen free dinner of to a good start.
The Breakfast for Dinner giveaway includes:
- Presto Jumbo Cool Touch electric griddle (1)
- 7-piece kitchen utensil set with stand (1)
- Family Talk conversation game (1)
- Smucker’s Strawberry Natural Squeeze jam (1)
- JIF Creamy Peanut Butter (1)
- JIF Chocolate Hazelnut Spread (1)
- Folger’s Classic Roast (1)
- Hungry Jack Breakfast Syrup (1)
- Hungry Jack Complete Pancake and Waffle Mix (2)
- Martha White Banana Nut Muffin Mix (2)
- Crisco No-Stick Cooking Spray (1)
- Martha White All-Purpose Flour (1)
Just follow the directions in the Rafflecopter box below to enter…
a Rafflecopter giveaway