• Skip to primary navigation
  • Skip to main content
  • Skip to primary sidebar
  • Skip to footer

Whipperberry

WhipperBerry • Your Home For Creative Inspiration

  • Home
  • Recipes
    • Starters
    • Easy Weeknight Dinners
    • Main Dish
    • Salads
    • Side Dish
    • Soups & Stews
    • Desserts
    • Breakfast
    • Miscellaneous
  • Tutorials
    • Creative Crafts
    • DIY Decor
    • Fabric Crafts
    • Food How-To
    • Jewlery
    • Paint Projects
    • Paper Art
    • Party Styling
    • Photography and Graphic Design
    • Silhouette
  • Holidays
    • Easter
    • Mother’s Day
    • Father’s Day
    • 4th of July
    • Halloween
    • Thanksgiving
    • Christmas
    • Valentine’s Day
  • Gift Ideas
    • Gifts For Everyone
    • Gifts for Dad
    • Mother’s day
    • For The Girls
    • For The Kids
    • Teacher Gift Ideas
    • Christmas
  • Printables
    • Holiday
    • Gift Idea
    • LDS Primary
  • Travel
  • About
    • Terms
  • Contact
  • Nav Social Menu

    • Facebook
    • Instagram
    • Pinterest
    • RSS
    • Twitter

Crafts

How to Decorate with Flowers

0 · Mar 1, 2016 · 2 Comments

+ How to decorate with flowers post brought to you by Michaels Craft Stores +

How to decorate with simple romantic flowers from the Michaels Flower Market by WhipperBerry

I ADORE flowers!

I love how something so simple can transform a space.

How-to-decorate-with-michaels-flower-market

Especially this time of year when we are all waking up from our winter hibernation. It’s time to pack away the buffalo check and the fun plaids and bring out the romantic spring florals. That’s why this month’s Michaels Makers Challenge is all about the Flower Market!

14616_MS_MM_MarchChallenge_m

How to decorate with flowers

My one issue…

I HATE how quickly fresh flowers fade. I love having them around, but I truly dislike the cost of keeping them up in our home. That’s why I’m in love with Michaels new Floral Market with over 500 fresh new blooms that will for sure match almost any personality and decorating style!

I tend to keep things more on the simple end. As much as I love huge arrangements in other spaces. I feel like the space in my home needs something a little more delicate.

Ranunculus-425-(1024x683)

img source + beyond sweet and savory

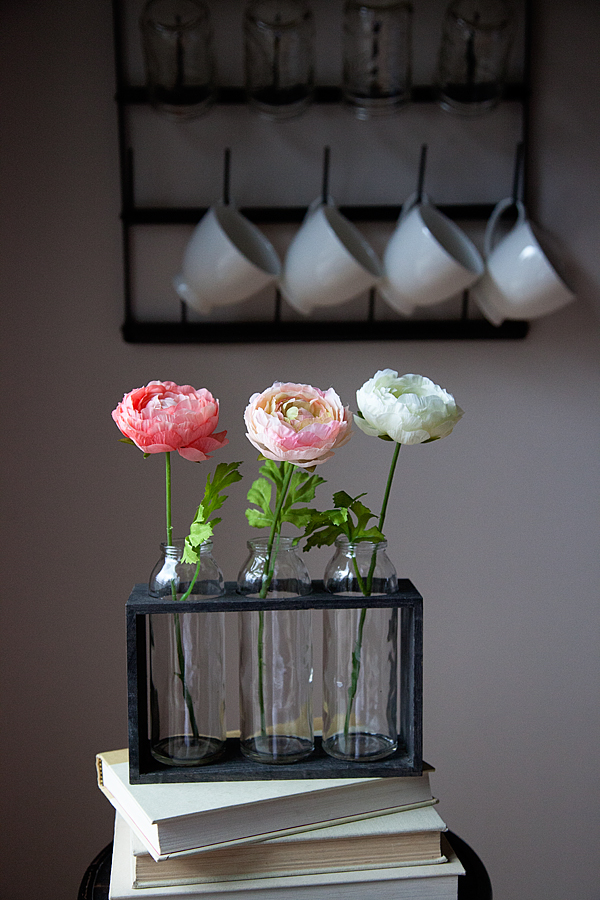
I have always loved Ranunculus blooms and thought they would be the perfect addition to this little corner in my kitchen.

decorating the simple but beautiful ranunculus blooms from Michaels Flower Market

These beautiful Ranunculus blooms paired with the romantic bud vase that I also found at Michaels it was a real home run!!

The beauty of the whole thing is that I get to have this romantic splash of spring and it’s not going to wither and die on me. I LOVE IT!

I’m sure you have a space in your home that could use a little love… It’s amazing how adding a little bloom can totally transform a room.

Looking for more simple floral ideas, you should visit Michaels blog The Glue String for all kinds of inspiration OR you can visit the 49 other Michaels Makers to see how they’ve dressed up their home from the Flower Market.

Michaels Makers Summit Challenge

Speaking of Michaels Makers…  YOU could win the opportunity to join us for this years Michaels Makers Summit

29016_SO_MakersSummit_Blog

Come and be creative with some of your favorite creative friends!!

All you have to do is submit a photo of your work at the Made with Michaels site. We will be pouring over your fun creative projects and we will be selecting a few of you to join us for this years event. Head on over for all the details.

NOW, here are all of the other fresh new spring ideas from the other Michaels Makers this month…

An InLinkz Link-up


Simple Kid Friendly DIY Christmas Village

3 · Nov 28, 2015 · Leave a Comment

WhipperBerry-Christmas-Village

Who’s looking for something fun & simple to do this Christmas? Something even the kiddos will love!

This year, I’m looking to simplify. I want to simplify everything, the gift giving, the message, the decor. I want the Holidays to be more about the family and the true meaning of Christmas. Several years ago my family spent a month in Germany in December and we had a chance to enjoy a European Christmas that was simply magical. For the Germans the holiday is all about nature, simplicity & family. We fell in love! Ever since then I have wanted to create more of an old-world Christmas experience and this year is finally the year… I’m so excited!!

It’s all starting with my simple kid-friendly DIY Christmas Village. I wish I could take all of the credit for this, but I can’t. I was inspired by a friend of mine here in Lincoln from Little Red Cabin. She has this beautiful shop where she sells simple, yet stunning decor items for the home. She used to sell these Christmas Villages in her shop but she no longer carries them, therefore I had to make one of my own and of course put my WhipperBerry spin on them. It’s really quite simple, you only need a few items.

Christmas Village Supplies

WhipperBerry-Christmas-Village-5-1

2×2 Select Pine Board

BB Frösch Chalk Paint Powder

Behr Premium Plus Sample Pots FLAT – Mink & Decorator White

Krylon Premium Metallic Spray Paint – Copper Foil

DIY Christmas Village Instructions

The trickiest thing with this project is getting access to a saw. If you don’t have a saw, hit up your neighbors or family members. I’m sure someone has something you can use. I have a Rigid 10 inch Sliding Compound Miter Saw and it works like a dream for this project, but it isn’t the only saw that will work.

How-to-cut-WhipperBerry-Christmas-Village

All you need is to be able to cut at an angle for this little village. There is no rhyme or reason when you’re cutting the little buildings. I made the little buildings roughly 3-4 inches tall, with all different types of angles for their roofs. I mostly used a 30-40˚ angle when cutting to tops of my buildings.

WhipperBerry-Christmas-Village-4

The only one that needs to be exact is the larger building in the center that you place your stencil on. For that one I used a 35˚ cut and made sure both sides of the building were the same hight.

Sand your blocks if needed. My wood cut so nice that I didn’t really need to sand them at all.

Now it’s time to paint your village. I knew that I wanted to keep some natural wood, Faux Stain some building with BB Frösch & then spray some of the buildings with copper spray paint for a metallic accent. I’ve see others use puffy paint for these kinds of projects but I liked the spray paint instead. If you have kids creating these then you can use puffy paint instead because they love it.  I wrote a post about how to make your own puffy paint too!

WhipperBerry-Christmas-Village-colors

Faux Staining & Painting with BB Frösch Chalk Paint Powder

This to me is my favorite part… I LOVE working with Chalk Paint! I use BB Frösch Chalk Paint Powder when I’m crafting. Typically Chalk Paint is too expensive for crafting, but not when you use BB Frösch. I mix the chalk paint powder with a sample pot of Behr Premium Plus Flat paint from Home Depot. The BB Frösch turns the regular paint into CHALK PAINT for a fraction of the cost.

It’s so easy to mix-up your chalk paint, here’s a quick video showing you how to do it.

For the White buildings, I just brush on the Decorator White BB Frösch Chalk Paint and because it’s has the all-natural mineral additives, it dries super quick! I don’t really bother to wax these guys, they don’t really need it. Plus, I like the look of the flat finish.

Now for the Faux Stain… You use this technique that I created when you want to see the natural wood come through. Traditionally people would use Stain for this, but I use BB Frösch because it’s so much easier. You can visit this post on WhipperBerry to learn how to Faux Stain.

Faux-Stain-BB-Frösch-Chalk-Paint-Powder

I love how the faux stain turns out for this Christmas Village. I use the color MINK from Benjamin Moore for most of my Faux Staining. YES, I use the sample pots of Behr at Home Depot, but they have the color recipe for the Benjamin Moore colors in their computer. Just ask for Benjamin Moore Mink and they will be able to look it up.

Copper Buildings

Now for the copper, I use Krylon’s Premium Metallic Spray Paint in Copper Foil. It’s super simple and adds that little pop of copper that is so hot right now.

WhipperBerry-Christmas-Village-6

Just spray paint a couple of your buildings for that accent color.

Spray-Paint-some-sections-of-the-Christmas-Village

Stencil

Now for the stencil…I’ve used a Swiss Cross, but you can use whatever you like. A star, snowflake, heart… Whatever you come-up with really. I cut my stencil out of vinyl on my Silhouette CAMEO but you can either buy a pre-made stencil or create one of your own.

I put the two pieces of cut wood together and then place the stencil on top.

Stenciling-WhipperBerry-Christmas-Village

Then paint with your desired color. ALSO, don’t forget that you can use both the positive and negative parts of the stencil. That way you don’t have to waste anything!

IMG_5997

Peel-off the vinyl once it is dry and voilá… You have a stylish decorated building for your set.

WhipperBerry-Christmas-Village-1

You can also drill a hole into one of your buildings and add a star. I just glued a star ornament from Michaels to the top of a dowel and it fit perfect with the village.

I love this simple decor that is kid friendly. So many Holiday decorations are breakable and we’re constantly following the kiddos around telling them not to touch… With this simple Christmas Village they can touch and play with it all they want!

+ This was originally a guest post on 30 Handmade Days +

Airheads Drink Gems

0 · Nov 13, 2015 · Leave a Comment

+ This Airheads Drink Gems post brought to you by Airheads. All thoughts, ideas and opinions are my very own. +

Air-Heads-Drink-Gems-from-WhipperBerry

Picture this scene… You have a house full of 10 and 11 year old girls. They are looking for something fun to do.

You are scrambling to find something “cool” to do that won’t embarrass your daughter and force your family to enter the Middle School Protection Program and relocate the entire family to Cleveland (sorry friends in Cleveland… I’m sure it’s a lovely city! I just needed to pick a place.) They are hungry and thirsty and things are starting to escalate… Your “cool” factor is dropping dramatically.

You’ve never been there? Boy, I have! I have three girls and the last one just started Middle School this year and the fun has started all over again. Take it from and experienced tween Mom… You need to stock-up on Airheads so that you can up your “cool” factor higher than you can even imagine!

Airhead-Drinks-from-WhipperBerry-9

 If you have a room full of restless kiddos, pull out your Airheads, some cutting boards, rolling pins and some small cookie cutters or cupcake decorating tips and let them go to town.

You’ll be the coolest Mom in town if you teach them how to make Airhead Drink Gems. They will LOVE it, plus it will kill some time before you have to come-up with some other non-cringe worthy activity.

Here’s how you can look like a rockstar…

Airhead-Drinks-from-WhipperBerry-1

I used a fondant rolling pin, but any kind will work. Unwrap 3-4 Airheads of the same color, place them in a microwave safe bowl. Microwave for 5-8 seconds to soften them up. Kneed them in your hand to work them together. Lay them on a cutting board and then use small cookie cutters or a large cupcake decorating tip to cut out your shapes.

All you need to do is gather some clear class cups or jars and then affix them to the side of the glass.

Airhead-Drinks-from-WhipperBerry-8

They are easy to affix… All you need to do is slightly dampen a paper towel. Just like you would dampen a stamp, lightly r ub one side of your shape on the paper towel, slightly dampening it. Place it on the side of the glass and voilá, you’ve created your first Airhead Drink Gem!

Drink-Decor-with-Air-Heads-from-WhipperBerry-2

Let them go to town designing their own glasses, they’ll love it!

Drink-Decor-with-Air-Heads-from-WhipperBerry-3

Once they are finished you can add some clear soda or seltzer water to the glass and watch the dr  ink take on the color of the gems. This is RIGHT DOWN THEIR ALLEY! You’re officially a ROCK STAR!

If you want to be extra cool… You can help them make their own Airheads Straw as well.

Drink-Decor-with-Air-Heads-from-WhipperBerry-5

You can make all kinds of stuff with Airheads! For more fun ideas on how to craft with Airheads visit and follow them on Pinterest. To learn more about Airheads candy visit their website and follow them on Facebook, Twitter, Instagram, and YouTube!

Yes, even YOU can be a cool mom with Airheads!

Disclaimer // This post is sponsored by Airheads. All thoughts, ideas & opinions are my very own.

Airhead-Drinks-from-WhipperBerry-6

Old World Charm Christmas Tree

2 · Nov 1, 2015 · 3 Comments

+ This Old World Charm Christmas Tree post is brought to you by Michaels +

Old-World-Christmas-Charm-Tree-from-WhipperBerry

A few years ago my family was lucky enough to spend the month of December in Germany and France. We fell in love with the way they celebrate Christmas in Europe. They keep it simple, natural and all about family. I was enchanted with all of the simple decor that our friends in Germany used to decorate their homes.

Every year when the kiddos and I bring out the Christmas decorations we’ve always felt a little let-down, it just didn’t have that magical old world feel. It has been my dream to bring that same feeling to our home here in Lincoln.  This year is the year! I have been working on all kinds of fun simple projects to bring that old world charm to our home for the holidays.

The very first project and the heart of the Holiday home is the Christmas Tree.

Classic-Christmas-Tree-from--WhipperBerry-6

I started with the 7.5 ft Hartford Pine Christmas Tree from Michaels and then I found some fantastic natural wood elements that are perfect to create that rustic European look.

Classic-Christmas-Tree-from--WhipperBerry-12

I added all kinds of texture with sprigs of berries and pine cones, perfect for that old world look. Michaels has these fun metal ornaments that you can decorate with all kinds of goodies. I wanted to keep the natural feel so I glued some wooden snowflakes in some and added some buffalo check ribbon to a few and it looked perfect.

Classic-Christmas-Tree-from--WhipperBerry-10

I even drilled some holes in some candles from Michaels and fed some floral wire through the hole and wired them onto the tree to get that true old world feel. We won’t light them of course, they are just there for the effect.

Classic-Christmas-Tree-from--WhipperBerry-11

I LOVE how this simple tree turned out. At the base of the tree I added a sign that I had painted to add a little pizzaz before the tree gets filled with presents.

Classic-Christmas-Tree-from--WhipperBerry-8

So what’s your dream Christmas? Do you like old and rustic or are you all glitter and glam?

  Inspired to start decorating your own tree? Make sure you visit Michaels’ blog, The Glue String, to see the other 49 Michaels Makers’ dream holiday trees that were created this year.

  • From now until November 14, you can get FREE shippingon all Christmas trees that are 6ft or taller on Michaels.com!
  • If you’re just getting started on your holiday decor, you can also check out some of the ornament projects and tutorials available on Michaels.com.

Disclaimer // This post is brought to you by Michaels however, all thoughts and ideas are my very own.

An InLinkz Link-up


  • « Go to Previous Page
  • Page 1
  • Interim pages omitted …
  • Page 15
  • Page 16
  • Page 17
  • Page 18
  • Page 19
  • Interim pages omitted …
  • Page 43
  • Go to Next Page »

Primary Sidebar

Heather from Whipperberry
Hello... my name is Heather and I'm the creator of WhipperBerry a creative lifestyle blog packed full of great recipes and creative ideas for your home and family. I find I am happiest when I'm living a creative life and I love to share what I've been up to along the way... Come explore, my hope is that you'll leave inspired!

Footer

  • Privacy Policy
  • Crafts
  • Food
  • Gifts
  • Holidays
  • Home
  • Mom Life
  • Recipes
  • Travel

Copyright © 2026 · Seasoned Pro