• Skip to primary navigation
  • Skip to main content
  • Skip to primary sidebar
  • Skip to footer

Whipperberry

WhipperBerry • Your Home For Creative Inspiration

  • Home
  • Recipes
    • Starters
    • Easy Weeknight Dinners
    • Main Dish
    • Salads
    • Side Dish
    • Soups & Stews
    • Desserts
    • Breakfast
    • Miscellaneous
  • Tutorials
    • Creative Crafts
    • DIY Decor
    • Fabric Crafts
    • Food How-To
    • Jewlery
    • Paint Projects
    • Paper Art
    • Party Styling
    • Photography and Graphic Design
    • Silhouette
  • Holidays
    • Easter
    • Mother’s Day
    • Father’s Day
    • 4th of July
    • Halloween
    • Thanksgiving
    • Christmas
    • Valentine’s Day
  • Gift Ideas
    • Gifts For Everyone
    • Gifts for Dad
    • Mother’s day
    • For The Girls
    • For The Kids
    • Teacher Gift Ideas
    • Christmas
  • Printables
    • Holiday
    • Gift Idea
    • LDS Primary
  • Travel
  • About
    • Terms
  • Contact
  • Nav Social Menu

    • Facebook
    • Instagram
    • Pinterest
    • RSS
    • Twitter

Crafts

DIY Jingle Bell Ornaments

29 · Dec 9, 2013 · 8 Comments

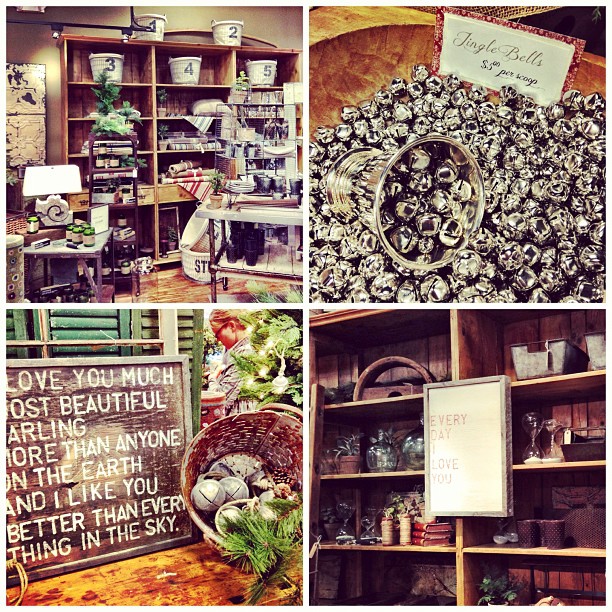
DIY Jingle Bell Ornaments // One of my favorites at this time of year are jingle bells! I love the songs, the stories and the bells themselves. One time last year I walked into a beautiful shop in Colorado called Old Glory Antiques and they had a giant rustic German bread bowl FULL of jingle bells…  I was in Heaven! Here is my Instagram collage of the place…

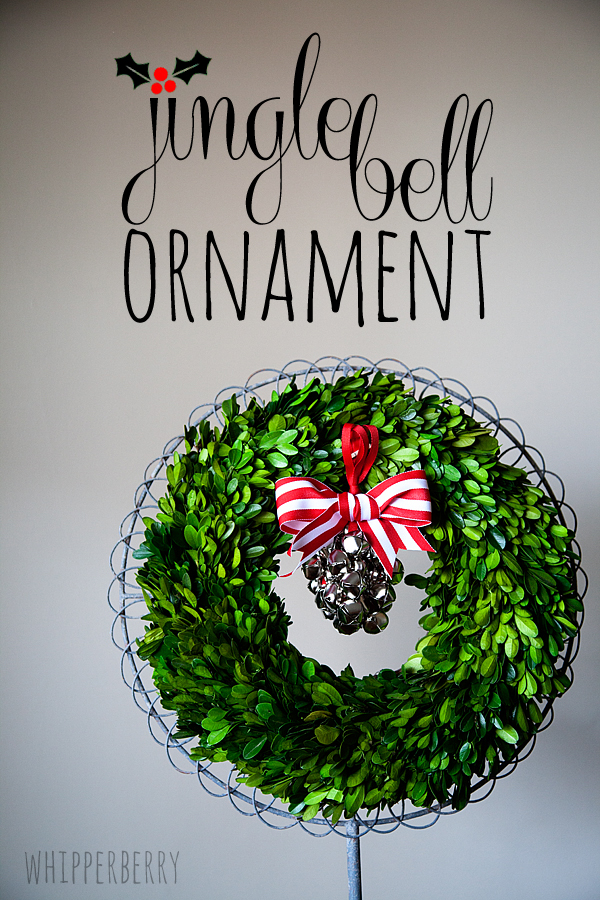
I knew I had to make something with jingle bells. It needed to be beautiful and easy to make, so I created my DIY Jingle Bell Ornament…

WhipperBerry Jingle Bells Christmas Ornament-2

DIY Jingle Bell Ornament Supplies

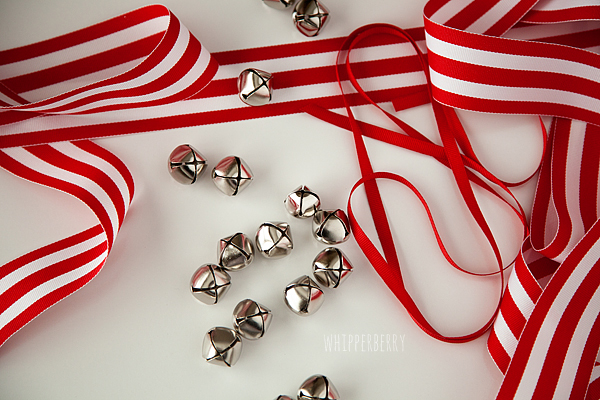
48 inches of red 1/4″ wide grosgrain ribbon

24 inches of 2″ wide decorative ribbon

41 medium size jingle bells

2 inches of masking tape

hot glue or floral wire

WhipperBerry Jingle Bells Christmas Ornament-4

DIY Jingle Bell Ornament Directions

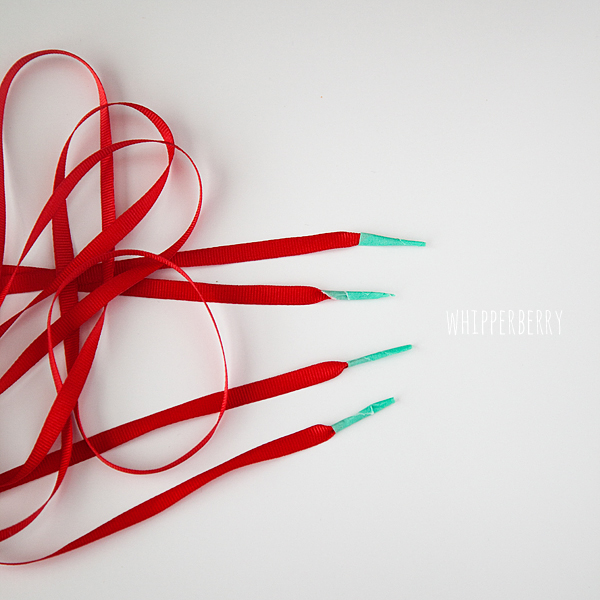
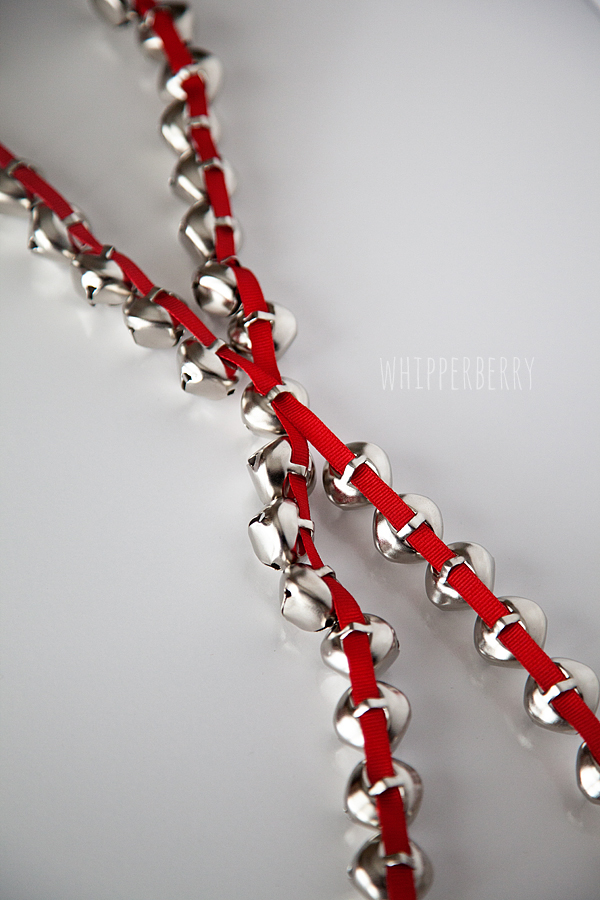
Take your 48 inches of small red ribbon and cut in half (24 inches.) Then using the masking tape place little pieces of tape around all four ends. You are essentially making needles at each end of the ribbon. This will make it easier to feed the bells onto the ribbon.

WhipperBerry Jingle Bells Christmas Ornament-8

Take one of the bells and feed it onto both of strands of ribbon.

WhipperBerry Jingle Bells Christmas Ornament-9

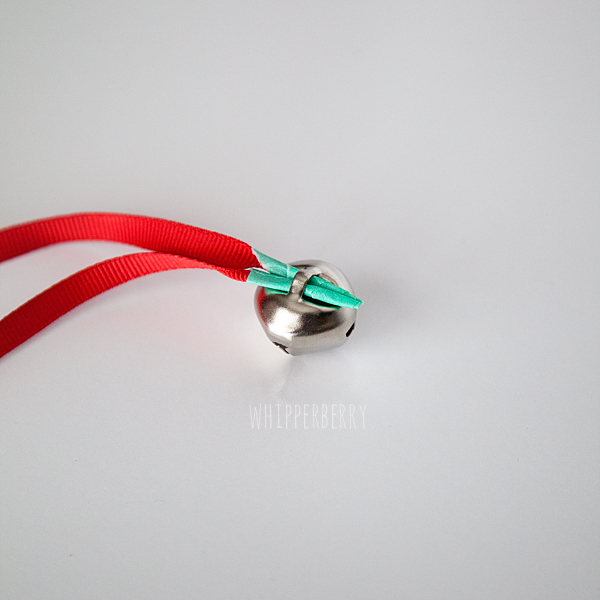
This is going to be your center bell so, pull it to the middle of both of the ribbons.

WhipperBerry Jingle Bells Christmas Ornament-10

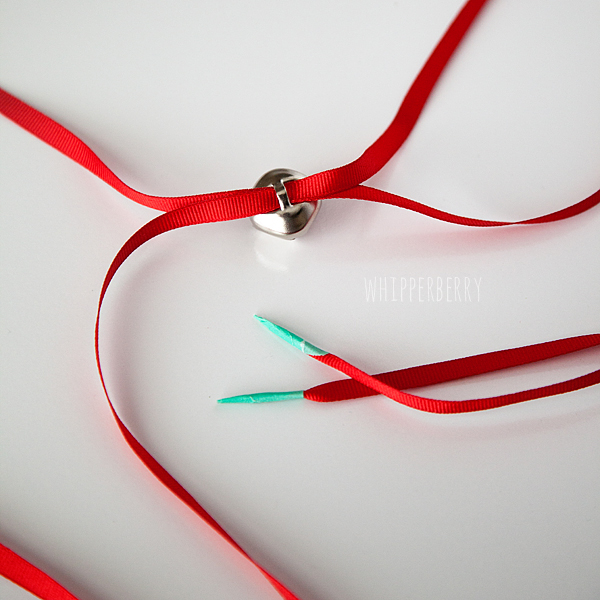
Next, spread out the four different ends and add one bell to each end and pull to the center.

WhipperBerry Jingle Bells Christmas Ornament-11

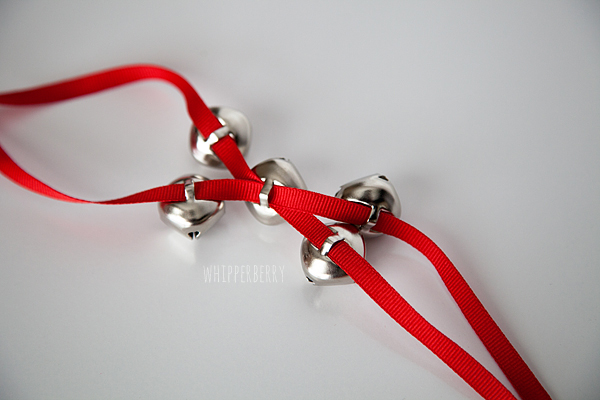
Now all you have to do is continue to add bells to each strand. Ten total on each strand.

WhipperBerry Jingle Bells Christmas Ornament-12

Now, scrunch them down so that they are over lapping and close to the center.

WhipperBerry Jingle Bells Christmas Ornament-13

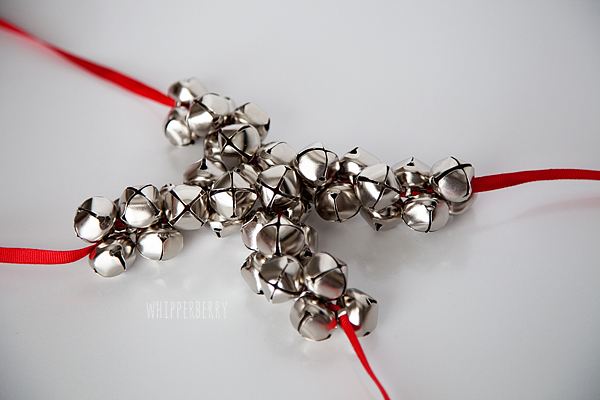
Gather each of the ribbons together and arrange the bells to your liking and then gather the ribbon together and tie with a large loop at the top.

WhipperBerry Jingle Bells Christmas Ornament-14

Make sure the knot is really tight and then trim the ends pretty close to the knot.

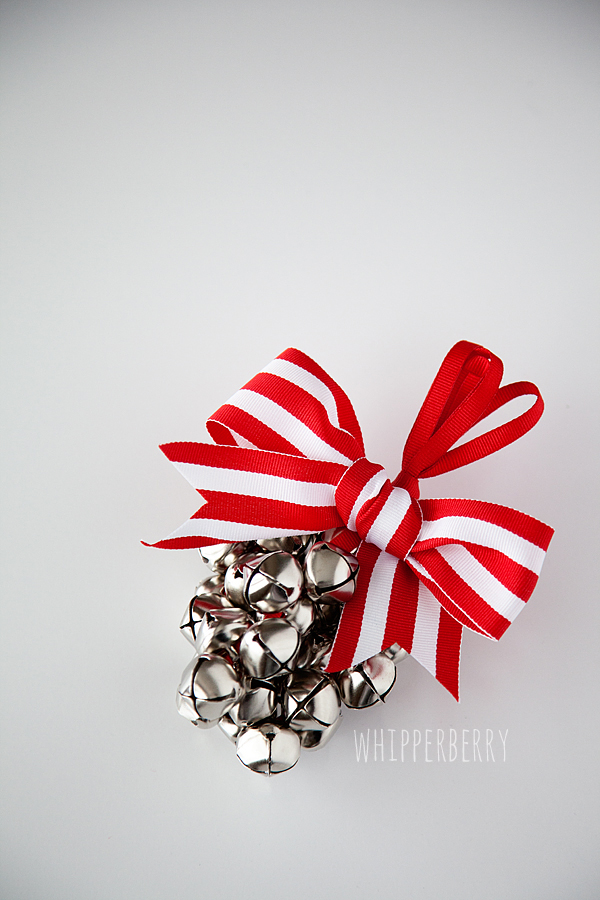
Tie a bow with the large ribbon and either hot glue the ribbon to the knot or use floral wire to wire it to the knot. I don’t actually tie the bow on the ornament because of the bulk of the wide ribbon. Voilá, you are finished!

WhipperBerry Jingle Bells Christmas Ornament-15

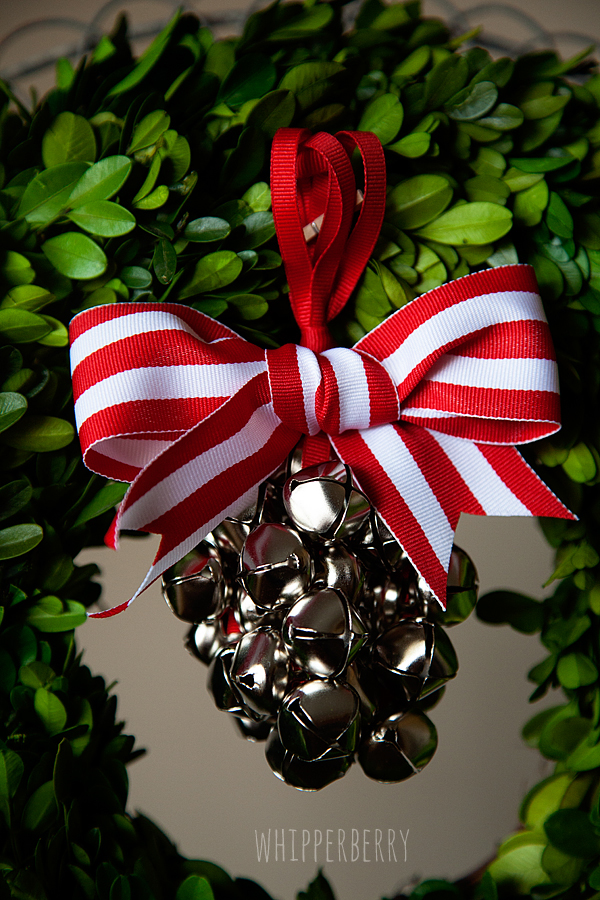
It’s perfect for your Christmas tree, they are so easy, you can make a whole bunch for your tree. Or,  you can use it to decorate a wreath. Either way, it’s super fun.

WhipperBerry Jingle Bells Christmas Ornament-3

What’s your favorite holiday item? Are you a jingle bell lover too?


3e8798cc375a11e28ac522000a9f141e_7


Want more do-it-yourself Christmas ideas? Get them below.

Hanging with My Gnomes Wreath


DIY Paper Fan Photo Ornaments

57 · Dec 8, 2013 · 7 Comments

 
Hello everyone! December snuck up on me…but I'm grateful Heather is so sweet to still share my photo ornament project! Hopefully some of you are like me, and still doing holiday crafting and decorating. Anyone? Buhler?? haha! I love subtly incorporating photos into decor…as seen here. 🙂 I made quite a few photo ornaments this year…and hope to carry on the tradition in years to come, making just a few more ornaments each year to add to the collection, displaying sweet winter memories.
 
Supplies you'll need:
Cardstock (I used gold glitter cardstock from Joann Fabric & Craft)
White Cardstock (or whatever color you'd want to frame/outline your photo)
Hot glue gun (with extra glue!)
Scissors
String/twine/yarn
Photos!
 
You can print/create your circular photos a few different ways:
–> I used two apps on my phone–Afterlight to get the photos into frames, then Diptic to put the circular photos into a collage (I put one picture in one part of the two-picture collage, and printed them out as 4×6's)
–> Print a bunch of photos (I liked mine black and white) and then use a cup or something circular to trace circles onto the photos….just make sure they're as uniform as possible.
–> Or you can use an online photo editing site like PicMonkey to create the circular pictures.
 
Then cut!
 
You'll want to reinforce the sturdiness of the photo by hot glueing the photos to card stock, then cut them out again (I left a thin frame/outline around the edge).


To create the paper fans, I used a tutorial Heather actually shared a few years ago over on the lovely Stephanie Lynn's blog, Under The Table and Dreaming. 🙂 Go here to see the how-to. Just be sure that the width of the paper strips you cut out (you'll need two strips per ornament) are a little more than what the radius (half the width) is of your circular photo.
 
Heather's tutorial for the paper fan has you glue a piece of paper to back, which I did here–and I wrote the month/year of the photo that would be on the front. And with the thicker card stock paper, I needed more than just a drop of glue, so I put about 3 or 4 circle/swirls of hot glue (moving quickly, as it dries fast) on each cut-out circle and pressed them onto the paper fan and held for a few seconds to make sure it was secure. 
**A photo is hot glued on the back of the lower fan already…that way I didn't have to hold it for the picture I was taking. But you'll need to hold it tight and flat on your work surface until you hot glue your paper to it.
 
Then you'll hot glue the photos…it's coming together! Again, quickly swirling the hot glue around the back of the paper/photo to make sure there is good coverage, then press it onto the paper fan and give it a good rub down to make sure it stays put. 😉 


Next, put the "hangers" on. I just cut pieces of the string/twine and, with a dab of hot glue, glued the two ends to the back, in one of the folds). And I used a pen to push the string down and get it nice and stuck in the glue. Remember to make sure you're putting the loop at a spot in the back where, when it hangs, the picture will be straight. 🙂 
 
Voila!!


Then trim your tree and deck yours halls!! I used ours as ornaments…but I'm thinking I may make more and create a garland for over our mantle. Lots and lots of possibilities. 🙂
 

Thank you Heather! And thank you WhipperBerry readers! Happy Holidays everyone!

 
xo
Haley
 
PS – Here are a couple Christmas projects I shared last year:
 
Go here for our Christmas box advent calendar…love this magical season and the sweet traditions that come with it!! 
 
Go here for stencils to create these Christmas photo booth props. We used them for our Christmas card, as well as at an Ugly Sweater party and a company holiday party! SO FUN.

Free Printable Christmas Countdown and Wood Clipboard Tutorial

0 · Nov 26, 2013 · 3 Comments

Hi all!  It’s Jenn from My Fabuless Life.  I’m SO excited that the Christmas season is HERE, and even more excited to share a little printable Christmas Countdown project with all of you.  If you follow me on my blog, you already know that I’m a sucker for all things counting down to the big Holiday, so this is one of several advent calendars that I have around my house.  
 
 
All you’ll need for this project is:
* a block of wood (mine is 8×10, purchased from a local woodcraft store, but you can easily use whatever scraps you have lying around, or even a picture frame).
*a metal clip or clothespin
*the printables I’ve provided for you at the end of the post
 
I sanded and rounded out the edges of my wood block, and then stained it with my favorite stain (Early American from Minwax).  Once the stain was dry, I sanded the edges again to give them a more aged look,
then I hot glued the clip on in the center of the wood. 
 
 
To give the cards a little something extra, I colored the edges with a red marker. 
 
 
This would be a really fun project with a picture frame too.  Just put some pretty paper inside the frame, and glue the clip to the glass on the frame.  
 
 
{DOWNLOAD FILES HERE}
 

Enjoy!  And happy Holiday decorating!  You can get details on my full Christmas display (including details on the coordinating "Merry & Bright" print) over at My Fabuless Life.


Or you might enjoy a few of these other Christmas projects:

Gold & White Nativity / Holiday Table Decorating Tips / $20 Handmade Tree 


From Napkin Rings to Beautiful Wreaths, Five Festive Ornament Frame Ideas

11 · Nov 24, 2013 · 11 Comments

This post brought to you by Michaels Craft Stores // I have always been a fan of the Ornament Frame, they are just perfect for creating all kinds of goodies for the holidays. I've given them as personalized gifts for years. This year, Michaels challenged me to come up with FIVE different "out of the frame" ideas for crafting with ornament frames.

Merry Christmas Banner

We will start with my Merry Christmas banner. This one was last minute inspiration, but turned out to be one of my favorite projects. I used my Silhouette Portrait to cut letters out of gold vinyl and then affixed it to the face of the frame. Then, this is the good part… I found these super cute gift bags at Michaels that I just fell in love with. I thought they would be a great background for the letter frames to make a fun banner. SUPER cool and SUPER easy to make. You don't have to cut any paper just use the bag as is as your banner background! 

Michael's Mini Frames #justaddmichaels-6

This year's hot trend is using both silver and gold together so, I thought the silver frames would look fantastic with the gold accents.

Michael's Mini Frames #justaddmichaels-4

The banner looks perfect in my new GIANT shadow box…

Michael's Mini Frames #justaddmichaels-5

Personalized Napkin Rings

Chalkboard Napkin Rings-5 #justaddmichaels

This idea was super simple and will add a little flair to your holiday table. Just use a little chalkboard paint on the face of the frame to make a chalkboard surface. Glue the frame onto a basic napkin ring and you're set.

Michael's Mini Frame napkin rings #justaddmichaels

Use a chalkboard maker to personalize your stylish napkin rings. You can even use a 3D Glue Dot to temporarily affix your frame to the napkin ring. At the end of the night, add the ribbon back and send the ornament home with your guests as a party favor.

Decorative Wall Art

Michael's Mini Frames #justaddmichaels-7

This piece was so fun to make. I again employed my Silhouette Portrait to help with this project. I cut several holiday images out of their gold vinyl and affixed it to the face of the frames. Then I glued the frames to an inexpensive silver charger that I found at Michaels. I LOVE how this turned out!!

Michael's Mini Frames #justaddmichaels-8

Accent Element

Michael's Mini Frames #justaddmichaels-2

This one is SIMPLE… I used one of the ornament frames to add a little accent element to a sign that I had created. Again, I used my Silhouette to cut the 2013 out of gold vinyl and affixed it to the frame. It was a great addition to my shadow box display…

Michael's Mini Frames #justaddmichaels-1

Personalized Gift Tag

Michael's Mini Frames #justaddmichaels-10

Last, but not least… I created a decorative gift tag that can be used over and over and over. I used one of those cute tiny gift bags that I had left over from the banner, cut it to size and then placed that inside the frame. You can then use dry erase or chalkboard makers to write the name on the tag and voilá, you have a stunning gift tag that anyone will love!

Well… there you have it. 5 different ways to create with a simple ornament frame. Did that get your imagination running? What would you make? Take a little time to "think outside the frame" and create something fun with some ornament frames!

Disclaimer // This post was sponsored by Michaels Craft Stores. I receive product from Michaels in order to create the projects in the post. 

  • « Go to Previous Page
  • Page 1
  • Interim pages omitted …
  • Page 20
  • Page 21
  • Page 22
  • Page 23
  • Page 24
  • Interim pages omitted …
  • Page 43
  • Go to Next Page »

Primary Sidebar

Heather from Whipperberry
Hello... my name is Heather and I'm the creator of WhipperBerry a creative lifestyle blog packed full of great recipes and creative ideas for your home and family. I find I am happiest when I'm living a creative life and I love to share what I've been up to along the way... Come explore, my hope is that you'll leave inspired!

Footer

  • Privacy Policy
  • Crafts
  • Food
  • Gifts
  • Holidays
  • Home
  • Mom Life
  • Recipes
  • Travel

Copyright © 2026 · Seasoned Pro