• Skip to primary navigation
  • Skip to main content
  • Skip to primary sidebar
  • Skip to footer

Whipperberry

WhipperBerry • Your Home For Creative Inspiration

  • Home
  • Recipes
    • Starters
    • Easy Weeknight Dinners
    • Main Dish
    • Salads
    • Side Dish
    • Soups & Stews
    • Desserts
    • Breakfast
    • Miscellaneous
  • Tutorials
    • Creative Crafts
    • DIY Decor
    • Fabric Crafts
    • Food How-To
    • Jewlery
    • Paint Projects
    • Paper Art
    • Party Styling
    • Photography and Graphic Design
    • Silhouette
  • Holidays
    • Easter
    • Mother’s Day
    • Father’s Day
    • 4th of July
    • Halloween
    • Thanksgiving
    • Christmas
    • Valentine’s Day
  • Gift Ideas
    • Gifts For Everyone
    • Gifts for Dad
    • Mother’s day
    • For The Girls
    • For The Kids
    • Teacher Gift Ideas
    • Christmas
  • Printables
    • Holiday
    • Gift Idea
    • LDS Primary
  • Travel
  • About
    • Terms
  • Contact
  • Nav Social Menu

    • Facebook
    • Instagram
    • Pinterest
    • RSS
    • Twitter

Crafts

Michaels Dream Tree Challenge 2018

23 · Nov 1, 2018 · 2 Comments

+ This post brought to you by the amazing folks at Michaels +

I am beyond honored to be able to participate in the Michaels Dream Tree Challenge again this year. I LOVE getting to put together my perfect tree and share what I’ve created with you guys. This year’s tree is standing majestically in our entryway and it looks beautiful!! I love how Michaels makes it so easy to create a cohesive holiday look. Michaels holiday décor collections make it easy to find your holiday style and bring your vision to life! From the perfect tree and trimmings to creative gifts and DIY supplies, Michaels has all the ingredients to create wonder-filled memories for family and friends.

DIY Farmhouse inspired Christmas Tree for the @michaels Dream Tree Challenge - WhipperBerry

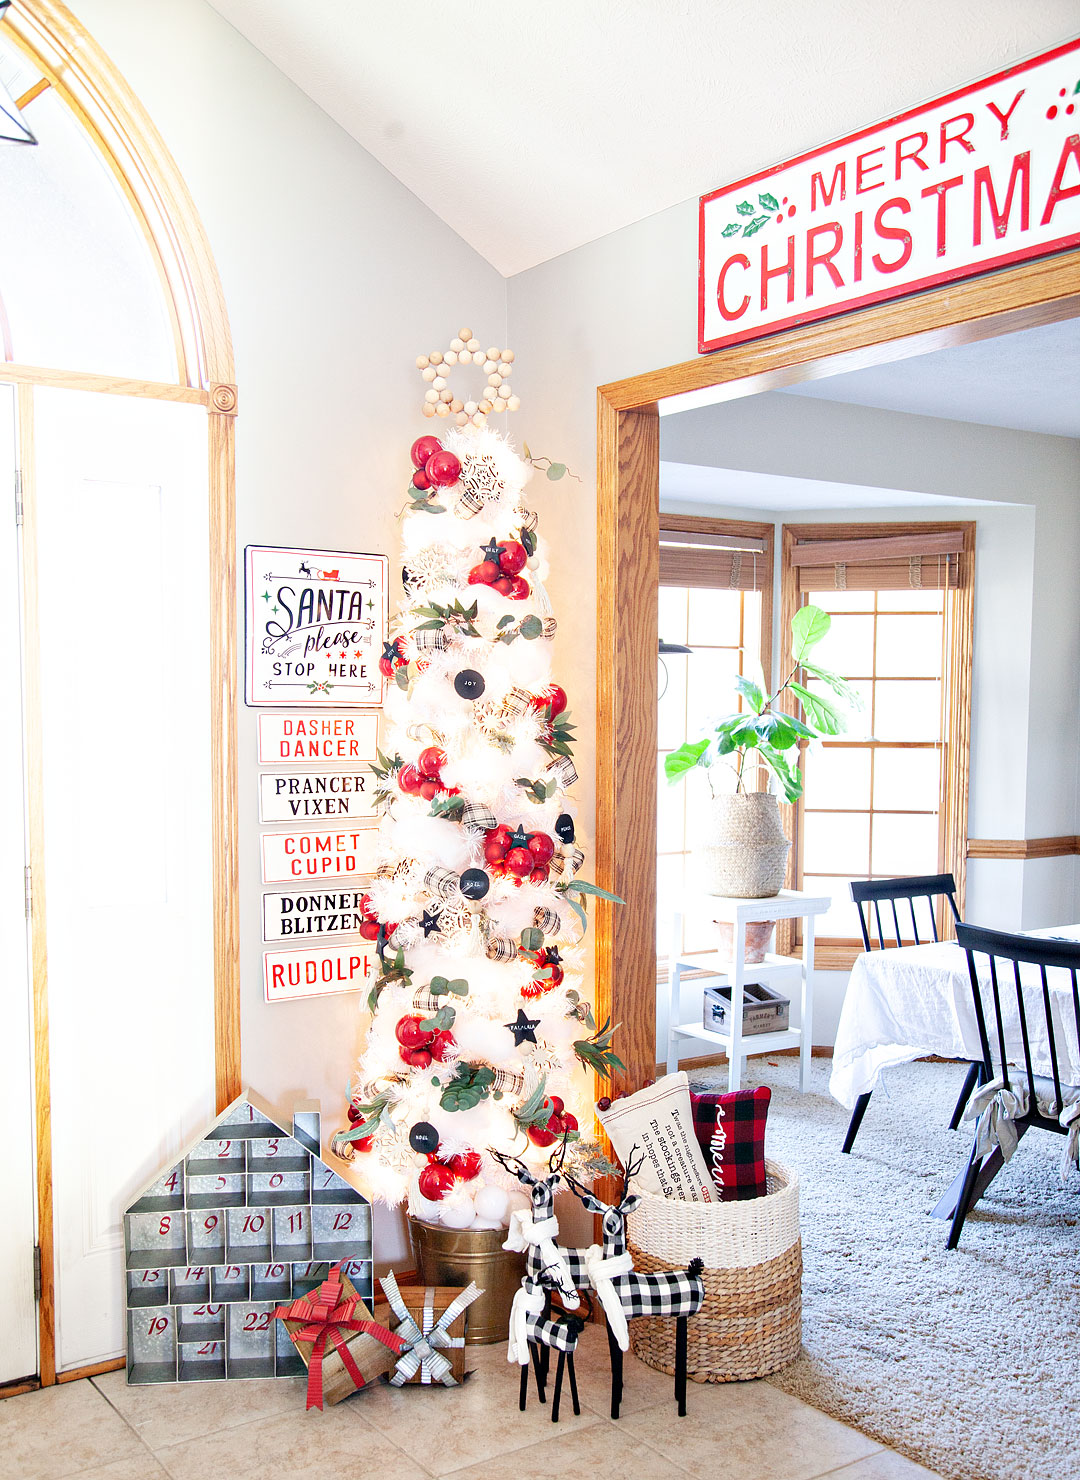
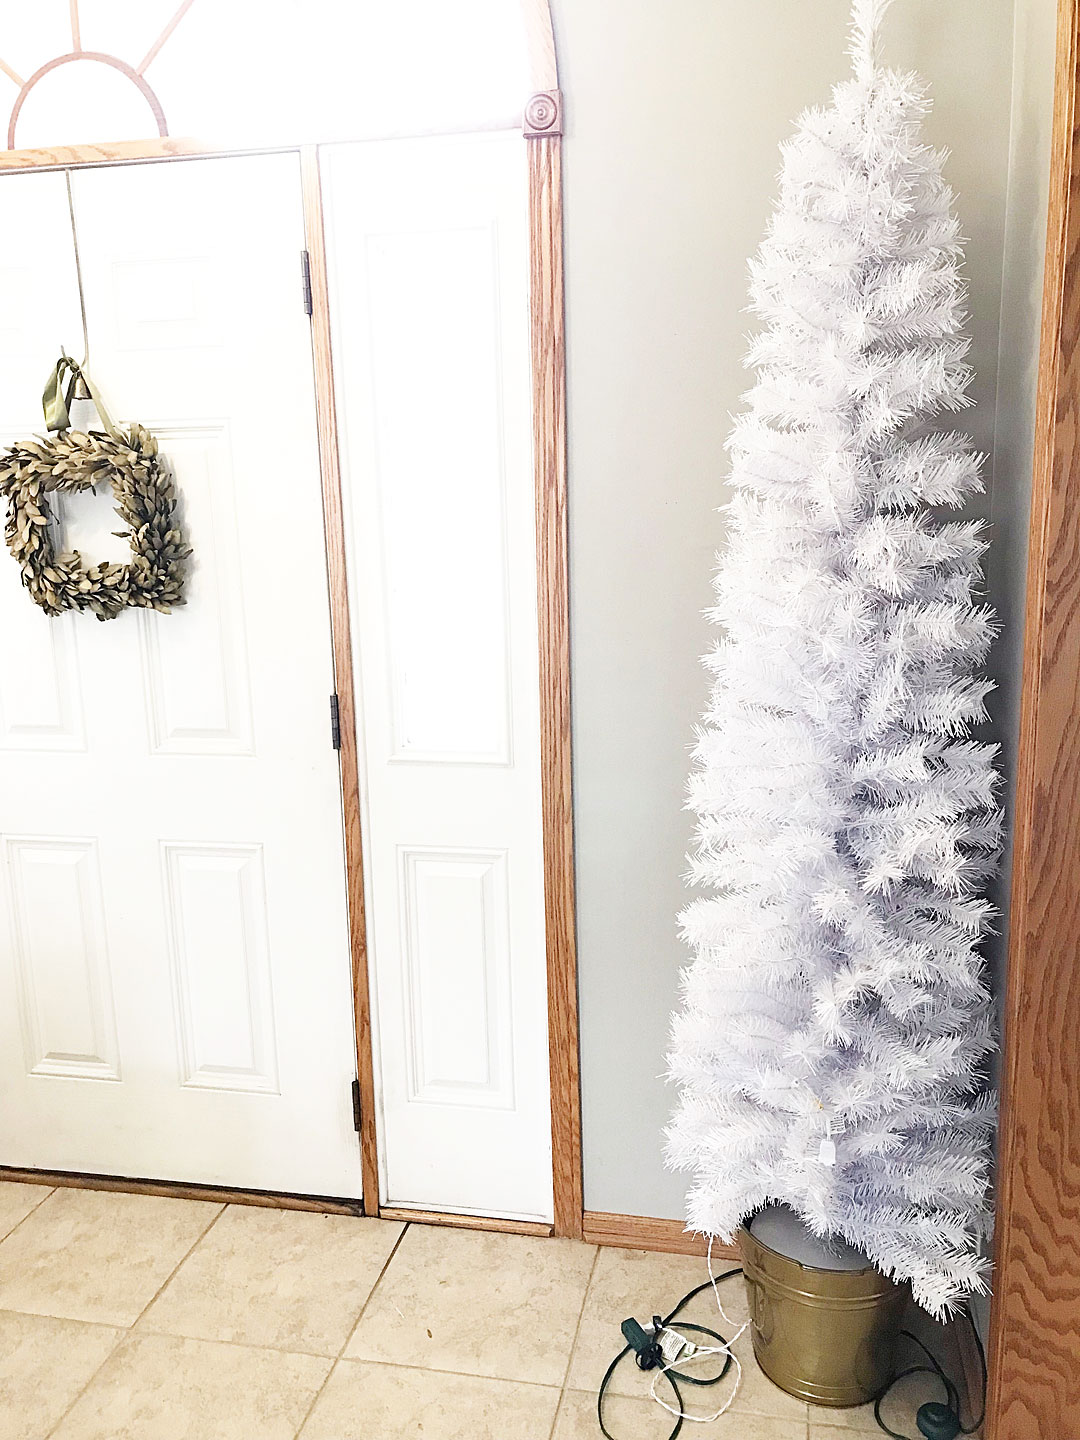
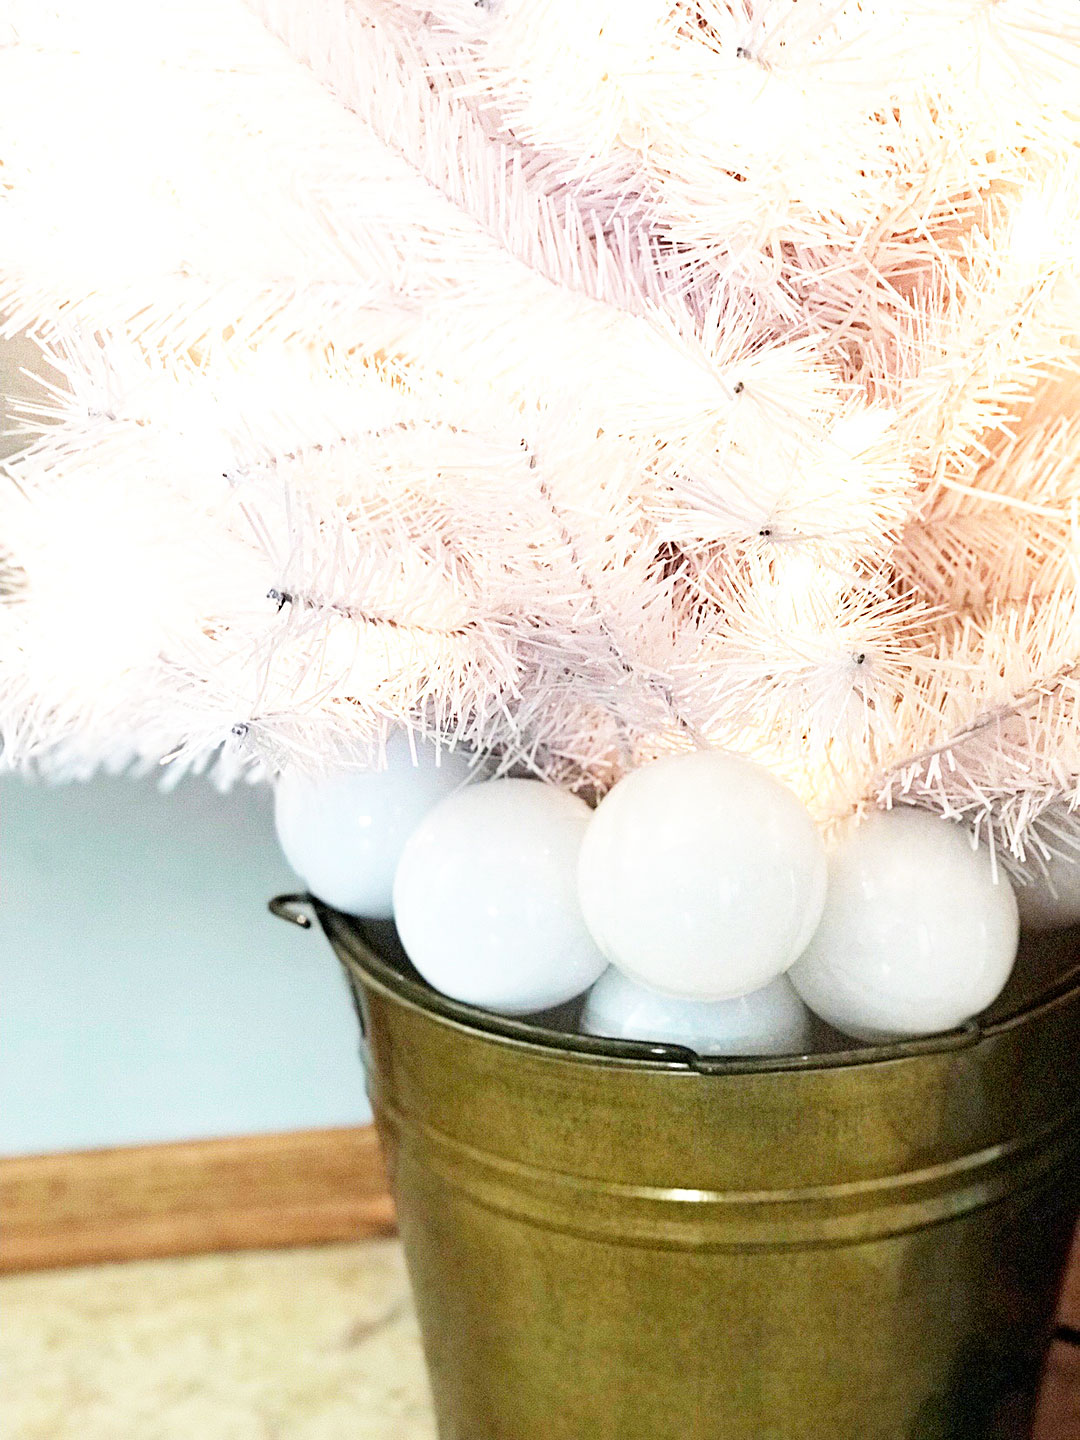
I had so much fun working on this tree! Several of the decorations on the tree were made with inexpensive items that you will find at Michaels that have been crafted into something simple and timeless for the tree. For example, we’ll start at the base of the tree and work our way up. I purchased this bucket at Michaels a little while ago and spray painted it a bronze-like gold and that is what I am using for my tree stand. I removed the official tree stand from the tree and fill the bucket with styrofoam cake rounds from Michaels to secure the tree in place. Then I filled the bucket the rest of the way up with matte white Christmas balls.

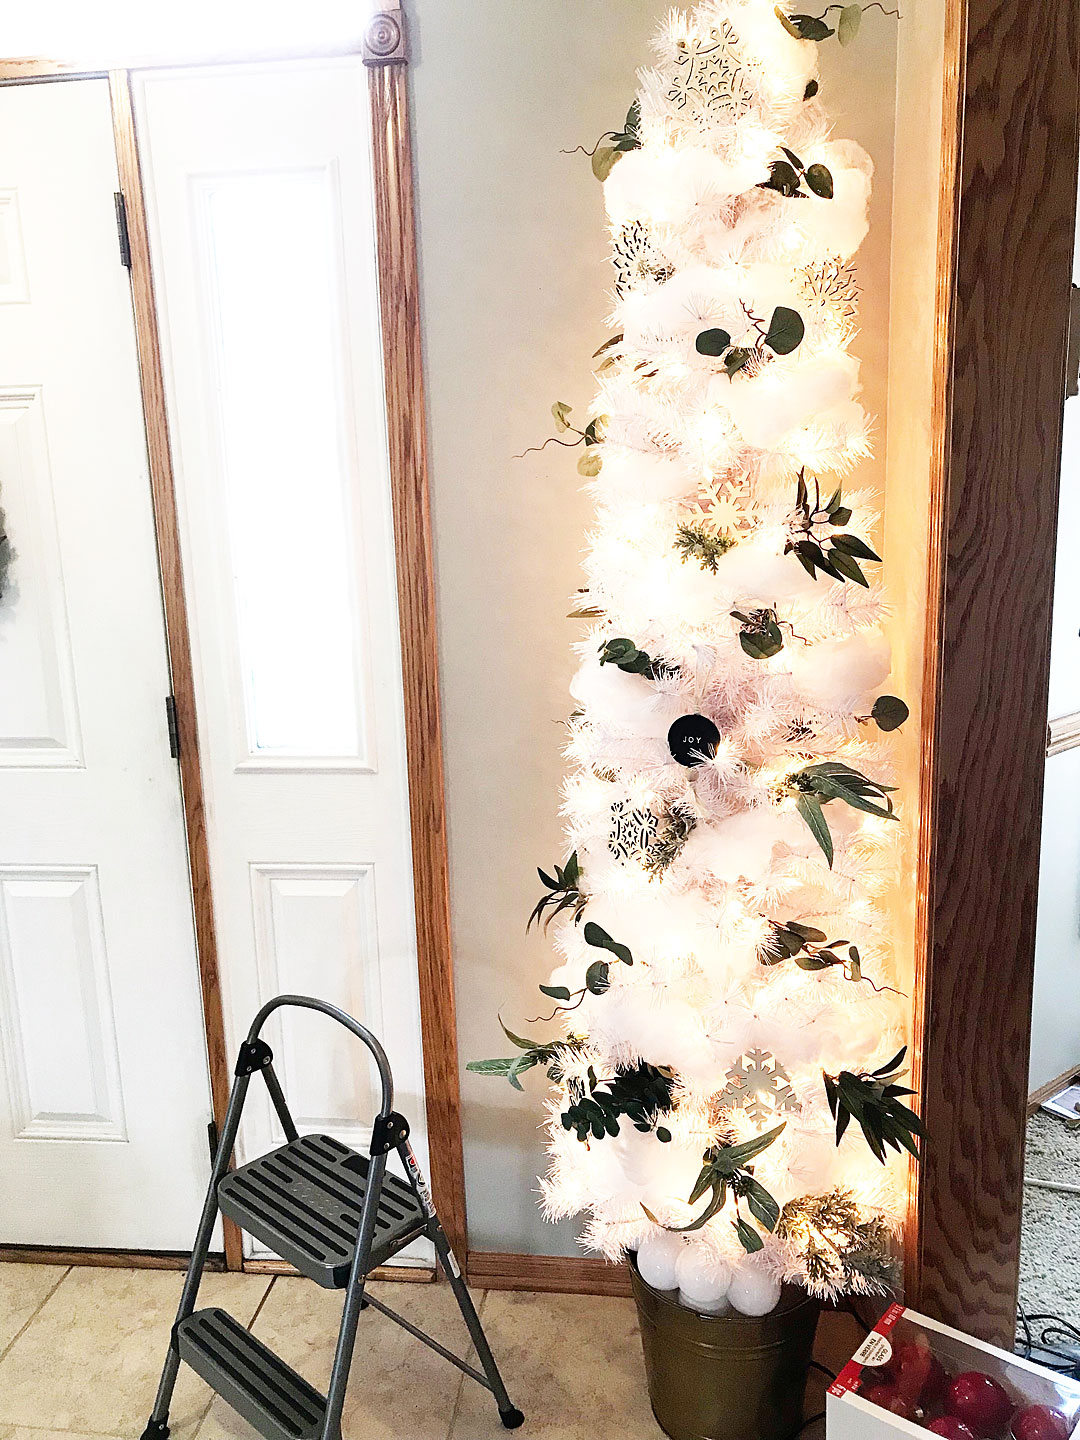
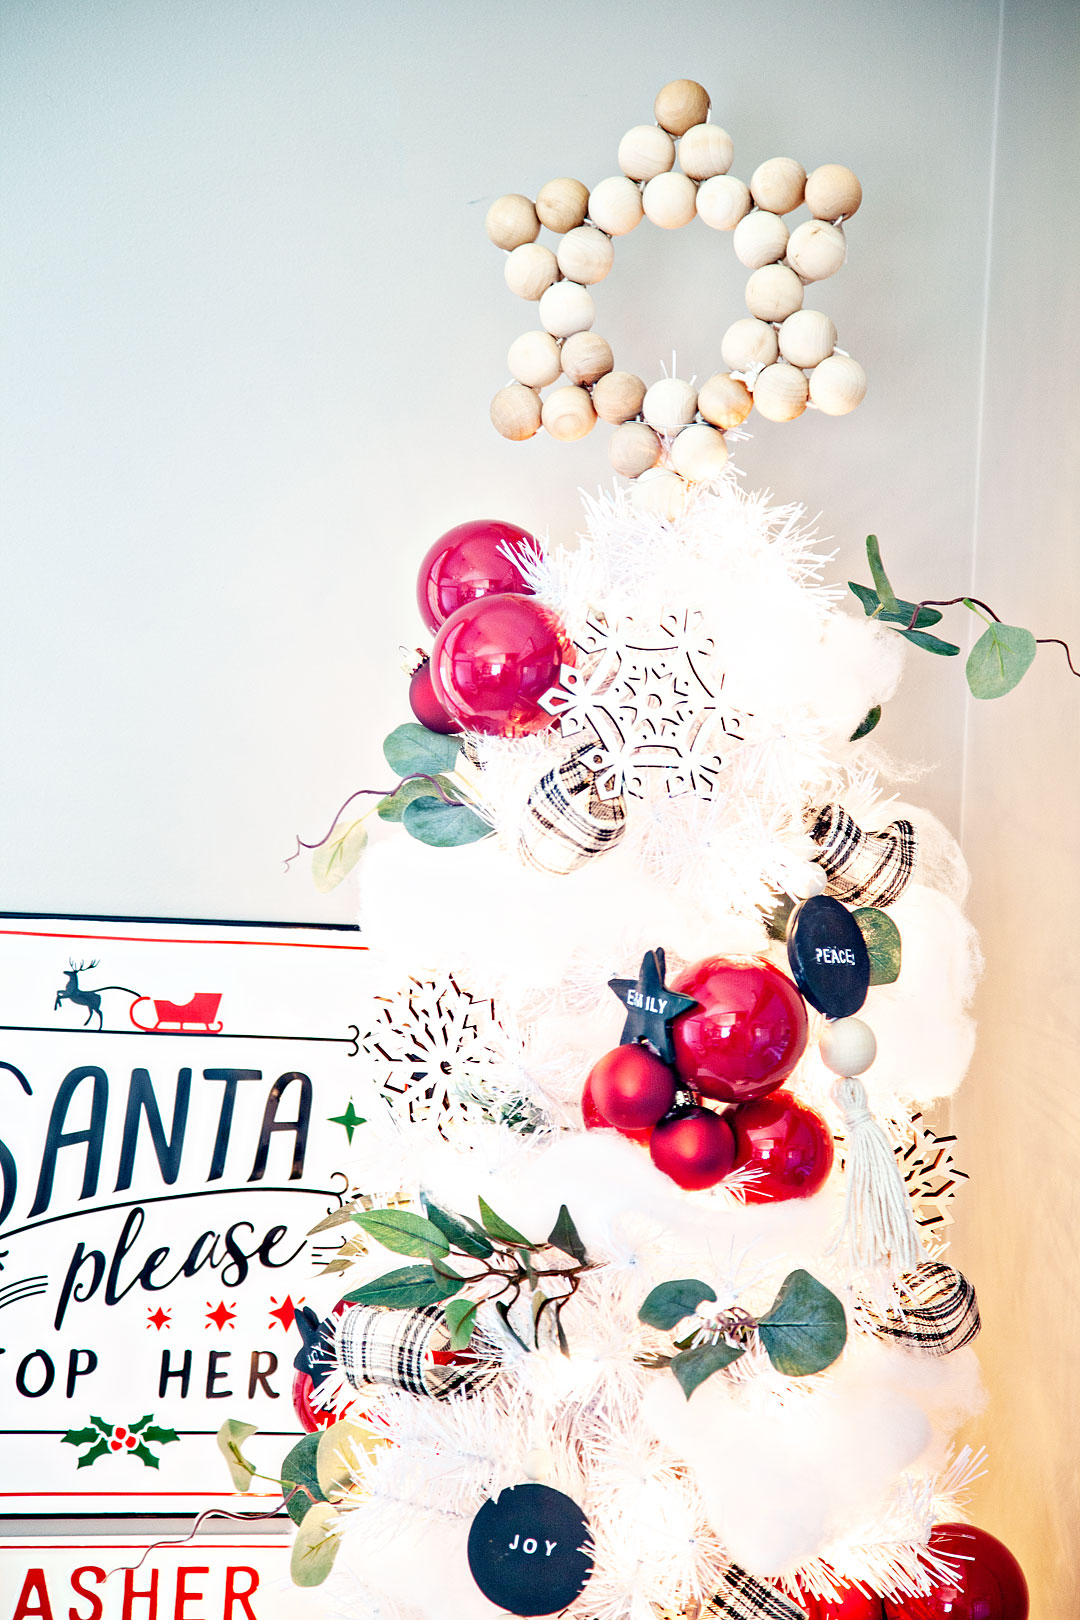
I wanted the tree to look nice and full regardless of the fact that it is a pencil tree so I filled in the tree with batting to make it look like it has been out in a glorious winter snowfall.


It’s crazy how the batting can add so much to the look of the tree. I wanted this tree to have a farmhouse style and what’s more farmhouse than some greenery? I wanted to think a little outside of the box and add greenery that isn’t the typical evergreen that you find during the holidays. I opted for different types of eucalyptus and some other basic greenery that you can find in the Michaels floral isles. I also tucked some wood snowflakes in as a base element for the tree.

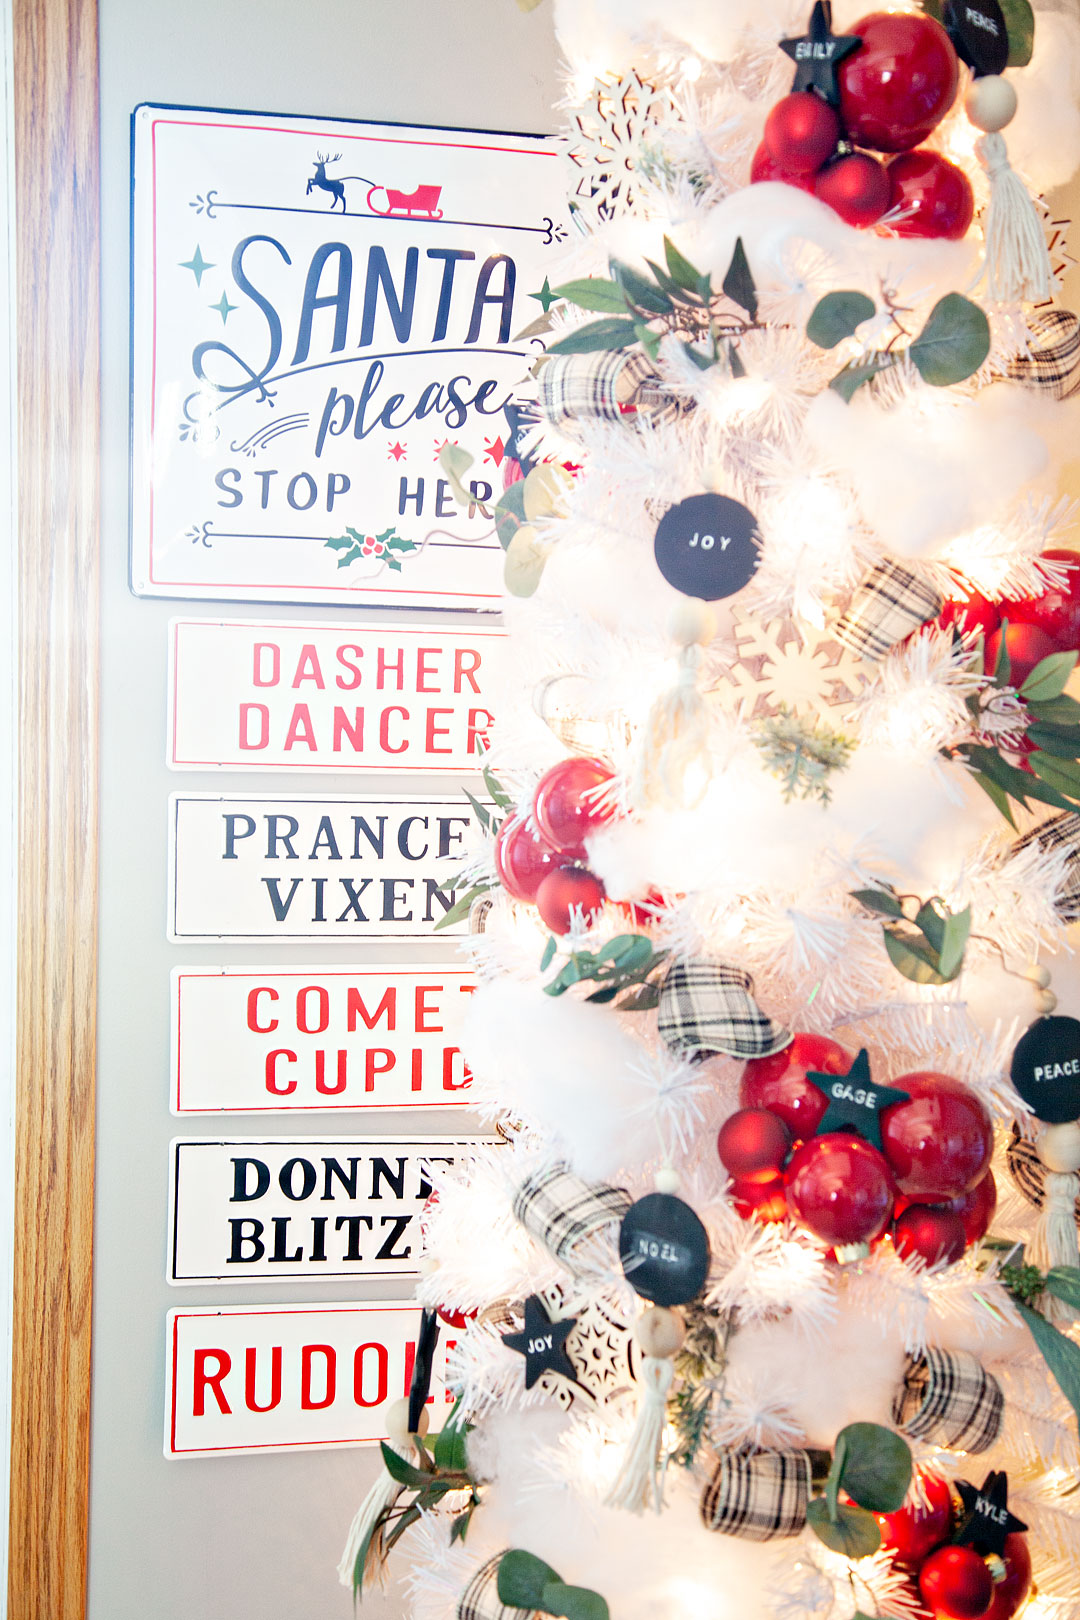
Now for the extra fun part! This year I made my own clay ornaments out of oven-baked clay that you can find at Michaels.

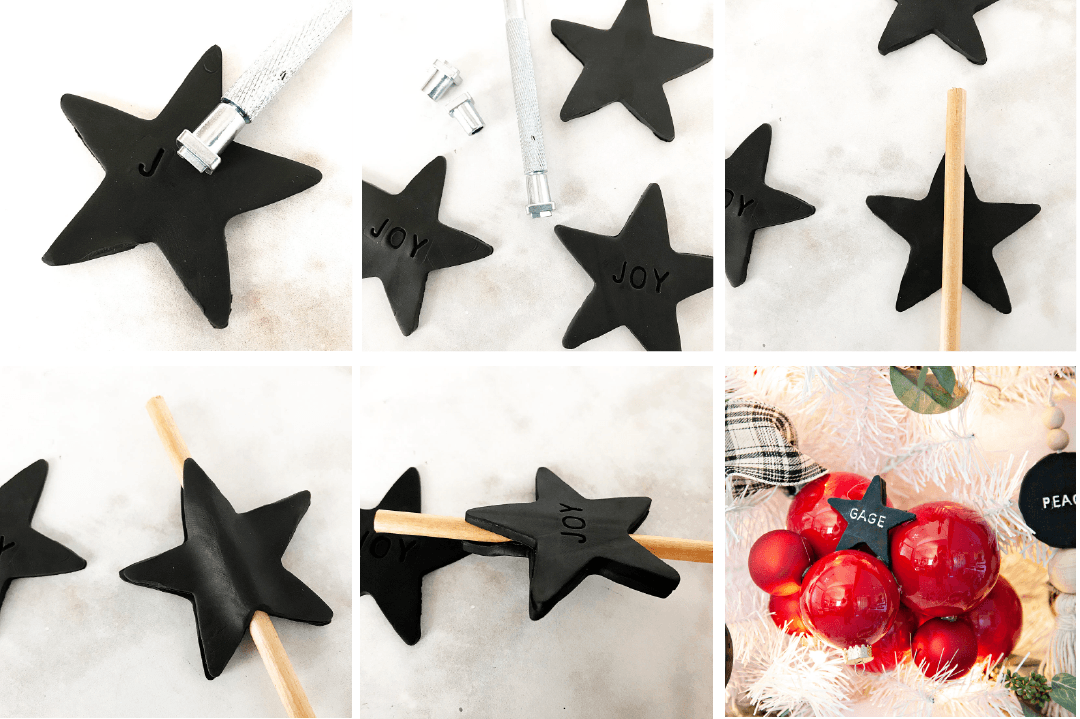
I rolled out the clay and cut out stars and circles with cookie cutters that I found at Michaels. Then, I used a leather alphabet stamp set to imprint words into the clay. I will have a full tutorial on how to make these fun ornaments in the next few days. Stay tuned!

One of my favorite parts of the tree are the ball ornament clusters.

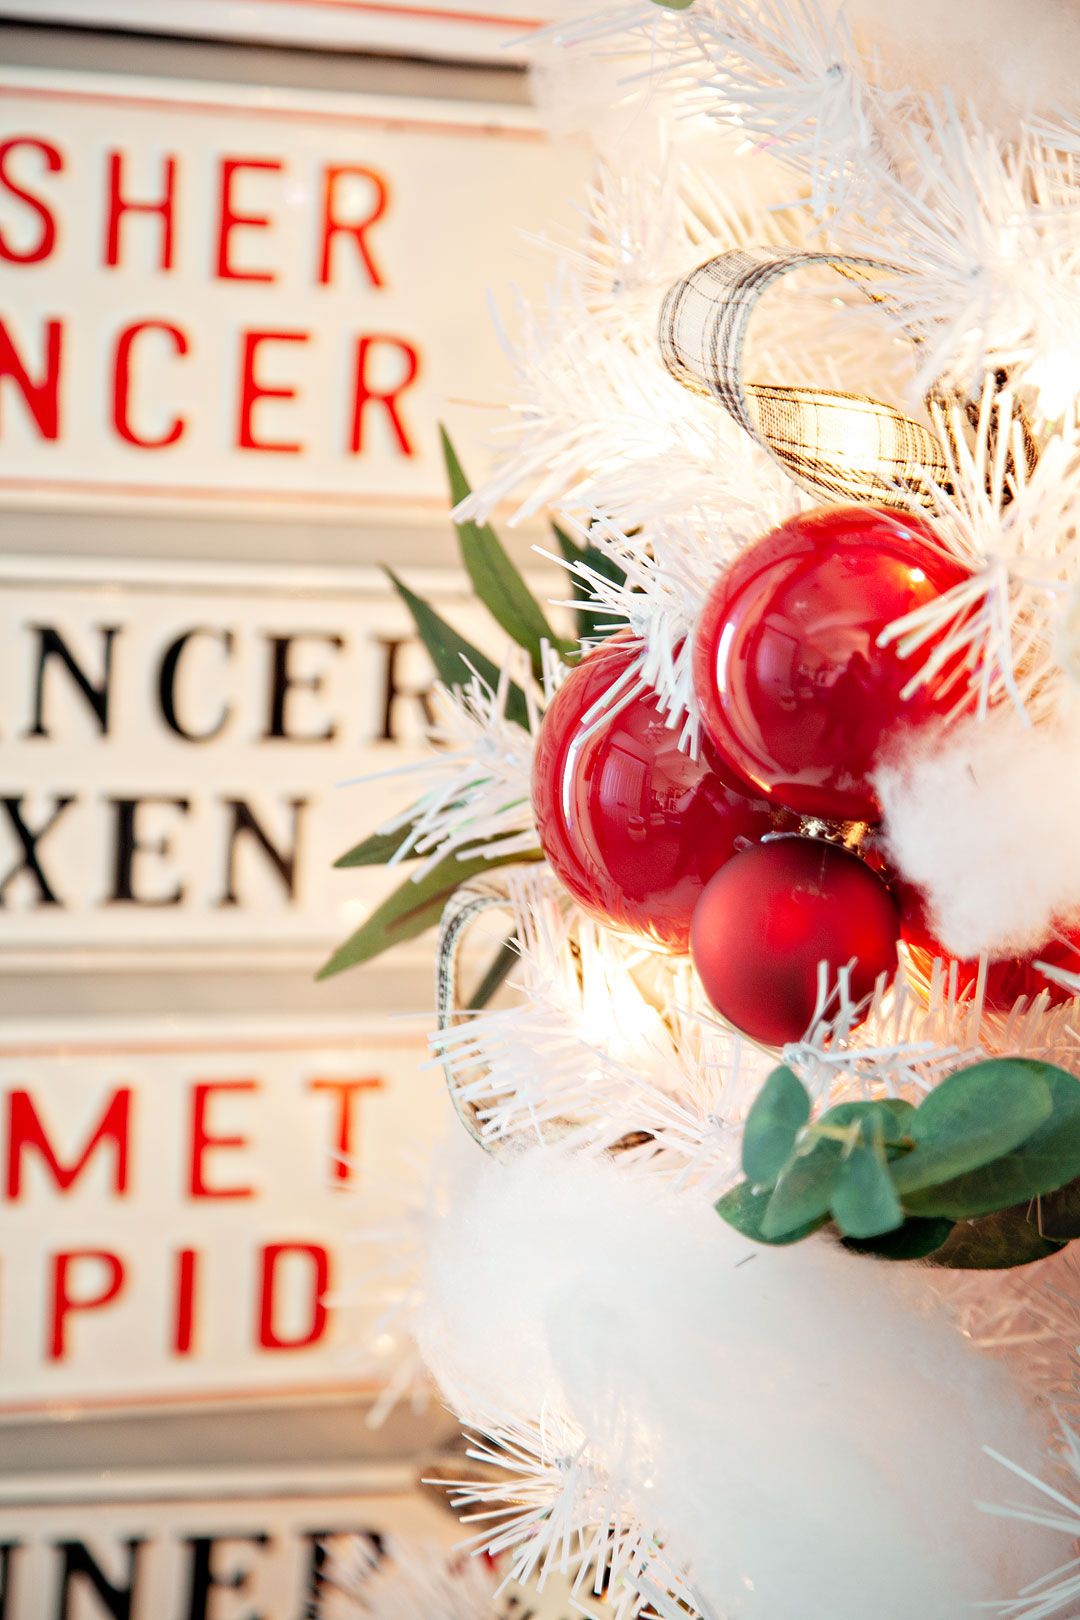
Instead of just hanging the balls on the tree, I hot glue them together in clusters and then wire them to the tree with floral wire.

This little trick can take your Christmas tree to a whole other level. It makes it look like a professional decorated your tree for you. Also, making ribbon picks by folding a 6-inch piece of ribbon in half and then wiring the ends together also make your tree look professionally decorated.

Then there is the star! I made mine using 1 inch unfinished wood balls that I found at Michaels. I did have to drill holes in them myself but, that was totally fine. I wanted a nice large wood ball for this star tree topper. I will have a post shortly as well for how to make this classic Christmas star.

And, finally… The fabulous Christmas Farmhouse decor that I just HAD to add to my Christmas scene. You guys REALLY need to check this stuff out. They have come up with some fabulous collections for this season! This is the Fireside collection that I used for my tree inspiration.

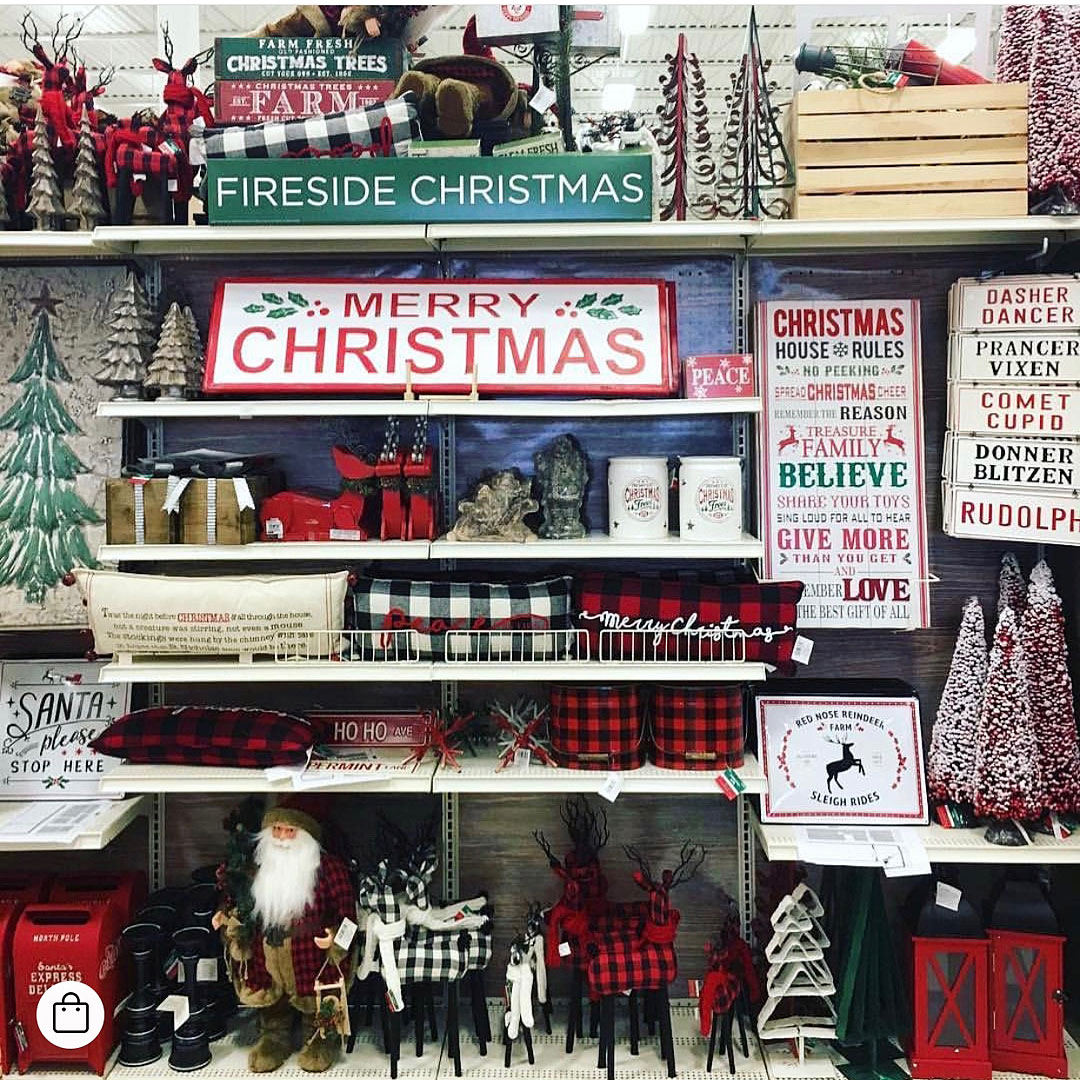
photo credit | Michaels Instagram

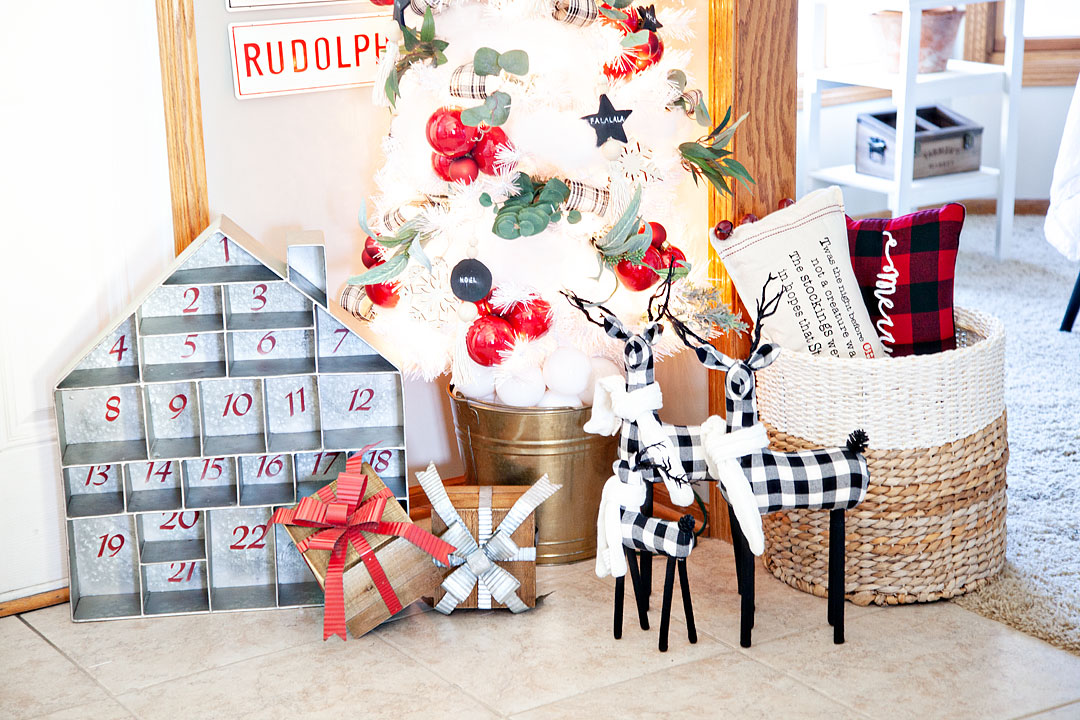
I LOVE the Advent House that is huge and will be a Christmas treasure from now on in our house. the reindeer, the wood presents and the pillows! Michaels has fabulous holiday pillows right now. AND then… there are the signs! You guys, enamel signs!! Metal signs!! So many incredible signs!!


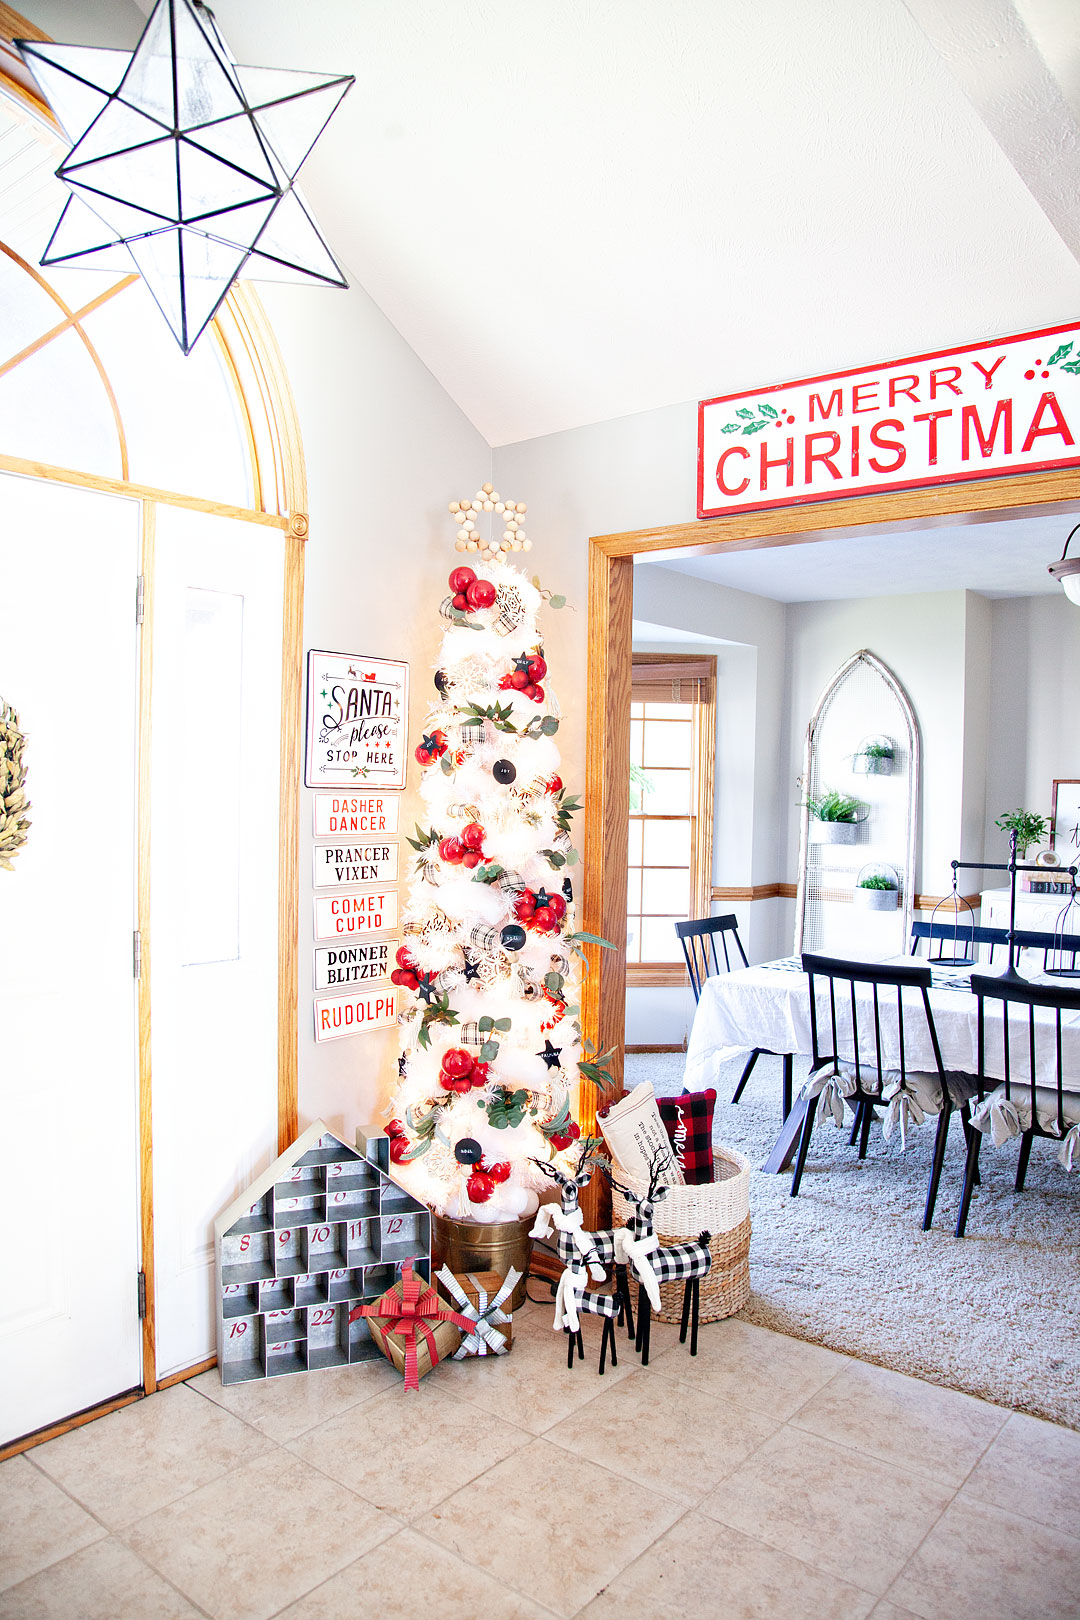
All you need is to stock up on some Command Strips and you can add all kinds of great holiday signs all over the house! Are you excited to start your holiday decorating?! I know that I’m loving my entryway tree corner and can’t wait to put up my main Christmas tree in a few weeks! I can’t wait to see what you guys create this year!


Snowflake Lantern Holiday Gift Idea 

854 · Oct 17, 2018 · 7 Comments

I’m not sure if there is anything more glorious than the thought of the first snow each year. I don’t care if you love or hate snow, the first snowfall of the year is always a fun event.

I’m thrilled that this season’s Ball® Keepsake Collectible Holiday Jar is an ode to the stunning snowflake! I decided that a fun way to use this fun collectible jar is to make snowflake lanterns that are perfect for dressing up your home for the winter season or, as a fabulous holiday gift.

The autumn is full of fun treats like all things pumpkin, apple preserves, hayrides through the pumpkin patch and so much more.

Towards the end of the autumn festivities there arrives a great anticipation in the air… when will it snow? I feel like no matter what part of the country you live in, snowflakes are truly magical. I’m thrilled that this season’s Ball® Keepsake Collectible Holiday Jar is an ode to the stunning snowflake!

I decided that a fun way to use this fun collectible jar is to make snowflake lanterns that are perfect for dressing up your home for the winter season or, as a fabulous holiday gift.

I can just imagine an army of these snowflake lanterns lining the walkway up to your home this winter season, warmly inviting your friends into your holiday gathering.

Won’t that be pretty? Let me teach you how to make them.

Snowflake Lantern Supplies

This project is pretty simple and doesn’t really require much in the way of supplies. Here is what you’ll need.

There are three different options for the Ball Mason jars. You can get a 4 pack of Keepsake Ball Mason jars, an 8 pack of regular Ball Mason jars, or a 12 pack of Snowflake Holiday jars. Now that I’ve redone this project a few times, I recommend the Snowflake Jars.

You can make these every Christmas! The snowflake jars add a really nice touch.

  • Ball® Snowflake Holiday Jars (12 Pack) This is the best option!
  • Regular jars in a set of 8
  • Regular jars set of 4
  • decoupage glue & Foam Brush Kit
  • Epsom salt – 1/2 cup for every 4 pack of jars
  • 2 1/2 inch circle vinyl sticker (optional)
  • decorative sand filler (optional)
  • small candles
  • 3/8” black ribbon
  • greenery with small berries
  • hot glue gun with sticks

  I’m thrilled that this season’s Ball® Keepsake Collectible Holiday Jar is an ode to the stunning snowflake! I decided that a fun way to use this fun collectible jar is to make snowflake lanterns that are perfect for dressing up your home for the winter season or, as a fabulous holiday gift.

Snowflake Lantern Instructions

This first part of the project will be super fun to do with your older kiddos. Grab your Ball® Keepsake Collectible Holiday Jars, decoupage glue, foam brush, stickers (if you are using them) and Epsom salt. 

I’m thrilled that this season’s Ball® Keepsake Collectible Holiday Jar is an ode to the stunning snowflake! I decided that a fun way to use this fun collectible jar is to make snowflake lanterns that are perfect for dressing up your home for the winter season or, as a fabulous holiday gift.

You’ll want to protect your work surface and have some type of container big enough to fit the jar into along with a large spoon at the ready.

ball

Fill your container with the Epsom salt half way.

I’m thrilled that this season’s Ball® Keepsake Collectible Holiday Jar is an ode to the stunning snowflake! I decided that a fun way to use this fun collectible jar is to make snowflake lanterns that are perfect for dressing up your home for the winter season or, as a fabulous holiday gift.

Place your sticker over the snowflake to protect that area from the decoupage glue and Epsom salt.

I’m thrilled that this season’s Ball® Keepsake Collectible Holiday Jar is an ode to the stunning snowflake! I decided that a fun way to use this fun collectible jar is to make snowflake lanterns that are perfect for dressing up your home for the winter season or, as a fabulous holiday gift.

If you don’t want to bother with the sticker, that’s totally fine. I made mine using my Cricut Maker or you can order them online. I prefer the sticker method because it creates a nice crisp line for the circle window of the lantern.

You are more than welcome to freehand a circle around the snowflake with your foam brush. Just know that your lines won’t be as perfect.

Cover your jar from below the rim down with the decoupage glue. Do not place glue on the bottom of the jar or on the jar threads.

I’m thrilled that this season’s Ball® Keepsake Collectible Holiday Jar is an ode to the stunning snowflake! I decided that a fun way to use this fun collectible jar is to make snowflake lanterns that are perfect for dressing up your home for the winter season or, as a fabulous holiday gift.

Using your large spoon, carefully cover the jar with the Epsom Salt. Make sure not to touch the surface of the jar with the glue on it. It will make for uneven coverage of “snow” on the jar. I also found that rolling the jar in the Epsom salt really didn’t give the desired effect as well. You really want to pour the “snow” over the decoupaged jar to create the nice snowy effect.

I’m thrilled that this season’s Ball® Keepsake Collectible Holiday Jar is an ode to the stunning snowflake! I decided that a fun way to use this fun collectible jar is to make snowflake lanterns that are perfect for dressing up your home for the winter season or, as a fabulous holiday gift.

Let your jars dry, undisturbed overnight. 

I’m thrilled that this season’s Ball® Keepsake Collectible Holiday Jar is an ode to the stunning snowflake! I decided that a fun way to use this fun collectible jar is to make snowflake lanterns that are perfect for dressing up your home for the winter season or, as a fabulous holiday gift.

This is a great project to make an assembly line. Grab a friend or your older kiddos and go to town and make a bunch of these fun gifts for friends, neighbors, teachers, bosses… I could go on and on. I LOVE that it could be a great holiday gift that doesn’t involve sugar!

I’m thrilled that this season’s Ball® Keepsake Collectible Holiday Jar is an ode to the stunning snowflake! I decided that a fun way to use this fun collectible jar is to make snowflake lanterns that are perfect for dressing up your home for the winter season or, as a fabulous holiday gift.

The following day, carefully remove your vinyl sticker. You may want to use a toothpick or tweezers to help get the sticker removal started.

Also, you may want to wear eye protection, the Epsom salt tends to fly in this stage of the process. I managed to have a little piece fly into my mouth and it was NOT tasty. So…eye protection and keep your mouth closed. 

I’m thrilled that this season’s Ball® Keepsake Collectible Holiday Jar is an ode to the stunning snowflake! I decided that a fun way to use this fun collectible jar is to make snowflake lanterns that are perfect for dressing up your home for the winter season or, as a fabulous holiday gift.

I’m thrilled that this season’s Ball® Keepsake Collectible Holiday Jar is an ode to the stunning snowflake! I decided that a fun way to use this fun collectible jar is to make snowflake lanterns that are perfect for dressing up your home for the winter season or, as a fabulous holiday gift.

Now you’re ready to decorate your jar. Fire-up your hot glue gun and prep your ribbon and winter greenery. I found my greenery at Michaels. It was a little wreath that I disassembled, and it worked perfectly.

I hot glued the greenery just above the lip of the jar that leads into the jar threads. I found that a little hot glue dot helped to secure the bottom section of the greenery to the jar creating it a nice frame around one side of the snowflake window.

Next, I tied the ribbon around the top of the jar, covering the hot glued section of the greenery, and tying a little knot. After that, I snipped off the ends using the inverted point technique.

I’m thrilled that this season’s Ball® Keepsake Collectible Holiday Jar is an ode to the stunning snowflake! I decided that a fun way to use this fun collectible jar is to make snowflake lanterns that are perfect for dressing up your home for the winter season or, as a fabulous holiday gift.

Then, fill the bottom of the jar with a 1/4 cup of either Epsom salt or decorative sand.

I’m thrilled that this season’s Ball® Keepsake Collectible Holiday Jar is an ode to the stunning snowflake! I decided that a fun way to use this fun collectible jar is to make snowflake lanterns that are perfect for dressing up your home for the winter season or, as a fabulous holiday gift.

I found the Ball® preserving funnel came in handy here.  

I’m thrilled that this season’s Ball® Keepsake Collectible Holiday Jar is an ode to the stunning snowflake! I decided that a fun way to use this fun collectible jar is to make snowflake lanterns that are perfect for dressing up your home for the winter season or, as a fabulous holiday gift.

After I placed the little candle into the jar, I lit-her-up!  

I’m thrilled that this season’s Ball® Keepsake Collectible Holiday Jar is an ode to the stunning snowflake! I decided that a fun way to use this fun collectible jar is to make snowflake lanterns that are perfect for dressing up your home for the winter season or, as a fabulous holiday gift.


These snowflake lanterns made from the Ball® Keepsake Collectible Holiday Jars look snowy and beautiful. All ready to usher in those Hygge winter nights! 


I’m thrilled that this season’s Ball® Keepsake Collectible Holiday Jar is an ode to the stunning snowflake! I decided that a fun way to use this fun collectible jar is to make snowflake lanterns that are perfect for dressing up your home for the winter season or, as a fabulous holiday gift.

Scandinavian Style Blanket Storage Box

5 · Oct 16, 2018 · Leave a Comment

The weather is getting chilly and we are all working on bringing out our warm and cozy home decor items as we dress our homes for the season. Our family loves to have cozy blankets close at hand when we are hanging out watching TV or playing games. The problem is that they end up making the room look like trash as they are left strewn about the room. I thought it would be fun to create a blanket & throw pillow storage box that could add a little design to the room as well. I’ve always loved Norwegian & Scandinavian design especially when it comes to winter designs and that was my inspiration for my new Scandinavian Style Blanket Storage Box created using Americana Decor Texture & the Americana Decor Stencils from DecoArt.

+ This post is brought to you by the lovely folks at DecoArt +I've always loved Norwegian & Scandinavian design especially when it comes to winter designs and that was my inspiration for my new Scandinavian Style Blanket Storage Box created using Americana Decor Texture & the Americana Decor Stencils from DecoArt.

Have you guys heard of this Americana Decor Texture? This stuff is really cool. It’s basically thick paint that you apply like you are frosting a cookie. Fun! Right? What’s really cool is that is works really well with stencils and creates a fun raised effect on your surface.

I've always loved Norwegian & Scandinavian design especially when it comes to winter designs and that was my inspiration for my new Scandinavian Style Blanket Storage Box created using Americana Decor Texture & the Americana Decor Stencils from DecoArt.

Isn’t that fun? I would have to say, I really love the way it looks. You can take something simple like a box crate and turn it into some extra special. Let me show you how to make one of your own.

Scandinavian Style Blanket Storage Box Supply List

  • wood crate 
  • America Decor Matte Metallics – Ivory Pearl
  • paint brush
  • Americana Decor Stencils – Patchwork & Quilt Star
  • Americana Decor Texture – Cream & Deep Plum
  • paint knife or offset spatula
  • painters tape

I've always loved Norwegian & Scandinavian design especially when it comes to winter designs and that was my inspiration for my new Scandinavian Style Blanket Storage Box created using Americana Decor Texture & the Americana Decor Stencils from DecoArt.

Instructions

First, I painted my wood crate with the Matte Metallic paint. I loved the little extra something that this color gives to the box. The wood grain still peaks through a bit but it has this nice soft metallic sheen to it. It’s really quite nice.

When I paint stuff like this, I use some canning jar lids to raise my piece off of my table.

You’d be amazed how handy this come in sometimes and not just for canning!

I painted on two coats and then let it dry for about an hour.

Then I tackled the fun part of the project, adding fun textured designs to the box. However, before we get started, here are a few things NOT to do. We learn from DOING and what I learned is really important when working with a high-viscosity, heavy-bodied type of paint.

Do NOT try and apply the texture paint vertically.

You want to have the area that you are working on a flat surface facing up at you.

DO NOT press down hard when applying the Americana Decor Texture using a stencil.

Just like with any stencil and paint project, a slower, lighter hand makes for a much better stencil experience. You don’t want your project to end up looking like my first attempt in the photo above.  Also, when working with Texture, you want to work in light short strokes like you are frosting a cookie, not like the longer strokes that you use when frosting a cake.

DO NOT let the Americana Decor Texture sit and dry before removing your stencil.

Yep, learned that the hard way. I have been stenciling for years and sometimes, depending on the type of paint, it’s better to let the paint dry a bit before you remove the stencil. So… I tested that technique out and it did not work at all. With this type of paint, you need to gently and carefully lift up your stencil as soon as you are finished applying the paint making sure not to let it slide around at all.

Now that we have those items of what “not to do” out of the way, let’s get busy with what to do!


It’s a really good idea to tape down your stencil and to press down each section as you are applying the Texture paint as you go. This will help avoid the paint going underneath the stencil and creating issues. Again, use light shorter strokes like you are frosting a cookie. You can make it as thick or as thin as you would like. You can also play around with the texture, keep it smooth, add peaks, run a comb through it to create stripes or make swirls with your spatula. This stuff is super fun to play with.

Speaking of that, I would play around with it a bit before you start a project on a surface that you really care about. Test out your design and style. That way you get your method down before the real deal project.

Once you have applied the Americana Texture paint and have pulled the stencil, move onto the next section. You may find that you will need to cut your stencil so that you can continue to work and that’s totally fine. Just make sure to press down the stencil as you apply the Texture paint. Typically the weight of the paint will hold down the stencil as you apply it and because it’s so heavy bodied, unless you are pressing down and overworking, you shouldn’t have issues with the paint seeping under the stencil.

Now that you’ve finished applying the Texture paint and you’ve removed the stencil, it’s time to let it dry completely.

I set-up a fan to help speed up the process but, you really should let it sit overnight and let it dry completely.

I've always loved Norwegian & Scandinavian design especially when it comes to winter designs and that was my inspiration for my new Scandinavian Style Blanket Storage Box created using Americana Decor Texture & the Americana Decor Stencils from DecoArt.

Now you can use your new Scandinavian style blanket box to corral all of the cozy blankets when you are finished with them AND add a little style to your room!

I've always loved Norwegian & Scandinavian design especially when it comes to winter designs and that was my inspiration for my new Scandinavian Style Blanket Storage Box created using Americana Decor Texture & the Americana Decor Stencils from DecoArt.

I've always loved Norwegian & Scandinavian design especially when it comes to winter designs and that was my inspiration for my new Scandinavian Style Blanket Storage Box created using Americana Decor Texture & the Americana Decor Stencils from DecoArt.


Whimsical Neon Halloween Mantel

5 · Sep 17, 2018 · 1 Comment

When it comes to my typical style choices I typically stick with classic and timeless. However, I also have a real love of fun and whimsey that sneaks out every once in a while.  This year I’ve created a whimsical mantel using all kinds of fun finds from DecoArt, Target & Refined Design for my whimsical NEON Halloween mantel!

• This post brought to you by DecoArt •When it comes to my typical style choices I typically stick with classic and timeless. However, I also have a real love of fun and whimsey that sneaks out every once in a while.  This year I've created a whimsical mantel using all kinds of fun finds from DecoArt, Target & Refined Design for my whimsical NEON Halloween mantel!

You may not be able to tell by looking at me but, I tend like walking the line sometimes when it comes to following the rules. Nothing that would involve a felony conviction or anything, more like… When my daughter was born, I felt like she looked better in blue. She had beautiful blueberry eyes and I loved highlighting that. To this day she still is weirded out by the fact that I dressed her in blue instead of pink.

The same holds true when I decorate for holidays, sometimes I don’t really want to stick with the normally prescribed color palette. For example, we don’t really have to decorate with black and orange for Halloween, we can decorate in NEON and create a really fun, whimsical Halloween display.

Neon Halloween Mantel Supplies

With a mission in mind, I grabbed my DecoArt Americana Neon Light paints and headed to the Target Bullseye’s Playground (the former dollar spot) and grabbed some inexpensive Halloween trinkets to add to my mantel and got to work. Here’s my supply list…

    • Americana Neon Lights 2oz – Pink Explosion
    • Americana Neon Lights 2oz – Peach Punch
    • Americana Neon Lights 2oz – Green Energy
    • Americana Neon Lights 2oz – Knockout Blue
    • Americana Neon Lights 2oz – Radiant Yellow
    • foam paint brushes
    • small witches broom
  • various fabric pumpkins
  • tiny witches hat (it was a headband originally)
  • mascarade mask
  • wood beads in various sizes
  • cotton bakers twine
  • an upholstery needle
  • a set of Letters and Ledges
  • scissors
  • command stips

Instructions

With this project, I wanted to add touches of color to typical Halloween objects. Kind of like color blocking in some cases without the hard lines. I wanted it to have a free spirit air about the mantle. Remember, we are going for whimsical.

I started by painting the stems of the pumpkins green.

While those were drying, I painted the edge of the masquerade mask with the neon pink  and you can find a mask for sale on Masquerade Store.

I have a quirky llama picture that I found at Target that sits on my mantle. Her name is Poppy and I adore her!

I thought it would be fun to get her in on the action, so Poppy will be wearing the mask for Halloween.

Then I added the color block on the bottom of the pumpkins, the broom & the little witches hat.

While I was waiting for them to dry, I starting to string my wood beads to create a garland. I was inspired by this tutorial from Design Love Fest…

You have to vist Design Love Fest to learn how to make fun bead garlands like this. Click on the link above.

I decided that since I didn’t want to paint the entire bead, it would be easier to string the garlands, hang them on the fireplace and then paint them.

Worked like a charm and saved a ton of time!

Once all of the paint was dry, it was time to dress the mantel.

With the addition of the Ledges & Letters and the bats the mantel was complete!

When it comes to my typical style choices I typically stick with classic and timeless. However, I also have a real love of fun and whimsey that sneaks out every once in a while.  This year I've created a whimsical mantel using all kinds of fun finds from DecoArt, Target & Refined Design for my whimsical NEON Halloween mantel!

Now, every few days we can change-up the Halloween quote and tickle our funny bone all over again!

Disclaimer • This is a paid post with my friends at DecoArt. I am a member of the DecoArt Core Creator program and do receive payment and product to help facilitate these creative posts. However, keep in mind… I will NEVER share something I don’t truly love and use in my everyday life.

  • « Go to Previous Page
  • Page 1
  • Page 2
  • Page 3
  • Page 4
  • Page 5
  • Page 6
  • Interim pages omitted …
  • Page 43
  • Go to Next Page »

Primary Sidebar

Heather from Whipperberry
Hello... my name is Heather and I'm the creator of WhipperBerry a creative lifestyle blog packed full of great recipes and creative ideas for your home and family. I find I am happiest when I'm living a creative life and I love to share what I've been up to along the way... Come explore, my hope is that you'll leave inspired!

Footer

  • Privacy Policy
  • Crafts
  • Food
  • Gifts
  • Holidays
  • Home
  • Mom Life
  • Recipes
  • Travel

Copyright © 2026 · Seasoned Pro