• Skip to primary navigation
  • Skip to main content
  • Skip to primary sidebar
  • Skip to footer

Whipperberry

WhipperBerry • Your Home For Creative Inspiration

  • Home
  • Recipes
    • Starters
    • Easy Weeknight Dinners
    • Main Dish
    • Salads
    • Side Dish
    • Soups & Stews
    • Desserts
    • Breakfast
    • Miscellaneous
  • Tutorials
    • Creative Crafts
    • DIY Decor
    • Fabric Crafts
    • Food How-To
    • Jewlery
    • Paint Projects
    • Paper Art
    • Party Styling
    • Photography and Graphic Design
    • Silhouette
  • Holidays
    • Easter
    • Mother’s Day
    • Father’s Day
    • 4th of July
    • Halloween
    • Thanksgiving
    • Christmas
    • Valentine’s Day
  • Gift Ideas
    • Gifts For Everyone
    • Gifts for Dad
    • Mother’s day
    • For The Girls
    • For The Kids
    • Teacher Gift Ideas
    • Christmas
  • Printables
    • Holiday
    • Gift Idea
    • LDS Primary
  • Travel
  • About
    • Terms
  • Contact
  • Nav Social Menu

    • Facebook
    • Instagram
    • Pinterest
    • RSS
    • Twitter

Recipe

Tomato Galette + Pie Crust 101

3 · Aug 25, 2015 · 1 Comment

Tomato-Galette-from-WhipperBerry-6

Summer just isn’t Summer without a bountiful harvest of tomatoes of all kinds. I know, I know… You’re either a lover or a hater. I find myself in the LOVE category. Salads, tacos, life in general, isn’t complete without tomatoes. The only issue I find is finding the time to try all of the amazing tomato recipes during the summer bounty.

If you’ve been following me for some time, you’ll know that I LOVE pie making. I’ve been good friends with pie crust for some time. Here is a post highlighting all of my favorite pie crust tips and tricks. Some people think that pies are just for the holidays and typically are only for sweet types of pies or galettes. NOT TRUE! It’s also not just for your grandmother’s turkey pot pie. You can make all kinds of savory treats with a mean pie crust. For example, my Tomato Galette.

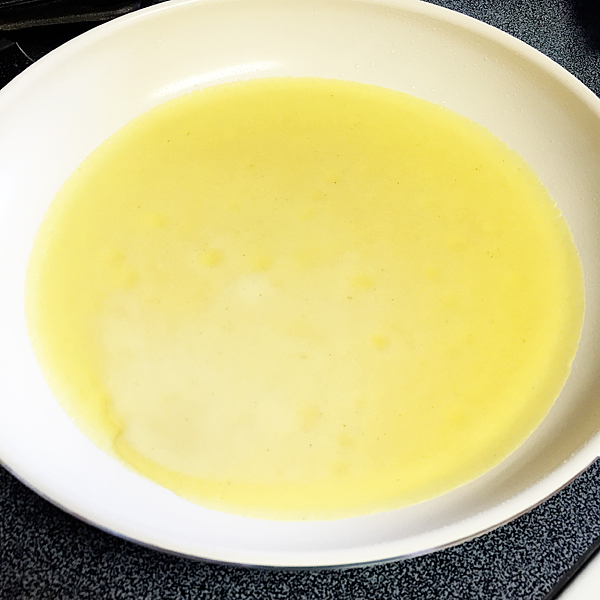
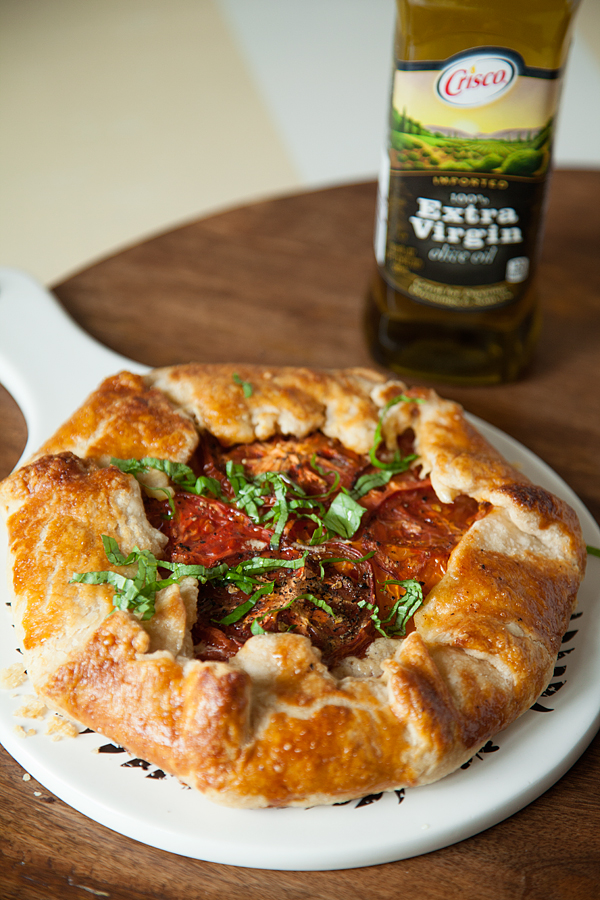
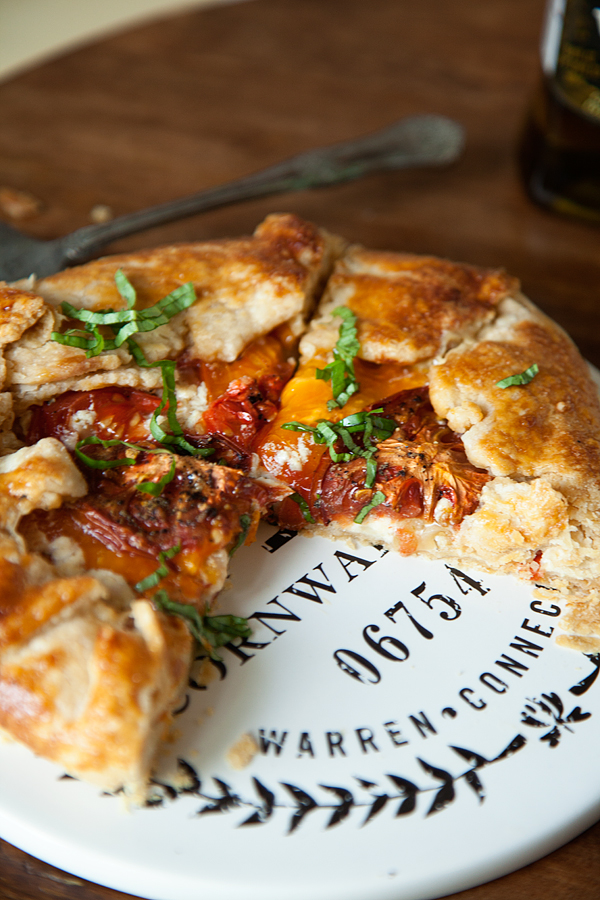
What’s a galette you ask! Well, it’s a fancy term for a free form pie. You don’t use a pie plate, you just fold up your crust over whatever filling you have and voilá, you have a free form pie. First I start with my crust. I whip that up quickly with a few simple ingredients; flour, Crisco, salt, vinegar, one egg & ice water. The key is to keep all of your ingredients as cold as possible. I use Crisco All-Vegetable Shortening Baking Sticks when I bake and I will cut it up into cubes and then place them into the freezer for 20 minutes so they get nice and cold. Temperature is key to great pie crusts. Butter Flavor and All-vegetable Crisco® Shortening and Baking Sticks deliver higher, lighter-textured baked goods and have 50% less saturated fat than butter and zero grams trans fat per serving.

Tomato-Galette-from-WhipperBerry-1

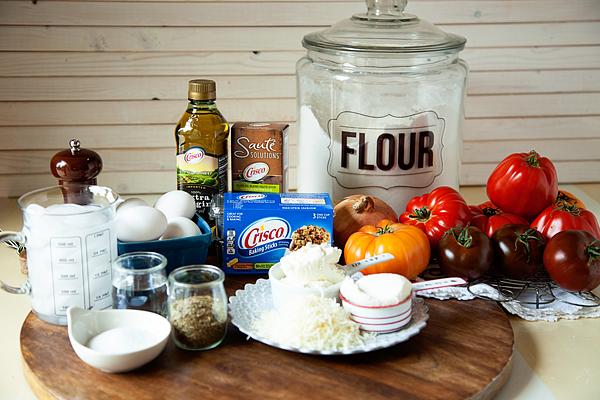
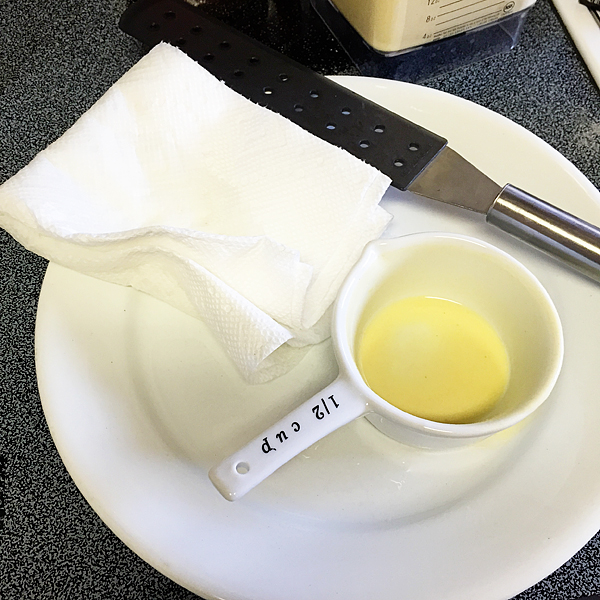
Once my crust is made, I chill it in the refrigerator for 20-30 minutes while I put together the filling for my galette. First I caramelized onions in Crisco Sauté Solutions Olive Oil Blend Stick with a little salt and a dash of sugar to help them caramelize. Then I mix my cheese filling. That’s a mixture of cream cheese, ricotta, parmesan cheese and some dried Italian herbs. Slice up some tomatoes and you’re all set to assemble. Once it’s baked, I drizzle with some Crisco Extra Virgin Olive Oil, add some fresh basil and it’s all set. Crisco® Extra Virgin Olive Oil uses the highest quality olives available to help enhance your cooking; available in three flavorful varieties 100% Extra Virgin, Pure and Light Tasting Olive Oil.

Here’s a video I put together that will help you make pie crust  your grandmother will love AND you get to see how I put together my tomato galette.

Looking for more great recipe inspiration? Visit The Crisco Heritage Kitchen,  a hub dedicated to all things food, tradition and family, where generations of home cooks can gather and discover tried-and-true recipes that will delight and inspire.

Tomato-Galette-from-WhipperBerry-9

Tomato Galette + Pie Crust 101 Recipe

Tomato Galette + Pie Crust 101
 
Save Print
Prep time
25 mins
Cook time
50 mins
Total time
1 hour 15 mins
 
This simple summer meal is perfect any time of day. Grab some of those amazing summer tomatoes and you'll fall in love! Ingredients
Author: Heather // WhipperBerry
Serves: 8-10
Ingredients
  • Crust
  • 3 cups flour
  • ½ teaspoon salt
  • 1½ cups of Crisco All-Vegetable Shortening Baking Sticks
  • 1 teaspoon white vinegar
  • 1 egg
  • 4-6 tablespoons water
  • Filling
  • 1 small sweet onion
  • 1 tablespoon Crisco Sauté Solutions Olive Oil Blend Stick
  • ½ cup cream cheese
  • ½ cup ricotta
  • ½ cup shredded parmesan
  • 1 teaspoon dried Italian Seasoning
  • 2-3 large tomatoes thinly sliced
  • Crisco Extra Virgin Olive Oil & fresh basil for garnish
Instructions
  1. In a large bowl, add flour, salt and cold Crisco All-Vegetable Shortening Baking Sticks. Use a pastry cutter to cut-in the shortening to the flour.
  2. In a small bowl beat egg and vinegar together and pour into flour mixture.
  3. Gently mix and add ice cold water until your dough just comes together. Be careful not to over mix. Pour out dough onto some plastic wrap and form into a disk. Wrap and place in refrigerator for 20-30 minutes.
  4. While the dough is chilling. Slice onions and caramelize over medium low heat with the Crisco Olive Oil Sauté Stick, salt and sugar. This will take 8-10 minutes. Remove from heat and set aside.
  5. In a medium mixing bowl, mix together the cream cheese, ricotta, parmesan cheese and Italian seasoning.
  6. Cut dough into quarters. Roll one quarter of the dough out on a floured surface into a 10 inch round.
  7. Spread on ½ of the cheese mixture, top with onions and tomatoes. Finish with salt and pepper to taste.
  8. Use the remaining ingredients to make up another galette.
  9. Place in a 375˚ oven for 40-50 minutes.
  10. Remove from oven, let cool for 10 minutes. Drizzle with Crisco Extra Virgin Olive Oil and garnish with fresh basil.
3.2.2925

*Disclosure: As a participant of the Crisco Ambassador Program, I’ve received compensation for my time and product samples for review purposes. Opinions are my own. 

Lemon Drop Crepes Recipe

2 · Aug 24, 2015 · 2 Comments

Compensation for this post was provided by Unilever via AOL Media.  The opinions expressed herein are those of the author and are not indicative of the opinions or positions of Unilever or AOL.

Lemon-Drop-Crepes-by-WhipperBerry-10

I love cooking.

It’s my escape, it’s my love language. I love to create beautiful meals for my family and friends. Hopefully they can feel the love and in-turn see the joy I receive when I cook for them, especially when the food I’m making is both nutritious and tasty.

One of my favorite meals to prepare is brunch. There is just something about brunch that says, “Come, sit down. Slow down, enjoy the beauty around you. Enjoy the people you are with. Savor the food, truly taste the simple ingredients placed before you. Let’s start this amazing day!”

No other meal really speaks like brunch…

When I was young, one of my favorite dishes that my mom prepared for us was crêpes.  Every time we had a slumber party, my mom would greet us in the morning with a plate full of crêpes.

It was a full production… The table was full of fun toppings like syrup, peanut butter, jelly, cinnamon sugar, powdered sugar, chocolate syrup and such. My mom would sit at the stove and systematically produce these magical crêpes. We would have to patiently wait our turn for the next hot treat.

My all time favorite concoction was just a simple crêpe with butter and powdered sugar. I loved the simplicity even as a kid. While my sisters and friends were loading theirs up with all kinds of goodies, I kept it simple because I wanted to actually taste the crêpe. I didn’t just want it to be a vehicle for a mess of toppings.

As I’ve gotten older, my love for crêpes has become even stronger. Our family traveled to Paris a few years ago and one of our FAVORITE memories was stopping at some of the street side crêpe vendors. We would each grab a giant crêpe and snack on it as we walked the streets of Paris. While I was there, I was introduced to the simple addition to my favorite treat. Again, it was just a simple crêpe with butter, powdered sugar BUT with the addition of lemon juice. As a lemon lover, my mind was blown!

How had I not thought of this idea before? It was simple beauty.

Not too long ago, I was working on some new brunch ideas and I thought it would be fun to create a Lemon Drop Crêpe recipe that would take me back to Paris but also have my own special WhipperBerry spin to a new recipe.

As I was developing this recipe, I started to rethink the butter element to the dish. I loved the flavor that it brings to the crêpes, but I wasn’t crazy about the type of fat that I had traditionally used.

I am a big believer in the idea that our bodies really need good fats as part of overall healthy-balanced diet The key… Finding the right kind of fats. (We cannot claim the list in good fat 5 is better than other good fat sources out there) You want to stick with The Good Fat 5!

It’s essential to get the right kinds of fat into our diets. Confused as to what a good fat is? Don’t worry.

Ask yourself, is this fat (whatever you are cooking with,) from a plant or from a fish? If it is, you are using a good fat. If it is an animal (other than fish) source of fat like butter or bacon fat, it’s most likely a saturated fat.

My quandary was… I LOVE the taste of butter, especially with my crêpes, so what should I use?

I Can’t Believe It’s Not Butter® is the perfect fat to use for my beloved crêpes. It tastes just like butter, however, it’s created with the good plant-based fats. That means that it’s 40% fewer calories and 70% less saturated fat than butter per serving. Not to mention that it has no artificial flavors, no artificial preservatives and no partially hydrogenated oils. It has non-GMO sourced ingredients, it’s cholesterol free with 0 grams of trans fats per serving.. It was exactly what I was looking for—a way to retain flavor but make sure the ingredients for the recipe were still a good nutrition alternative, which you would never expect in a dessert!

You can find out more information about I Can’t Believe it’s Not Butter® here. Click here for some other fun recipes that celebrate the role of good fats in our diet.

Lemon Drop Crepe Recipe

Now that I’ve solved my butter issue, I’m ready to serve up my new crêpe recipe!

Lemon-Drop-Crepes---WhipperBerry-2

This is super simple and unbelievably tasty. Here’s what you will need…

{A printable version of this recipe is at the bottom of the post}

Crêpe Batter

6 eggs

Pinch of salt

1 teaspoon vanilla

1 tablespoon sugar

A pinch of nutmeg

Zest from one lemon

2 cups milk

2 cups all-purpose flour

1 teaspoon vegetable oil

Topping

I Can’t Believe It’s Not Butter

Lemon slices

Powdered sugar

Mixed berries for garnish

When it comes to making crêpes, your tools are as important as your ingredients.


You will also need a blender, a large, non-stick skillet and a crêpe turner or spatula that is designed not to scratch your non-stick skillet. I brought a crêpe turner home from IKEA in Germany and so far, I have yet to find one here in the USA… A spatula will work just fine!

Lemon-Drop-Crepes---WhipperBerry-4

To get started, crack all six eggs into your blender and add your pinch of salt, vanilla, sugar, nutmeg and zest from one lemon. Turn on your blender and carefully remove the lid. Alternate the flour and milk starting with the flour and ending with milk. Once you have finished blending your batter, let it sit for 2o minutes or so to rest.

Lemon-Drop-Crepes---WhipperBerry-3


Now, the key to making crêpes is simple. You need to heat your pan over medium heat until it’s nice and hot. Pour in a little vegetable oil and then wipe the pan with a paper towel.

IMG_2396


Save the paper towel and wipe down the pan before each crêpe. I keep a plate next to the stove for the paper towel and my measuring cup that I use to pour the crêpe batter into the pan. It keeps my workflow super smooth.

how-to-make-crepes-3---whipperberry


Now, you will need to decide what size measuring cup you should use to pour your batter. I have a large 12 inch pan and I used a 1/2 cup measure. For a 9 inch pan I would use 1/3 cup and a 7 inch pan I would use 1/4 cup.

Now here’s the trick… make sure your pan is hot, but only over medium heat. Hold your pan up, right over the burner and pour your batter into the center of the pan as you slowly tilt the pan in a circular motion. Once the batter has covered the bottom of the pan, set it back down on the burner and let it cook for 1 minute or until the sides start to pull-away from the side of the pan.

how to make crepes 2 - whipperberry


Use your crêpe turner or spatula and turn your crêpe over and cook for another 30 seconds to a minute. It depends on how you like your crêpes. I tend to like mine on the blonde side. I like them soft without much browning. If you like a crispy crêpe, you will need to cook a little longer.

Now, here’s the fun part. Take your warm crêpe and spread some I Can’t Believe it’s Not Butter® all over…

Lemon-Drop-Crepes---WhipperBerry-5


It doesn’t have to be pretty. Have some lemon slices ready for your guest and have them squeeze some fresh lemon onto their crêpe.

Lemon-Drop-Crepes---WhipperBerry-6


Sprinkle generously with powdered sugar…

Lemon-Drop-Crepes---WhipperBerry-7


Fold in half and then in half again…

Lemon-Drop-Crepes---WhipperBerry-8


For a really nice presentation, plate three crêpes and then dress with some mixed berries.

Lemon-Drop-Crepes---WhipperBerry-9


Dust your crêpes with more powdered sugar and enjoy!

Lemon Drop Crepes
 
Save Print
Author: Heather // WhipperBerry
Cuisine: Breakfast
Ingredients
  • 6 eggs
  • Pinch of salt
  • 1 teaspoon vanilla
  • 1 tablespoon sugar
  • A pinch of nutmeg
  • Zest from one lemon
  • 2 cups milk
  • 2 cups all-purpose flour
  • 1 teaspoon vegetable oil
  • Topping
  • I Can't Believe It's Not Butter
  • Lemon slices
  • Powdered sugar
  • Mixed berries for garnish
Instructions
  1. Crack all six eggs into your blender and add your pinch of salt, vanilla, sugar, nutmeg and zest from one lemon. Turn on your blender and carefully remove the lid. Alternate the flour and milk starting with the flour and ending with milk. Once you have finished blending your batter, let it sit for 2o minutes or so to rest.
  2. Now, the key to making crêpes is simple. You need to heat your pan over medium heat until it's nice and hot. Pour in a little vegetable oil and then wipe the pan with a paper towel.
  3. Save the paper towel and wipe down the pan before each crêpe. I keep a plate next to the stove for the paper towel and my measuring cup that I use to pour the crêpe batter into the pan. It keeps my workflow super smooth.
  4. Now, you will need to decide what size measuring cup you should use to pour your batter. I have a large 12 inch pan and I used a ½ cup measure. For a 9 inch pan I would use ⅓ cup and a 7 inch pan I would use ¼ cup.
  5. Now here's the trick... make sure your pan is hot, but only over medium heat. Hold your pan up, right over the burner and pour your batter into the center of the pan as you slowly tilt the pan in a circular motion. Once the batter has covered the bottom of the pan, set it back down on the burner and let it cook for 1 minute or until the sides start to pull-away from the side of the pan.
  6. Use your crêpe turner or spatula and turn your crêpe over and cook for another 30 seconds to a minute. It depends on how you like your crêpes. I tend to like mine on the blonde side. I like them soft without much browning. If you like a crispy crêpe, you will need to cook a little longer.
  7. Now, here's the fun part. Take your warm crêpe and spread some I Can't Believe it's Not Butter® all over...
  8. It doesn't have to be pretty. Have some lemon slices ready for your guest and have them squeeze some fresh lemon onto their crêpe.
  9. Sprinkle generously with powdered sugar...
  10. Fold in half and then in half again...
  11. For a really nice presentation, plate three crêpes and then dress with some mixed berries.
  12. Dust your crêpes with more powdered sugar and enjoy!
3.2.2925


I Can’t Believe It’s Not Butter! sources ingredients that are not genetically modified. However, in the field-to-tub journey of making our buttery spread there is some contact with genetically modified vegetable oils, resulting in a small amount in this product.

Honey Pumpkin Yogurt Topping

1 · Aug 17, 2015 ·

+ This Honey Pumpkin Yogurt Topping post brought to you by Silk +

Honey-Pumpkin-Yogurt-Topping-from-Whipperberry

I don’t know why this is, but the minute the kiddos head back to school I’m ready to head into the magic of fall. It just doesn’t seem right to continue to celebrate summer when there’s early bedtimes and homework to be finished.  In my mind, I KNOW that it is still mid-August and pumpkin season still has a few weeks before we hit it full swing, BUT… I’m in the mood for fall flavors!

Fall flavors are just something extra special. It’s like a little gift from Mother Nature saying, “I’m sorry the summer is over, here’s your little gift to smooth the transition to winter.” That’s when the pumpkin spice, stewed cinnamon apples & candy corn come to play. That’s the magic when the air turns cooler.

With the kiddos getting back into the routine of school, we’ve had to get back onto a normal breakfast schedule and sometimes that can get a little boring. We love yogurt, but sometimes you need to kick it up a notch, plus we need some of  that autumn magic this time of year to make it special.

Here’s what we came up with at our house…

Honey-Pumpkin-Yogurt-Topping-1

Honey, pumpkin butter, roasted pumpkin seeds & Vanilla Silk® Dairy-Free Yogurt Alternative. I love that thanks to silk, even people with diary issues can still enjoy great yogurt creation for breakfast. Who knew that dairy-free could taste so good. Silk® Dairy-Free Yogurt Alternative  has…

  • 6 grams of plant-powered protein per serving
  • 6 smooth, creamy flavors with juicy bits of real fruit
  • Excellent source of calcium and vitamin D
  • No cholesterol, dairy, lactose, gluten, carrageenan
    or casein.

PLUS, It’s tastes aaaaamazing topped with honey, your favorite pumpkin butter and some roasted pumpkin seeds.

Honey-Pumpkin-Yogurt-Topping-2

Honey Pumpkin Yogurt Topping Recipe

1 5.3 oz. container of Vanilla Silk® Diary-Free Yogurt Alternative

1 tablespoon honey

1-2 tablespoons pumpkin butter

1-2 tablespoons of roasted pumpkin seeds

Top yogurt with honey, pumpkin butter and roasted pumpkin seeds to your taste and enjoy!

If pumpkin isn’t your thing and you would like some more fruity flavors, Silk® has you covered their too.

Honey-Pumpkin-Yogurt-Topping-12

They also have Black Cherry, Peach & Mango, Strawberry, Tropical Pineapple along with Blueberry. All of them perfect to top with your favorite toppings. Click HERE to grab a coupon to try these Silk® dairy-free yogurt alternatives.

I think I’m going to stick with my honey pumpkin creation for a bit. I’ve kind of fallen in LOVE!!

Honey-Pumpkin-Yogurt-Topping-10

This conversation is sponsored by Silk. The opinions and text are all mine.

Dairy Free Chia Pudding

2 · Apr 29, 2015 · 1 Comment

+ This Dairy Free Chia Pudding brought to you by my friends at Silk® +

Dairy-Free-Chia-Pudding-WhipperBerry

Not too long ago I started a trend at my house…

We’ve all fallen in LOVE with the Overnight Cashew Milk Oatmeal and have become quite obsessed.

Overnight-Oats-with-Silk-Cashew-Milk-from-WhipperBerry-9

My daughter Hannah has become our designated oatmeal prep girl and each night she prepares our oatmeal for the morning. We LOVE it!

Recently we’ve been introduced to another overnight breakfast treat that we’ve equally fallen for…

 Dairy Free Chia Pudding!

Dairy-Free-Chia-Pudding-by-WhipperBerry-2

Doesn’t it just sound sinful to have pudding for breakfast? With this “pudding” you don’t have to worry! I love it for a light dessert as well.

Have you jumped on the Chia Seed band wagon? I kind love them. They are nature’s quirky little gems and I love quirky.  Paired with our favorite dairy-free Silk® Dairy Free Yogurt Alternative and Silk® Cashew Milk it’s the perfect dairy-free treat!

Dairy-Free-Yogurt-Chia-Pudding-3

 Have you discovered the new Silk® Dairy-Free Yogurt Alternative?

It’s plant-powered nutrition that never tasted so good – or so smooth and creamy. Made from the goodness of plants instead of dairy, Silk Dairy-Free provides 6 grams of soy protein per serving, with no cholesterol.  It’s made with real fruit, without any artificial flavors or colors. And the taste? One delightful spoonful and you’ll be amazed.

Let me show you how I mix-up our Dairy Free Chia Pudding…

Silk Dairy-Free Yogurt Chia Pudding from Heather Thoming on Vimeo.

How fun and simple is that? Here are your ingredients…

Dairy Free Chia Pudding Recipe

Dairy-Free Chia Pudding
 
Save Print
Prep time
5 mins
Cook time
4 hours
Total time
4 hours 5 mins
 
A Simple overnight breakfast treat!
Author: Heather // WhipperBerry
Cuisine: Breakfast / Light Dessert
Serves: 1-2 servings
Ingredients
  • 1 cup Silk® Cashew Milk
  • 1 cup Silk® Dairy-Free Yogurt Alternative - Any flavor you like, I used vanilla
  • 1 tsp vanilla extract
  • 1 tablespoon honey
  • ¼ cup chia seeds
  • a pinch of salt
  • Garnish with dairy-free, gluten-free granola, fruit & a drizzle of honey
Instructions
  1. In a small mixing bowl or jar, add Silk® Cashew Milk, Silk® Dairy-Free Yogurt Alternative, vanilla, honey, chia seeds and salt. Mix well.
  2. Cover pudding and place in the refrigerator for at least 4 hours or overnight.
  3. Garnish with granola, fruit and a drizzle of honey.
3.2.2925

Dairy-Free-Chia-Pudding-by-WhipperBerry-4

Want to discover more Silk goodness? Follow them on Instagram! They have all kinds of scrumptious ideas for you to bring into your own kitchen.

This conversation is sponsored by Silk. The opinions and text are all mine.

  • « Go to Previous Page
  • Page 1
  • Interim pages omitted …
  • Page 13
  • Page 14
  • Page 15
  • Page 16
  • Page 17
  • Interim pages omitted …
  • Page 53
  • Go to Next Page »

Primary Sidebar

Heather from Whipperberry
Hello... my name is Heather and I'm the creator of WhipperBerry a creative lifestyle blog packed full of great recipes and creative ideas for your home and family. I find I am happiest when I'm living a creative life and I love to share what I've been up to along the way... Come explore, my hope is that you'll leave inspired!

Footer

  • Privacy Policy
  • Crafts
  • Food
  • Gifts
  • Holidays
  • Home
  • Mom Life
  • Recipes
  • Travel

Copyright © 2026 · Seasoned Pro