• Skip to primary navigation
  • Skip to main content
  • Skip to primary sidebar
  • Skip to footer

Whipperberry

WhipperBerry • Your Home For Creative Inspiration

  • Home
  • Recipes
    • Starters
    • Easy Weeknight Dinners
    • Main Dish
    • Salads
    • Side Dish
    • Soups & Stews
    • Desserts
    • Breakfast
    • Miscellaneous
  • Tutorials
    • Creative Crafts
    • DIY Decor
    • Fabric Crafts
    • Food How-To
    • Jewlery
    • Paint Projects
    • Paper Art
    • Party Styling
    • Photography and Graphic Design
    • Silhouette
  • Holidays
    • Easter
    • Mother’s Day
    • Father’s Day
    • 4th of July
    • Halloween
    • Thanksgiving
    • Christmas
    • Valentine’s Day
  • Gift Ideas
    • Gifts For Everyone
    • Gifts for Dad
    • Mother’s day
    • For The Girls
    • For The Kids
    • Teacher Gift Ideas
    • Christmas
  • Printables
    • Holiday
    • Gift Idea
    • LDS Primary
  • Travel
  • About
    • Terms
  • Contact
  • Nav Social Menu

    • Facebook
    • Instagram
    • Pinterest
    • RSS
    • Twitter

silhouette

How to Create Vinyl Chalkboard Art

147 · Apr 3, 2013 · 36 Comments

Chalkboard Art Inspiration Wall // Have you ever had a GREAT idea and then just couldn’t find the time to make it happen? I had this idea to create a chalkboard wall filled with inspirational quotes for my kitchen wall, about a million years ago… ok, well maybe five months ago when we first moved into our house here in Lincoln. I’ve been collecting chalkboards from Decor Steals for a bit, and had all the supplies, just none of the time to make it happen. Sadly we’ve lived with a naked wall for 5 months and last week I finally decided it was time, time to make this idea into a reality!

WhipperBerry's Chalkboard Inspiration Wall


Will Vinyl Stick to a Chalkboard or Chalkboard Paint?

Yes! You have to get the right kind of vinyl so it will stick. You will also need to prep the chalkboard first. More on this later though. Just know that yes, vinyl will definitely stick.

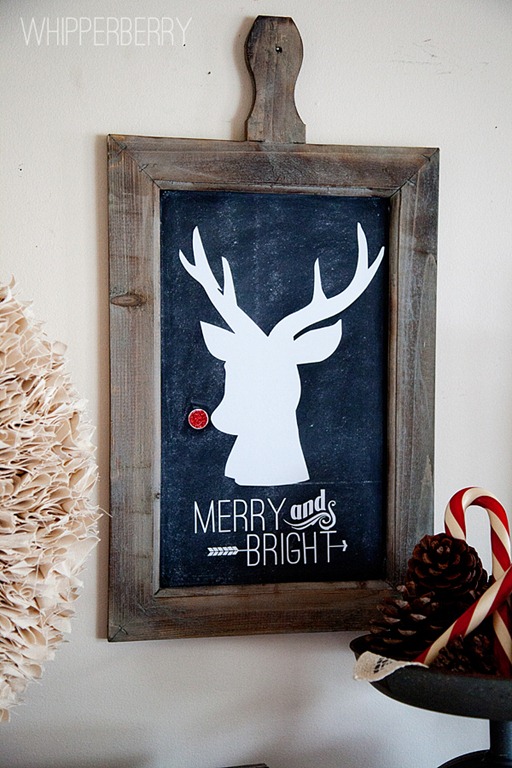
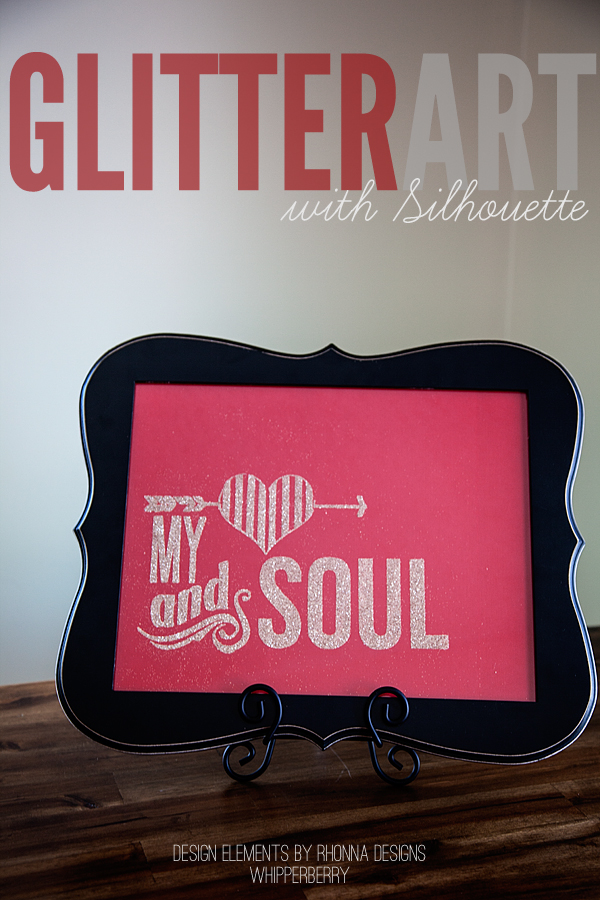
Now here’s the deal… As much as I love chalkboard art like the fabulous pieces created by my friend Rhonna Farrer, I have NO talent when it comes to hand-lettered art, like none. I wish that I did! I can however design stuff on my computer, so I thought I would create my chalkboard signs with white vinyl and make it look like chalkboard art. Easy fix!

Well, not so fast… You need a few tips before you can make a successful vinyl chalkboard sign.

  1. You need to prime your chalkboard. Here is a tutorial on how to prime your chalkboard.
  2. You need to clean your chalkboard with a wet cloth to remove any chalk dust, you need to work with a clean slate. Any dust or chalk on the board will make it difficult for the vinyl to adhere to your board.
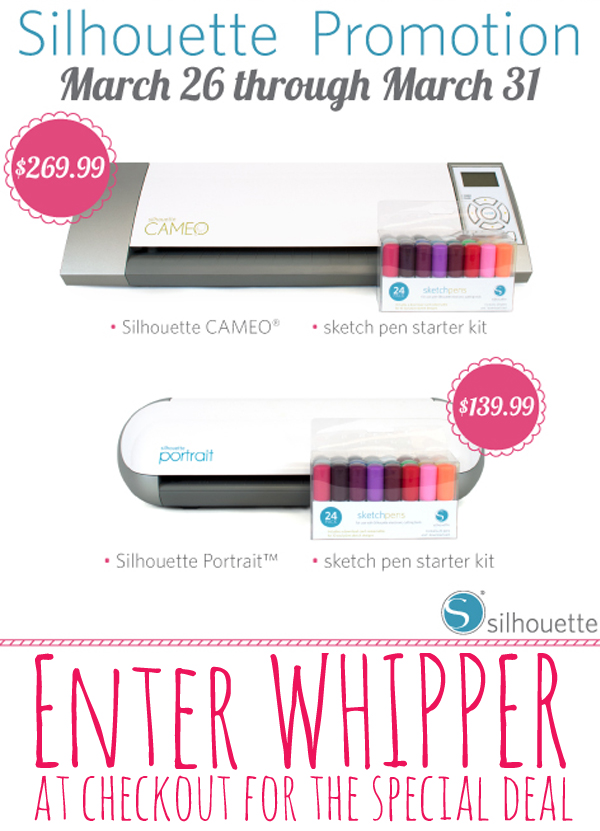
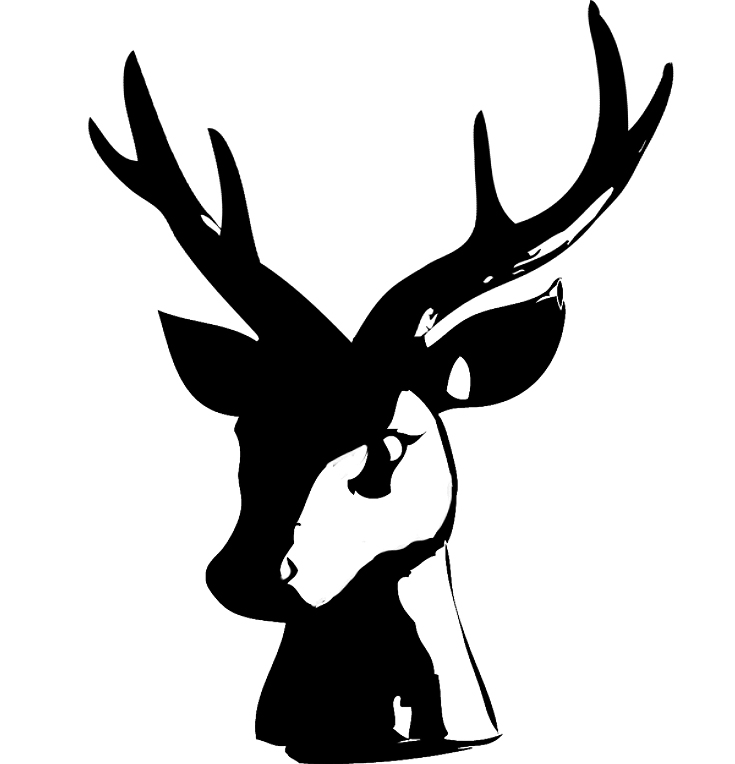
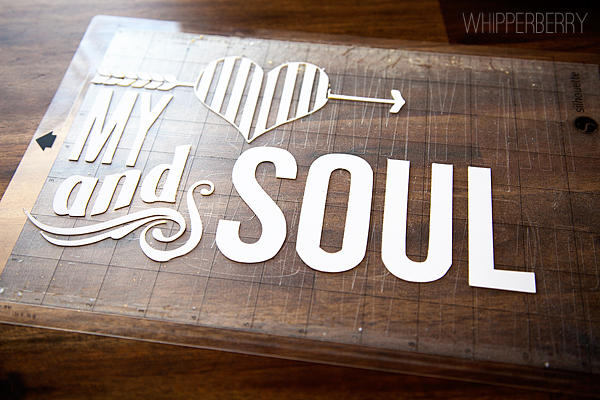
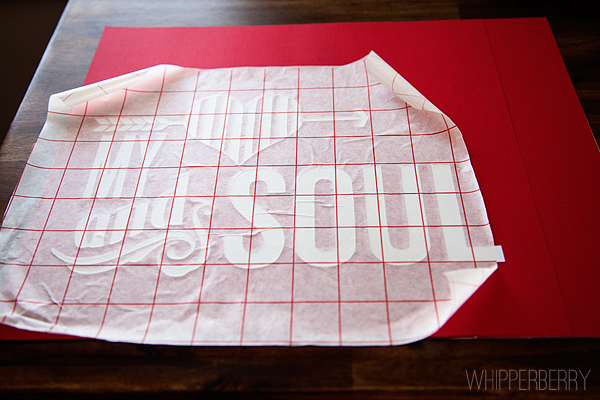
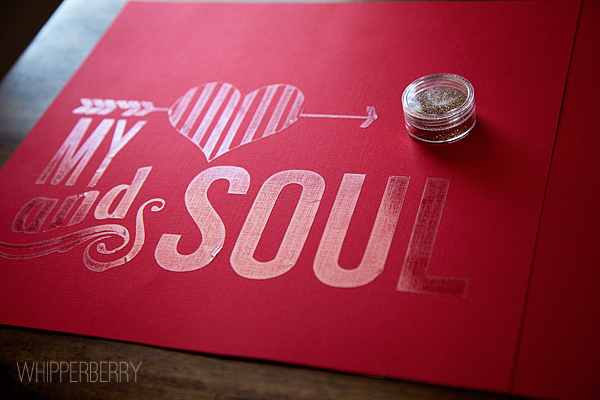
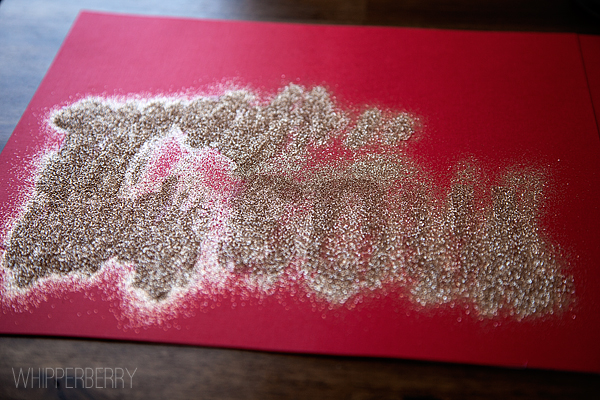
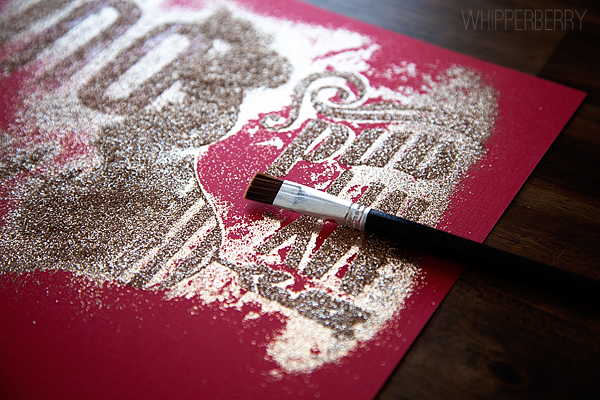
  3. Cut your vinyl with whatever method or machine you like,  I have a Silhouette CAMEO so that’s what I used. I also used Silhouette Premium White Vinyl for this project as well. Affix your vinyl to your board using the transfer tape method.
  4. To make your chalkboard look like a chalkboard sign, you need to add some chalk to the board. You would think that drawing on the board with chalk would do the trick, it won’t. You risk compromising the vinyl. Here’s my super easy trick to solve this problem… Take a piece of chalk and place it in a Ziplock bag and crush with a hammer. Take a paper towel and load it with some chalk dust by placing it in the bag. Next, rub the chalk carefully all over the sign. Gently tap off the extra chalk and volia, you have a fabulous chalkboard sign. That’s all there is to it!

What Supplies Do You Need to Create Vinyl Chalkboard Art?

There are only a few things you’ll need and I’ve covered a little so far already. I’ll list them here so you can get your supplies!

  • Silhouette CAMEO (This is the bundle pack which is a really good deal!)
  • The right kind of vinyl so it sticks to the chalkboard
  • A chalkboard (if you don’t have it already)

That’s really all you need.

Chalkboard Quotes I Like

Here are the different quotes that I’ve been collecting for a while. Now that my girls are getting older {15,11 & almost 9} I wanted them to see something inspiring and uplifting each day before they head off into the world. Here are the quotes that I settled on…

WhipperBerry Quote Wall

“Choose your friends with caution. Plan your future with purpose and frame your life with faith.” This quote is from Thomas S. Monson the President of our Church, The Church of Jesus Christ of Latter-Day Saints. “Always be kinder than necessary.” – J.M.Barrie

Chalkboard Inspiration Wall with Silhouette

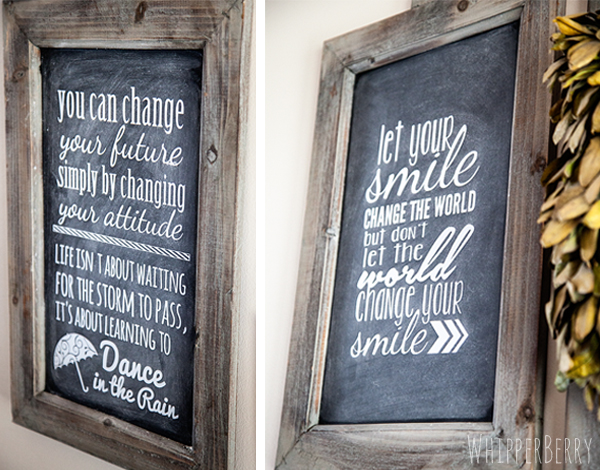
“You can change your future simply by changing your attitude.” This quote was suggested by Lil’Whip my 15 year old daughter Hales. I thought it was VERY appropriate. She’s not totally sure where she found the quote, so unfortunately I can’t give proper credit. “Let your smile change the world, but don’t let the world change your smile.” Again, this was from Lil’Whip’s Pinterest board, but we couldn’t find the person to give credit to, bummer!

Chalkboard Inspiration board

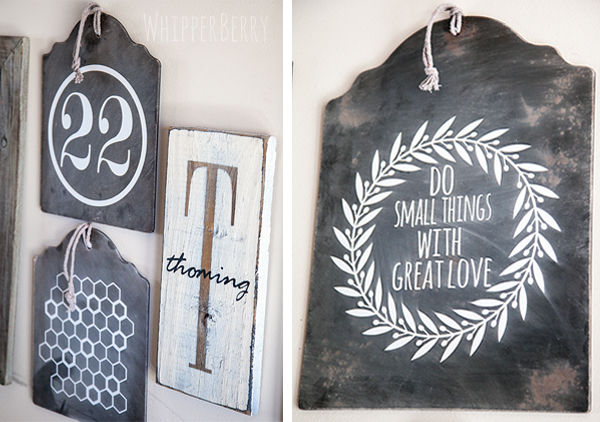
If you follow me on Instagram, you’ll know why the number 22 is my favorite number. Both my husband and I are born on the 22nd of two different months so of course, we also had to get married on the 22nd as well. It’s our number, so I had to add it to the board. The Thoming sign is from Signs by Andrea and I just adore it! I added the honeycomb graphic to go with the bee on one of the top boards. It’s to symbolize that, to have a successful family we ALL need to work together to create a successful home. I found the “Do small things with great love” quote from Lena Henzel.

I’m not totally finished with the project, I’m planning on adding some pops of color today for “Project Add Color” and I can’t wait to see how it turns out. I’ll show it off again when I’m totally finished. I may also have the svg files for you to download as well for the quotes that I used. Soooo, stay tuned!

Silhouette Sketch Pen Starter Kit Special // Silhouette Portrait Giveaway

2 · Mar 26, 2013 · 16 Comments

Silhouette Portrait GIVEAWAY // It's my favorite time of the month… It's Silhouette Promotion time!! The time each month when the lovely folks at Silhouette share a fabulous deal with everyone AND I get to give one of you, my favorite friends a Silhouette Portrait of your very own!!

Silhouette Portrait Giveaway at Whipperberry

This months Silhouette Special is featuring their new Sketch Pen Starter Kit…

Silhouette's new sketch pen combos

I made a fun banner for spring with the Sketch Pens, it turned out so cute.  My kiddos walked in the door from school and asked if I had drawn it myself. They were ooooohing and awwwing, saying I did such a good job… I of course told them I did. Well, I did!! I used my Silhouette CAMEO with my new Sketch Pens. I did confess and told them that I had a little help, but they were still impressed.

Silhouette Sketch Pens

Check out the fun detail that you can create with these pens…

Silhouette Sketch pen designs

I just made this quick banner, but I can now think of all kinds of fun things I can use these pens for. How about your Project Life journal cards. Yea… totally doing that. Cards, invitations, wall art… So many fun things you could make. Silhouette has a fabulous deal this month that includes the Sketch Pen Starter Kit…

Silhouette March Promotion

Yep you got it… $269.99 for a CAMEO and a sketch pen starter kit (a $49.99 savings)  //  $139.99 for a Portrait and a sketch pen starter kit (a $79.99 savings)  //  and you can get the Sketch Pen starter kit all by it's self for just $12.99 (a $7.00 savings)

Click HERE to visit the Silhouette March Special Site and don't forget to enter WHIPPER at checkout to receive this amazing deal!!

Now, raise your hand if you would like to WIN a brand new Silhouette Portrait? You would? Well here's what you need to enter to win. Follow all the steps in the Rafflecopter box below, cross your fingers and toes, think winning thoughts and make someone else day. If you do all of that, you'll feel so good about yourself and you may get lucky and win a Portrait too!! WIN, WIN!!

a Rafflecopter giveaway

Silhouette Studio Designer Edition Video Tutorial // Silhouette Portrait Giveaway

6 · Feb 28, 2013 · 24 Comments

Silhouette Portrait GIVEAWAY // I have so many treats in this post, I don't even know where to start!! Well, here are the three major components…

1. I'm giving away a Silhouette Portrait!!! 

Silhouette Portrait Giveaway at Whipperberry

2. I have an amazing deal on your choice of either a Silhouette CAMEO, Silhouette Portrait, both with the Silhouette Studio Designer Edition OR a smokin' deal on the software alone.

Silhouette March Promo

3. A video tutorial on how to convert a PNG file to a cutable image with your Silhouette Studio Designer Edition Software.

Title Image

All three of those things are pretty awesome in my book! Let's start with the tutorial and work our way up the list…

Silhouette Studio Designer Edition Video Tutorial

I have been wanting to create this video for you guys since DECEMBER! Man-o-Man does time fly. We're knocking on the door of good ole' Saint Patricks Day and I'm finally getting around to it. Remember my post around Christmas time about my Winter White Wreath along with the cute Rudolph Silhouette sign? Let me refresh your memory…

Rudolph-Sign

I actually converted that image from a PNG file from Rhonna Designs that looks like this…

17InstaChristmas_RhonnaFarrer

They look pretty different, right? Now, I know we aren't looking to recreate Rudolph right now, but this is actually a good image to show you what the software is capable of. You can select any PNG and the same techniques will apply. Here's a video on how to convert a PNG file into an image that you can use with your Silhouette products.

How cool is that? I'm totally digging this video tutorial stuff. I think I am going to work on more of those for you guys.

Silhouette March Promotion

Now that you've seen what you can do with your Silhouette Studio Designer Edition, You kind of want to get it… Don't you? I totally understand. The software is normally $50 but for the next little bit, you can grab it for only $24.99! Click here to visit the Silhouette Store for all of the amazing deals this month. 

  • Silhouette CAMEO with Designer Edition Software $269.99 (msrp $348.98)
  • Silhouette Portrait with Designer Edition Software $179.99 (msrp $249.98)
  • Silhouette Studio Designer Edition Software $24.99 (msrp $49.99)

Make sure you use WHIPPER at checkout to receive the smokin' hot deal! This deal is good February 28th through March 8th.

Silhouette Portrait GIVEAWAY

Feelin' lucky? Would you like to try and WIN a Portrait of your very own? Well, follow the directions in the Rafflecopter box below and see if the luck of the Irish is with you this month!

a Rafflecopter giveaway

Silhouette Portrait Giveaway, Discount Code and the NEW Double Sided Adhesive

0 · Feb 2, 2013 · 10 Comments

Silhouette Portrait GIVEAWAY, Discount Code and Glitter Art with Double Sided Adhesive // That's a mouth full!! So much stuff going on this week. It's started yesterday, with our Ultimate Valentine's Day Getaway Giveaway and now I have a rare Saturday post with the ever popular Silhouette GIVEAWAY!!

Silhouette Portrait Giveaway

But, before we get to the giveaway… I'm and super excited to show off one of the new products that Silhouette announced at CHA last month. Their Double Sided Adhesive and the new Silhouette Glitter, perfect for creating stunning glitter art…


Glitter Art with Silhouette

I created this wall art for Valentine's Day by cutting out an image from Rhonna Designs Insta Kiss kit in the new Double Sided Adhesive using the Silhouette Designer Edition software. The double sided adhesive is perfect for all kinds of applications that involve glitter or flocking and certainly makes the whole process of working with glitter sooooooo much easier! I cut the image and weeded out the excess material…


cutting double sided adhesive from Silhouette

Then I decided to use transfer tape to make sure the image stayed in tact. When cutting a more simple design, you really don't need to use the transfer tape.


Use transfer paper to help transfer your double sided adhesive

Next, I removed the transfer tape and the white layer of the adhesive and got ready for the fun part,  the glitter…


My heart and soul sign

Now who doesn't love GLITTER? Well, maybe my husband. He hates it!! But you know, the Double Sided Adhesive actually makes it really easy to work with…


Silhouette Glitter

All you need to do is pour the glitter onto to the adhesive…


Glitter with Silhouette double sided adhesive

Brush it away with the brush that is included in the Double Sided Adhesive starter kit and voila you're done!! No messy glue, and your image is perfect and crisp.


My heart and soul glitter art

I framed my "Heart and Soul" in a trendy frame from Hobby Lobby and I LOVE it!! Want to give it a go? You know you want to! Silhouette has a great deal for you whether you have a Portrait, CAMEO already or if you don't… Silhouette has a special deal for that as well.

Use WHIPPER at checkout to receive the February discount

Click here to access the February Silhouette Special!

If you're feeling lucky… You can enter to win a Portrait!!

a Rafflecopter giveaway

  • « Go to Previous Page
  • Page 1
  • Interim pages omitted …
  • Page 5
  • Page 6
  • Page 7
  • Page 8
  • Page 9
  • Go to Next Page »

Primary Sidebar

Heather from Whipperberry
Hello... my name is Heather and I'm the creator of WhipperBerry a creative lifestyle blog packed full of great recipes and creative ideas for your home and family. I find I am happiest when I'm living a creative life and I love to share what I've been up to along the way... Come explore, my hope is that you'll leave inspired!

Footer

  • Privacy Policy
  • Crafts
  • Food
  • Gifts
  • Holidays
  • Home
  • Mom Life
  • Recipes
  • Travel

Copyright © 2026 · Seasoned Pro