• Skip to primary navigation
  • Skip to main content
  • Skip to primary sidebar
  • Skip to footer

Whipperberry

WhipperBerry • Your Home For Creative Inspiration

  • Home
  • About
    • Terms
  • Recipes
    • ZipList
    • Starters
    • Easy Weeknight Dinners
    • Main Dish
    • Salads
    • Side Dish
    • Soups & Stews
    • Desserts
    • Breakfast
    • Miscellaneous
  • Tutorials
    • Creative Crafts
    • DYI Decor
    • Fabric Crafts
    • Food How-To
    • Jewlery
    • Paint Projects
    • Paper Art
    • Party Styling
    • Photography and Graphic Design
    • Silhouette
  • Holidays
    • St. Patrick’s Day
    • Easter
    • Mother’s Day
    • Father’s Day
    • 4th of July
    • Halloween
    • Thanksgiving
    • Christmas
    • New Years
    • Valentine’s Day
  • Gift Ideas
    • Gifts For Everyone
    • Gifts for Dad
    • Mother’s day
    • For The Girls
    • For The Kids
    • Teacher Gift Ideas
    • Christmas
  • Printables
    • Holiday
    • Gift Idea
    • LDS Primary
  • Travel
  • Contact
  • Nav Social Menu

    • Facebook
    • Instagram
    • Pinterest
    • RSS
    • Twitter

DecoArt

Crane & Canopy Review – My Designer Bedding Makeover

13 · Aug 13, 2022 · 10 Comments

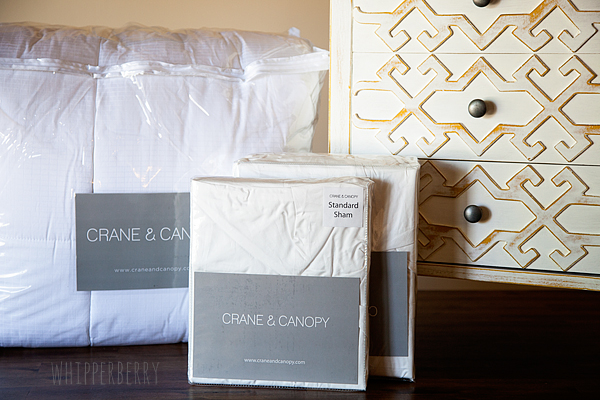
I recently got Crane & Canopy bedding. I’ve always wanted some designer bedding to go with my fancy pants sleep number bed. Now, let me share with you my Crane & Canopy review.

Bedroom Makeover with Crane & Canopy

Key Takeaways

I think Crane &Canopy makes great bedding but it’s expensive! Below are my key takeaways if you’re short on time.

  • Great Comforter
  • Perfect weight
  • Fluffy
  • Great features
  • BUT IT IS EXPENSIVE!

If $200+ is too expensive for bedding for you, then I have a great alternative for you that I’ve tried since writing this Crane & Canopy review years ago. The bedding is practically the same quality but for about half the cost.

Check out the Crane & Canopy Bedding alternative below:

View it Here

My Crane & Canopy Story & Review

I LOVE my bed. I know most of us do… but I REALLY LOVE my bed! As much as I love to travel, there is nothing like coming home to my own bed. If you have the right bed, (which I do… it’s a Sleep Number bed) it fits you like a glove and gently soothes you into a deep sleep. As a girl, I used to daydream about my bed (yea, I told you I love my bed). To me, the only way to go is a bed not unlike what you would find in a Swiss chalet (at least the Swiss chalet in my imagination, I’ve never really stayed in said chalet.)

  • Crisp & white.
  • White duvet, filled with a heavenly down comforter.
  • Crisp white sheets & lots and lots of white pillows.

It would be a perfect little white nest. I can just imagine coming home from a day of skiing out in the powdery Swiss snow and jumping into my plush white cloud, snuggling under the covers with my sweetie, and reading a good book… among other things (blush). Really, that was my dream Honeymoon for years… Instead, we went to Vegas. Yea, didn’t really hit the mark on that one.

Not to worry, minus the Swiss Alps and the skiing, I can still have my dream bed!!

For years I have searched for bedding that was just right. I’ve made due for many years because I wanted a certain quality that was just out of my price range. I could have gone to any big box store and purchased the same type of bedding, pretending that I really had the bedding of my dreams. In reality I would have a cheap impostor. The fabric would be rough and the fill would be clumpy and weak. It just wasn’t what I was looking for.

Not too long ago, the folks at Crane & Canopy introduced me to their innovative line of luxury bedding. After a few weeks of taking it for a test drive, I can safely say… From now on, Crane & Canopy is going to be my one-stop shop for affordable designer bedding!

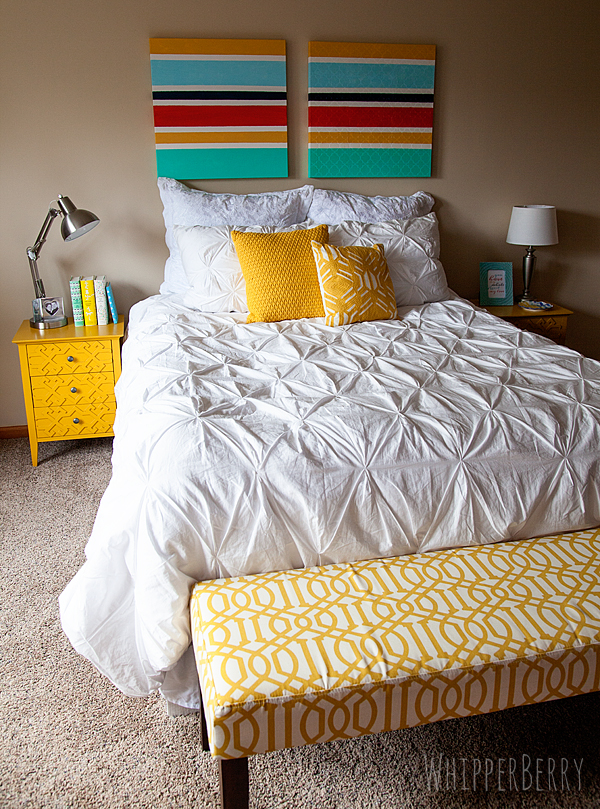
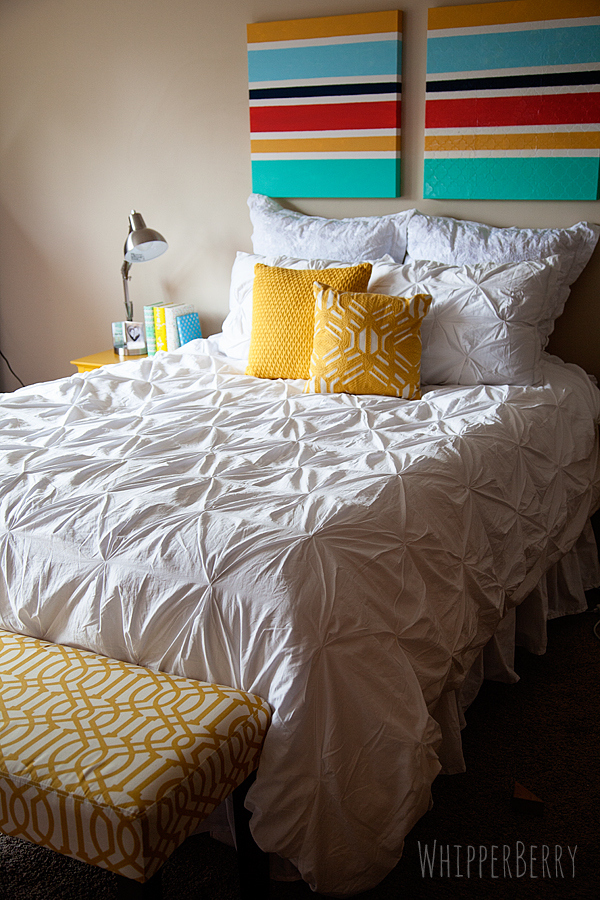
I selected the bedding that was as close to a cloud as I could possibly find… The Valencia White Pintuck Duvet Set.

Crane & Canopy Bedding on WhipperBerry

There are surely some negative reviews about Crane and Canopy online but I really don’t understand them. When you’re sleeping in the clouds like this, what’s not to love?

Now, this bedding has a ton of features that you won’t find at your typical big box store.

Crane & Canopy Bedding

  • 400 thread count
  • 100% cotton sateen
  • The pintucks are sewn to perfection and will not come unpinned even when washing.
  • The duvet cover  has a hidden pocket zipper which makes it so much easier to use. No more clunky button closures.
  • Interior corner ribbons to tie down the insert… this my friends is aaaaamazing!!  For YEARS my husband and I have dealt with our down comforter shifting all over the place and creating all kinds of havoc on our bed. If you have a duvet, you know exactly what I am talking about. These corner ties are genius!

Crane & Canopy Duvet Ties

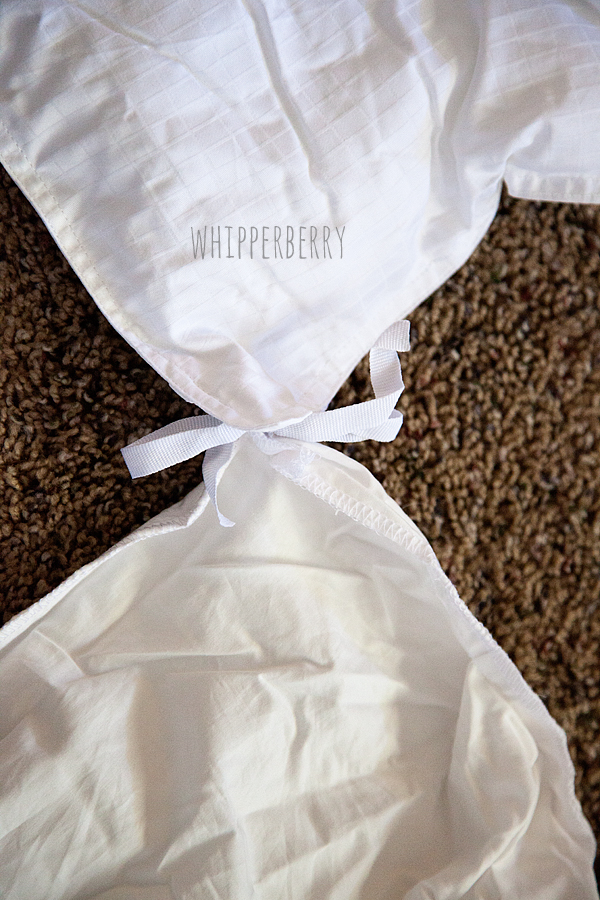
All you have to do is turn the duvet inside out and tie the top two corners. Then turn it right side out, pull the duvet down, tie the bottom two corners then zip up the bottom… It’s PERFECT!

The alternative bedding I suggested at the beginning of this review also has these features. You can check it out here:

View it Here

I decided that with the new bedding I needed to give our room a little makeover at the same time. I created some custom wall art with some amazing new products from DecoArt. I will be showing off this fun new technique in a few weeks on the DecoArt Blog.  Then, I added a few fun new accessories from my favorite shop… Target!

The bench is part of the fabulous Threshold collection, along with the accent tables. 
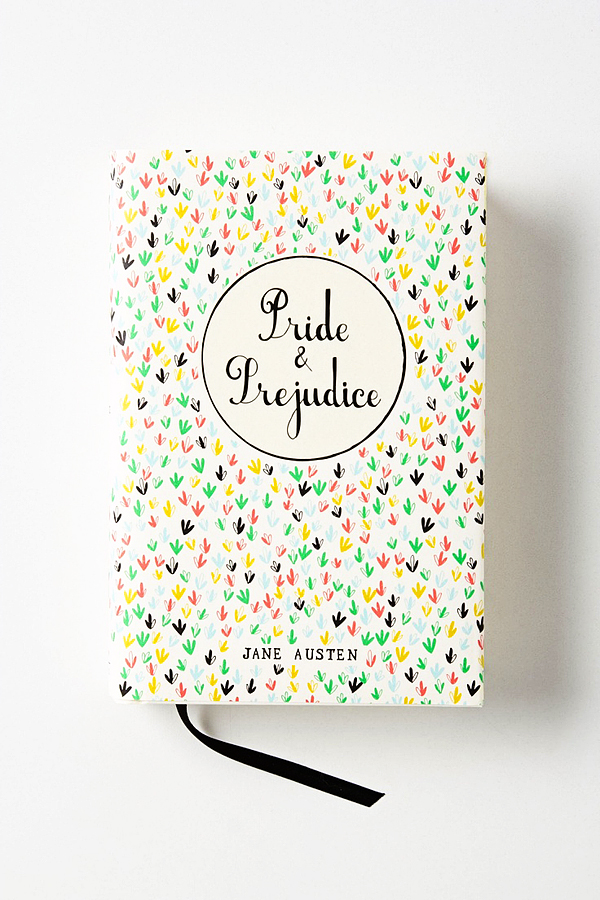
Both lamps are from Target as well. The one on the right I’ve had for awhile and they no longer carry it. The one on the right is a fabulous Architect Desk Lamp that I just love. The books are from Anthropologie. I actually took the color scheme for the makeover from the cover of Anthro’s Pride & Prejudice.

Pride and Prejudice

Just because I want to sleep in a cloud doesn’t mean that the whole room needs to be devoid of color. All in all, I adore my new room. I LOVE, LOVE, LOVE my new bedding from Crane & Canopy. My husband and I just celebrated 13 years together last week, and I can finally say… I have my dream bed!

Crane & Canopy Bedroom Makeover on WhipperBerry

Where is Crane & Canopy Made?

Crane & Canopy is designed in San Francisco, CA.  Then the bedding is manufactured in Oeko-Tex factories. These are the highest standard of factories that exist for bedding products. These certified factories are located all across the world in many different countries and likely help with distribution.

Crane & Canopy Bedding Features

I covered some of the features above in my rambling but I will list out some of the amazing features below.

  • Highest quality cotton
  • High thread counts
  • Zipper enclosure at bottom of the duvet cover.
  • Interior corner ties to keep your comforter in place.

The other alternative has very similar features but for half the cost.

View it Here

Is Crane & Canopy Bedding Worth The Cost?

If you can’t tell by now, I love my Crane & Canopy bedding and Duvet. It’s designer, it’s fluffy, and it’s amazing overall. The main question you probably have is if it’s worth the cost. After all, it is a bit expensive and there are some bad Crane & Canopy reviews out there online. In my humble opinion, it’s 100% worth it but you can also get something similar for half the price. You sleep in your bed every night. If there’s one thing you should spend a bit of extra money on it’s a comfy and fluffy bed. You’ll get a better night’s sleep and wake up thinking you’re in a chalet.

What’s your dream bed? Do you have it yet? If not, I highly recommend you head over to Crane & Canopy and check out their entire line of designer bedding. Tell them WhipperBerry sent ya! However, if that’s too expensive you can get an alternative here:

View it Here


Disclaimer // This post has been sponsored by Crane & Canopy. I did receive product to review, but I was not paid for my review. This is why I am also recommending an alternative. All thoughts, ideas & opinions are my very own. Rest assured, I will NEVER post about a product or a company that I don’t wholeheartedly believe in and use in my normal everyday life.

DIY Pearlized Wood Bead Star Ornament

71 · Nov 16, 2018 · 1 Comment

I love wood beads, it’s a classic trend that I can fully embrace and not feel like it’s going to go out of style anytime soon.  Plus, you don’t have to worry about them breaking which is an added bonus as well. This year for the Michaels Dream Tree Challenge I made a large wood bead star for the top of my tree and I fell in LOVE with my new star. Then I thought it would be fun to use some DecoArt Americana Decor Matte Metallic paint to pearlized some wood beads to make a smaller wood bead star ornament for my Christmas tree. As promised in my Instagram story, I also made a video for how to make the star. Let me show you how EASY it is!

+ This post sponsored by DecoArt+How to make a classic pearlized wood bead star ornament for Christmas decorating or for Hanukkah • WhipperBerry

Over the years I’ve fallen more and more in love with making my own Christmas ornaments. It really does add more of a story to your Christmas celebration. If they are ornaments that the whole family can make together, even better. This project can be a bit messy, however, if planned for that’s not a bit deal. It would be great fun for kiddos of all ages to play around with the paint and string some “pearls” during a cozy winter activity together. Here is what you’ll need to make the pearlized wood bead ornament.

Pearlized Wood Bead Ornament Supplies

How to make a classic pearlized wood bead star ornament for Christmas decorating or for Hanukkah • WhipperBerry

  • raw wood beads 
  • Americana Decor Matte Metallic paint – Ivory Pearl
  • string
  • scissors
  • aluminum foil
  • ribbon
  • large needle
  • hot gun
  • hot glue stick

Instructions

You guys, this project can be some messy fun if you’d like OR, you can keep it nice and neat. Either way, it’s a fun project to work on with the family. The first thing you’ll need to do is create your “pearls.”

How to make a classic pearlized wood bead star ornament for Christmas decorating or for Hanukkah • WhipperBerry

To do that, you’ll need to line a dish with aluminum foil and then pour a small amount of paint into your lined paint tray.

How to make a classic pearlized wood bead star ornament for Christmas decorating or for Hanukkah • WhipperBerry How to make a classic pearlized wood bead star ornament for Christmas decorating or for Hanukkah • WhipperBerry

This is the fun part… rather than laboriously painting each and every bead (there are 30.) You will just dump them into the tray of paint.

How to make a classic pearlized wood bead star ornament for Christmas decorating or for Hanukkah • WhipperBerry

How to make a classic pearlized wood bead star ornament for Christmas decorating or for Hanukkah • WhipperBerry

The paint is a little think so you can move them around by moving the tray a bit but, you most likely either need to use your fingers or a tool to spin the beads around in the paint to cover the surface of the bead.

How to make a classic pearlized wood bead star ornament for Christmas decorating or for Hanukkah • WhipperBerry

For this project, I’m using an upholstery needle to string the beads so I used that to move the beads around a bit and then resorted to my fingers. 😉

Next, I threaded the string on my needle and strung the beads onto the string so that they could dry without resting on a surface.

How to make a classic pearlized wood bead star ornament for Christmas decorating or for Hanukkah • WhipperBerry

How to make a classic pearlized wood bead star ornament for Christmas decorating or for Hanukkah • WhipperBerry

How to make a classic pearlized wood bead star ornament for Christmas decorating or for Hanukkah • WhipperBerry

Now, this part can get a little messy, make sure your surface is protected with foil or some other material to cover your surface. Once all of the beads are on the string, you will want to hang it from something you have around the house, even taping it between two soda boxes will work.

How to make a classic pearlized wood bead star ornament for Christmas decorating or for Hanukkah • WhipperBerry

Now, you will need to touch up any bald spots and then let them dry for a couple of hours. Halfway through, when the beads are dry to the touch, pull them apart so that the paint dries between the beads. Once they are dry, you’re ready to make your star. As promised, I created a video to show you how.

How cool is that? So EASY, right? Go grab your supplies and have these ready to go for when you have downtime next week during your Thanksgiving celebration. The family will love it AND, they’ll look fabulous on your tree!!

How to make a classic pearlized wood bead star ornament for Christmas decorating or for Hanukkah • WhipperBerry

Toddler Activity Pencil Jars 

27 · Nov 7, 2018 · Leave a Comment

This post is brought to you by Ball® Fresh Preserving Products by Newell Brands

Do you know that old saying from Chaucer, “Idle hands are the Devil’s tools”? It’s an understatement when it comes to toddlers and preschoolers. I’m the mother of four and I would have to say, I’ve experienced love from those cute little puggy hands along with total mayhem. We have one member of our family who has been called “Poopy Picasso” a few times in their life. I’ll let you figure that one out on your own. I’ve also worked in early childhood education and have learned that busy hands that have been guided successfully, are hands that are constantly learning and growing. That’s why I am making these Toddler Activity Jars for all of my younger friends this year for the holidays. 

busy hands that have been guided successfully, are hands that are constantly learning and growing. That’s why I am making these Toddler Activity Jars for all of my younger friends this year for the holidays. 

There are two key components for this project. The cute Ball® Sharing Jars along with fun activities inside of the jars.  These jars are meant to be managed by an adult so that the kiddos won’t risk breaking the jars. I like to keep mine on a shelf where the little ones can see them but have to ask to have them brought down by a grown-up. They know there are going to have something fun inside, and each time you bring one of the jars down, they never know what they are going to find. One time the yellow jar will have the fishing game, the next time it might have a matching game or, maybe a pad of paper and some fun crayons. That’s what’s fun about these jars, they will always have something fun and colorful inside. That’s pure magic for this age group. Here’s what you need to do to make some of your own.

Toddler Activity Jars Supplies

  • Ball® Wide Mouth Quart Sharing Jars
  • Chalk Paint
    • White
    • Black
    • 4 complimenting colors
  • Chalk painting brush
  • Small flat paint brush
  • 600 grit sandpaper

Instructions

The minute I was introduced to the Ball® Sharing Jars I thought they would look super cute as a pencil jar and couldn’t wait for a chance to give that project a go. Now, when chalk painting jars like this, the plan from the beginning is that you will distress them a bit as you are finishing up the project. With that in mind, you will want to decide on what color you want to come through as you distress down through the paint. For this project, I decided to go with white as an undercoat and then set to work.

I painted two coats of the white letting it dry in between coats. Make sure that you don’t paint the bottom of the jar. This is a fun little element that the toddlers will love. It’s a little window where they can sneak a peek to see what’s inside.

Next, I painted the four different colors, one on each of the four jars. 

Because of the nice white bottom layers, I didn’t really need a 2nd coat for the other colors. I let these dry overnight at this point. You really need the paint to have time to not only dry but to also cure. The following day I distressed the jars to give them that worn-in look. 

Once the distressing was finished and I had wiped the jars down with a damp cloth and let them dry, I added the white scallop at the top to look like the sharpened pencil. I just followed the lines of the Sharing Jar which are perfect for the pencil shape. I painted in rough small circles with a thicker chalk paint to add some texture to the surface to make it look more like wood. Once that had dried, I added a ring of black chalk paint to make it look like the pencil lead. I also used the small flat brush to lightly line the raised edges on the side of the Sharing Jar to highlight the jars structure and its pencil-like shape.

Now, with these jar being used by sticky little fingers, I would use a chalk paint finishing wax to protect the paint and keep it from distressing any further. 

Pro Tip – If brush lines bother you in your finished project (sometimes it adds to the effect of the project) all you have to do is smooth the surface of the paint after each layer of paint. You can do that by lightly sanding it with a 600 grit sandpaper. 

Toddler Activity Ideas

 Here is where the sky is the limit. You can fill these jars with all kinds of fun for toddlers and preschoolers alike. I made a couple to show what you could with these fun jars. A color matching paint palette & a fishing game. Both of these projects were no-sew and easy to put together. I used my Cricut cutting machine to cut the felt, but you could always print a pattern and then cut them out yourself. If you do happen to have a Cricut Maker, you are more than welcome to use my Toddler Activity cut files for this project. It’s already sized and ready to go.

The paint palette was easy, I glued the circles of “paint” onto the artist’s palette with some fabric glue and then glued two other circles of “paint” onto a clothespin. One on the top of the clothespin and one sandwiching the top section of the clothespin, inside of the open pin, so the top piece of wood is sandwiched in felt and the bottom section is free. This way your little ones can clip the paint sticks onto the corresponding paint on the palette. 

When the glue is totally dry, I fold the palette in half and then roll it up like a cone and place it inside of the jar and put all of the paint sticks inside as well.


The fishing game is just as simple. Just a little cutting and gluing.


I placed a heavy-duty washer in between two layers of felt fish and used a fabric glue to glue the two pieces of felt together.

Then I wrapped a strong magnet in fabric (to minimize the choking hazard) tied it off with a string. Then, I hot glued a piece of rope to the wrapped magnet. I put a finger loop at the top of the string for our little friends to slip their finger into and go fishing!

These are just two ideas to fill your fun pencil jars! You can make some memory games, matching letters and number games. All kinds of stuff will go in these fun jars.  

Snowflake Lantern Holiday Gift Idea 

767 · Oct 17, 2018 · 7 Comments

I’m not sure if there is anything more glorious than the thought of the first snow each year. I don’t care if you love or hate snow, the first snowfall of the year is always a fun event.

I’m thrilled that this season’s Ball® Keepsake Collectible Holiday Jar is an ode to the stunning snowflake! I decided that a fun way to use this fun collectible jar is to make snowflake lanterns that are perfect for dressing up your home for the winter season or, as a fabulous holiday gift.

The autumn is full of fun treats like all things pumpkin, apple preserves, hayrides through the pumpkin patch and so much more.

Towards the end of the autumn festivities there arrives a great anticipation in the air… when will it snow? I feel like no matter what part of the country you live in, snowflakes are truly magical. I’m thrilled that this season’s Ball® Keepsake Collectible Holiday Jar is an ode to the stunning snowflake!

I decided that a fun way to use this fun collectible jar is to make snowflake lanterns that are perfect for dressing up your home for the winter season or, as a fabulous holiday gift.

I can just imagine an army of these snowflake lanterns lining the walkway up to your home this winter season, warmly inviting your friends into your holiday gathering.

Won’t that be pretty? Let me teach you how to make them.

Snowflake Lantern Supplies

This project is pretty simple and doesn’t really require much in the way of supplies. Here is what you’ll need.

There are three different options for the Ball Mason jars. You can get a 4 pack of Keepsake Ball Mason jars, an 8 pack of regular Ball Mason jars, or a 24 pack of Snowflake Holiday jars. Now that I’ve redone this project a few times, I recommend the Snowflake Jars.

You can make these every Christmas! The snowflake jars add a really nice touch.

  • Ball® Snowflake Holiday Jars (24 Pack) This is the best option!
  • Regular jars in a set of 8
  • Regular jars set of 4
  • decoupage glue & Foam Brush Kit
  • Epsom salt – 1/2 cup for every 4 pack of jars
  • 2 1/2 inch circle vinyl sticker (optional)
  • decorative sand filler (optional)
  • small candles
  • 3/8” black ribbon
  • greenery with small berries
  • hot glue gun with sticks

  I’m thrilled that this season’s Ball® Keepsake Collectible Holiday Jar is an ode to the stunning snowflake! I decided that a fun way to use this fun collectible jar is to make snowflake lanterns that are perfect for dressing up your home for the winter season or, as a fabulous holiday gift.

Snowflake Lantern Instructions

This first part of the project will be super fun to do with your older kiddos. Grab your Ball® Keepsake Collectible Holiday Jars, decoupage glue, foam brush, stickers (if you are using them) and Epsom salt. 

I’m thrilled that this season’s Ball® Keepsake Collectible Holiday Jar is an ode to the stunning snowflake! I decided that a fun way to use this fun collectible jar is to make snowflake lanterns that are perfect for dressing up your home for the winter season or, as a fabulous holiday gift.

You’ll want to protect your work surface and have some type of container big enough to fit the jar into along with a large spoon at the ready.

I’m thrilled that this season’s Ball® Keepsake Collectible Holiday Jar is an ode to the stunning snowflake! I decided that a fun way to use this fun collectible jar is to make snowflake lanterns that are perfect for dressing up your home for the winter season or, as a fabulous holiday gift.

Fill your container with the Epsom salt half way.

I’m thrilled that this season’s Ball® Keepsake Collectible Holiday Jar is an ode to the stunning snowflake! I decided that a fun way to use this fun collectible jar is to make snowflake lanterns that are perfect for dressing up your home for the winter season or, as a fabulous holiday gift.

Place your sticker over the snowflake to protect that area from the decoupage glue and Epsom salt.

I’m thrilled that this season’s Ball® Keepsake Collectible Holiday Jar is an ode to the stunning snowflake! I decided that a fun way to use this fun collectible jar is to make snowflake lanterns that are perfect for dressing up your home for the winter season or, as a fabulous holiday gift.

If you don’t want to bother with the sticker, that’s totally fine. I made mine using my Cricut Maker or you can order them online. I prefer the sticker method because it creates a nice crisp line for the circle window of the lantern.

You are more than welcome to freehand a circle around the snowflake with your foam brush. Just know that your lines won’t be as perfect.

Cover your jar from below the rim down with the decoupage glue. Do not place glue on the bottom of the jar or on the jar threads.

I’m thrilled that this season’s Ball® Keepsake Collectible Holiday Jar is an ode to the stunning snowflake! I decided that a fun way to use this fun collectible jar is to make snowflake lanterns that are perfect for dressing up your home for the winter season or, as a fabulous holiday gift.

Using your large spoon, carefully cover the jar with the Epsom Salt. Make sure not to touch the surface of the jar with the glue on it. It will make for uneven coverage of “snow” on the jar. I also found that rolling the jar in the Epsom salt really didn’t give the desired effect as well. You really want to pour the “snow” over the decoupaged jar to create the nice snowy effect.

I’m thrilled that this season’s Ball® Keepsake Collectible Holiday Jar is an ode to the stunning snowflake! I decided that a fun way to use this fun collectible jar is to make snowflake lanterns that are perfect for dressing up your home for the winter season or, as a fabulous holiday gift.

Let your jars dry, undisturbed overnight. 

I’m thrilled that this season’s Ball® Keepsake Collectible Holiday Jar is an ode to the stunning snowflake! I decided that a fun way to use this fun collectible jar is to make snowflake lanterns that are perfect for dressing up your home for the winter season or, as a fabulous holiday gift.

This is a great project to make an assembly line. Grab a friend or your older kiddos and go to town and make a bunch of these fun gifts for friends, neighbors, teachers, bosses… I could go on and on. I LOVE that it could be a great holiday gift that doesn’t involve sugar!

I’m thrilled that this season’s Ball® Keepsake Collectible Holiday Jar is an ode to the stunning snowflake! I decided that a fun way to use this fun collectible jar is to make snowflake lanterns that are perfect for dressing up your home for the winter season or, as a fabulous holiday gift.

The following day, carefully remove your vinyl sticker. You may want to use a toothpick or tweezers to help get the sticker removal started.

Also, you may want to wear eye protection, the Epsom salt tends to fly in this stage of the process. I managed to have a little piece fly into my mouth and it was NOT tasty. So…eye protection and keep your mouth closed. 

I’m thrilled that this season’s Ball® Keepsake Collectible Holiday Jar is an ode to the stunning snowflake! I decided that a fun way to use this fun collectible jar is to make snowflake lanterns that are perfect for dressing up your home for the winter season or, as a fabulous holiday gift.

I’m thrilled that this season’s Ball® Keepsake Collectible Holiday Jar is an ode to the stunning snowflake! I decided that a fun way to use this fun collectible jar is to make snowflake lanterns that are perfect for dressing up your home for the winter season or, as a fabulous holiday gift.

Now you’re ready to decorate your jar. Fire-up your hot glue gun and prep your ribbon and winter greenery. I found my greenery at Michaels. It was a little wreath that I disassembled, and it worked perfectly.

I hot glued the greenery just above the lip of the jar that leads into the jar threads. I found that a little hot glue dot helped to secure the bottom section of the greenery to the jar creating it a nice frame around one side of the snowflake window.

Next, I tied the ribbon around the top of the jar, covering the hot glued section of the greenery, and tying a little knot. After that, I snipped off the ends using the inverted point technique.

I’m thrilled that this season’s Ball® Keepsake Collectible Holiday Jar is an ode to the stunning snowflake! I decided that a fun way to use this fun collectible jar is to make snowflake lanterns that are perfect for dressing up your home for the winter season or, as a fabulous holiday gift.

Then, fill the bottom of the jar with a 1/4 cup of either Epsom salt or decorative sand.

I’m thrilled that this season’s Ball® Keepsake Collectible Holiday Jar is an ode to the stunning snowflake! I decided that a fun way to use this fun collectible jar is to make snowflake lanterns that are perfect for dressing up your home for the winter season or, as a fabulous holiday gift.

I found the Ball® preserving funnel came in handy here.  

I’m thrilled that this season’s Ball® Keepsake Collectible Holiday Jar is an ode to the stunning snowflake! I decided that a fun way to use this fun collectible jar is to make snowflake lanterns that are perfect for dressing up your home for the winter season or, as a fabulous holiday gift.

After I placed the little candle into the jar, I lit-her-up!  

I’m thrilled that this season’s Ball® Keepsake Collectible Holiday Jar is an ode to the stunning snowflake! I decided that a fun way to use this fun collectible jar is to make snowflake lanterns that are perfect for dressing up your home for the winter season or, as a fabulous holiday gift.


These snowflake lanterns made from the Ball® Keepsake Collectible Holiday Jars look snowy and beautiful. All ready to usher in those Hygge winter nights! 


I’m thrilled that this season’s Ball® Keepsake Collectible Holiday Jar is an ode to the stunning snowflake! I decided that a fun way to use this fun collectible jar is to make snowflake lanterns that are perfect for dressing up your home for the winter season or, as a fabulous holiday gift.

  • Go to page 1
  • Go to page 2
  • Go to page 3
  • Interim pages omitted …
  • Go to page 9
  • Go to Next Page »

Primary Sidebar

Heather from Whipperberry
Hello... my name is Heather and I'm the creator of WhipperBerry a creative lifestyle blog packed full of great recipes and creative ideas for your home and family. I find I am happiest when I'm living a creative life and I love to share what I've been up to along the way... Come explore, my hope is that you'll leave inspired!

Footer

  • Privacy Policy

Copyright © 2023 · Seasoned Pro