• Skip to primary navigation
  • Skip to main content
  • Skip to primary sidebar
  • Skip to footer

Whipperberry

WhipperBerry • Your Home For Creative Inspiration

  • Home
  • Recipes
    • Starters
    • Easy Weeknight Dinners
    • Main Dish
    • Salads
    • Side Dish
    • Soups & Stews
    • Desserts
    • Breakfast
    • Miscellaneous
  • Tutorials
    • Creative Crafts
    • DIY Decor
    • Fabric Crafts
    • Food How-To
    • Jewlery
    • Paint Projects
    • Paper Art
    • Party Styling
    • Photography and Graphic Design
    • Silhouette
  • Holidays
    • Easter
    • Mother’s Day
    • Father’s Day
    • 4th of July
    • Halloween
    • Thanksgiving
    • Christmas
    • Valentine’s Day
  • Gift Ideas
    • Gifts For Everyone
    • Gifts for Dad
    • Mother’s day
    • For The Girls
    • For The Kids
    • Teacher Gift Ideas
    • Christmas
  • Printables
    • Holiday
    • Gift Idea
    • LDS Primary
  • Travel
  • About
    • Terms
  • Contact
  • Nav Social Menu

    • Facebook
    • Instagram
    • Pinterest
    • RSS
    • Twitter

Wreath

Spring Wreath DIY // Vintage Vignette // Whatever Craft Weekend Part II

3 · May 2, 2013 · 12 Comments

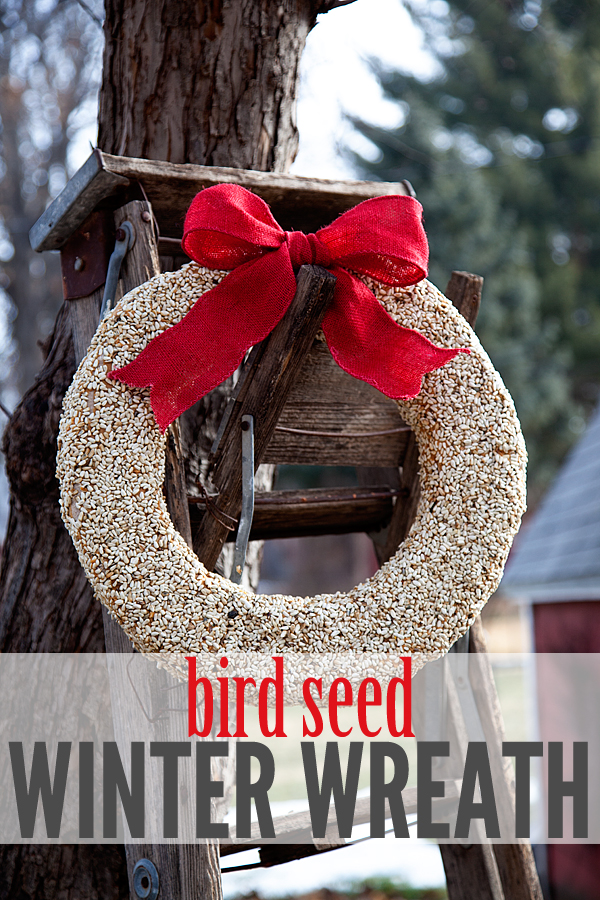
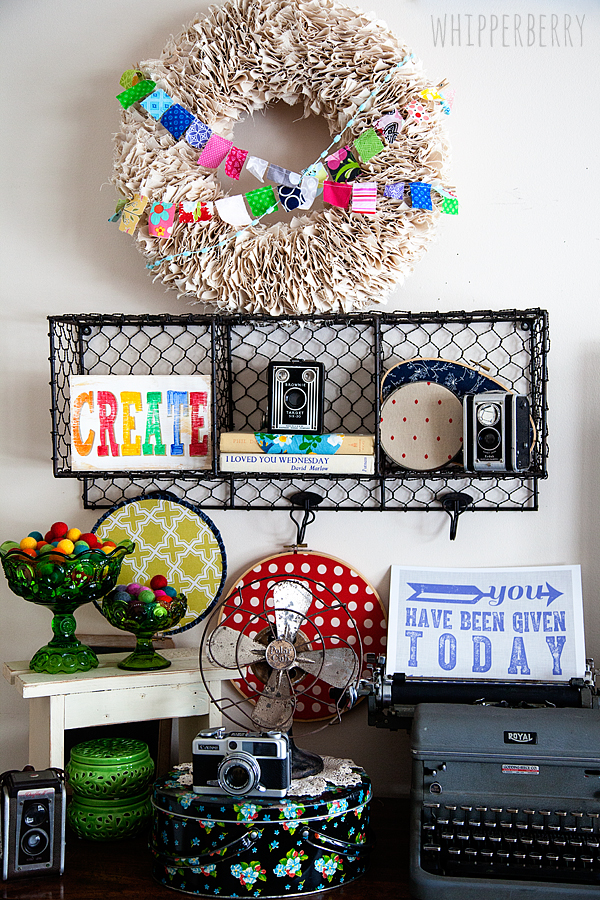
Spring Wreath DIY // WOWZA that's quite a bit to have all in one post!! I have been working on my Spring Vignette for a little bit. Gathering treasures and such, tweaking and rearranging. I finally have a fun grouping to share with you today that's inspired by my Whatever Craft Weekend. Of course it starts with my Winter White Wreath that I will be using all year. I've used it for Christmas, The New Year, Valentine's Day and now I've updated it for Spring!

Spring Wreath from WhipperBerry

All I did was add some fancy yarn and a fabric banner to the wreath. The fabric garland was made by my friend Amy from Ameroonie Designs. I had been trying to find time to put together a fabric garland for the wreath and just hadn't found the time. Luckily, Amy was handing little fabric garlands out to her customers at the Queen Bee Market last month at SNAP and I was sooooo excited… I didn't have to worry about that element anymore! Not that they are hard to make, the issue for me would be to find my sewing machine in the sea of boxes still in my garage. We are in a temporary home right now, so there is no need to unpack everything. Thanks Amy for the rescue!! 

Now, for the full vignette. It was inspired by my Whatever Craft Weekend… Yes, I will be trying to live in that fabulous weekend for the rest of my life I think. Almost everything in the display came from that magical weekend…

Spring Vingnette from WhipperBerry

Isn't it cheerful and fun?! Part of the Whatever Craft Weekend is a fun Junking trip. Meg & Kimberlee have some amazing treasure troves that they share with all of their guest and I had a ball finding all kinds of goodies. 

Lunch at the barn Whatever Craft Weekend

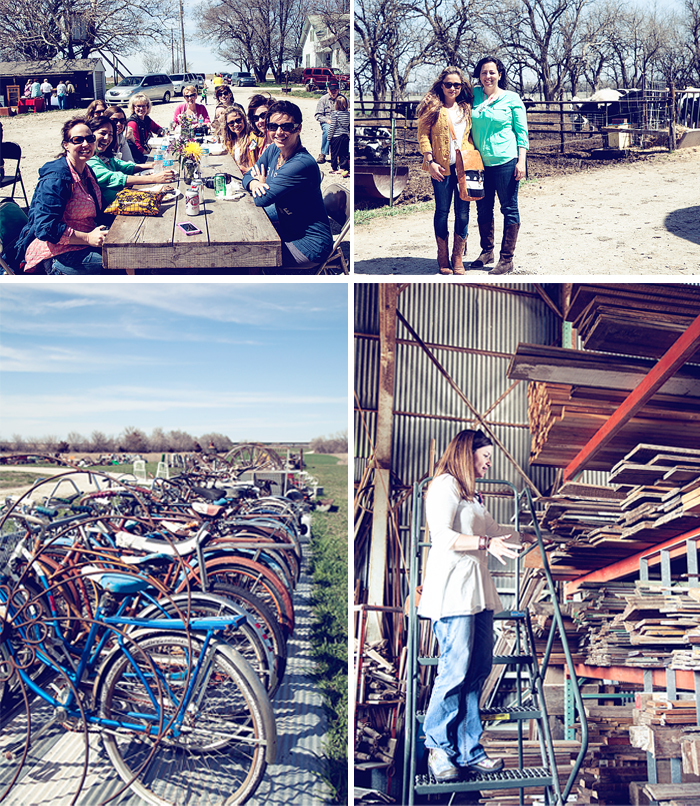
Here are Ashley, Mique, Kristi, Pam and several other friends on our junking tour, Kristi is going ga gah over all the amazing wood available at this amazing junk barn!

I curated a group of fun smaller items like these…

WhipperBerry typewriter

Many of these goodies made it into my vignette… and, I even found a large item that I am head over heels in love with.

shopping at the barn whatever craft weekend

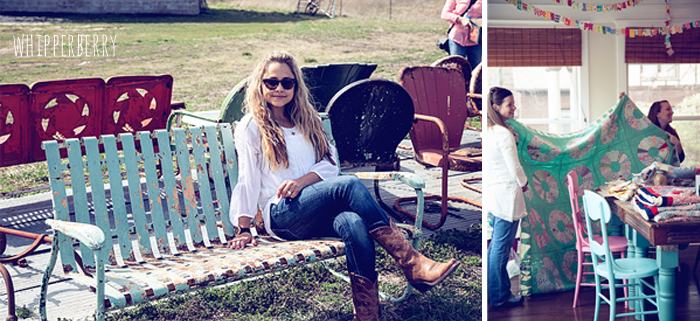
Check out that lovely, chippy bench that Ashley is testing out… yep, it came home with me!! Several friends found some amazing quilts in our antique tour. All of them just divine. I'm not sure if there is anything more fun than junking with several fun friends!

Back to my Whatever Vignette… Here are some of my little elements…

Vintage Typewriter with sign from Katy Girl Design

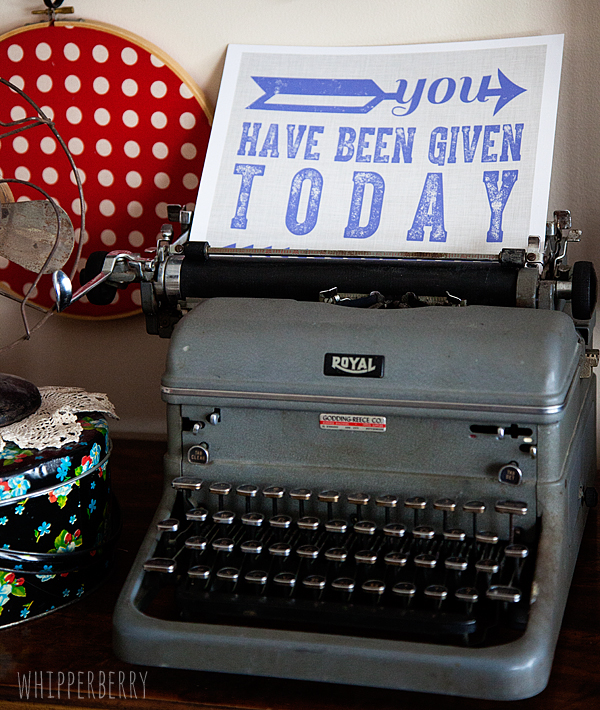
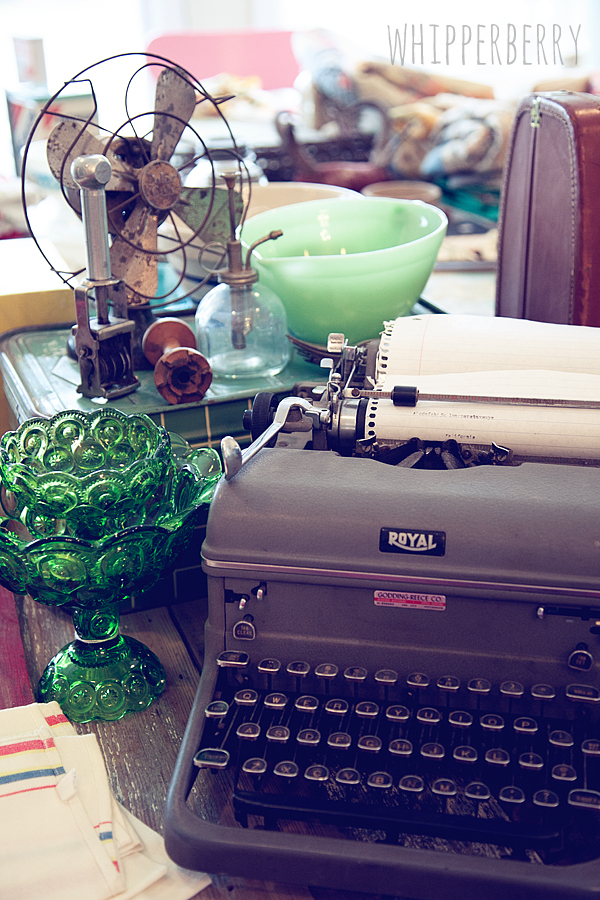
This typewriter was one of my favorite finds… it was only $30, a total deal! I've paired it with my sign from Katy Girl Designs. You have to run over and check out Katy's shop. Its lovely!!

Vintage Canon Camera

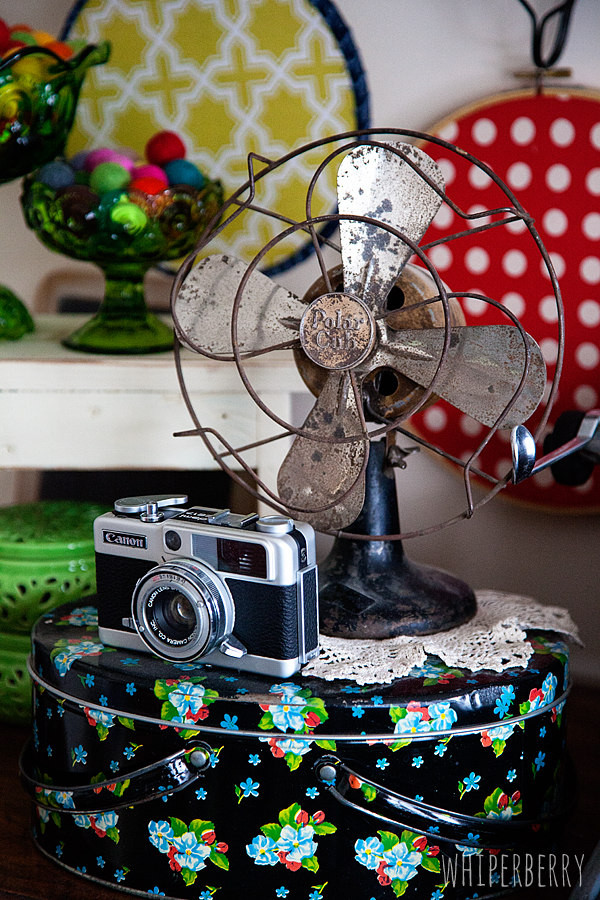
Next, I have a fun biscuit tin as a base for my vintage fan and Canon camera. The camera belonged to my Grandfather and I love having it out on display. It reminds me of his curiosity and love of life and it makes me happy to see it sitting there all day.

antique glass with felted foxes felt balls

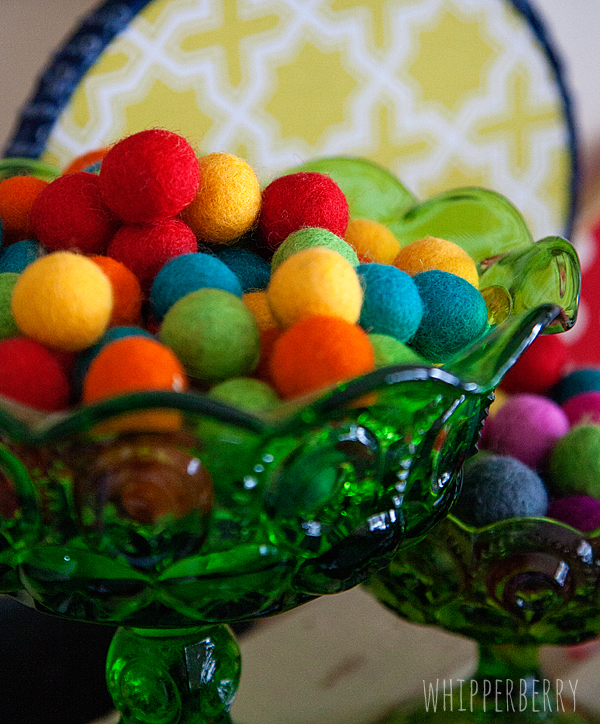
I have always been in love with felted balls and have made many projects with them, but I was dying when we opened a whole package from FeltedFoxes during our craft time at Meg's.  I've made felt balls… I even have a tutorial on how to make them. They aren't easy and take quite a bit of time and effort to  make. I think I will just order them from now on from FeltedFoxes and save the time and effort! I love how they look in my emerald Depression Glass… just stunning!

Create sign from Little Branches

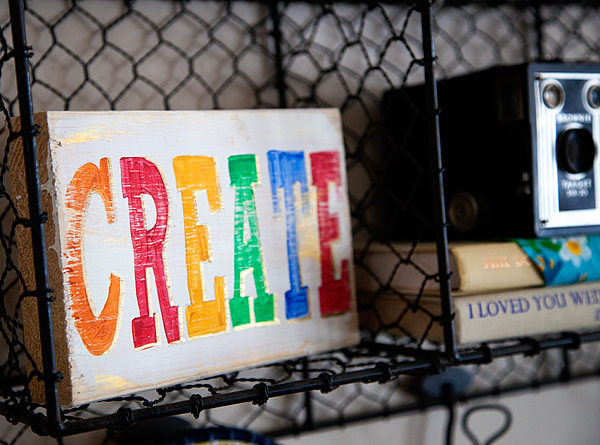
I LOVE my new Little Branches CREATE sign. It's just so perfect for my house. I love the colors and the gold accents! It's just so cheery!

Vintage Kodak Camera

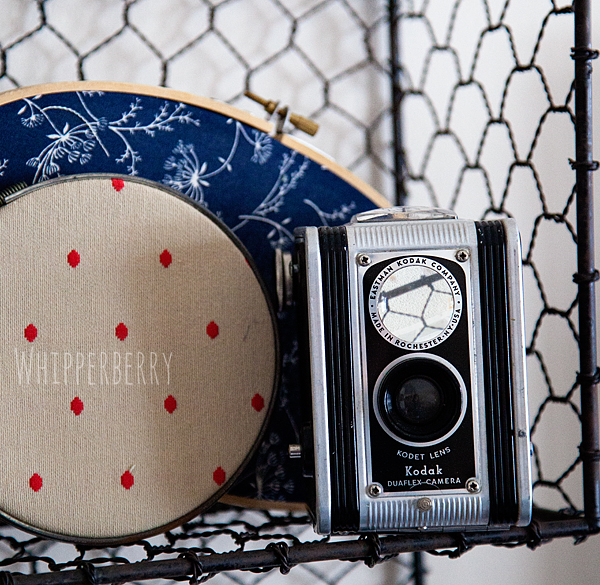
I used  fabric in old embroidery hoops to add color and texture to the display and peppered in more cameras from my vintage camera collection.   I'm just so in love with this display. It may stay up for a few months while I soak in all the vintage goodness!

Spring Vingnette from WhipperBerry

Are you a junker? What do you like to collect?

Bird Seed Winter Wreath // Tutorial

22 · Jan 21, 2013 · 12 Comments

Bird Seed Winter Wreath // One of my favorite things to do since moving to Nebraska is watching the colorful birds outside my window. Las Vegas isn't really  known has a habitat for pretty birds so I've missed them for several years. Here in Lincoln we have Blue Jays and every once in a while we even have a red Cardinal or two and I adore them! Over the Christmas break my girls and I were thinking of fun things to do and Hannah thought it would be fun to make some type of bird feeder for the birds during these cold months. I thought it would be fun to make a bird seed winter wreath.

bird seed winter wreath

Supplies Needed

  • Foam wreath form
  • Fabric strips
  • 2-3 push pins
  • 1 jar peanut butter
  • 1/2 cup honey
  • Parchment paper
  • Bird seed mixture of your choice

Instructions

I happened to have a foam wreath form on hand so we decided to us it, but I was worried about the birds pecking at the styrofoam. We decided that we would wrap the wreath with strips of fabric to protect the birds.

wreath form and fabric strips

The girls and I cut some scrap fabric into 2 1/2 to 3 inch wide strips and wrapped the wreath with them and secured the fabric with some push pins. Next we made a peanut butter and honey concoction. We took one small jar of honey and mixed it with about 1/2 a cup of honey. 

honey peanut butter mixture for bird seed wreath

The girls and I then place our wreath form on several pieces of parchment paper and started to cover the wreath with the peanut butter spread…

cover the wreath with the peanut butter mixture

… and then the bird seed.

generosly add bird seed to the wreath

We found the parchment paper quite helpful when we were placing the bird seed on the sides of the wreath. Once we were finished we place the wreath outside in the cold garage to let it set a bit. Then after a couple of days we added a burlap bow and placed it out in our yard so that the birds could enjoy a little winter treat!

bird seed wreath from whipperberry

What are some fun winter activites that you like to do with your kiddos? We're actually having a ball living in a place with a real winter so we would LOVE some new ideas!

DIY Winter White Wreath Tutorial

128 · Dec 11, 2012 · 26 Comments

I just can’t help myself… I love this style of wreath.  I love how full and rich it looks when finished.  Thus far I’ve made two different versions, my Candy Corn Wreath and my Candy Cane Wreath from last year’s wreath tutorial.

This year I made a simple yet stunning Winter White Canvas Wreath that I can use throughout the year…

Winter White Canvas Wreath Tutorial

I love a good thick wreath full of rich colors and textures.  I think they are always a fabulous winter statement piece for anything from a front door to a fun vignette like this one I created for Christmas this year.

WhipperBerry Christmas Vingette

This wreath is super easy to make, it just takes a little time.  Here is what you will need…

Supply List

  • Foam wreath form
  • 16 inch floral wreath form
  • 3 yards of winter white canvas or duck cloth
  • 550 white head quilters pins
  • Cutting mat and rotary cutter

Instructions

Cut your canvas into 3 inch strips and wrap the wreath form with a few of the strips of fabric to cover the Styrofoam. Use some pins to pin the fabric down at the end.

Wrap your wreath form with strips of the same fabric

Cut the remaining fabric into 3×3 inch squares. You don’t need to be super precise, this wreath is very forgiving. Fold a square in half and then half again and then pin to the wreath form.

How to make a canvas wreath

You don’t need to make these little squares very precise either.  Actually, the messier they are, the better the wreath will look.

Now… grab a Diet Coke and a good movie (I watched on of my favorites, White Christmas) and go to town…Continue to fill in the wreath, packing them pretty tight. 

I really used every speck of the 3 yards of canvas for this wreath and it looks so rich and full, I ADORE it!!

Whipperberry Winter White Wreath

Now, this wreath is a bit of an investment (I totally get that) So… I plan on creating fun ways to dress it up throughout the year to make the investment of time and materials worth it.

Here is what I did to accessorize it for Christmas…

Decorate your winter white wreath with little items

I added a cute little house ornament from the Target holiday collection along with some vintage jingle bells that I found at Old Glory Antiques in Denver, and a little frosted berry sprig. 

I pinned the bells to the back of the wreath, tucked the berries into the folds of fabric and set the house on the wreath.

This is perfect for indoors, If you were going to use the same accessories for outdoors, I would secure it a little better.

To hang the wreath, I use the little pocket created when wrapping the foam base with the fabric…

How to hang your winter white wreath

It actually works quite well with the stiff canvas fabric. Don’t worry about all the strings from the fabric.  After a little bit of time and grooming they settle down and you don’t even see them.

This week I am giving away an elegant holiday décor kit from the Sterling Pear, that’s where I found those amazing stocking hangers from my faux mantle. Make sure you head over to enter the giveaway!! 

I will also in a future post teach you guys how to make that fun Rudolph sign that I created using my favorite Rhonna Designs digital artwork!

Rudolph Sign

That one is going to be really fun!! Some great Silhouette tips and tricks I can’t wait to share!  So… Enough about me, what have you guys been working on? Any fun Holiday projects you’ve been working on? I would love to hear about them!

Heather copy

The Candy Cane Wreath

54 · Nov 16, 2011 · 45 Comments

A few weeks ago I participated in I Heart Nap Time's Crazy Christmas Crafter event with my Candy Cane Wreath.  Just in case you missed it… here it is!


Hello all you Crazy Christmas Crafters!  I'm Heather from WhipperBerry and I am thrilled to come and hang out with you guys here at I Heart Naptime today. I LOVE the Holidays and I especially love all of the fun Christmas crafting that can be had this time of year,  It was so fun to bust out the red and white the other day to work on this fun Candy Cane Wreath…

A few weeks ago Shelley from House of Smiths invited me over to her place to share a fun Halloween wreath that I had created that I aptly named The Candy Corn Wreath.  While I was working on that post I thought it would also be a GREAT candy cane wreath for Christmas too, and… it would be perfect for Jamielyn's Crazy Christmas Crafters!! It is soooo easy to make, anyone can do it.  Plus it really makes a statement.  Here is what you will need…

…

Read On →

  • « Go to Previous Page
  • Page 1
  • Page 2
  • Page 3
  • Go to Next Page »

Primary Sidebar

Heather from Whipperberry
Hello... my name is Heather and I'm the creator of WhipperBerry a creative lifestyle blog packed full of great recipes and creative ideas for your home and family. I find I am happiest when I'm living a creative life and I love to share what I've been up to along the way... Come explore, my hope is that you'll leave inspired!

Footer

  • Privacy Policy
  • Crafts
  • Food
  • Gifts
  • Holidays
  • Home
  • Mom Life
  • Recipes
  • Travel

Copyright © 2026 · Seasoned Pro