• Skip to primary navigation
  • Skip to main content
  • Skip to primary sidebar
  • Skip to footer

Whipperberry

WhipperBerry • Your Home For Creative Inspiration

  • Home
  • Recipes
    • Starters
    • Easy Weeknight Dinners
    • Main Dish
    • Salads
    • Side Dish
    • Soups & Stews
    • Desserts
    • Breakfast
    • Miscellaneous
  • Tutorials
    • Creative Crafts
    • DIY Decor
    • Fabric Crafts
    • Food How-To
    • Jewlery
    • Paint Projects
    • Paper Art
    • Party Styling
    • Photography and Graphic Design
    • Silhouette
  • Holidays
    • Easter
    • Mother’s Day
    • Father’s Day
    • 4th of July
    • Halloween
    • Thanksgiving
    • Christmas
    • Valentine’s Day
  • Gift Ideas
    • Gifts For Everyone
    • Gifts for Dad
    • Mother’s day
    • For The Girls
    • For The Kids
    • Teacher Gift Ideas
    • Christmas
  • Printables
    • Holiday
    • Gift Idea
    • LDS Primary
  • Travel
  • About
    • Terms
  • Contact
  • Nav Social Menu

    • Facebook
    • Instagram
    • Pinterest
    • RSS
    • Twitter

Christmas

Creamy Flan Recipe

21 · Dec 1, 2013 · 3 Comments

This post brought to you by Eagle Brand // I LOVE FLAN!  I don't know if I can emphasize that enough. My Mom has made flan for years and it has become a bit of a holiday tradition. All be it, a rather non-traditional holiday tradition. Most people don't correlate Flan, a creamy custard like dessert with strong Latin roots with Christmas, but they should!  It's so easy to make and the creamy custard with the caramelized sugar is just lovely. 

Eagle Brand Creamy Flan

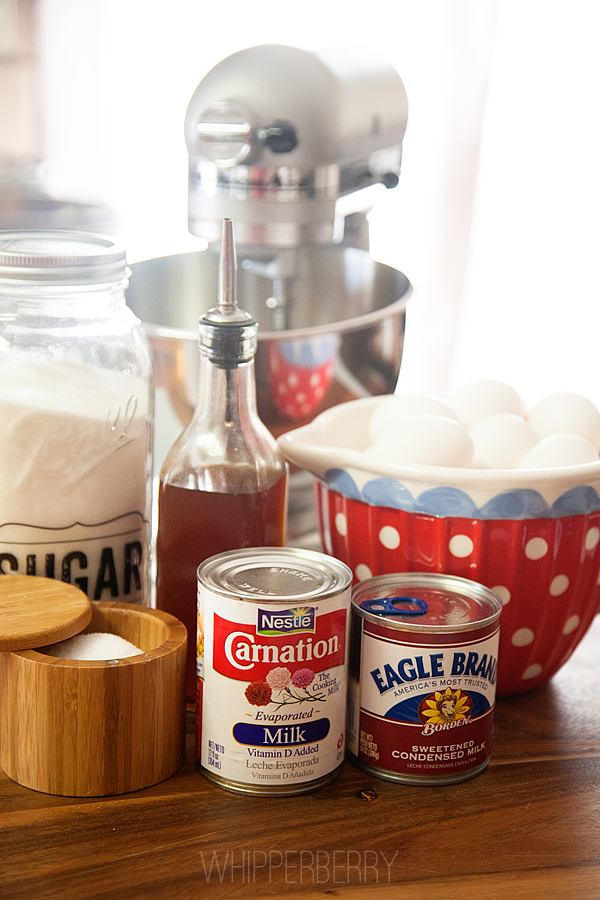
Ingredients for Flan Recipe

1 cup sugar

1 14 oz. can of Eagle Brand™ Sweetened Condensed Milk

1 12 oz. can of Carnation® Evaporated Milk

6 eggs

1 teaspoon vanilla

pinch of salt

Eagle Brand Flan

Directions for Flan

Caramelize sugar by putting it into a saucepan and melting the sugar until it becomes caramel. Try to avoid stirring the sugar, just swirl the pan. If you stir the sugar it could cause sugar crystals to form in your caramel. When the sugar has fully caramelized, pour into the bottom of your oven safe ramekins or a 8×8 baking dish. 

Eagle Brand Flan-4

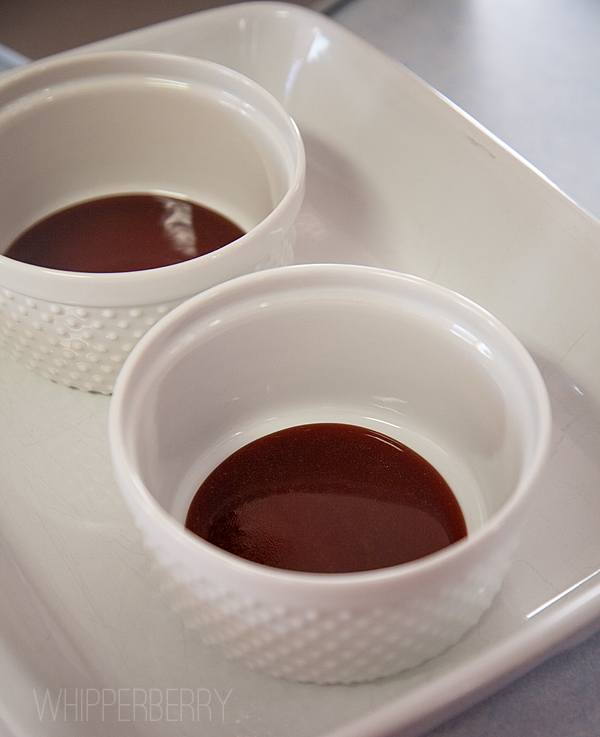
Set aside and let cool while you are mixing the custard. 

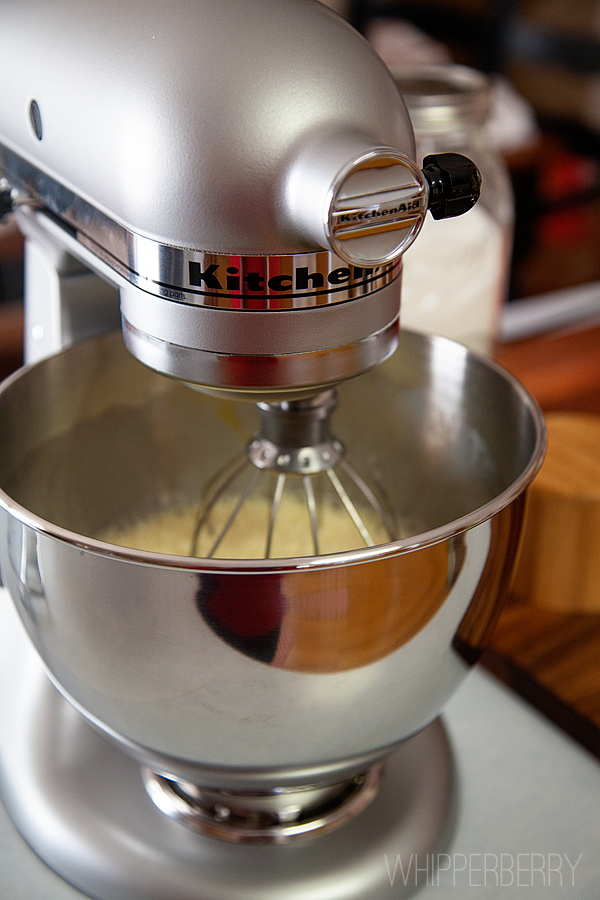
In your mixing bowl, combine the Eagle Brand™ Milk, Carnation® Evaporated Milk, eggs, vanilla and salt and whisk together well. 

Eagle Brand Flan-2

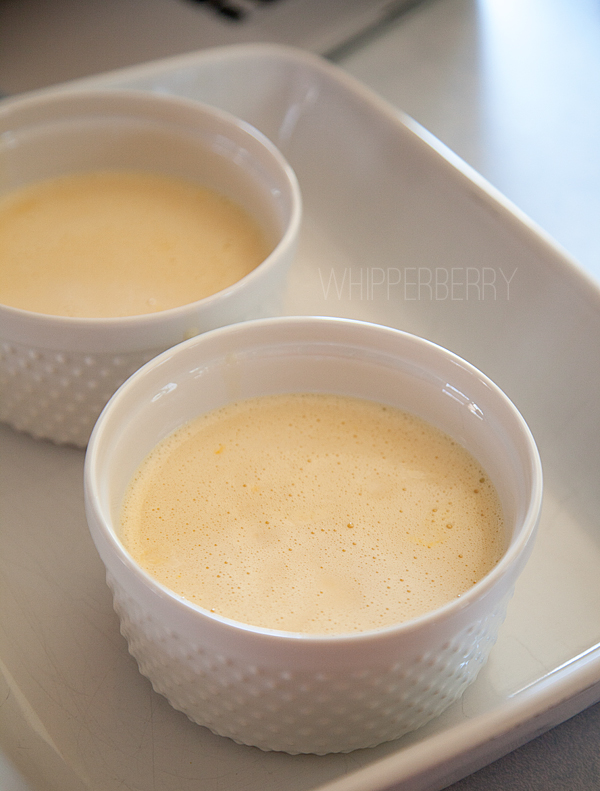
Pour custard into your dish or ramekins right on top of the caramel.

Eagle Brand Flan-5

Next, you will need to heat some water. Place your ramekins or baking dish into a larger baking dish. Pour the hot water into the dish up to the middle of the custard dishes.

Eagle Brand Flan-bake is a baking dish filled half way with hot water

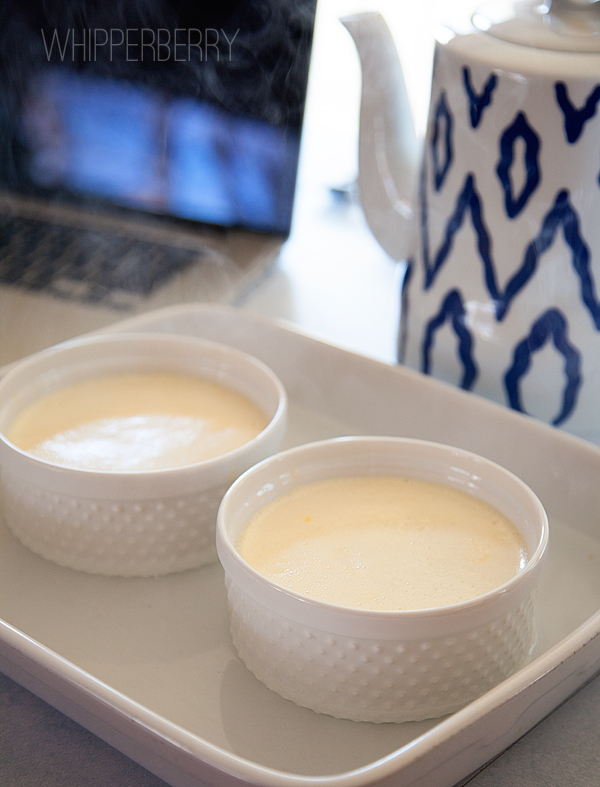
This is called a Bain Maria or hot water bath. 

Place in a 300˚ oven for one hour or until the custard has set. Remove from oven and let cool for 10-20 minutes. If you are using ramekins, you can then invert the flan out on a plate at this point. Or, you can let it chill and serve later.

Eagle Brand Flan from WhipperBerry

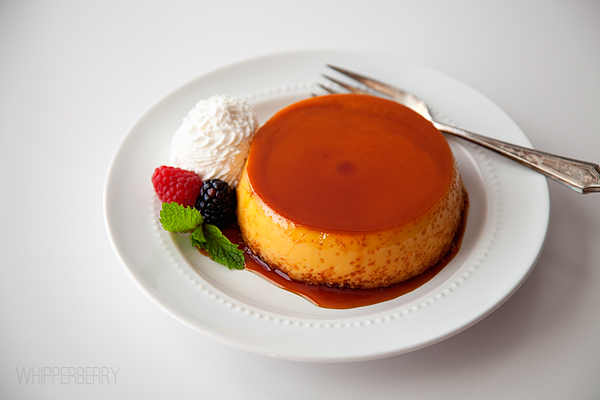
We really like to serve it with whipped cream and berries… SUPER yum!!

The folks at Eagle Brand would LOVE to help make your holidays a little sweeter. They are offering a fabulous GIVEAWAY!! 

KitchenAid Giveaway at WhipperBerry

Click HERE to visit the GIVEAWAY!!

Disclaimer // This post is sponsored by Eagle Brand™ Sweetened Condensed Milk. I received a KitchenAid Mixer and product to help create this post.

Three Tips for Picture Perfect Pie Crust

15 · Nov 27, 2013 · 109 Comments

This post brought to you by Crisco // When I  was about 14 years old, I had a wise woman in my life, her name was Mrs. Robinson, who gave me some great advice… When in the kitchen, learn how to make one thing REALLY well. If you love chocolate cake, learn how to make the best chocolate cake. If you love pies, learn how to make the best pie out there. She said that if you have one really good dessert recipe, you could catch any guy you want. LOL!! Well, I decided that I wanted to make the perfect pie. To be more specific, I wanted to learn how to make the perfect pie crust. That way I could have several more options when it came to my man catching baking skills! 

I have to say, I got pretty good at it. I was always called on to make the pies in my house during the holidays and after many attempts after awhile, they turned out nice and flaky every time.    Then I met my so-to-be husband and boy was she right… He loved pies. All kinds of pies… Blueberry, Peach, Cherry & Apple.  I was golden… Thank you Mrs. Robinson!!

Recently, I was asked by the lovely folks at Crisco to become a Crisco Pie Partner and I was thrilled. I'm excited for two reasons… I'm excited to share some of my hard earned pie tips and tricks with you, and that  I could also honor my friend Mrs. Robinson, who has since passed on by sharing her sweet advice with all of you. So here you have it… Some tricks to making Picture Perfect Pie Crust EVERY TIME thanks to Mrs. Robinson.

Picture Perfect Pie Crust with Crisco-16 copy

With the holidays here, we are all gearing up to do all kinds of holiday baking and pies are always on the list. However, many of us have taken to using store bought frozen pie crust and my friends… it's just not the same. We have been tricked into thinking that pie crust is hard to make and it's not. It's really rather easy if you follow a few basic principles. Here are my tried and true pie crust secrets…

Tip #1 // Selecting the Right Ingredients

For years the debate with pie crust has been, which fat is better… Butter, Crisco or Lard? After MANY years of making pies and trying each option myself, I hands down select Crisco shortening every time. It just seems to make the lightest, flakiest crust each time. Sometimes I will do half butter, half Crisco if I'm wanting that buttery flavor but I always use Crisco or even the butter flavored Baking Sticks. The recipe I'm using today is your simple basic pie crust using just flour, salt, Crisco and water…

Picture Perfect Pie Crust with Crisco Ingredients

It's super simple click HERE to visit the recipe page. Can I just take a minute and thank Crisco for coming up with the Baking Sticks… I LOVE them!! No mess, no fuss and the measuring is done for you. PERFECT!!

Tip #2 // Cold Ingredients are your Friend

The absolute key to making good crust is to use COLD ingredients. I place my Crisco Baking Sticks in the freezer for a few hours before hand and I use ice cold water when mixing the crust. I also try not to touch the dough too much with my warm hands. That will also cause the dough to warm up and you don't want that.

The reason why you want things to stay cold is… You want your Crisco to stay solid and in small little pieces within the crust. When those little nuggets are hit by the heat in the oven that is what makes those flaky little pockets in the crust that we love so much. Without those little gems, your crust will turn out solid and tough and not a whole lot of fun to eat. 

To start, I place my flour and salt in a large bowl. Then I remove the Crisco from the freezer and cut it into small pieces…

Picture Perfect Pie Crust with Crisco-2

Sometimes, I even stick the Crisco back in the freezer for a few minutes after I have cut it, in order for it to chill again.  Then I place my shortening into the bowl with my flour and salt. Using a pastry cutter I cut the Crisco into the flour…

Picture Perfect Pie Crust with Crisco-3

Again, you want to make sure to leave your shortening in small little pea size pieces so don't over work. 

Tip #3 // The Key is a Light Hand

When it comes to working with this kind of dough. a light hand is key. Don't over mix the Crisco into the flour. Next, you will lightly fold in the cold ice water into the dough. I use a rubber spatula at this stage and gently fold in the water starting with one tablespoon and slowly mixing it just until the dough starts to come together. Again… light hand here. The more you mix the tougher the dough will be.

Picture Perfect Pie Crust with Crisco-6

For this crust, the recipe calls for 3-6 tablespoons of water. I ended up using 4 but, that will depend on your environment where you are baking. You may need more, you may need less. Then I pour the loose dough out onto a clean board and this is what it should look like…

Pour your dough on a clean surface

Now, this is the one step where I will quickly use my hands. I carefully pull the dough together and form it into a disk like so…

Picture Perfect Pie Crust with Crisco-8

Then I wrap it in plastic wrap and place in the refrigerator for 20-30 minutes. Once it has chilled again, than I am ready to roll it out. On a clean floured surface I roll out my dough. I carefully turn the dough after a few passes with the rolling pin, to ensure that the dough doesn't stick to the board. You may even need to turn it and flour your surface  a few times. But, be careful not to over flour.

Then using your rolling pin as a handy tool… roll the dough onto your pie plate…

Use your rolling pin to help transfer the crust to your pie plate #pictureperfectpiecrust

I trim my edges a bit and then crimp my edges using my two finger pinching method…

crimping pie crust

Now, you have the perfect canvas for any pie that you can dream up…

Picture Perfect Pie Crust with Crisco-13

Not sure what to make? Crisco has you covered! Here are some fabulous resources for creating the perfect pie…

  • You can call the Crisco Pie Hotline 1-877-FOR PIE TIPS (877-367-7438) for all kinds of around the clock PIE help this holiday season!
  • Crisco has a Picture Perfect Pie Pinterest board that has all kinds of fabulous recipes.
  • The Crisco Kitchen has teamed up with Michele Stuart owner of Michele's pies in Connecticut, she is over at Crisco's site sharing all kinds of fun pie tips and ideas.
  • Crisco is hosting a fun Rate & Review contest for a chance to win a Michele Stuart pie prize pack. Visit the Rate & Review site to rate your favorite pie for a chance to win!

I hope Crisco and I have inspired you to pass on the freezer pie crust and try your hand in a truly homemade pie. I promise, if you follow these tips you will blow your family away with your scrumptious pies this year! In order to do just that… Crisco is giving away a fabulous Perfect Pie Prize Pack to one of you!! Here is what you will win…

  • Breville Personal Pie Maker
  • Babycakes Pie Pop Maker
  • Sur La Table® Ruffled Pie Plates
  • Lattice pie top cutter
  • Pie Pop sticks

A Prize Pack valued at $200!! Follow the directions in the Rafflecopter box below to enter. This giveaway is open to those with a shipping address within the United States and will be open from November 27-January 2 with the winner announced on January 3rd.

a Rafflecopter giveaway

Disclaimer // This post is sponsored by Crisco. I did receive payment for development of this post.

Free Printable Christmas Countdown and Wood Clipboard Tutorial

0 · Nov 26, 2013 · 3 Comments

Hi all!  It’s Jenn from My Fabuless Life.  I’m SO excited that the Christmas season is HERE, and even more excited to share a little printable Christmas Countdown project with all of you.  If you follow me on my blog, you already know that I’m a sucker for all things counting down to the big Holiday, so this is one of several advent calendars that I have around my house.  
 
 
All you’ll need for this project is:
* a block of wood (mine is 8×10, purchased from a local woodcraft store, but you can easily use whatever scraps you have lying around, or even a picture frame).
*a metal clip or clothespin
*the printables I’ve provided for you at the end of the post
 
I sanded and rounded out the edges of my wood block, and then stained it with my favorite stain (Early American from Minwax).  Once the stain was dry, I sanded the edges again to give them a more aged look,
then I hot glued the clip on in the center of the wood. 
 
 
To give the cards a little something extra, I colored the edges with a red marker. 
 
 
This would be a really fun project with a picture frame too.  Just put some pretty paper inside the frame, and glue the clip to the glass on the frame.  
 
 
{DOWNLOAD FILES HERE}
 

Enjoy!  And happy Holiday decorating!  You can get details on my full Christmas display (including details on the coordinating "Merry & Bright" print) over at My Fabuless Life.


Or you might enjoy a few of these other Christmas projects:

Gold & White Nativity / Holiday Table Decorating Tips / $20 Handmade Tree 


From Napkin Rings to Beautiful Wreaths, Five Festive Ornament Frame Ideas

11 · Nov 24, 2013 · 11 Comments

This post brought to you by Michaels Craft Stores // I have always been a fan of the Ornament Frame, they are just perfect for creating all kinds of goodies for the holidays. I've given them as personalized gifts for years. This year, Michaels challenged me to come up with FIVE different "out of the frame" ideas for crafting with ornament frames.

Merry Christmas Banner

We will start with my Merry Christmas banner. This one was last minute inspiration, but turned out to be one of my favorite projects. I used my Silhouette Portrait to cut letters out of gold vinyl and then affixed it to the face of the frame. Then, this is the good part… I found these super cute gift bags at Michaels that I just fell in love with. I thought they would be a great background for the letter frames to make a fun banner. SUPER cool and SUPER easy to make. You don't have to cut any paper just use the bag as is as your banner background! 

Michael's Mini Frames #justaddmichaels-6

This year's hot trend is using both silver and gold together so, I thought the silver frames would look fantastic with the gold accents.

Michael's Mini Frames #justaddmichaels-4

The banner looks perfect in my new GIANT shadow box…

Michael's Mini Frames #justaddmichaels-5

Personalized Napkin Rings

Chalkboard Napkin Rings-5 #justaddmichaels

This idea was super simple and will add a little flair to your holiday table. Just use a little chalkboard paint on the face of the frame to make a chalkboard surface. Glue the frame onto a basic napkin ring and you're set.

Michael's Mini Frame napkin rings #justaddmichaels

Use a chalkboard maker to personalize your stylish napkin rings. You can even use a 3D Glue Dot to temporarily affix your frame to the napkin ring. At the end of the night, add the ribbon back and send the ornament home with your guests as a party favor.

Decorative Wall Art

Michael's Mini Frames #justaddmichaels-7

This piece was so fun to make. I again employed my Silhouette Portrait to help with this project. I cut several holiday images out of their gold vinyl and affixed it to the face of the frames. Then I glued the frames to an inexpensive silver charger that I found at Michaels. I LOVE how this turned out!!

Michael's Mini Frames #justaddmichaels-8

Accent Element

Michael's Mini Frames #justaddmichaels-2

This one is SIMPLE… I used one of the ornament frames to add a little accent element to a sign that I had created. Again, I used my Silhouette to cut the 2013 out of gold vinyl and affixed it to the frame. It was a great addition to my shadow box display…

Michael's Mini Frames #justaddmichaels-1

Personalized Gift Tag

Michael's Mini Frames #justaddmichaels-10

Last, but not least… I created a decorative gift tag that can be used over and over and over. I used one of those cute tiny gift bags that I had left over from the banner, cut it to size and then placed that inside the frame. You can then use dry erase or chalkboard makers to write the name on the tag and voilá, you have a stunning gift tag that anyone will love!

Well… there you have it. 5 different ways to create with a simple ornament frame. Did that get your imagination running? What would you make? Take a little time to "think outside the frame" and create something fun with some ornament frames!

Disclaimer // This post was sponsored by Michaels Craft Stores. I receive product from Michaels in order to create the projects in the post. 

  • « Go to Previous Page
  • Page 1
  • Interim pages omitted …
  • Page 12
  • Page 13
  • Page 14
  • Page 15
  • Page 16
  • Interim pages omitted …
  • Page 21
  • Go to Next Page »

Primary Sidebar

Heather from Whipperberry
Hello... my name is Heather and I'm the creator of WhipperBerry a creative lifestyle blog packed full of great recipes and creative ideas for your home and family. I find I am happiest when I'm living a creative life and I love to share what I've been up to along the way... Come explore, my hope is that you'll leave inspired!

Footer

  • Privacy Policy
  • Crafts
  • Food
  • Gifts
  • Holidays
  • Home
  • Mom Life
  • Recipes
  • Travel

Copyright © 2026 · Seasoned Pro