• Skip to primary navigation
  • Skip to main content
  • Skip to primary sidebar
  • Skip to footer

Whipperberry

WhipperBerry • Your Home For Creative Inspiration

  • Home
  • Recipes
    • Starters
    • Easy Weeknight Dinners
    • Main Dish
    • Salads
    • Side Dish
    • Soups & Stews
    • Desserts
    • Breakfast
    • Miscellaneous
  • Tutorials
    • Creative Crafts
    • DIY Decor
    • Fabric Crafts
    • Food How-To
    • Jewlery
    • Paint Projects
    • Paper Art
    • Party Styling
    • Photography and Graphic Design
    • Silhouette
  • Holidays
    • Easter
    • Mother’s Day
    • Father’s Day
    • 4th of July
    • Halloween
    • Thanksgiving
    • Christmas
    • Valentine’s Day
  • Gift Ideas
    • Gifts For Everyone
    • Gifts for Dad
    • Mother’s day
    • For The Girls
    • For The Kids
    • Teacher Gift Ideas
    • Christmas
  • Printables
    • Holiday
    • Gift Idea
    • LDS Primary
  • Travel
  • About
    • Terms
  • Contact
  • Nav Social Menu

    • Facebook
    • Instagram
    • Pinterest
    • RSS
    • Twitter

Christmas

Grinch Oreo Pops

2 · Nov 21, 2013 · 5 Comments

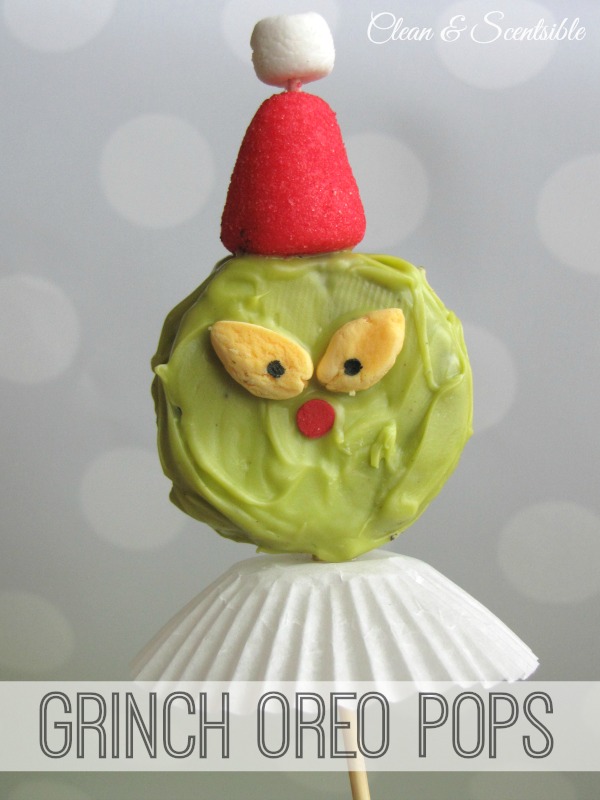
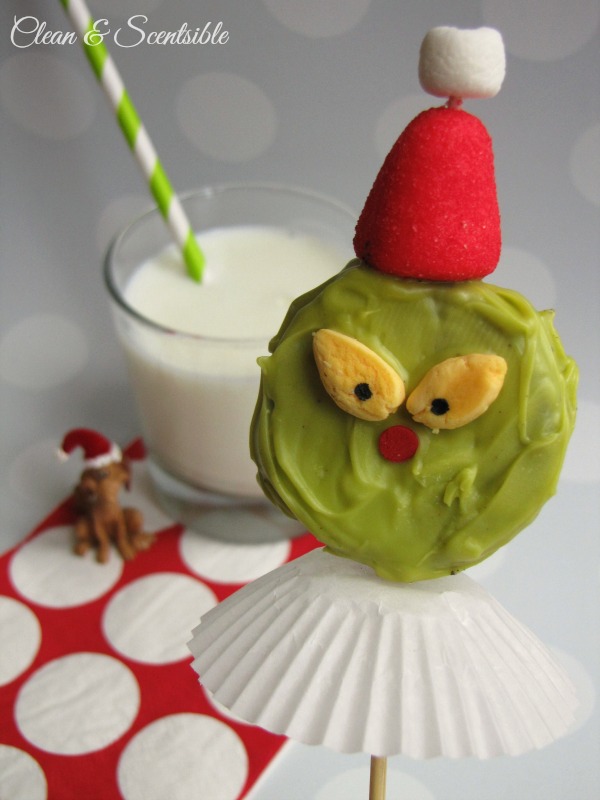
Hello Whipperberry readers!  Jenn here from Clean and Scentsible. I am SO excited to be back here today with these fun Grinch Oreo Pops….

Grinch Oreo Pops.  So fun!

Although I love celebrating all of the holidays, the Christmas season is by far my favorite.  December is always filled with so many activities with family and friends and I love repeating all of our Christmas traditions.  The kids and I look forward to all of the Christmas specials that come on television and The Grinch Who Stole Christmas is always on the top of our list.  This past weekend, we had an early Grinch party with some of the neighborhood kids to start off the Christmas season and these Grinch pops were the hit of the party!

Grinch Oreo Pops.

Ingredients

  • Oreo cookies
  • wooden skewer sticks {or thin sucker sticks}
  • green candy melts {I used about half a package for 8 pops}
  • banana marshmallows
  • black edible ink pen
  • large red sprinkle for the nose
  • strawberry marshmallows
  • mini marshmallows
  • toothpick
  • white mini cupcake liners

Directions

  • Melt chocolate melts in the microwave according to package directions.  Be careful not to overheat.
  • Cut banana marshmallows into small almond shapes for the eyes and use the edible ink pen to draw in an eyeball.  
  • Insert skewer into the center of the Oreo.
  • Spread chocolate around all sides of the cookie.  
  • Add eyes and the sprinkle for the nose.
  • Place on parchment paper and allow chocolate to harden.
  • Spread out cupcake liners, turn it upside down, ad pierce skewer through the center.

NOTE: My original plan was to draw on a mouth with the edible marker, however, it did not draw well over the chocolate and I just decided to skip it.  If you would like to do a mouth, you could try using a toothpick to carve it out of the chocolate before it hardens.

Grinch Oreo Pops

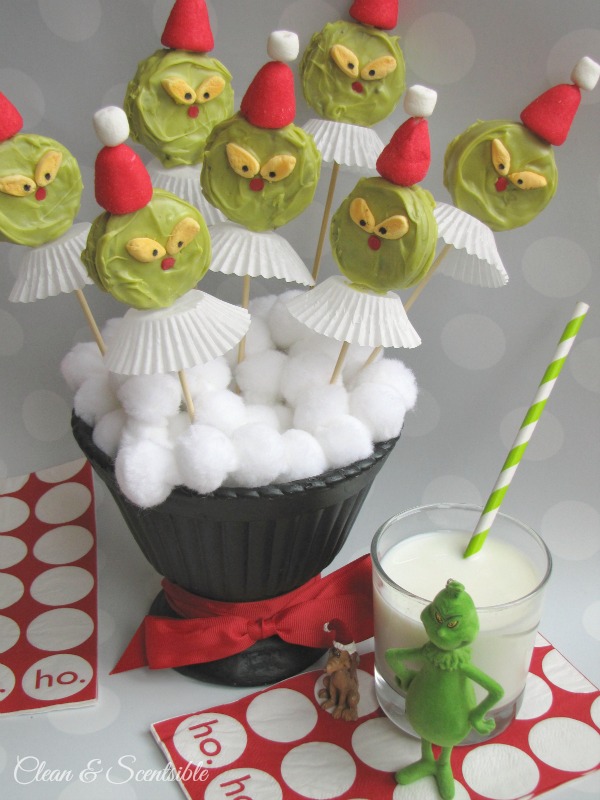
Even if you are not having a party, these pops would be great for a family Grinch night or fun class treat!  And of course, you can't have Oreos without milk! 🙂

If you are looking for more Grinch party ideas, head on over to Clean and Scentsible to see the rest of the party.

Grinch Party.

 Feel free to check out some of my other Christmas projects while you are there or connect with me here: FACEBOOK / PINTEREST / INSTAGRAM / TWITTER 

Fun Christmas projects!

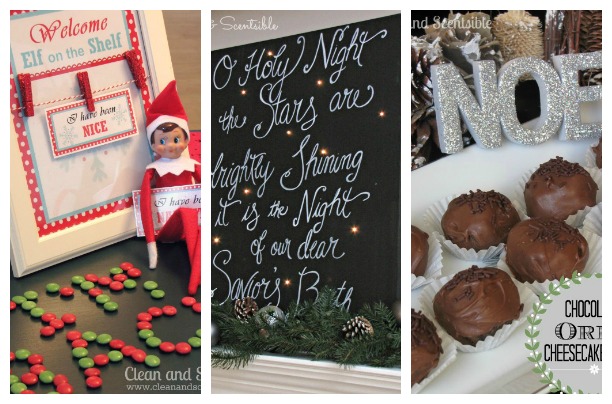
Elf on the Shelf Breakfast / Twinkling Christmas Canvas / Chocolate Oreo Cheesecake Balls

"Maybe Christmas", he thought, "Doesn't come from a store.  Maybe Christmas, perhaps, means a little bit more."

Happy Holidays!

Sparkly Ornament Advent Calendar

3 · Nov 7, 2013 · 8 Comments

Well ho ho ho hello there!  I'm so happy to be back here again this month!  I'm stepping away from my usual food posts, and instead I've got a little Christmas project to share with you.  I know, Christmas feels very far away, but it's not really, especially if you want to make your own advent calendar which needs to be ready for December 1!

Every year we have advent calendars for the kids and they love the countdown to the big day (secrets be told, I do too)!  I've always just bought those candy or picture advent calendars, but this year I wanted to do something a little different and make my own.  I was inspired by this advent calendar that I saw on Bower Power blog a couple of years ago, so when I received a box of ornaments in the mail recently, I knew they would make an amazing advent calendar.

Ornament-Advent-Calendar-{A-Pretty-Life}7-_edited-1

The idea with this advent calendar is that there is a unique ornament for each day leading up to Christmas that the kids can hang on our tree.

Ornament Advent Calendar {A Pretty Life}

Here's How To:

Materials:

  • A picture frame
  • A piece of cork board to fit the frame
  • Paper or fabric to cover the cork board
  • 25 paper key tags (you can find these in any office supply store)
  • 25 silver push pins
  • 25 ornaments
  • number stamps & silver stamping ink
  • Large ribbon for hanging the frame.

Ornament Advent Calendar {A Pretty Life}

Instructions:

  • First choose a frame for your calendar, then string through a 2 1/2 foot long ribbon for hanging.
  • Then cut a piece of cork board to fit the frame, and wrap it in paper or fabric.  I liked this sparkly wrapping paper, as it was very forgiving when I needed to move around the push pins…it hid tiny holes well.
  • Place the covered cork board firmly into the frame.
  • Chose 25 different ornaments to hang in the frame.
  • To mark each day, you can use paper key tags, and stamp them with the number of the day.
  • Now it's time to hang the ornaments!  First lay out the ornaments approximately where you would like to hang them.
  • Use a push pin to first hang the date tag, then the ornament.

That's it!  SO simple!

Ornament-Advent-Calendar-{A-Pretty-Life}2-_edited-1

Here's what mine looks like all done!  Sparkly, fun & festive!

Ornament Advent Calendar {A Pretty Life}

The fun part of making your own advent calendar is you can tailor it to your own Christmas decor.  Have fun with colours, textures and different kinds of ornaments!

Here are some ideas for your calendar:

  • Use a picture frame that you can hang on your wall each season.
  • Or put heavy duty magnets on the back of the frame so that you can hang it on your fridge.
  • Keep the background on the frame neutral so you can change the ornaments every year.  I just used silver sparkly wrapping paper.

Instead of tree ornaments you can hang:

  • Little envelopes with Christmas messages.
  • Or put a little note in an envelope that has a seasonal activity to do for that day:  things like skating, make hot chocolate, go for a walk, bake cookies…
  • You can hang little bags filled with candy.
  • Fill envelopes or little boxes with tiny treasures like money, earrings, erasers…fun little dollar store items.

Ornament Advent Calendar {A Pretty Life}

I hope I inspired you to make an advent calendar of your own!

Thank you so much for reading today!  Have a wonderful day! Signature

Feel free to stop on by anytime!  I'd love to have you!

Facebook  |  Pinterest  |  Twitter  |  Instagram

Merry Christmas

1 · Dec 23, 2012 · 4 Comments

This week has been and odd week, I’ve been a little quiet for a number of reasons. Some of them technical, computer and site issues… Others have been this wonderful season we have to share with our family and friends at this time of year. In light of recent events here in our country in the last week or so, I’ve decided to take this time to spend with my family. I don’t want to miss any minute with my kiddos and my sweet husband at this magical time of the year.  I have decided to take the next couple of weeks off while my kiddos are out of school and enjoy time with them. I will still pop in a few times with a couple of posts here and there and, I will be on Facebook, Twitter and Instagram but, for the most part I am going to be spending time with my little family.

have yourself a merry christmas

img source // diy felt holiday banner from a beautiful mess

I want to send my holiday wishes to you all, I hope you have a wonderful, magical Christmas and enjoy some time with your family and friends. If your heart is hurting or sad at this time of year I send my love and prayers that your burdens will be lifted and that happiness will find it’s way back into your life. I am so grateful for the time you spend with me each and everyday. I know that time is precious and I am so grateful that you choose to say hello and spend a few minutes with me and my crazy, creative world. I look forward to spending more time together in 2013 and can’t wait to share some fun new idea with you.

Merry Christmas and I will see you all in 2013!!

Sharing Holiday Joy with Chocolate Peanut Butter Bars

3 · Dec 6, 2012 · 29 Comments

Chocolate Peanut Butter Bars // My all time favorite Christmas goodies are my Mom's Chocolate Peanut Butter Bars…

Some of my earliest Christmas memories are hanging out in the kitchen with my Mom and sometimes my Dad while they made their famous holiday concoctions. They had a few staples on the list… Fudge, peanut brittle (not my favorite,) your classic Christmas Sugar cookie and then my favorite the chocolate peanut butter bar. I remember dreaming about this little treat all though out the year. Not to mention the anticipation I would feel when Mom would start the task of holiday baking. She always kept the pans of goodies out in our cool garage which acted as our overflow kitchen storage. They were supposedly hidden from sticky little fingers, but no… I always found them. Nibbling little morsels here and there until the sad day when the pan of chocolate peanut butter goodness was gone for another year.

I remember that sense of pride I felt as we would travel out as a family to deliver our plate of goodies to friends and neighbors. I always felt like my Mom's holiday plate was just a little extra special because of the chocolate peanut butter bars. My Mom would always make them in a 9×13 pan and then cut them into bars. This year I made some for my family and friends in these super cute mini paper loaf pans that I found at Walmart and then wrapped them with decorative parchment paper tied with bakers twine. A nice little updated touch to an old family classic.

I just love these little treats full of messages of love from giver to the lucky person receiving the special gift. Whether it's a personalized card or cookies right out of the oven, I love sharing the warmth of the holiday season with my family, friends and, of course, my readers! 

Chocolate Peanut Butter Bars

2 cups graham cracker crumbs

1 cup peanut butter

2 cups powdered sugar

2 sticks butter (melted)

2 cups chocolate chips

Directions

Mix graham crakers crumbs, peanut butter, sugar and butter together well and press into a 8×8 pan. Melt chocolate and spread on top of peanut butter mixture and chill for 30 minutes. Cut into small squares and serve at room temperature.

  • « Go to Previous Page
  • Page 1
  • Interim pages omitted …
  • Page 13
  • Page 14
  • Page 15
  • Page 16
  • Page 17
  • Interim pages omitted …
  • Page 21
  • Go to Next Page »

Primary Sidebar

Heather from Whipperberry
Hello... my name is Heather and I'm the creator of WhipperBerry a creative lifestyle blog packed full of great recipes and creative ideas for your home and family. I find I am happiest when I'm living a creative life and I love to share what I've been up to along the way... Come explore, my hope is that you'll leave inspired!

Footer

  • Privacy Policy
  • Crafts
  • Food
  • Gifts
  • Holidays
  • Home
  • Mom Life
  • Recipes
  • Travel

Copyright © 2026 · Seasoned Pro