• Skip to primary navigation
  • Skip to main content
  • Skip to primary sidebar
  • Skip to footer

Whipperberry

WhipperBerry • Your Home For Creative Inspiration

  • Home
  • Recipes
    • Starters
    • Easy Weeknight Dinners
    • Main Dish
    • Salads
    • Side Dish
    • Soups & Stews
    • Desserts
    • Breakfast
    • Miscellaneous
  • Tutorials
    • Creative Crafts
    • DIY Decor
    • Fabric Crafts
    • Food How-To
    • Jewlery
    • Paint Projects
    • Paper Art
    • Party Styling
    • Photography and Graphic Design
    • Silhouette
  • Holidays
    • Easter
    • Mother’s Day
    • Father’s Day
    • 4th of July
    • Halloween
    • Thanksgiving
    • Christmas
    • Valentine’s Day
  • Gift Ideas
    • Gifts For Everyone
    • Gifts for Dad
    • Mother’s day
    • For The Girls
    • For The Kids
    • Teacher Gift Ideas
    • Christmas
  • Printables
    • Holiday
    • Gift Idea
    • LDS Primary
  • Travel
  • About
    • Terms
  • Contact
  • Nav Social Menu

    • Facebook
    • Instagram
    • Pinterest
    • RSS
    • Twitter

Product Review

Old World Charm Christmas Tree

2 · Nov 1, 2015 · 3 Comments

+ This Old World Charm Christmas Tree post is brought to you by Michaels +

Old-World-Christmas-Charm-Tree-from-WhipperBerry

A few years ago my family was lucky enough to spend the month of December in Germany and France. We fell in love with the way they celebrate Christmas in Europe. They keep it simple, natural and all about family. I was enchanted with all of the simple decor that our friends in Germany used to decorate their homes.

Every year when the kiddos and I bring out the Christmas decorations we’ve always felt a little let-down, it just didn’t have that magical old world feel. It has been my dream to bring that same feeling to our home here in Lincoln.  This year is the year! I have been working on all kinds of fun simple projects to bring that old world charm to our home for the holidays.

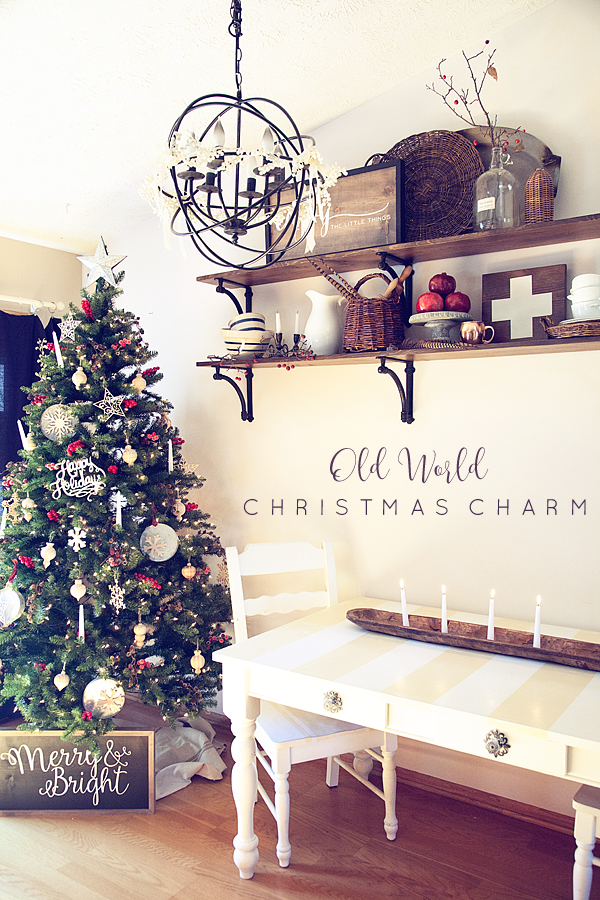
The very first project and the heart of the Holiday home is the Christmas Tree.

Classic-Christmas-Tree-from--WhipperBerry-6

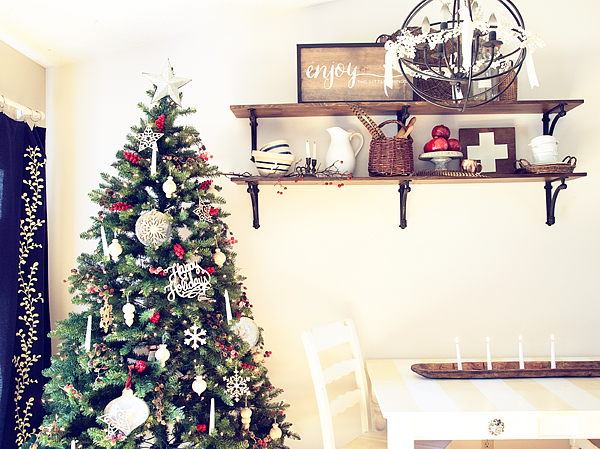
I started with the 7.5 ft Hartford Pine Christmas Tree from Michaels and then I found some fantastic natural wood elements that are perfect to create that rustic European look.

Classic-Christmas-Tree-from--WhipperBerry-12

I added all kinds of texture with sprigs of berries and pine cones, perfect for that old world look. Michaels has these fun metal ornaments that you can decorate with all kinds of goodies. I wanted to keep the natural feel so I glued some wooden snowflakes in some and added some buffalo check ribbon to a few and it looked perfect.

Classic-Christmas-Tree-from--WhipperBerry-10

I even drilled some holes in some candles from Michaels and fed some floral wire through the hole and wired them onto the tree to get that true old world feel. We won’t light them of course, they are just there for the effect.

Classic-Christmas-Tree-from--WhipperBerry-11

I LOVE how this simple tree turned out. At the base of the tree I added a sign that I had painted to add a little pizzaz before the tree gets filled with presents.

Classic-Christmas-Tree-from--WhipperBerry-8

So what’s your dream Christmas? Do you like old and rustic or are you all glitter and glam?

  Inspired to start decorating your own tree? Make sure you visit Michaels’ blog, The Glue String, to see the other 49 Michaels Makers’ dream holiday trees that were created this year.

  • From now until November 14, you can get FREE shippingon all Christmas trees that are 6ft or taller on Michaels.com!
  • If you’re just getting started on your holiday decor, you can also check out some of the ornament projects and tutorials available on Michaels.com.

Disclaimer // This post is brought to you by Michaels however, all thoughts and ideas are my very own.

An InLinkz Link-up


The Silhouette Curio is HERE

0 · Aug 27, 2015 · Leave a Comment

Silhouette-Curio

Guys… The new Silhouette Curio is HERE!!

I have a special discount just for you guys at the end of this post!!

Back in May, I had the chance to travel to Hawaii for the Silhouette Summit where they announced a TON of new products.

Silhouette-Summit

Linda from Craftaholics Anonymous and I with the CEO of Silhouette

All kinds of new consumable products, new software and software functions and TWO new members of the Silhouette family of crafting machines. The Curio and the Mint.

The Mint is a super fun little machine where you can create your own custom stamps and that will debut later this year.

Today, the Curio has launched. What’s special about the Curio you ask? Will this replace the CAMEO and Portrait?

The answer is no, it’s not meant to replace either machine. It is a new companion for your CAMEO or Portrait. It has all kinds of new features that the other machines do not have. For example…

Silhouette Curio Stippling

Stippling – Not familiar with Stippling? It’s SUPER cool!! You create with little dots. Create stippled ink projects with Silhouette felt tip pens or even stipple foils and metals.

Silhouette-Curo-New-Possibilities

Silhouette-Curio-Stippling-2

How fun is that? The world of creating with metal has just opened even wider!

Next on the list of new features…

Silhouette-Curo-Etch

You can etch on metal now as well. Create beautifully etched metal with the Curio’s etching tool to customize jewelry, charms, home décor, mixed media art, and more.

Silhouette-Curo-Emboss

The Curio can Emboss with a new embossing tool!

Silhouette-Curio-Double-your-creativity

The Curio has a dual carriage for double the fun!

Silhouette-Curo-Sketch

You can still Sketch, you can do with TWO Silhouette felt tipped pens now.

Silhouette-Curo-Cut

With the Curio you can still Cut, but you can cut even deeper!

Silhouette-Curo-Deeper-Cuts

The Curio has an improved blade and more clearance which means more options. The Curio’s 5mm clearance allows you to etch, sketch, or cut on new project palettes. Think wood, foil, leather, foam, and even metal.

I can go on and on… You’ll have to go over to Silhouette and check it out for yourself.

I will be working on all kinds of projects here on WhipperBerry with the new Curio and would love for you to join me.

The price for a Curio is $249.99

The folks at Silhouette are giving you guys $15 off a new Curio if you use the code WHIPPER at checkout.

Click the link HERE to get the $15 discount

I can’t wait to start creating with the Curio, what about you? Head on over to their site to check out all of the new products and software options. The Silhouette brand of machines are truly my favorite crafting tool. I use them more than any other tool that I have in my creative tool box!

Disclaimer – I am a member of the Silhouette Makers Affiliate Program.

Honey Pumpkin Yogurt Topping

1 · Aug 17, 2015 ·

+ This Honey Pumpkin Yogurt Topping post brought to you by Silk +

Honey-Pumpkin-Yogurt-Topping-from-Whipperberry

I don’t know why this is, but the minute the kiddos head back to school I’m ready to head into the magic of fall. It just doesn’t seem right to continue to celebrate summer when there’s early bedtimes and homework to be finished.  In my mind, I KNOW that it is still mid-August and pumpkin season still has a few weeks before we hit it full swing, BUT… I’m in the mood for fall flavors!

Fall flavors are just something extra special. It’s like a little gift from Mother Nature saying, “I’m sorry the summer is over, here’s your little gift to smooth the transition to winter.” That’s when the pumpkin spice, stewed cinnamon apples & candy corn come to play. That’s the magic when the air turns cooler.

With the kiddos getting back into the routine of school, we’ve had to get back onto a normal breakfast schedule and sometimes that can get a little boring. We love yogurt, but sometimes you need to kick it up a notch, plus we need some of  that autumn magic this time of year to make it special.

Here’s what we came up with at our house…

Honey-Pumpkin-Yogurt-Topping-1

Honey, pumpkin butter, roasted pumpkin seeds & Vanilla Silk® Dairy-Free Yogurt Alternative. I love that thanks to silk, even people with diary issues can still enjoy great yogurt creation for breakfast. Who knew that dairy-free could taste so good. Silk® Dairy-Free Yogurt Alternative  has…

  • 6 grams of plant-powered protein per serving
  • 6 smooth, creamy flavors with juicy bits of real fruit
  • Excellent source of calcium and vitamin D
  • No cholesterol, dairy, lactose, gluten, carrageenan
    or casein.

PLUS, It’s tastes aaaaamazing topped with honey, your favorite pumpkin butter and some roasted pumpkin seeds.

Honey-Pumpkin-Yogurt-Topping-2

Honey Pumpkin Yogurt Topping Recipe

1 5.3 oz. container of Vanilla Silk® Diary-Free Yogurt Alternative

1 tablespoon honey

1-2 tablespoons pumpkin butter

1-2 tablespoons of roasted pumpkin seeds

Top yogurt with honey, pumpkin butter and roasted pumpkin seeds to your taste and enjoy!

If pumpkin isn’t your thing and you would like some more fruity flavors, Silk® has you covered their too.

Honey-Pumpkin-Yogurt-Topping-12

They also have Black Cherry, Peach & Mango, Strawberry, Tropical Pineapple along with Blueberry. All of them perfect to top with your favorite toppings. Click HERE to grab a coupon to try these Silk® dairy-free yogurt alternatives.

I think I’m going to stick with my honey pumpkin creation for a bit. I’ve kind of fallen in LOVE!!

Honey-Pumpkin-Yogurt-Topping-10

This conversation is sponsored by Silk. The opinions and text are all mine.

Kitchen Marquee Sign with Heidi Swapp

0 · Jul 31, 2015 · 3 Comments

+ Kitchen Marquee Sign post brought to you by Michaels Craft Stores +

kitchen-marquee-sign-with-heidi-swapp-by-whipperberry

I am obsessed with marquee signs… I truly am.

It started with this post back in July of 2013, my Designer Marquee Letters.

designer-marquee-letters-by-whipperberry

Back in the day when marquee letters were rather elusive. Your options were to either pay a fortune for the real deal, or find a way to DIY a set of your own. I went the DIY route which was great, the sign still lives in my kitchen and I love it, however… it was a tad challenging, still expensive and quite frankly it still looked a little wonkey with all kinds of wiring to contend with.

The day that Heidi Swapp released her Marquee Love, was a DREAM! Seriously, I’m not sure if I’ve ever been that excited about a product release in a long time. It’s BRILLIANT! Truly, I’m always kind of excited to see what Heidi has up her sleeve. She is taking the crafting world by storm these days with not only her Marquee Letters but her Minc Foil Applicator is GENIUS as well. One of my favorite crafting tools right now!

Heidi is one of those individuals who is amazingly innovative but someone who is truly genuine. She’s everyone’s cheerleader. We have connected a bit over social media and had a chance to chat at SNAP this last year. She is one lady who I truly admire and look up to. She’s brilliant and a go getter. She’s one of those ladies who dreams up a crazy idea like the Minc and just MAKES IT HAPPEN! I love that!

I had a ball this week creating with my favorite Heidi Swapp Marquee Love letters to celebrate Michaels Big Brand Sale Starting Sunday, August 2nd.

 Kitchen Marquee Sign

Kitchen-is-now-open-Heidi-Swapp-Marquee-Sign-from-WhipperBerry-1-2

I decided to take Heidi Swapp’s Marquee Love letters to the next level and add them to a wood sign, rather than just having them sit on a shelf. I have fallen in love with all kinds of fun typography signs for the kitchen floating around like this one from Gina of Shabby Creek Cottage

small-kitchen

BUT… I thought, how fun would it be to have a marquee element to it. Why not do a sign saying, “Kitchen is Now OPEN” with the OPEN in marquee letters showing that when the sign is alight, the kitchen is open, when it’s off, the kitchen is CLOSED. Fun, right! Here’s how to make it…

Materials Needed

  1. 24×24 plywood board
  2. 4 – 25 inch 1 1/2 x 1/2 inch boards for the frame
  3.  Heidi Swapp Marquee Love letters O,P,E,N
  4. Krylon Chalk Board Spray Paint
  5. White Chalk Paint – I used BB Frösch Chalk Paint Powder
  6. Silhouette or Cricut cutting machine OR Stencil Letters
  7. Vinyl
  8. Scrap paper
  9. painters tape
  10. Hot glue
  11. Brad nails
  12. Glue dots

Directions

Heidi-Swapp-Marquee-Sign-from-WhipperBerry-10

Gather your materials and prepare them to paint. I decided to use Krylon Black Chalkboard Paint because I love the deep black and the matte finish.

First, I spray painted my letters and the frame for the sign.

Heidi-Swapp-Marquee-Sign-from-WhipperBerry-9

Heidi-Swapp-Marquee-Sign-from-WhipperBerry-7

Then I used BB Frösch Chalk Paint to white wash the sign base. I chose that technique rather than just straight paint because I still wanted to see the wood grain.

Heidi-Swapp-Marquee-Sign-from-WhipperBerry-8

To white wash your board, all you need to do is use watered-down chalk paint and then lightly wipe-off the paint to reveal the grain of the wood. This is a great way to add a little color, keep the wood look and it also dries really quick!

Heidi-Swapp-Marquee-Sign-from-WhipperBerry-5

Next, I cut my vinyl with my Silhouette CAMEO using the Bebas font. Love that font!

I laid down my vinyl and then taped the rest of the board with painters tape and some scrap paper to mask the rest of the board while I spray painted the letters.

Heidi-Swapp-Marquee-Sign-from-WhipperBerry-4

Once the paint was dry, I placed my marquee letters and drilled holes to feed the lights through. Now, keep in mind, you need to think through the pavement of the holes and how you are going to arrange the lights in the letters. You want the battery packs sitting on the bottom frame of the sign and you need to place the drilled holes accordingly.

Heidi-Swapp-Marquee-Sign-from-WhipperBerry-6

Heidi-Swapp-Marquee-Sign-from-WhipperBerry-3

Then, I assembled my marquee letters and hot glued them to the board.

Next, I hot glued the frame to the sign base and then secured it with some brad nails.

Heidi-Swapp-Marquee-Sign-from-WhipperBerry-1

On the back of the board, I used a few glue dots to secure the battery packs for the letters to the back of the board.

Heidi-Swapp-Marquee-Sign-from-WhipperBerry

And that was it… your Kitchen Marquee Sign is finished!

Kitchen-is-now-open-Heidi-Swapp-Marquee-Sign-from-WhipperBerry-2

The cool thing it looks great with the lights ON or OFF!

Kitchen-is-now-open-Heidi-Swapp-Marquee-Sign-from-WhipperBerry-3

I found the cutest sign on The Diary of Dave’s Wife not to long ago…

Lunch-now-being-served

Of course had to make one of my own, I thought it look great placed right under my Kitchen is Now Open sign…

Kitchen-is-now-open-Heidi-Swapp-Marquee-Sign-from-WhipperBerry-4

How fun is that! I used some 3M Command Picture Hanging Strips that are velcro so I can easily interchange my breakfast, lunch & dinner signs for fun! LOVE IT!!

Don’t forget this next week is the perfect time to stock-up on all your favorite brands at Michaels Big Brand Sale!!

Disclaimer // This post is sponsored by Michaels Craft Stores. I am Michaels Maker this year and will be posting all kinds of goodies from Michaels Craft Stores. I do receive free product to create with.

  • « Go to Previous Page
  • Page 1
  • Interim pages omitted …
  • Page 3
  • Page 4
  • Page 5
  • Page 6
  • Page 7
  • Interim pages omitted …
  • Page 27
  • Go to Next Page »

Primary Sidebar

Heather from Whipperberry
Hello... my name is Heather and I'm the creator of WhipperBerry a creative lifestyle blog packed full of great recipes and creative ideas for your home and family. I find I am happiest when I'm living a creative life and I love to share what I've been up to along the way... Come explore, my hope is that you'll leave inspired!

Footer

  • Privacy Policy
  • Crafts
  • Food
  • Gifts
  • Holidays
  • Home
  • Mom Life
  • Recipes
  • Travel

Copyright © 2026 · Seasoned Pro