• Skip to primary navigation
  • Skip to main content
  • Skip to primary sidebar
  • Skip to footer

Whipperberry

WhipperBerry • Your Home For Creative Inspiration

  • Home
  • Recipes
    • Starters
    • Easy Weeknight Dinners
    • Main Dish
    • Salads
    • Side Dish
    • Soups & Stews
    • Desserts
    • Breakfast
    • Miscellaneous
  • Tutorials
    • Creative Crafts
    • DIY Decor
    • Fabric Crafts
    • Food How-To
    • Jewlery
    • Paint Projects
    • Paper Art
    • Party Styling
    • Photography and Graphic Design
    • Silhouette
  • Holidays
    • Easter
    • Mother’s Day
    • Father’s Day
    • 4th of July
    • Halloween
    • Thanksgiving
    • Christmas
    • Valentine’s Day
  • Gift Ideas
    • Gifts For Everyone
    • Gifts for Dad
    • Mother’s day
    • For The Girls
    • For The Kids
    • Teacher Gift Ideas
    • Christmas
  • Printables
    • Holiday
    • Gift Idea
    • LDS Primary
  • Travel
  • About
    • Terms
  • Contact
  • Nav Social Menu

    • Facebook
    • Instagram
    • Pinterest
    • RSS
    • Twitter

Product Review

Kitchen Marquee Sign with Heidi Swapp

0 · Jul 31, 2015 · 3 Comments

+ Kitchen Marquee Sign post brought to you by Michaels Craft Stores +

kitchen-marquee-sign-with-heidi-swapp-by-whipperberry

I am obsessed with marquee signs… I truly am.

It started with this post back in July of 2013, my Designer Marquee Letters.

designer-marquee-letters-by-whipperberry

Back in the day when marquee letters were rather elusive. Your options were to either pay a fortune for the real deal, or find a way to DIY a set of your own. I went the DIY route which was great, the sign still lives in my kitchen and I love it, however… it was a tad challenging, still expensive and quite frankly it still looked a little wonkey with all kinds of wiring to contend with.

The day that Heidi Swapp released her Marquee Love, was a DREAM! Seriously, I’m not sure if I’ve ever been that excited about a product release in a long time. It’s BRILLIANT! Truly, I’m always kind of excited to see what Heidi has up her sleeve. She is taking the crafting world by storm these days with not only her Marquee Letters but her Minc Foil Applicator is GENIUS as well. One of my favorite crafting tools right now!

Heidi is one of those individuals who is amazingly innovative but someone who is truly genuine. She’s everyone’s cheerleader. We have connected a bit over social media and had a chance to chat at SNAP this last year. She is one lady who I truly admire and look up to. She’s brilliant and a go getter. She’s one of those ladies who dreams up a crazy idea like the Minc and just MAKES IT HAPPEN! I love that!

I had a ball this week creating with my favorite Heidi Swapp Marquee Love letters to celebrate Michaels Big Brand Sale Starting Sunday, August 2nd.

 Kitchen Marquee Sign

Kitchen-is-now-open-Heidi-Swapp-Marquee-Sign-from-WhipperBerry-1-2

I decided to take Heidi Swapp’s Marquee Love letters to the next level and add them to a wood sign, rather than just having them sit on a shelf. I have fallen in love with all kinds of fun typography signs for the kitchen floating around like this one from Gina of Shabby Creek Cottage

small-kitchen

BUT… I thought, how fun would it be to have a marquee element to it. Why not do a sign saying, “Kitchen is Now OPEN” with the OPEN in marquee letters showing that when the sign is alight, the kitchen is open, when it’s off, the kitchen is CLOSED. Fun, right! Here’s how to make it…

Materials Needed

  1. 24×24 plywood board
  2. 4 – 25 inch 1 1/2 x 1/2 inch boards for the frame
  3.  Heidi Swapp Marquee Love letters O,P,E,N
  4. Krylon Chalk Board Spray Paint
  5. White Chalk Paint – I used BB Frösch Chalk Paint Powder
  6. Silhouette or Cricut cutting machine OR Stencil Letters
  7. Vinyl
  8. Scrap paper
  9. painters tape
  10. Hot glue
  11. Brad nails
  12. Glue dots

Directions

Heidi-Swapp-Marquee-Sign-from-WhipperBerry-10

Gather your materials and prepare them to paint. I decided to use Krylon Black Chalkboard Paint because I love the deep black and the matte finish.

First, I spray painted my letters and the frame for the sign.

Heidi-Swapp-Marquee-Sign-from-WhipperBerry-9

Heidi-Swapp-Marquee-Sign-from-WhipperBerry-7

Then I used BB Frösch Chalk Paint to white wash the sign base. I chose that technique rather than just straight paint because I still wanted to see the wood grain.

Heidi-Swapp-Marquee-Sign-from-WhipperBerry-8

To white wash your board, all you need to do is use watered-down chalk paint and then lightly wipe-off the paint to reveal the grain of the wood. This is a great way to add a little color, keep the wood look and it also dries really quick!

Heidi-Swapp-Marquee-Sign-from-WhipperBerry-5

Next, I cut my vinyl with my Silhouette CAMEO using the Bebas font. Love that font!

I laid down my vinyl and then taped the rest of the board with painters tape and some scrap paper to mask the rest of the board while I spray painted the letters.

Heidi-Swapp-Marquee-Sign-from-WhipperBerry-4

Once the paint was dry, I placed my marquee letters and drilled holes to feed the lights through. Now, keep in mind, you need to think through the pavement of the holes and how you are going to arrange the lights in the letters. You want the battery packs sitting on the bottom frame of the sign and you need to place the drilled holes accordingly.

Heidi-Swapp-Marquee-Sign-from-WhipperBerry-6

Heidi-Swapp-Marquee-Sign-from-WhipperBerry-3

Then, I assembled my marquee letters and hot glued them to the board.

Next, I hot glued the frame to the sign base and then secured it with some brad nails.

Heidi-Swapp-Marquee-Sign-from-WhipperBerry-1

On the back of the board, I used a few glue dots to secure the battery packs for the letters to the back of the board.

Heidi-Swapp-Marquee-Sign-from-WhipperBerry

And that was it… your Kitchen Marquee Sign is finished!

Kitchen-is-now-open-Heidi-Swapp-Marquee-Sign-from-WhipperBerry-2

The cool thing it looks great with the lights ON or OFF!

Kitchen-is-now-open-Heidi-Swapp-Marquee-Sign-from-WhipperBerry-3

I found the cutest sign on The Diary of Dave’s Wife not to long ago…

Lunch-now-being-served

Of course had to make one of my own, I thought it look great placed right under my Kitchen is Now Open sign…

Kitchen-is-now-open-Heidi-Swapp-Marquee-Sign-from-WhipperBerry-4

How fun is that! I used some 3M Command Picture Hanging Strips that are velcro so I can easily interchange my breakfast, lunch & dinner signs for fun! LOVE IT!!

Don’t forget this next week is the perfect time to stock-up on all your favorite brands at Michaels Big Brand Sale!!

Disclaimer // This post is sponsored by Michaels Craft Stores. I am Michaels Maker this year and will be posting all kinds of goodies from Michaels Craft Stores. I do receive free product to create with.

Design Ingenuity with Decor Steals + GIVEAWAY

8 · May 4, 2015 · 5 Comments

+ This Design Ingenuity post brought to you by Decor Steals +

May-4-design_ingenuity

Oh my stars… I’m so excited to share a fun project that I’ve been working on!

If you’ve been following me for a while, you’ll know that I LOVE Decor Steals. My husband most likely wishes I didn’t love them so much.

If you aren’t familiar with them, It’s a daily deal site that has all kinds of vintage, farmhouse &  industrial type home decor at amazing prices. I have found so many of my favorite decor items from them over the last couple of years. Not too long ago they asked me to be a part of their new Design Ingenuity challenge.

Basically… Two design bloggers are given the same items and then given the opportunity to style them in their home, in their own style. First off, I was totally honored to be asked to participate. Giddy really. I’ve always been such a huge fan of their shop. Here are just a few of my Instagram photos with items from Decor Steals in them…

WhipperBerry-and-Decor-Steals

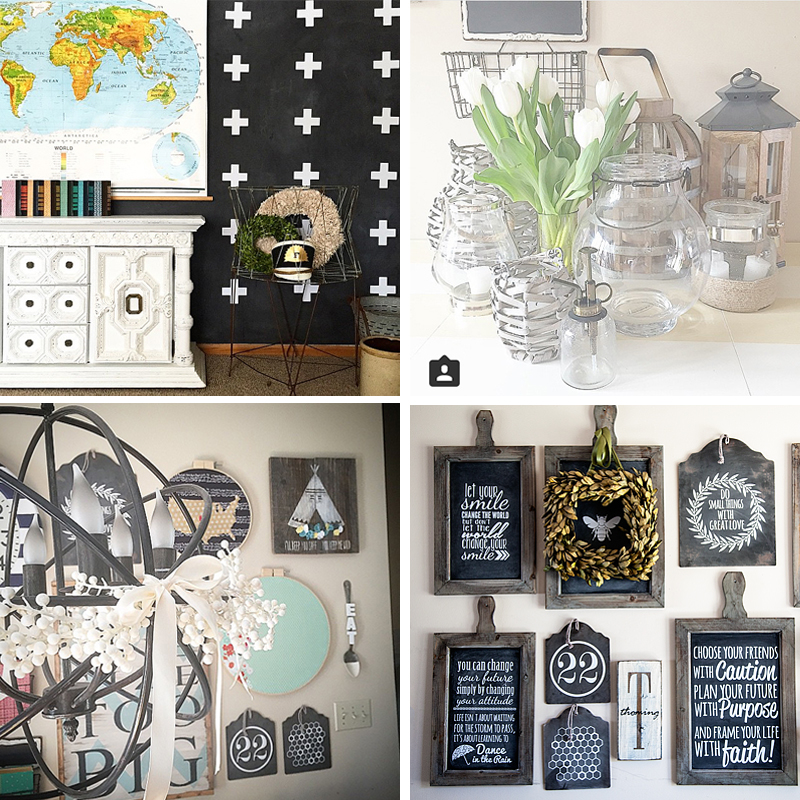
Honestly, that’s not even the half of them!

For this challenge I was paired with Bre from Rooms for Rent… I have to say, I was slightly star struck. I adore Bre’s style. If you aren’t following her, you should… She’s amazing!

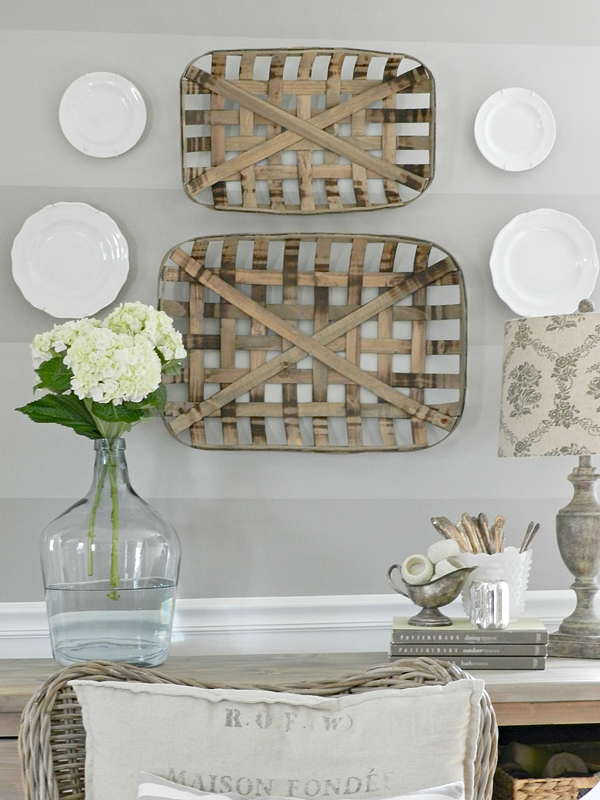
We were both given these fabulous Tobacco Baskets to style our way…

lc303 3-5-15

I decided to pay with mine a bit… First, I used one of them right outside my front door paired with a boxwood wreath that I purchased at Decor Steals a couple of years ago.

WhipperBerry-DecorSteals-Challenge-1

It’s a fun way to add a little more depth & dimension to a wreath.

Then I brought it inside and added it to my statement wall display in my living room.

Decor-Steals-Tabacco-Baskets---WhipperBerry-4

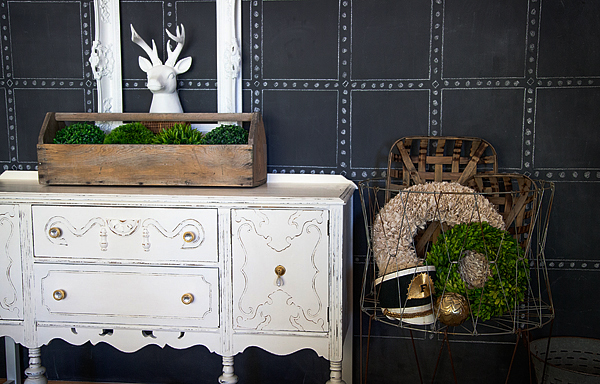
I added the Tobacco Baskets to a little vignette inside of a vintage laundry basket that I had also purchased from Decor Steals a few years ago.

Decor-Steals-Tabacco-Baskets---WhipperBerry-1

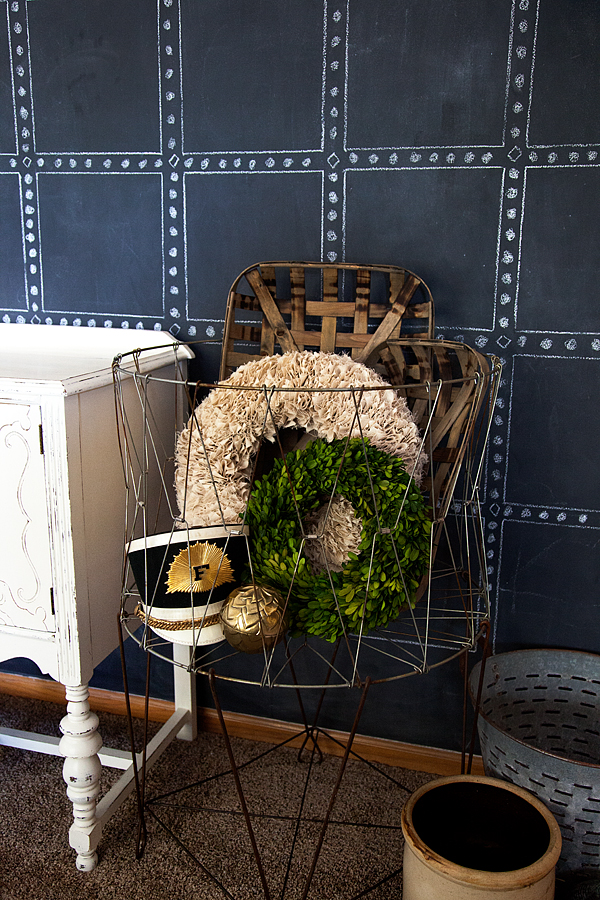
Totally in love with it! But, I also LOVE what Bre did with her’s…

Rooms-for-Rent

Stunning!!

If you love these Tobacco Baskets, you need to run over to Decor Steals… They are on sale today!!

Decor Steals will be running a fun giveaway on their Facebook page today. They are giving away one set of Tobacco Baskets and two $50 gift cards to Decor Steals.

Go follow them and stay up to date on all of their daily deals. Make sure you sign-up for their emails so that you don’t miss out on any deals!!

Thanks Daily Deals for a fun challenge!!

+ Disclaimer – This post is sponsored by Decor Steals, as always… All thoughts, ideas and opinions are my very own. +

Dairy Free Chia Pudding

2 · Apr 29, 2015 · 1 Comment

+ This Dairy Free Chia Pudding brought to you by my friends at Silk® +

Dairy-Free-Chia-Pudding-WhipperBerry

Not too long ago I started a trend at my house…

We’ve all fallen in LOVE with the Overnight Cashew Milk Oatmeal and have become quite obsessed.

Overnight-Oats-with-Silk-Cashew-Milk-from-WhipperBerry-9

My daughter Hannah has become our designated oatmeal prep girl and each night she prepares our oatmeal for the morning. We LOVE it!

Recently we’ve been introduced to another overnight breakfast treat that we’ve equally fallen for…

 Dairy Free Chia Pudding!

Dairy-Free-Chia-Pudding-by-WhipperBerry-2

Doesn’t it just sound sinful to have pudding for breakfast? With this “pudding” you don’t have to worry! I love it for a light dessert as well.

Have you jumped on the Chia Seed band wagon? I kind love them. They are nature’s quirky little gems and I love quirky.  Paired with our favorite dairy-free Silk® Dairy Free Yogurt Alternative and Silk® Cashew Milk it’s the perfect dairy-free treat!

Dairy-Free-Yogurt-Chia-Pudding-3

 Have you discovered the new Silk® Dairy-Free Yogurt Alternative?

It’s plant-powered nutrition that never tasted so good – or so smooth and creamy. Made from the goodness of plants instead of dairy, Silk Dairy-Free provides 6 grams of soy protein per serving, with no cholesterol.  It’s made with real fruit, without any artificial flavors or colors. And the taste? One delightful spoonful and you’ll be amazed.

Let me show you how I mix-up our Dairy Free Chia Pudding…

Silk Dairy-Free Yogurt Chia Pudding from Heather Thoming on Vimeo.

How fun and simple is that? Here are your ingredients…

Dairy Free Chia Pudding Recipe

Dairy-Free Chia Pudding
 
Save Print
Prep time
5 mins
Cook time
4 hours
Total time
4 hours 5 mins
 
A Simple overnight breakfast treat!
Author: Heather // WhipperBerry
Cuisine: Breakfast / Light Dessert
Serves: 1-2 servings
Ingredients
  • 1 cup Silk® Cashew Milk
  • 1 cup Silk® Dairy-Free Yogurt Alternative - Any flavor you like, I used vanilla
  • 1 tsp vanilla extract
  • 1 tablespoon honey
  • ¼ cup chia seeds
  • a pinch of salt
  • Garnish with dairy-free, gluten-free granola, fruit & a drizzle of honey
Instructions
  1. In a small mixing bowl or jar, add Silk® Cashew Milk, Silk® Dairy-Free Yogurt Alternative, vanilla, honey, chia seeds and salt. Mix well.
  2. Cover pudding and place in the refrigerator for at least 4 hours or overnight.
  3. Garnish with granola, fruit and a drizzle of honey.
3.2.2925

Dairy-Free-Chia-Pudding-by-WhipperBerry-4

Want to discover more Silk goodness? Follow them on Instagram! They have all kinds of scrumptious ideas for you to bring into your own kitchen.

This conversation is sponsored by Silk. The opinions and text are all mine.

Orange Honey Butter Spread with Melt Organic

5 · Jan 14, 2015 ·

+  Orange Honey Butter Spread Recipe brought to you by Melt® Organic +

Orange-Honey-Butter-Spread-WhipperBerry

This is one of my favorite culinary times of year… Citrus Season! I don’t know about you, but I love the oranges this time of year. They are like candy and I just can’t get enough of them. Which is probably good since we all seem to be fighting the cold and flu war this time of year, a little extra vitamin C is perfect! I thought a lovely Orange Honey Butter would be a great addition to a brunch table, especially when looking for inspiration from Bee Inspired recipes.

Recently, I was invited to try a new product out on the market called Melt® Organic. It’s this really cool “butter like” spread that has all the stuff we love about butter, but it’s packed full of healthier fats and it’s dairy and soy free. I would have to say I was a little skeptical at first. Can this product made out of a blend of  organic coconut, flaxseed, canola, palm fruit & sunflower oils really have the taste and creamy texture of butter? I decided to put it to the test.

First test, compound butter… Last Christmas, for my neighbor gifts, I made some lovely compound butters. I whipped together some honey, garlic & berry butters, packaged them up and gave them to my friends and neighbors for holiday gifts. They were a hit.

Sweet-Savory-Christmas-Gift-from-WhipperBerry-1

I wanted to give this idea a go with this new Melt® Organic product. I whipped it up the very same way, I place roughly 6 oz. basically half a container of Melt® Organic into my mixer with roughly 1 heaping tablespoon of orange marmalade.

Orange-Honey-Butter

Then whip the two together really well. Place in a small jar and serve immediately or store in the refrigerator and use as needed. It turned out beautifully!

Orange-Honey-Butter-Spread-3

I whipped up some black cherry butter spread with the other half of my container and I was all set for a lovely brunch.

What I LOVE about the Melt® Organic is that it is GMO-free and it’s helping get my healthy fats in the right way. Here’s the skinny about Melt® Organic…

  • Ideal balance of Omega 6 and Omega 3 fatty acids – 2:1
  • Good daily source of Omega 3 ALA’s at 425 mg – 26% RDA per serving
  • Good daily source of Vitamin E – 15% RDA per serving
  • Certified USDA Organic and OU Kosher Pareve
  • Verified non-GMO by the Non-GMO Project
  • Absolutely no hydrogenated or partially hydrogenated oils
  • Trans Fat Free
  • Gluten Free
  • Soy Free
  • Dairy Free
  • Vegan
  • No artificial colors, flavors or preservatives

Not bad if you ask me!

The next test… Baking Cookies.

I mixed up a batch of our favorite Chocolate Peanut Butter Granola Cookies with Melt® Organic rather than butter. They mixed up beautifully and baked even better. My family didn’t even notice the difference.

chocolate-chip-cookies-with-Melt-Organic-whipperberry

I noticed a difference knowing that even though cookies aren’t exactly health food, and fat is still fat, I felt better knowing that the cookies they were eating were made from healthier fats. You can grab this recipe HERE, just substitute the Melt® Organic for the butter.

The next test… I sautéd some corn with Melt® Organic and I really liked that much better than butter. You still have the butter flavor without all the yucky fats. My family loved this test too.

All in all, my experience with Melt® Organic has been super positive and we have been converted for sure!

Orange-Honey-Butter-Spread-5

Click HERE to find a store near you that carries Melt® Organic. You can generally find it in the organic dairy section of your local super market. If not, you can always order it online. Grab some and give it a spin, tell me what you think!

MELT® Organic is a line of luscious, organic spreads made from healthy oils for butter lovers seeking a much healthier alternative, available in Rich & Creamy (original), Honey, and NEW Chocolate.

This is a sponsored conversation written by me on behalf of MELT Organic. The opinions and text are all mine.

  • « Go to Previous Page
  • Page 1
  • Interim pages omitted …
  • Page 4
  • Page 5
  • Page 6
  • Page 7
  • Page 8
  • Interim pages omitted …
  • Page 27
  • Go to Next Page »

Primary Sidebar

Heather from Whipperberry
Hello... my name is Heather and I'm the creator of WhipperBerry a creative lifestyle blog packed full of great recipes and creative ideas for your home and family. I find I am happiest when I'm living a creative life and I love to share what I've been up to along the way... Come explore, my hope is that you'll leave inspired!

Footer

  • Privacy Policy
  • Crafts
  • Food
  • Gifts
  • Holidays
  • Home
  • Mom Life
  • Recipes
  • Travel

Copyright © 2026 · Seasoned Pro