• Skip to primary navigation
  • Skip to main content
  • Skip to primary sidebar
  • Skip to footer

Whipperberry

WhipperBerry • Your Home For Creative Inspiration

  • Home
  • Recipes
    • Starters
    • Easy Weeknight Dinners
    • Main Dish
    • Salads
    • Side Dish
    • Soups & Stews
    • Desserts
    • Breakfast
    • Miscellaneous
  • Tutorials
    • Creative Crafts
    • DIY Decor
    • Fabric Crafts
    • Food How-To
    • Jewlery
    • Paint Projects
    • Paper Art
    • Party Styling
    • Photography and Graphic Design
    • Silhouette
  • Holidays
    • Easter
    • Mother’s Day
    • Father’s Day
    • 4th of July
    • Halloween
    • Thanksgiving
    • Christmas
    • Valentine’s Day
  • Gift Ideas
    • Gifts For Everyone
    • Gifts for Dad
    • Mother’s day
    • For The Girls
    • For The Kids
    • Teacher Gift Ideas
    • Christmas
  • Printables
    • Holiday
    • Gift Idea
    • LDS Primary
  • Travel
  • About
    • Terms
  • Contact
  • Nav Social Menu

    • Facebook
    • Instagram
    • Pinterest
    • RSS
    • Twitter

Dessert

Pie Crust the Perfect Canvas // Mini Cherry Pies

92 · Dec 13, 2013 · 28 Comments

This post brought to you by Crisco // It's no secret that I LOVE pie! I love making pie, I love eating pie. As far as I'm concerned pie crust is the perfect canvas to make what ever you want! A few weeks ago I created a post about some of my favorite tips for making Picture Perfect Pies. It all starts with my favorite simple pie crust recipe from Crisco. Once you have that down you can make anything. You can make sweet pies or savory pies. Last night after a day of pie making, I decided to whip up some more crust dough and make some Taco Pies in my new Breville Personal Pie Maker.  The family LOVED it!! I will post the recipe soon, promise!

While I was working on this week's pie project, I thought I would make a little video on Instagram on how I make my pie crust.

Kinda fun… thanks to Rhonna Designs and Mindy Gledhill for letting me use some of their talents for the video.

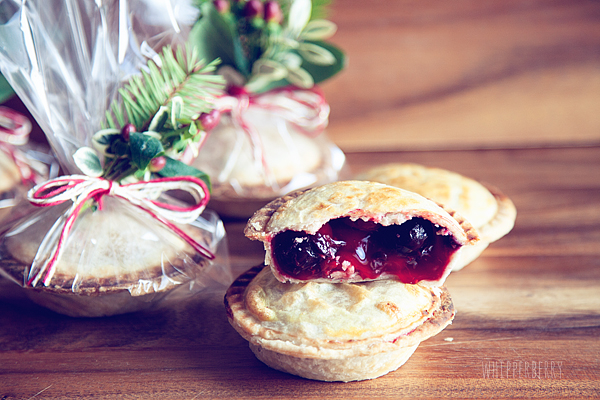
So, I had a thought. Since I just adore pies… Why not make mini pies to give as neighbor gifts for this Christmas season? 

Mini Pies with Crisco and WhipperBerry-9

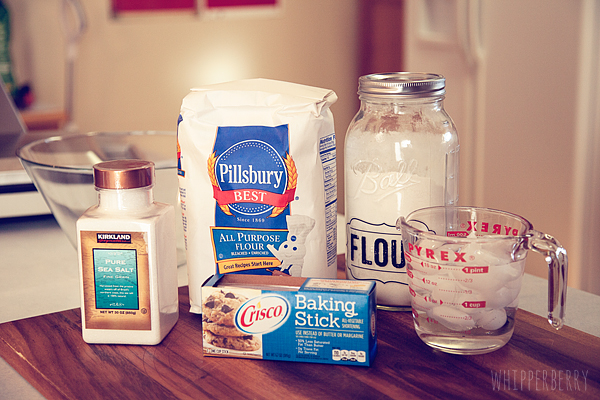
Now, these couldn't be any easier… With a great pie crust recipe, some simple store bought filling and the Breville Personal Pie maker. Nothing too crazy here, I gathered my pie crust ingredients…

Mini Pies with Crisco and WhipperBerry-1

Click Here for the Recipe

If you still have any questions about making Pie Crust, you can always call the Crisco Pie Hotline 1-877-FOR PIE TIPS (877-367-7438) for all kinds of around the clock PIE help this holiday season!

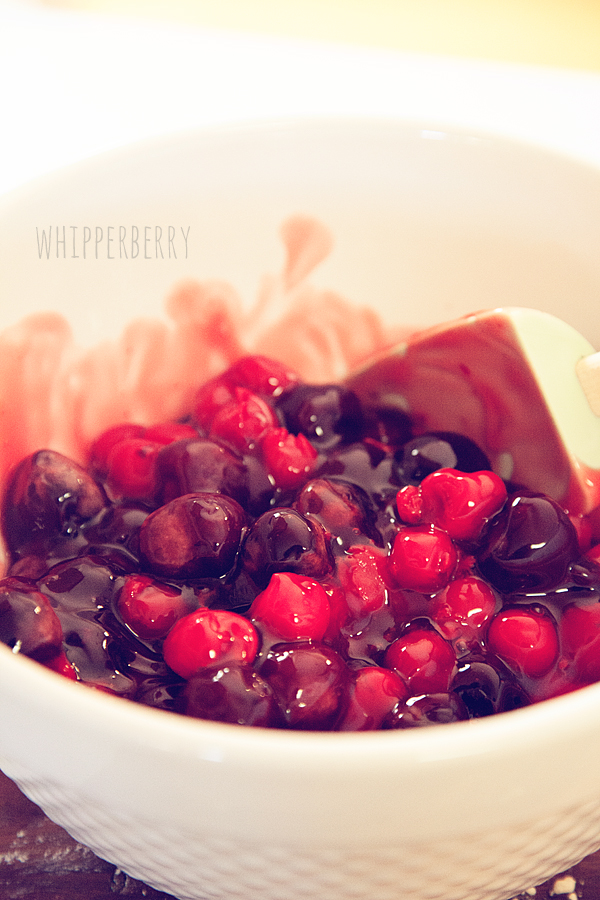
Next, I took some store bought cherry pie filling and supplemented it with some frozen sweet black cherries. The color contrast makes the filling really pretty, plus I LOVE black cherries. I used one 12 oz. bag of frozen cherries to 2 cans of cherry pie filling.

Mini Pies with Crisco and WhipperBerry-4

Then, I rolled out my pie crust and cut it using the special cutter from Breville machine, here is a quick video on how I did that as well.

Didn't they turn out CUTE?! They fit right inside those clear cellophane bags that you can find any where these days. Then I added some holiday greenery to make it look festive.

Mini Pies with Crisco and WhipperBerry-10

 These cute little mini pies are just so fun and so easy to make…

Mini Pies with Crisco and WhipperBerry-11

The are just scrumptious!!  Crisco has made pie making so easy these days.

  • They have a Crisco Picture Perfect Pie Pinterest board that has all kinds of fabulous recipes.
  • The Crisco Kitchen has teamed up with Michele Stuart owner of Michele's pies in Connecticut, she is over at Crisco's site sharing all kinds of fun pie tips and ideas.
  • Crisco is hosting a fun Rate & Review contest for a chance to win a Michele Stuart pie prize pack. Visit the Rate & Review site to rate your favorite pie for a chance to win!

Crisco is giving away a fabulous Perfect Pie Prize Pack to one of you!! Here is what you will win…

  • Breville Personal Pie Maker
  • Babycakes Pie Pop Maker
  • Sur La Table® Ruffled Pie Plates
  • Lattice pie top cutter
  • Pie Pop sticks

A Prize Pack valued at $200!! Follow the directions in the Rafflecopter box below to enter. This giveaway is open to those with a shipping address within the United States and will be open from November 27-January 2 with the winner announced on January 3rd.

a Rafflecopter giveaway

Disclaimer // This post is sponsored by Crisco. I did receive payment for development of this post.

Gingerbread Granola

3 · Dec 10, 2013 · 2 Comments

I’ve known for some time that I want to recreate this recipe. Gingerbread has been on my mind a lot recently with the holidays. My two flavor staples for this time of year are gingerbread and eggnog. So when I tried out a granola that incorporated one of those I became giddy with the thought of building a recipe around the product! This gingerbread granola is now a staple in our home. Mainly because it’s so quick to prepare and packages up beautifully for last minute neighbor treats!

gingerbread-granola

4 cups old-fashioned rolled oats
1 1/2 cups pecans, finely chopped
1 teaspoon salt
1/2 teaspoon cinnamon
1/2 teaspoon ground ginger
1/2 cup melted butter
1/3 cup real maple syrup
1/4 cup molasses
3/4 teaspoon vanilla


Preheat your oven to 350 degrees. Line a large baking sheet with parchment or a baking mat.

Mix all of your ingredients together in a large bowl. Spread into an even layer on your prepared pan.

Bake for 30 minutes, stirring halfway through the baking time. Allow to cool completely and enjoy!

gingerbread-granola-gift

While this bakes you get the wonderful smell of the Holiday’s floating through your home. It is so wonderful to wake up to and seems to last for days! We like to double the batch otherwise it never seems to make it to our friends and family!

gingerbread-granola-treat

Try it out on top of cereal, yogurt, fruit… or just on it’s own. It is unbelievably delicious and helps spread Christmas cheer whenever you decide to share! If you liked this recipe, check out these:

coconut-macaroon   Orange-rolls   cranberry-bars

Coconut Macaroons // Easy Orange Blossom // Cranberry Bliss Bars

Peppermint Drop Cookies // Cookie Swap Recipe

21 · Dec 5, 2013 · 14 Comments

Peppermint Drop Cookie Recipe // The season is upon us… Holiday baking and general goodie making. I grew up with a Mom who created all kinds of goodies each year to share with friends and neighbors. This year I decided to experiment with a "cookie" or a meringue cookie really… to come up with a cute take on those traditional peppermint candies. 

WhipperBerry Peppermint Drop Meringue Cookies

Meringue cookies are all over the patisseries in Paris in varies shapes and flavors. They are sooooo easy to make and are a fun unique treat that you can WOW your friends with. They are made just like a meringue for a pie, but you pipe them onto a parchment lined baking sheet and bake them for quite a bit longer. They turn into these cute, crunchy, yet soft in the middle sweet treats. When you add a little red food coloring and some peppermint extract they get even better and are like peppermint candies, but WAY better!

Peppermint Drop Cookie Recipe

This recipe has been adapted from Martha Stewart's Peppermint Meringues with Chocolate Filling Recipe // It will yield about 30 two inch size meringue cookies.

3 egg whites

3/4 cup sugar

1/2 teaspoon peppermint extract

red gel food coloring

Instructions

In a heat safe mixing bowl, place the egg whites and sugar. Place over a medium sauce pan filled half way with water at a low simmer on the stove. Slowly whisk the egg whites and sugar until the sugar has melted. The best way to test that is using your CLEAN fingers. Just pinch a bit of the mixture and see if you still feel the grit of the sugar. As soon as the grit is gone, this usually take a few minutes, the whites are then ready to whip into a meringue.

Place mixing bowl in mixer and with the whisk attachment, whisk on high until the egg whites and sugar form stiff peaks.  Once you have stiff peaks, add the peppermint extract and whisk until fully combined.

Place a large star tip in a large pastry bag. Then using a clean brush or tip of a butter knife, draw some stripes onto the inside of the pastry bag with the red gel food coloring.

WhipperBerry Peppermint Drop Cookies-pipping bag trick

It doesn't need to be pretty, or exact… just four or five lines to add the red stripes to the peppermint drops.

WhipperBerry Peppermint Drop Cookies-2

Next, pipe the meringue onto a parchment lined baking sheet. Make the cookies about two inches in diameter.  A quick note… Due to the nature of these cookies you may want to use masking tape to tape down the parchment paper on the baking sheet. That way you won't have parchment paper floating around wreaking havoc on your peppermint drop cookies.  Make nice little drops with the pastry bag and then carefully pull up to create the nice peak at the top.

WhipperBerry Peppermint Drop Cookies-3

Place in a 175˚ oven for 3 hours. I also place a wooden spoon in between the oven door and the oven so that any steam that is created can escape. Once the cookies are hard, remove them from the oven and let cool.

WhipperBerry Peppermint Drop Cookies - Meringue Recipe

These little meringues turn into these bite size peppermint treats that just melt in your mouth. They are a perfect addition to a goodie plate, because they add DRAMA. The nice thing is they can be made ahead of time and stored in an air tight container for a couple of weeks. You can even create a fun little goodie bag just filled with these little treats. Either way, they would be a great addition to your holiday treat list!

WhipperBerry Peppermint Drop Cookies

Santa will even love them on his goodie plate. They are a nice change of pace to your regular cookie!

I am participating in a fun cookie swap this week with a group of fabulous bloggers!!

cookie swap button 680

You can head over and check out their fun recipes…

Tracie from Cleverly Inspired made some rustic Gingerbread Biscotti… 

easy-gingerbread-biscotti-recipe-cleverlyinspired-4_thumb

Chelsea from Two Twenty One made another peppermint treat… Peppermint Chocolate Cookies.

cookies

Tomorrow, Carmel from Our Fifth House will have another cookie to share with you guys! Make sure to head over and see what she's created.

Happy Holidays!

Caramel Corn Recipe

0 · Dec 3, 2013 · 5 Comments

Caramel Corn Recipe //  Hello Whipperberry friends!  Can you believe that it's December already?  It feels like this season flies by so fast…it's hard to take it all in isn't it?  There's just so much to do, and so little time to do it!  But I admit I love it all…the fast pace of the malls, the music, the gatherings and the goodies.  Oh my, how much do I love the goodies!  I might need a bigger pants by the time January rolls around!  Nah, holiday calories don't count right?!  😉

Speaking of goodies, I wanted to share a family favorite recipe with you today.  This caramel corn is actually my Grandma's recipe, and I remember my Mom making it for us every year…I always looked forward to it!  And now I make it for my family.  Don't you just love recipes that get passed down through the generations?  There's something so special about sharing a recipe with your loved ones that generations before you have been enjoying too.  Love that so much.

Anyway, this caramel corn is SO good.  Creamy, and chewy and delicious!  I hope you try it and love it!

Caramel-Corn-{A-Pretty-Life}

This caramel corn is also perfect for gift giving or simply just enjoying with your family during a movie night!  It's quick and easy to make and it's crazy delicious!  Trust me when I say this treat will get devoured.  I seriously could eat this all by my lonesome!

 Whisk

Ingredients

  • 1⅓ cups granulated sugar
  • 1 cup salted butter
  • 1/2 cup corn syrup
  • 1 tsp vanilla
  • 8 cups popped popcorn
  • 1 cup pecans & almonds (optional)

Instructions

  1. Pop your popcorn.  Then measure out about 8 cups and spread it out onto a large cookie sheet.
  2. If you wish to add nuts to your popcorn, you might want to toast them in a 350 degree oven for 2-5 minutes, watching them very carefully.  Toasting them brings out amazing flavor!  When the nuts are toasted, sprinkle them over the popped popcorn.  Set aside.
  3. Now on to the caramel!  In a saucepan melt the butter, then add the sugar and corn syrup.
  4. Bring to a boil over medium heat, stirring constantly.
  5. Continue to boil, stirring occasionally until the mixture turns caramel colored.
  6. Remove from the heat and stir in the vanilla.
  7. Then pour the caramel over the popcorn and nuts.  Using a fork, gently mix, and separate into clusters.
  8. You can eat it at this point while it's soft and warm, or you can let it cool and enjoy it later.
  9. Store in a tightly closed container.

Deeeelish!  I hope your holiday season is full of cheer and much deliciousness!

– – – – – – – – – – – – – – – –

If you get at chance this season, I'd love for you to stop by my blog for some Christmas cookie recipes!  Yum.

Christmas-Cookies-{A-Pretty-Life}

Mint Chocolate Chip Blizzard Cookies  |  Candy Cane Crumble Nutella Cookies  |  Eggnog Ice Box Cookies

Have a delicious day! Signature

  • « Go to Previous Page
  • Page 1
  • Interim pages omitted …
  • Page 18
  • Page 19
  • Page 20
  • Page 21
  • Page 22
  • Interim pages omitted …
  • Page 28
  • Go to Next Page »

Primary Sidebar

Heather from Whipperberry
Hello... my name is Heather and I'm the creator of WhipperBerry a creative lifestyle blog packed full of great recipes and creative ideas for your home and family. I find I am happiest when I'm living a creative life and I love to share what I've been up to along the way... Come explore, my hope is that you'll leave inspired!

Footer

  • Privacy Policy
  • Crafts
  • Food
  • Gifts
  • Holidays
  • Home
  • Mom Life
  • Recipes
  • Travel

Copyright © 2026 · Seasoned Pro