• Skip to primary navigation
  • Skip to main content
  • Skip to primary sidebar
  • Skip to footer

Whipperberry

WhipperBerry • Your Home For Creative Inspiration

  • Home
  • Recipes
    • Starters
    • Easy Weeknight Dinners
    • Main Dish
    • Salads
    • Side Dish
    • Soups & Stews
    • Desserts
    • Breakfast
    • Miscellaneous
  • Tutorials
    • Creative Crafts
    • DIY Decor
    • Fabric Crafts
    • Food How-To
    • Jewlery
    • Paint Projects
    • Paper Art
    • Party Styling
    • Photography and Graphic Design
    • Silhouette
  • Holidays
    • Easter
    • Mother’s Day
    • Father’s Day
    • 4th of July
    • Halloween
    • Thanksgiving
    • Christmas
    • Valentine’s Day
  • Gift Ideas
    • Gifts For Everyone
    • Gifts for Dad
    • Mother’s day
    • For The Girls
    • For The Kids
    • Teacher Gift Ideas
    • Christmas
  • Printables
    • Holiday
    • Gift Idea
    • LDS Primary
  • Travel
  • About
    • Terms
  • Contact
  • Nav Social Menu

    • Facebook
    • Instagram
    • Pinterest
    • RSS
    • Twitter

Frozen Desserts

Healthy Ice Cream Sandwiches

2 · Jul 15, 2013 · 1 Comment

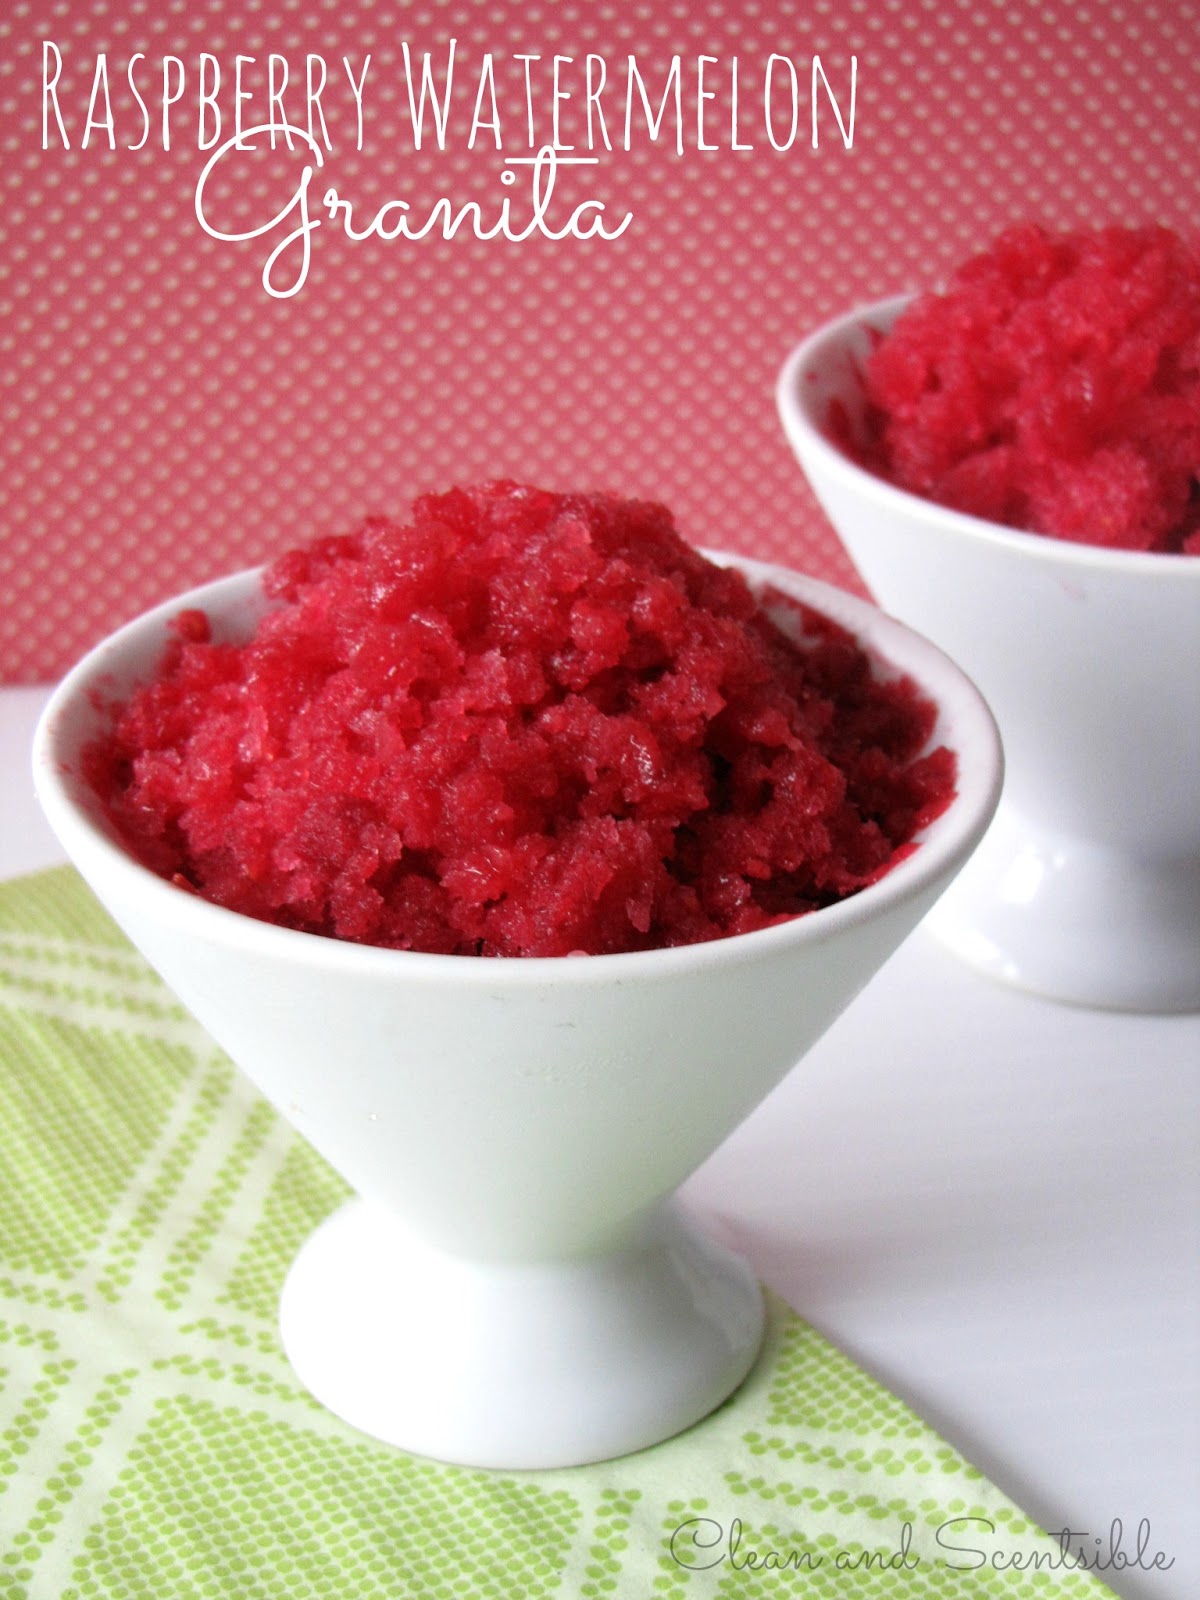
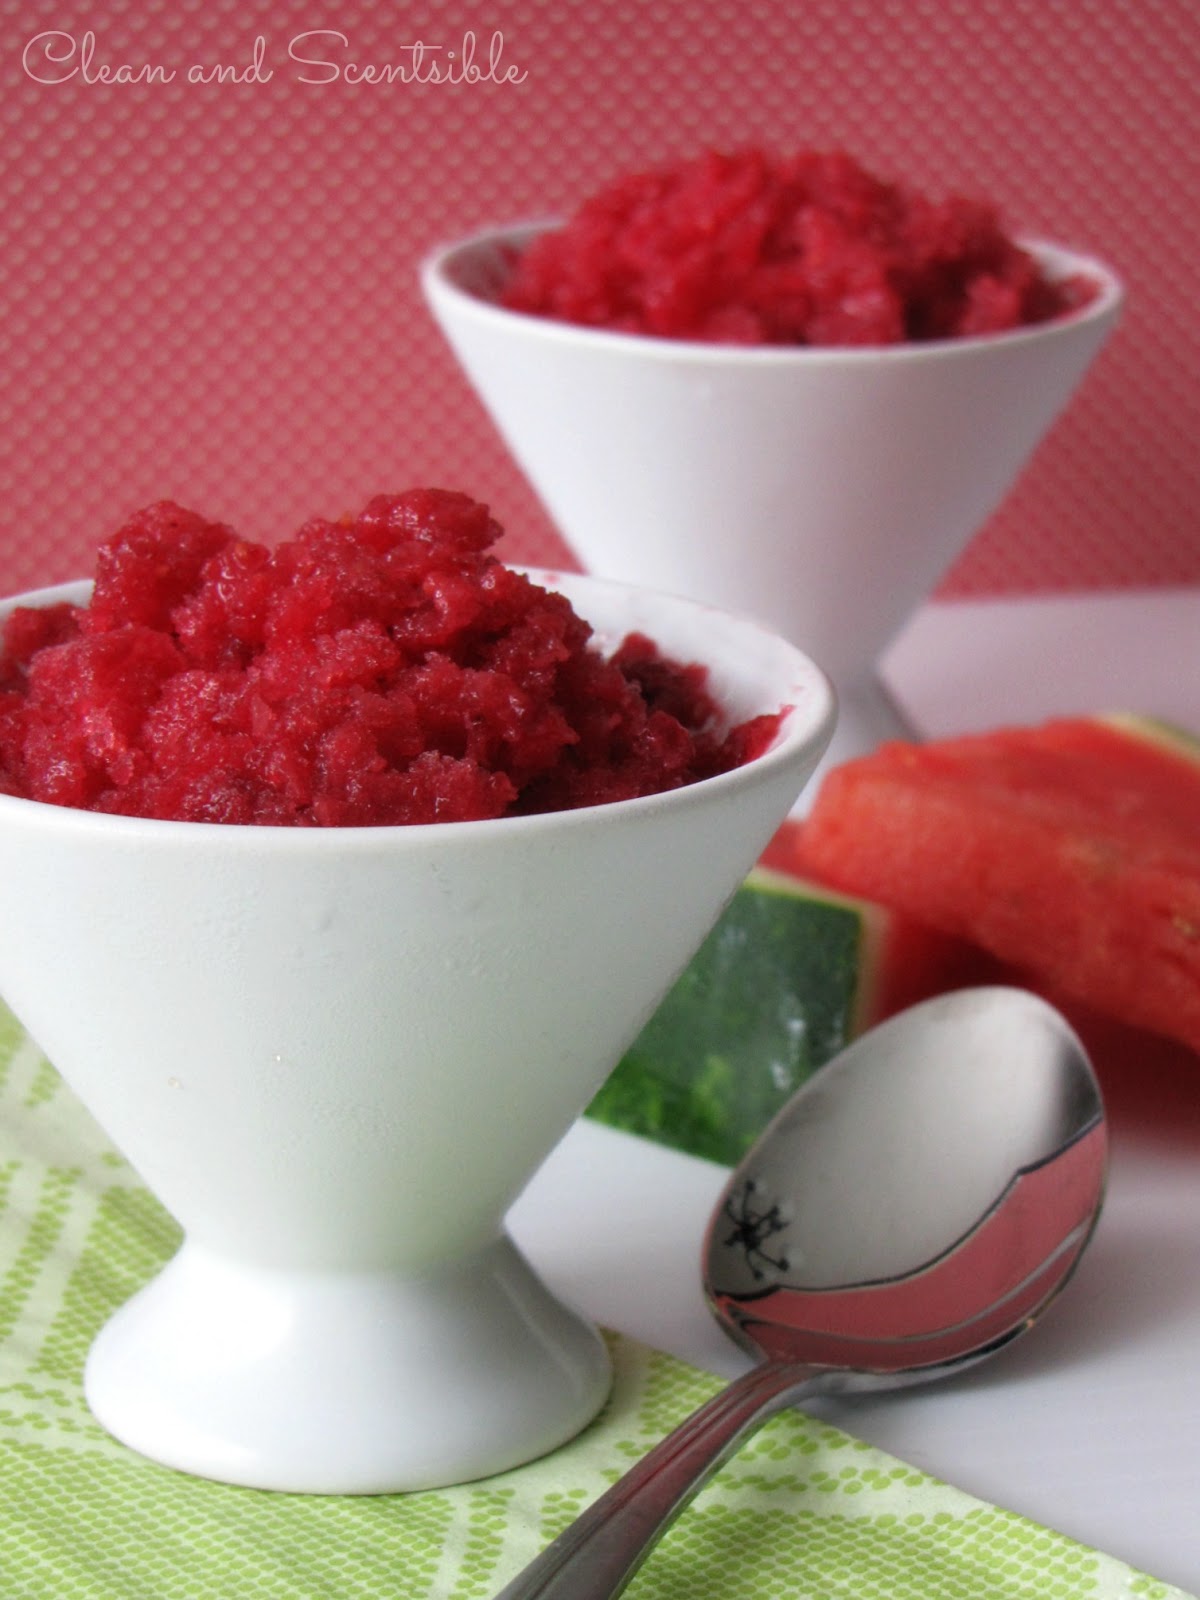
Hello Whipperberry readers! Jenn here from Clean and Scentsible!  I'm so excited to be back here today sharing one of our kid-friendly, healthy summertime treats…


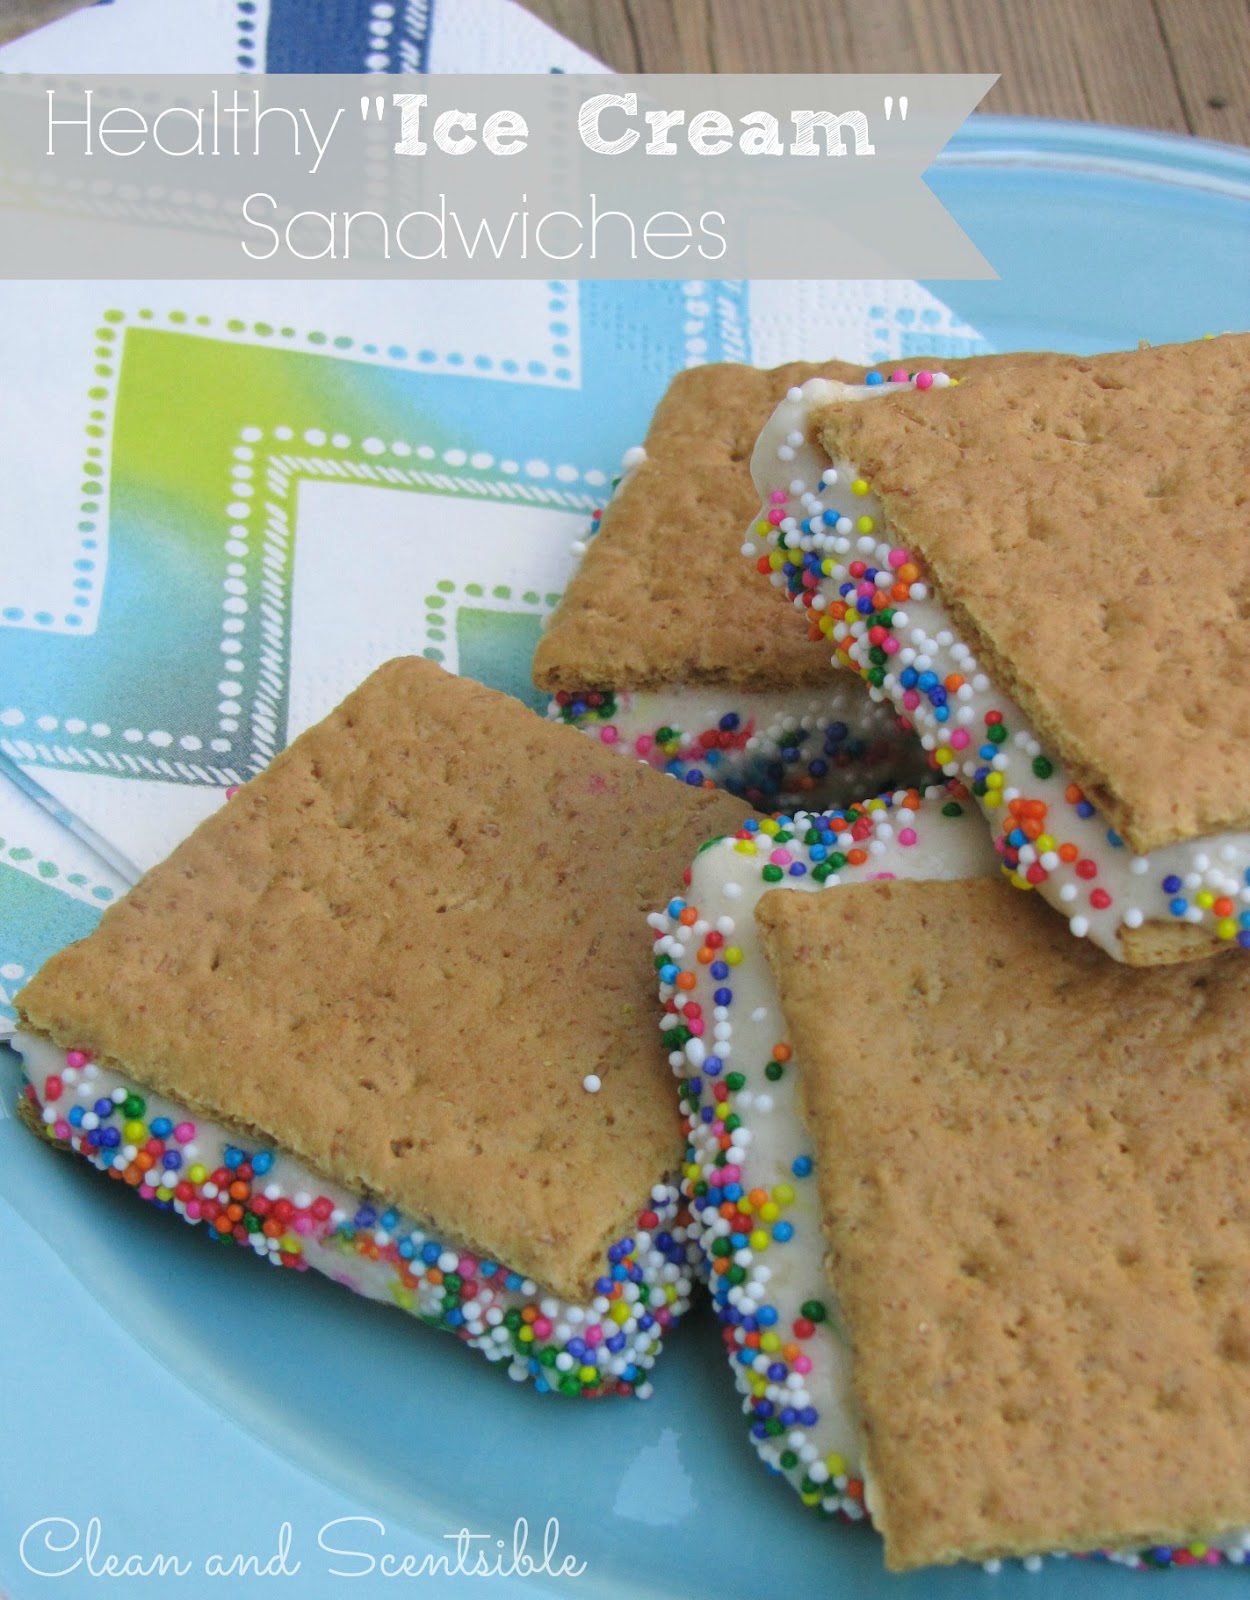
These ice cream sandwiches are very simple to make and the kids can have lots of fun coming up with their own variations.  To make the "ice cream" simply blend up 2 ripe, frozen bananas in your blender or food processor until it turns soft and creamy {like a soft served ice cream texture}.  Spoon the mixture between 2 graham crackers and place in the freezer for approximately 20-30 minutes {makes 6 sandwiches}.
 
 
My oldest is a huge sprinkles fan, so we added some colorful sprinkles to these ones.  They also taste wonderful with peanut butter {or Nutella!}spread over the graham crackers and, of course, adding a little chocolate is always a yummy option too! 🙂
 
 
If you get a chance, pop on over to Clean and Scentsible for some more summertime inspiration!  There's always lots going on and I would love to hear from you!
Summertime Caddy and Frosted Mason Jars
Watermelon Pudding Pops
Sisal Rope Flower Pots
You can also connect with me here:
 Facebook / Pinterest / Instagram / Twitter


I hope you are all having a wonderful summer!

Jenn Clean and Scentsible

Photobucket

Mint Chocolate Chip Ice Cream Recipe

6 · Jul 9, 2013 · 7 Comments

Mint Chocolate Chip Ice Cream Recipe // It is great to be back here at Whipperberry! Let’s talk about one of my favorite summer treats… Ice cream! It gets pretty warm here in Utah. As the temperatures rise, my mind gets busy trying to think of fun and new flavors of ice cream to make. I always end up back at the old standby of chocolate chip. This time I wanted to get a little crazy and add a little somthin’ extra!

mint_ice_cream

Now, you might be surprised to learn that I DO NOT own an ice cream maker! *GASP!* So how is it that I made this amazingly fluffy and delicious looking treat? Easy! I combined two basic ingredients, added in my mixers and froze away. You can see the tutorial for the basic two ingredient ice cream here.

mint_chocolate_chip

Here is what you will need: 2 cups of heavy whipping cream 1 (14 oz) can sweetened condensed milk 1 cup chocolate chunks 1/2 teaspoon peppermint extract 1/2 teaspoon vanilla extract Now, let’s get started! In a small bowl mix together the condensed milk, chocolate chunks, and extracts. Set aside. Whisk your heavy cream in the bowl of an electric mixer until soft peaks form. Gently fold your whipped cream into your condensed milk mixture. Pour this into an airtight container and transfer to your freezer. Allow to freeze 6 hours, or overnight.

mint_ice_cream_close

I like to chop my chocolate chunks a bit to make them a little smaller, but that’s just personal preference.  

mint

The best thing about this recipe is how adaptable it is! Don’t like mint or chocolate chips? No problem! Switch them out for cherries or cheesecake. Or stick with plain ol’ vanilla. The possibilities are endless! Hop over to my site and check out a few of the fun flavors I’ve made!

jesseca from one sweet appetite

One Sweet Appetite

cake batter ice cream // july bbq // parmesan fries

Raspberry Watermelon Granita

0 · Jun 19, 2013 · 13 Comments

Raspberry Watermelon Granita // I'm thrilled to have Jenn from Clean & Scentsible, another member of the WhipperBerry creative team here today. She has been a long time contributor to my Friday Flair link party and she always blows me away with her fun idea. I'm so excited to have her on the team

Hello Whipperberry fans! I'm Jenn from Clean and Scentsible and I cannot tell you how excited I am to be contributing to Heather's amazing blog!


Jenn Clean and Scentsible

To me, summertime is all about simplifying things.   We usually only have a few months of nice, warm weather around here so I savor every moment I can get!  This raspberry watermelon granita is one of my favorite summertime treats and is so easy to make.   It does require a bit of patience while it is freezing but it is well worth it!


Raspberry Watermelon Granita

5 cups cubed seedless watermelon

2 1/2 cups fresh or frozen raspberries

1/2 cup sugar

1 envelope unflavored gelatin {1/4 ounce}

1/2 cup cran-raspberry juice cocktail 

Preparation

Puree the watermelon and raspberries in a food processor or blender.  Depending on the size of your blender you may need to do this in two batches.

Combine the sugar and gelatin in a small sauce pan and stir over low heat until gelatin dissolves.  Stir in juice.

Combine about half of the sugar mixture with the puree.  Slowly add the remainder of the mixture to taste depending on how sweet you would like your granita to be.  Remember that it will lose a little of the sweetness once frozen.  

Pour into a 9 x 9 baking pan, cover with foil, and place in freezer.

Freeze for at least 2-3 hours and then use a fork to scrape along the top layers creating an icy texture.  Continue until you start to get close to the less-frozen middle and then place back in the freezer.  Repeat this process until it is all scraped.  Makes about 10-12 servings.

**NOTE: Don't worry if you won't be around to scrape it every couple of hours.  I often just leave it overnight and then scape it in one go – it just requires a little more muscle!  If you only need a couple of servings, just scrape what you need and place the rest back in the freezer.


This keeps well in the freezer as long as you keep it covered.  The kids love it and it is a refreshing, low calorie treat for those hot days!
 
****************
Here are a few other summer projects that I have worked on…
 
Blackberry Cheesecake Pots
 
 
Crab Cupcakes
 
 
Summer Lemonade Bar
 
 
If you have a chance, I would love for you to drop by Clean and Scentsible to say hello!  You can also connect with me here:
 
Facebook / Pinterest / Twitter / Google+ / Instagram

Photobucket

  • « Go to Previous Page
  • Page 1
  • Page 2
  • Page 3
  • Page 4

Primary Sidebar

Heather from Whipperberry
Hello... my name is Heather and I'm the creator of WhipperBerry a creative lifestyle blog packed full of great recipes and creative ideas for your home and family. I find I am happiest when I'm living a creative life and I love to share what I've been up to along the way... Come explore, my hope is that you'll leave inspired!

Footer

  • Privacy Policy
  • Crafts
  • Food
  • Gifts
  • Holidays
  • Home
  • Mom Life
  • Recipes
  • Travel

Copyright © 2026 · Seasoned Pro