• Skip to primary navigation
  • Skip to main content
  • Skip to primary sidebar
  • Skip to footer

Whipperberry

WhipperBerry • Your Home For Creative Inspiration

  • Home
  • Recipes
    • Starters
    • Easy Weeknight Dinners
    • Main Dish
    • Salads
    • Side Dish
    • Soups & Stews
    • Desserts
    • Breakfast
    • Miscellaneous
  • Tutorials
    • Creative Crafts
    • DIY Decor
    • Fabric Crafts
    • Food How-To
    • Jewlery
    • Paint Projects
    • Paper Art
    • Party Styling
    • Photography and Graphic Design
    • Silhouette
  • Holidays
    • Easter
    • Mother’s Day
    • Father’s Day
    • 4th of July
    • Halloween
    • Thanksgiving
    • Christmas
    • Valentine’s Day
  • Gift Ideas
    • Gifts For Everyone
    • Gifts for Dad
    • Mother’s day
    • For The Girls
    • For The Kids
    • Teacher Gift Ideas
    • Christmas
  • Printables
    • Holiday
    • Gift Idea
    • LDS Primary
  • Travel
  • About
    • Terms
  • Contact
  • Nav Social Menu

    • Facebook
    • Instagram
    • Pinterest
    • RSS
    • Twitter

Frozen Desserts

Indian Themed Dinner Party

1 · May 31, 2014 ·

This Indian Themed Dinner Party is brought to you by Silk Coconut Milk // I adore coconut… Like a lot. My husband and I share this love and it’s a treat that we will take in any form possible. Sweet or savory, there is something about coconut that just takes recipes to a new level.

Not to long ago, the folks at Silk challenged me to throw a coconut themed dinner party and with it being coconut, I was for sure up to the challenge. I checked out Silk’s Coconut Milk Pinterest Board and their Silk Coconut Milk Web Page and decided on an Indian themed night.

We started the night with a flavorful butternut squash coconut and lentil stew…

Silk-Coconut-Milk-Dinner-Party-with-WhipperBerry-2

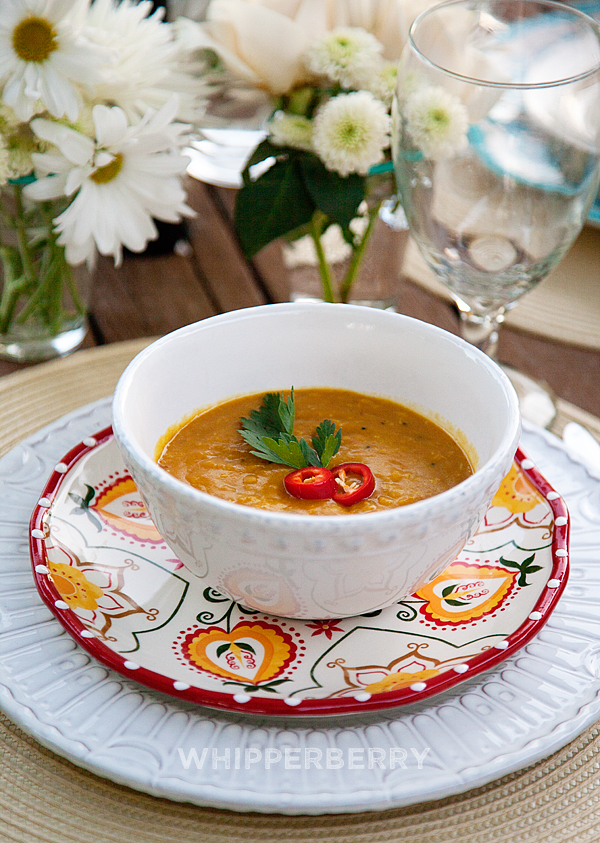
This soup was inspired by a recipe that was created by Aarti Sequeira of Food Network fame. She is my go to girl when it comes to Indian dishes. She just takes a rather mysterious cuisine and takes all the mystery out of it. Most of the recipes that I used for this dinner have been modified from her recipes and they turned out aaaamazing.

Click HERE for the Butternut Squash Coconut and Lentil Stew Recipe

For our dinner, I set a simple table out in my backyard with mismatched plates and some fresh flowers from Trader Joes. It couldn’t be more simple. I’ve collected all of my plates and bowls primarily from Target and Anthropologie. I like buying mismatched plates, that way, if I fall in love with a plate, I buy one which doesn’t break the bank and add it to my collection.

Next on the menu for the evening was my Coconut Curry Shrimp…

Now this shrimp isn’t your typical deep fried tropical shrimp dish. It has a lovely curry flavor and it covered with dried unsweetened coconut with no frying at all…. It was lovely.

Click HERE for my Coconut Curry Shrimp Recipe

For the main course, I made Coconut Curry Meatballs served over rice. These little goodies were the star of the show…

Forget what you have every thought about meatballs! These scrumptious bites have a totally different flavor profile and they were divine.

Click HERE for the Coconut Curry Meatballs with Rice

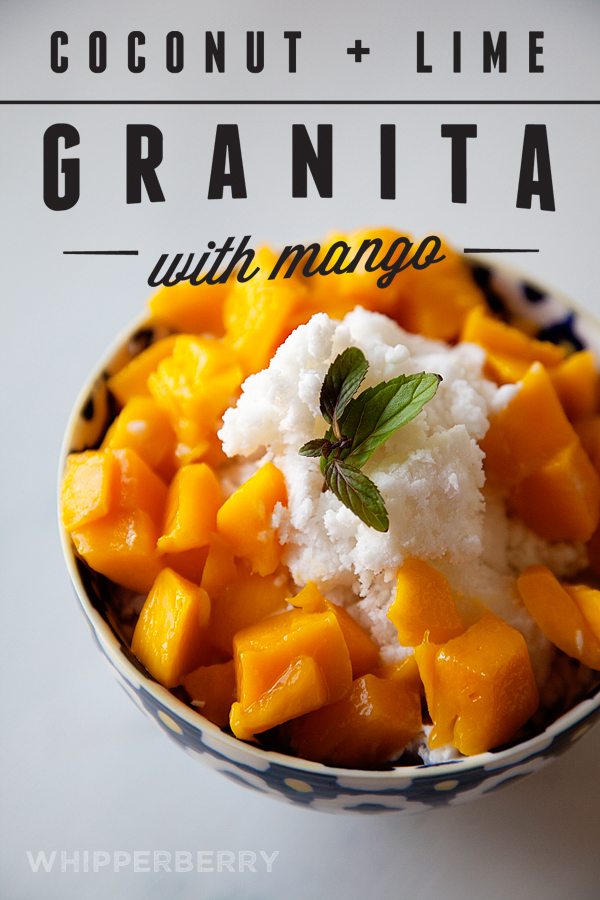
Finally, we topped off the night with a creamy and refreshing coconut lime granita…

This is a frozen treat that is a little like lazy man’s ice cream. It’s super simple to make and you don’t need an ice cream maker. The bonus… It’s dairy-free! One of my friends who joined us for the evening has a daughter with a major milk allergy and this little treat will help when everyone else in the family is enjoying a bowl full of ice cream. She won’t feel left out at all!

Click HERE for the Coconut Lime Granita Recipe

My friends were floored when I told them that every single recipe had Silk Coconut Milk in the recipe in some form.

Who knew coconut milk was so versatile. Its not just for drinking or making smoothies, you can make all kinds of dishes. Visit the Silk Coconut Milk site for a $1 off coupon plus a whole bunch of fun recipes to try with your new SECRET INGREDIENT!

This is a sponsored conversation written by me on behalf of Silk. The opinions and text are all mine.

Coconut Lime Granita

0 · May 31, 2014 · Leave a Comment

+ Coconut Lime Granita a creamy yet dairy free refreshing dessert +

coconut-lime-granita-#whipperberry

Looking for a fresh, creamy bowl full of summer? This coconut lime granita served with scrumptious champagne mangos will totally hit the spot. It’s dairy free so for anyone with milk allergies, this creamy dessert will tickle your tastebuds for sure!

Coconut Lime Granita
 
Save Print
Prep time
15 mins
Cook time
3 hours
Total time
3 hours 15 mins
 
Finish your Indian meal with this cream and refreshing dessert!
Author: Heather // WhipperBerry
Recipe type: Dessert
Cuisine: Indian
Serves: 5-6
Ingredients
  • ½ cup sugar
  • ½ cup Silk Vanilla Coconut Milk
  • 1 14 oz. can of full fat coconut milk
  • zest of one lime
  • juice of a ½ a lime
  • 2 tablespoons of shredded unsweetened coconut
  • 2 mangos, cut into bite sized pieces
Instructions
  1. Place a 8x8 baking sheet or large pie plate into the freezer to chill.
  2. In a medium pot, add the Silk Vanilla Coconut Milk and sugar and place over medium heat. Bring to a simmer and cook until the sugar has completely dissolved.
  3. Remove from the heat and pour into a shallow dish and place in the refrigerator to cool.
  4. In a medium bowl, whisk together the full fat coconut milk, lime zest, lime juice and coconut. Pour in cooled coconut milk sugar mixture.
  5. Place into chilled baking dish and place in the freezer.
  6. Chill for one hour and then remove from freezer and using a fork, break-up the ice crystals that are forming around the edge and pull them into the middle. Smooth mixture and return to the freezer for another hour.
  7. Repeat this process two more times.
  8. When ready to serve remove from freezer and let sit for a few minutes then fluff with a fork. Place into a small serving dish and top with mango.
3.2.2310

The Best Homemade Vanilla Ice Cream Recipe

38 · Mar 19, 2014 · 13 Comments

// The Best Homemade Vanilla Ice Cream Recipe //

Homemade-ice-cream-from-Whipperberry-22

I am so ready for things to start warming up!  I am single handedly willing the warmer weather to arrive with this fantastic ice cream recipe! Without question, anything homemade is ten times better than anything that you can buy pre made at the store. Ice cream is definitely one of those goodies that lives buy that rule.

I have fond memories of when I was a little girl, sitting on the back porch on a hot summer day, slowly turning the crank on our family’s “old fashioned” ice cream maker.  I didn’t quite understand why you needed to salt the ice, but I trusted that my Dad knew what he was doing. I vividly remember homemade peach ice cream that could curl your toes it was so good. My Mom would make the ice cream base in the kitchen and us girls along my dad were in charge of churning the ice cream until it was just right, out in our back yard.

Things are a little different today… Today we have nifty, easy to use ice cream machines right at our finger tips. No more salting the ice, still not sure what that was all about. I’m not a science whiz.  You can find ice cream machines in several different price brackets. I personally have a Cuisinart Ice Cream maker that I’ve had for years. I wish it was a little bigger, but it does the job. This cute turquoise one is priced at $59.95 at Amazon.  Not too bad… You can ask for one for Mother’s Day this year!

71rA3wIIeyL._SL1500_

If you have a Kitchen Aid mixer you can purchase a freezer bowl for your mixer and create all kinds of fun frozen concoctions with that. It’s available at Amazon for $76.00.

5153jZHlJ4L

Either option is pretty good for the home cook.  Once you have a good freezing option, then you have to find a good ice cream base recipe. This is the key to good homemade ice cream. I have found a fabulous egg custard base recipe that I LOVE. I originally found it via The Pioneer Woman, but I have modified it a bit for my taste. It’s a rather large recipe but it can be prepared and then stored in the fridge for up to 5 days and then churned in batches.  I love that I can create one flavor one day, and a completely different flavor the next all with the same base. Here is how you make it…

Vanilla Ice Cream Base

First you will need to grab your 18 eggs and separate the yolk from the whites. Save your whites in your fridge and use them to make macrons or angel food cake or egg white omelets… either way, you don’t want to just throw them down the drain.

Homemade-ice-cream-from-Whipperberry-3

In a large sauce-pan, combine the sugar and whole milk (you may also use pasteurized milk). Stir to combine. Place over medium-low heat. Carefully stir and watch that is doesn’t ever come to a boil.

Homemade-ice-cream-from-Whipperberry-4

Cut your vanilla bean length wise and scrape out the vanilla caviar and place in the milk, sugar mixture. Then add the entire vanilla bean as well. Continue to gently stir. Heat the mixture until it is hot, but not boiling.

Add the yolks to a large bowl and whisk for 2 minutes until the yolks become a lighter color.

Homemade-ice-cream-from-Whipperberry-5

Now you need to temper the egg yolks with a couple of ladles full of the hot milk and sugar mixture. You need to do this so that your eggs don’t become scrambled eggs in the hot milk. Once your egg yolks are tempered or brought up to temperature, slowly stir them into the hot milk. Cook for an additional 2-3 minutes until the mixture starts to thicken. You can tell that it’s ready when it coats the back of a spoon.

Using a fine mesh strainer, strain your mixture into a large bowl. Discard any lumps. Slowly stir in the heavy cream.

Homemade-ice-cream-from-Whipperberry-6

At this point I divide my ice cream base into three separate containers, I refrigerate two batches and then prepare and churn the third batch.

For the basic vanilla ice cream, all you need to do is churn the ice cream base in your ice cream maker following the directions for the specific machine. Your ice cream will still be pretty soft when it is finished churning and will need more time in the freezer before you serve.
I line a bread pan with plastic wrap and scoop my ice cream in the bread pan, cover and place in the freezer for 3-4 hours before serving. More or less depending on what consistency you like for ice cream.

5.0 from 3 reviews
The Best Homemade Vanilla Ice Cream
 
Save Print
Prep time
10 mins
Cook time
30 mins
Total time
40 mins
 
This luscious vanilla ice cream base is perfect for any type of ice cream you can dream up! This recipe is adapted from The Pioneer Woman.
Author: Heather // WhipperBerry
Recipe type: Dessert
Cuisine: American
Serves: 20-30
Ingredients
  • 6 cups whole milk
  • 4 cups of sugar
  • 1 vanilla bean
  • 18 large egg yolks
  • 6 cups heavy cream
Instructions
  1. First you will need to grab your 18 eggs and separate the yolk from the whites. Save your whites in your fridge and use them to make macrons or angel food cake or egg white omelets... either way, you don't want to just throw them down the drain.
  2. In a large sauce pan combine the sugar and whole milk stir to combine. Place over medium-low heat. Carefully stir and watch that is doesn't ever come to a boil.
  3. Cut your vanilla bean length wise and scrape out the vanilla caviar and place in the milk, sugar mixture. Then add the entire vanilla bean as well. Continue to gently stir. Heat the mixture until it is hot, but not boiling.
  4. Add the yolks to a large bowl and whisk for 2 minutes until the yolks become a lighter color.
  5. Now you need to temper the egg yolks with a couple of ladles full of the hot milk and sugar mixture. You need to do this so that your eggs don't become scrambled eggs in the hot milk. Once your egg yolks are tempered or brought up to temperature, slowly stir them into the hot milk. Cook for an additional 2-3 minutes until the mixture starts to thicken. You can tell that it's ready when it coats the back of a spoon.
  6. Using a fine mesh strainer, strain your mixture into a large glass bowl. Discard any lumps.
  7. Slowly stir in the heavy cream.
  8. At this point I divide my ice cream base into three separate containers, I refrigerate two sections and then prepare and churn the third.
  9. For the basic vanilla ice cream, all you need to do is churn the ice cream base in your ice cream maker following the directions for the specific machine.
  10. Your ice cream will still be pretty soft when it is finished churning and will need more time in the freezer before you serve.
  11. I line a bread pan with plastic wrap and scoop my ice cream in the bread pan, cover and place in the freezer for 3-4 hours before serving. More or less depending on what consistency you like for ice cream.
3.2.1275

 Disclaimer // This is not a sponsored post however, I am an Amazon affiliate.

Plum Berry Basil Ice Cream

1 · Jul 30, 2013 · 3 Comments

 
A couple years ago my sister in law introduced me to the flavor combination of strawberries and basil. Sounds odd at first, but they compliment each other beautifully! And I recently found a love for a frozen treat put plum and basil together, so when I was assigned to make one of the flavors of homemade ice cream for a family reunion, I knew what I wanted to do! Considering that one of my husband's uncles was hesitant to try it because of the basil, but then asked for the recipe later, I'd say it was a success.
 
 
Homemade Plum Berry Basil Ice Cream
Yields: 1 quart
 
Ingredients:
1 lbs very ripe plums, pitted and chopped, with skins (I used 4 large plums)
7-8 strawberries, sliced
2/3 cups blueberries (fresh or frozen)
1/2 cup agave (or 3/4 cup sugar)
2 cups heavy whipping cream
1/3 cup fresh basil, chopped and bruised
 
In a medium pot, cook the plums and strawberries over medium heat, stirring often. Continue until the fruit softens and the plums start to break down — about 15 minutes. Pour into a heat proof bowl (I used a 9×13" glass pan to cool it down faster), add blueberries, then cover and refrigerate until the mixture is room temperature — about 30 minutes. 
 
Pour the cream in the pot you just used for the fruit, and add the agave (or sugar) and basil, which has been finely chopped and bruised by pressing it with the flat part of the knife to release the oils. Warm the cream mixture over medium-low heat, stirring often. Cook for about 5 minutes (if you use sugar, make sure it has dissolved), then remove from heat to let steep — about 15-20 minutes.
 
Pour cream mixture through a strainer into the bowl (or 9×13" pan) with the fruit mixture to strain the basil, make sure to press the basil leaves with a wooden spoon to release any extra liquid and as much flavor as possible. And if you really like the basil flavor, like myself, you can put a spoonful of it back in. 🙂 Stir the mixture, then cover and refrigerate, until the ingredients are very cold — 1 to 2 hours, or more.
 
Pour ice cream into an ice cream machine and freeze/churn until desired consistency. You could serve immediately, or place in a freezer container and freeze for another few hours to harden it up. The lovely fuchsia color comes from the plum!
 
** If you don't have an ice cream maker, go here for great directions on how to make/freeze ice cream without a machine. 
 
 
Thank you again for having me Heather! Hope everyone is enjoying an extra sweet summer!
 
xo,
Haley


 Pear & Gorgonzola Pizza // DIY Sillhouettes on Canvas // Tuxedo Zucchini Bread Muffins
 
Haley life is sweet
 
  • « Go to Previous Page
  • Page 1
  • Page 2
  • Page 3
  • Page 4
  • Go to Next Page »

Primary Sidebar

Heather from Whipperberry
Hello... my name is Heather and I'm the creator of WhipperBerry a creative lifestyle blog packed full of great recipes and creative ideas for your home and family. I find I am happiest when I'm living a creative life and I love to share what I've been up to along the way... Come explore, my hope is that you'll leave inspired!

Footer

  • Privacy Policy
  • Crafts
  • Food
  • Gifts
  • Holidays
  • Home
  • Mom Life
  • Recipes
  • Travel

Copyright © 2026 · Seasoned Pro