• Skip to primary navigation
  • Skip to main content
  • Skip to primary sidebar
  • Skip to footer

Whipperberry

WhipperBerry • Your Home For Creative Inspiration

  • Home
  • Recipes
    • Starters
    • Easy Weeknight Dinners
    • Main Dish
    • Salads
    • Side Dish
    • Soups & Stews
    • Desserts
    • Breakfast
    • Miscellaneous
  • Tutorials
    • Creative Crafts
    • DIY Decor
    • Fabric Crafts
    • Food How-To
    • Jewlery
    • Paint Projects
    • Paper Art
    • Party Styling
    • Photography and Graphic Design
    • Silhouette
  • Holidays
    • Easter
    • Mother’s Day
    • Father’s Day
    • 4th of July
    • Halloween
    • Thanksgiving
    • Christmas
    • Valentine’s Day
  • Gift Ideas
    • Gifts For Everyone
    • Gifts for Dad
    • Mother’s day
    • For The Girls
    • For The Kids
    • Teacher Gift Ideas
    • Christmas
  • Printables
    • Holiday
    • Gift Idea
    • LDS Primary
  • Travel
  • About
    • Terms
  • Contact
  • Nav Social Menu

    • Facebook
    • Instagram
    • Pinterest
    • RSS
    • Twitter

Recipes

Almond Pumpkin Spice Steamer Recipe

6 · Oct 7, 2014 ·

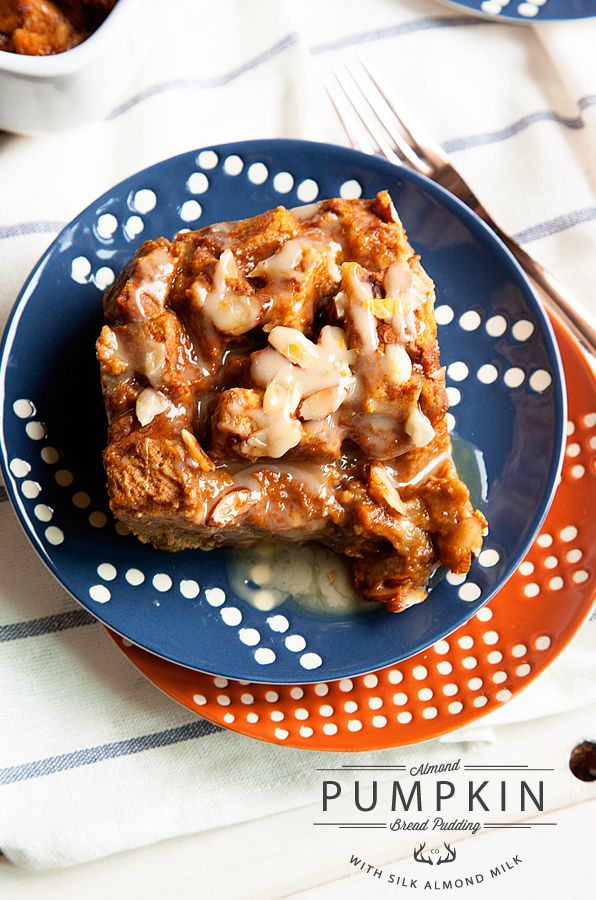
Today, I stumbled upon something AAAAAMAZING!!

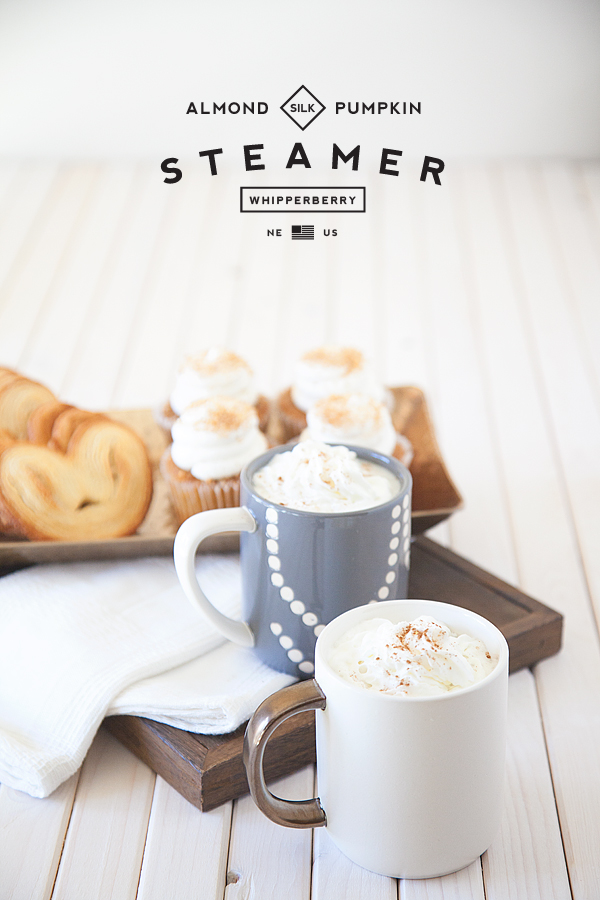
A little back story. I’m not a coffee drinker, however I love a good warm drink like hot chocolate, Choffy or a simple hazelnut steamer. I love the fall and I have always felt a bit envious of all you PSL lovers out there. For those of you who don’t speak Starbucks, that’s the iconic Pumpkin Spice Latte that appears at Starbucks this time of year. It has always been so intriguing. I started to think about how I could create my own PSL experience and I came up with this… The Almond Pumpkin Spice Steamer!

Silk-Almond-Pumpkin-Spice-Steamer-2

Yes, you will thank me after you try this sinfully simple treat!

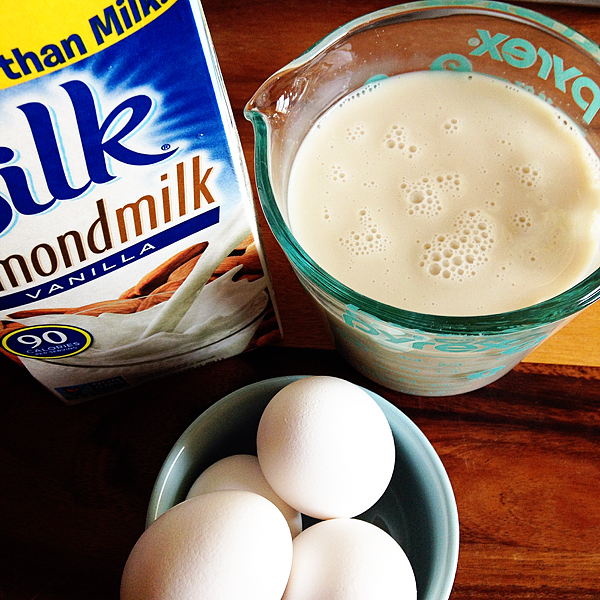
Two ingredients, three minutes, some optional garnish and you are enjoying the flavors of the season. I use Light Silk Almond Milk. Why you ask? Well, first off it’s…

• 60 calories per serving – 60 calories for 1 whole cup!

• 50% more calcium than dairy milk

• Excellent source of vitamin E

• Absolutely no cholesterol or saturated fat

• Free of dairy, soy, lactose, gluten, casein, egg and MSG

• Verified by the Non-GMO Project’s product verification program

• No artificial colors, flavors or funny business

On top of all of that, it tastes great! I thought it would be the perfect base for my steamer experiment.

Silk Almond Pumpkin Spice Steamer-7

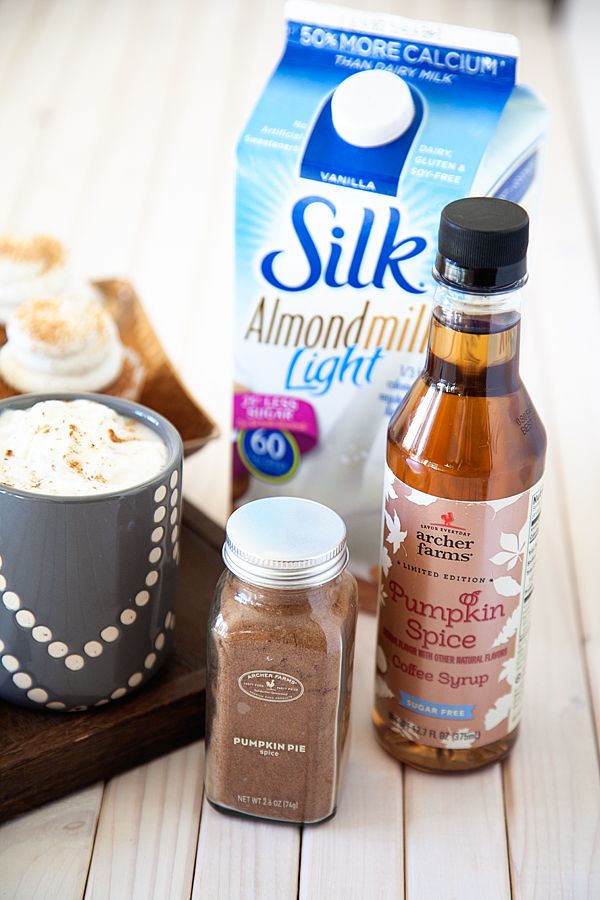
The next ingredient can be a little tricky. Getting ahold of some pumpkin spice syrup to add to your steamer. Here are your options…

  • Sweet talk your Starbucks barista into giving you a cup with just a few hits of the liquid gold (yea, I’m not above that at all!) I have been known to pay for a Tall PSL minus the L.
  • I have found a lovely Sugar-Free Pumpkin Spice Coffee Syrup by Archer Farms at Target. I’m sure that’s a seasonal item, so go and grab some quick. It’s in the coffee isle at your local target.
  • You can order some Torani Pumpkin Spice online. Where there’s a will, there’s a way! If you are a pumpkin lover, you can find some pumpkin spice syrup.

Now, all you need to do is pour your Silk Almond Milk into a small sauce pan over medium high heat. Gently warm your Almond Milk until it starts to steam. This will take 3-4 minutes. As soon as you see steam remove from the heat.

Silk Almond Pumpkin Spice Steamer-5

Pour into your mug and add a splash or two of your Pumpkin syrup. Start with a little bit and add until you have your perfect pumpkin flavor. Top with whipped cream and some pumpkin pie spice and voilá, you have fall in a cup! If you want to keep this dairy-free skip the whipped cream topping and it’s the perfect dairy-free autumn treat.

For more Silk ideas, visit their Facebook page. For all kinds of Silk fun, sign-up to receive Silk news and special deals right in your in-box! Seriously, check it out! This month they are giving away a CAMERA. Go join the Silk fun!!

What’s your favorite fall treat? Are you part of the pumpkin craze or are you holding out for egg nog?

This conversation is sponsored by Silk. The opinions and text are all mine.

Roasted Pork White Chili Recipe

50 · Oct 6, 2014 · 9 Comments

Roasted Pork White Chili Recipe sponsored by Pompeian OlivExtra Premium

Roasted-Pork-White-Chili-1

Oh my stars… this is by far my favorite time of the year, SOUP season!! We finally had a super chilly weekend this weekend and it was a perfect time to ramp up my soup, stew & chili making skills.  We have chili cook-off coming up here in Lincoln, so I thought I would start working on a fantastic white chili recipe. One of my favorite recipes is a White Chicken Chili that I crave year round. This time I used a scrumptious roast pork that I browned in Pompeian OlivExtra® Premium Mediterranean Blend.

Pompeian OlivExtra® Premium Mediterranean Blend is a unique, healthy blend of canola, extra virgin and grapeseed oil, representing key components of the Mediterranean Diet. This innovative blended oil provides the robust taste of extra virgin olive oil and the high smoke point of grape seed oil, making this the perfect oil to brown my pork roast. 

Browned-Pork-Roast

Doesn’t that look scrumptious?! Because of the oil blend it’s perfect for the higher temperatures required for browning and frying.

Roasted-Pork-White-Chili-3

This recipe is perfect for using left-over roast pork. Make up this same pork recipe and use it for tacos one night and chili the next, it’s perfect!!

Roasted Pork White Chili Recipe

Roasted Pork White Chili
 
Save Print
Prep time
10 mins
Cook time
5 mins
Total time
15 mins
 
This hearty white chili full of all kinds of rich flavors will make you want to say red chili, who?
Author: Heather // WhipperBerry
Recipe type: Chili
Cuisine: Southwest
Serves: 6-8
Ingredients
  • 2 lb. pork roast
  • salt
  • 5 tablespoons Pompeian OlivExtra® Premium Mediterranean Blend
  • Pepper
  • ¼ cup minced garlic
  • 3 tablespoon cumin
  • 1 chipoltle pepper + adobo
  • 1 chopped yellow onion
  • 1 clove minced garlic
  • 1 tablespoon of Mexican oregano
  • 48 oz. low-fat, low-sodium chicken broth
  • 1 small can of white navy beans
  • 1 small can of Cannellini beans
  • 1 small can of hominy
  • 1 small can of green chili
  • 2 cups shredded pork
  • 2 cans of evaporated milk
  • salt & pepper to taste
Instructions
  1. In a large, heavy bottom dutch oven, heat Pompeian OlivExtra® Premium blend over high heat until hot. Salt your pork roast generously and place in the dutch oven. Reduce heat to medium and brown on all side of the roast turning every two minutes until nice and brown.
  2. Once roast is nice and brown, remove from heat and cover with cumin, garlic and adobo sauce. Add the chipoltle pepper to the pot. Cover and slow-roast in a 300˚ oven for 4 hours.
  3. After four hours, remove from oven and place roasted pork on a separate plate to rest.
  4. Reserve any pan drippings in a small container. Use a fat-separator to remove fat from the pan drippings.
  5. Using the same dutch oven which is packed full of good flavor, add 2 tablespoons of OlivExtra® over medium high heat. Add chopped onions and cook until tender for 5 minutes, stirring occasionally.
  6. Add minced garlic, additional cumin and oregano and cook for an additional minute.
  7. Add chicken broth, beans, hominy. Place over high heat and bring to a low simmer.
  8. Shred pork and place two cups of shredded pork to the pot along with the pan drippings
  9. Simmer for 10 minutes.
  10. Remove from heat and add your evaporated milk. At this point taste and see if you need to add anymore salt & pepper.
  11. Garnish with lime, tortilla strips and either a queso fresco or shredded pepper jack cheese.
3.2.2708

Roasted-Pork-White-Chili-2

Disclaimer // This post sponsored by Pompeian OlivExtra® Premium Mediterranean Oil Blend. I am a member of the 2014 Pompeian team and have been compensated for my recipe creation. All thoughts, ideas and opinions are my very own.

Almond Pumpkin Bread Pudding Topped with Maple Butter Glaze

1 · Sep 18, 2014 ·

It’s finally here… PUMPKIN SEASON!! Oh my stars, this is truly my favorite season of the year. The chill that’s in the air, the leaves are hinting of change. Starbucks has busted PSL out of the vault. I’m not a coffee drinker, but even I can sense how big that is. Baking season has arrived and with it, all kinds of fabulous new pumpkin recipes. I’ve created the most scrumptious Almond Pumpkin Bread Pudding that your family and friends are going to die over!

SIMPLE-Almond-Pumpkin-Bread-Pudding-with-Silk-Almond-Milk-by-WhipperBerry-3

This simple bread pudding recipe is a cinch to make and it packs a huge pumpkin wallop. The cool thing is that I make it with SEVEN basic ingredients. Bread, Silk Almond Milk, eggs, pumpkin pie spice, one can of pure pumpkin, honey and topped with slivered almonds. I love baking with the whole family of Silk products. I especially love the flavor that the Vanilla Almond Milk adds to the flavor profile for this dish. Many of you know that I cook quite a bit with Silk. I love that it’s a natural plant based protein rather than animal based. It’s heart healthy with no fat or cholesterol. It’s low in calories, high in vitamins and is GMO free. You can’t beat all of that! You can learn even more about Silk and all of it’s amazing benefits here.

That is why I choose Silk Almond Milk over regular cows milk to make the custard for my Almond Pumpkin Bread Pudding and the glaze that I top it with.

Almond Pumpkin Bread Pudding Recipe

1 loaf of hearty bread (I used a pumpkin struesal bread from Target, but you can use virtually any hearty bread for this recipe.)

3 cups Silk Almond Milk

6 eggs

1 tablespoon pumpkin pie spice

1 can of pure pumpkin puree

1/4 cup honey

2 tablespoons slivered almonds

First, you take your hearty bread, like I said before, I used a pumpkin streusal bread but, you can use any bread of your liking. You could use a cinnamon bread, a crusty loaf of French bread or even a hearty wheat. It’s really whatever you like.

Pumpkin-Bread

Cut the bread into cubes and place in a small baking dish that has been covered in a non-stick cooking spray.

Cut-bread-into-cubes

Next, you need to mix your custard in either a mixer or blender. My blender bit the dust this summer, so I opted for my mixerAdd your Silk Almond Milk and eggs.

Add-Silk-Almond-Milk-and-Eggs

Your pumpkin pie spice and pumpkin puree.

Add-Pumkin-Pie-Spice-and-a-can-of-pure-pumpkin

and your honey and mix until your custard is mixed well.

Mix-pumpkin-custard

Pour over your cubed bread and top with slivered almonds.

Pour-custard-over-bread

Cover with foil and place in a 350˚ oven for 30 minutes. After 30 minutes, remove the foil and place back in the oven for an additional 40 minutes or until the top has brown and the pudding has set.

Almond-Pumpkin-Bread-Pudding-with-Silk-Almond-Milk-by-WhipperBerry-2

I top mine with a butter maple glaze. Here is the recipe for that…

Butter Maple Glaze Recipe

1 1/2 cups Powdered Sugar

1 tablespoon Silk Almond Milk

a SMALL splash of maple and butter extracts

a small pinch of salt

In a small bowl whisk together the Silk Almond Milk and powdered sugar. You want the glaze to be rather thick. Add a few drops of maple extract and butter extract and a pinch of salt. Whisk together well.

You could really use any extracts that you like. Vanilla, Almond or even Rum if you like. Top your warm bread pudding with the glaze and serve.

This conversation is sponsored by Silk. The opinions and text are all mine.

Almond-Pumpkin-Bread-Pudding-with-Silk-Almond-Milk-by-WhipperBerry-4

For more Silk inspiration follow them on Facebook or sign-up for their mailing list. They have great giveaways all the time, plus great coupons and fantastic ideas on how to add more plant protein into your life!

Disclaimer //  This post is sponsored by Silk Almond Milk. I have received payment for recipe development along with my post. However, all thoughts, ideas and opinions are my very own.

Chocolate Peanut Butter Granola Cookies

9 · Sep 11, 2014 · 4 Comments

It’s official… Fall is just around the corner. The kiddos are in school, the weather is starting to crisp… Baking season is getting ready to gear-up! I know that when my kiddos arrive home after a long day at school they are famished. Short of providing a meal for them right as they walk through the door, which on most days is a challenge, the practically inhale everything in sight! I’ve smartened up and have come up with a simple go-to recipe for a scrumptious after school snack with a bit of protein staying power tucked inside! Here are my Chocolate Peanut Butter Granola Cookies…

Chocolate-Peanut-Butter-Granola-Cookies-6

With these little goodies ready to hand out right as the kiddos walk in the door, that need to eat whatever isn’t nailed down is taken care of. They get a quick little snack that has some hidden protein and they can make it through to dinner. My secret…

Chocolate-Peanut-Butter-Granola-Cookies-2

Nature Valley™ Protein Crunchy Granola! Did you know that Nature Valley™ Protein Crunchy Granola packs a whopping 10 grams of protein in each 1/2 cup serving?! Yep… That’s a whole lot of quick protein that you can grab on the go. What’s so cool is that you can disguise all that protein in a treat like these Chocolate Peanut Butter Granola Cookies. Your kiddos will never know that you are helping them get to their next meal without having a case of hungry tummy in-between!

Chocolate-Peanut-Butter-Granola-Cookies-3

These cookies are soft and chewy with that lovely granola crunch baked right it that is just such a treat. Here’s how to make them…

Chocolate Peanut Butter Granola Cookies Recipe

2 cups all-purpose flour

1 teaspoon baking soda

1/2 teaspoon salt

2 sticks butter – room temperature

3/4 cup sugar

3/4 cup brown sugar

2 eggs

2 teaspoons vanilla extract

1 bag of Nature Valley™ Crunchy Granola – Peanut Butter ‘N Dark Chocolate (12.7 oz.)

1 cup chocolate chips

In a large bowl, combine flour, baking soda and salt. Whisk together and set aside.

In a large mixing bowl, add room temperature butter, sugar and brown sugar and mix until light and fluffy. Add vanilla and two eggs, one at a time.

Slowly add your flour, baking soda and salt mixture. Once that is incorporated, add your granola and chocolate chips and mix just until combined.

Place in the refrigerator for 30 minutes to chill. Once lightly chilled, scoop into one ounce balls and place on a parchment lined baking sheet. Place in a 350˚ oven for 11-12 minutes or until lightly brown. Remove from oven and place on a wire rack to cool.

This yields about 24 cookies. Store in an air tight container. Better yet… Mix up a batch and place the dough in a large air tight container in the refrigerator or freezer and only bake as many cookies that you need at a time. It’s the perfect after school snack!

Chocolate-Peanut-Butter-Granola-Cookies-4

For more ideas on how you can add more protein in your diet with Nature Valley™ Crunchy Protein Granola, you can find all kinds of ideas on their Facebook or Twitter page. The folks at Nature Valley™ would like to help you add more protein into YOUR diet with this coupon (link to be added once brand approves) for Nature Valley™ Crunchy Protein Granola!

This is a sponsored conversation written by me on behalf of Nature Valley Protein Granola via Burst Media. The opinions and text are all mine.

  • « Go to Previous Page
  • Page 1
  • Interim pages omitted …
  • Page 27
  • Page 28
  • Page 29
  • Page 30
  • Page 31
  • Interim pages omitted …
  • Page 66
  • Go to Next Page »

Primary Sidebar

Heather from Whipperberry
Hello... my name is Heather and I'm the creator of WhipperBerry a creative lifestyle blog packed full of great recipes and creative ideas for your home and family. I find I am happiest when I'm living a creative life and I love to share what I've been up to along the way... Come explore, my hope is that you'll leave inspired!

Footer

  • Privacy Policy
  • Crafts
  • Food
  • Gifts
  • Holidays
  • Home
  • Mom Life
  • Recipes
  • Travel

Copyright © 2026 · Seasoned Pro