This post brought to you by DecoArt // I have become obsessed with the Lazy Susan! My Grandmother’s table had a large lazy susan that I was enamored with as a child. I was fascinated by the inner workings and the fact that it could double as a steering wheel in a pinch. Just in the last few months I’ve been on the hunt for the perfect lazy susan and then it hit me… It would look fabulous with a little artistic touch.
I am a part of the DecoArt Core Bloggers and did receive compensation for this post. However, all thoughts, ideas and opinions are my very own.
I found this great bamboo lazy susan at a local store and I just loved the wood grain. I thought it would look great with a negative graphic stenciled onto the surface. Meaning… You use a negative stencil thus showing the wood grain in the graphic while the rest of the surface is covered in paint. I’ve loved this look for quite some time now. Here is what you will need…
Supplies
- Lazy Susan
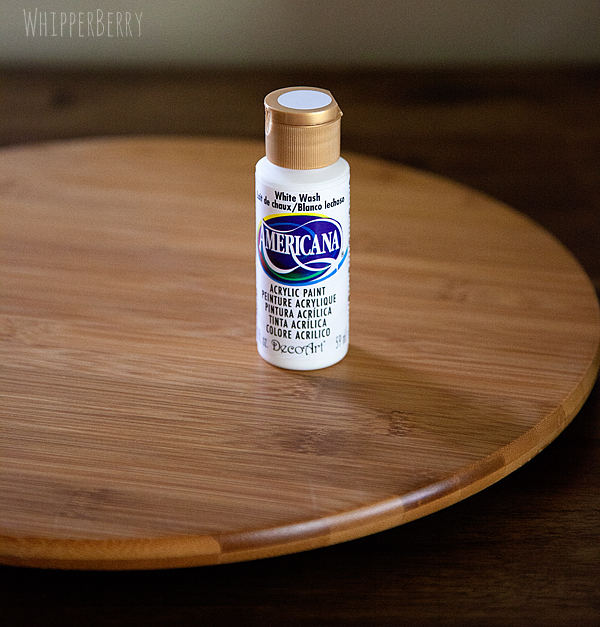
- DecoArt Americana White Wash
- Vinyl Stencil (I created mine using my Silhouette CAMEO)
- Transfer tape
- Sandpaper
- Foam brush
Instructions
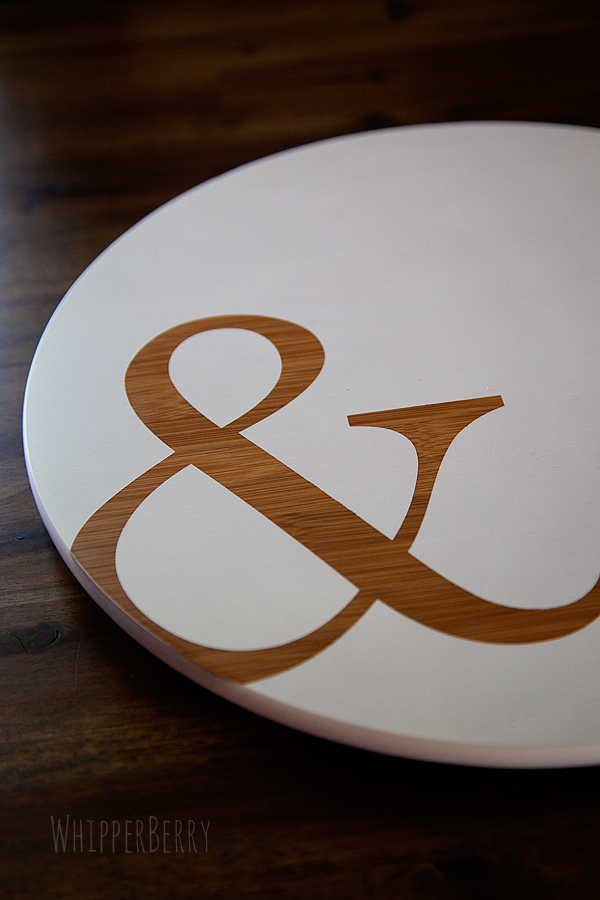
This project is so easy, it really only takes a half an hour at the most, a little more if you count drying time. Yet, it creates a stunning piece for your table or for a gift. First you need to decide what graphic you would like to put on the surface of your lazy susan. I have always loved ampersands (&) and I thought it would look fabulous as a graphic on the table. I scrolled though a bunch of fonts until I found the perfect ampersand, it was in the Baskerville font. Isn’t it just lovely? For those of you who love ampersnads, you know just what I’m talking about.
I used my Silhouette CAMEO to cut the ampersand out in vinyl. I wanted the ampersand to be large, but not to take over the entire wood surface and I knew I wanted it to be a little off set. I used transfer tape to help me position the vinyl just right…
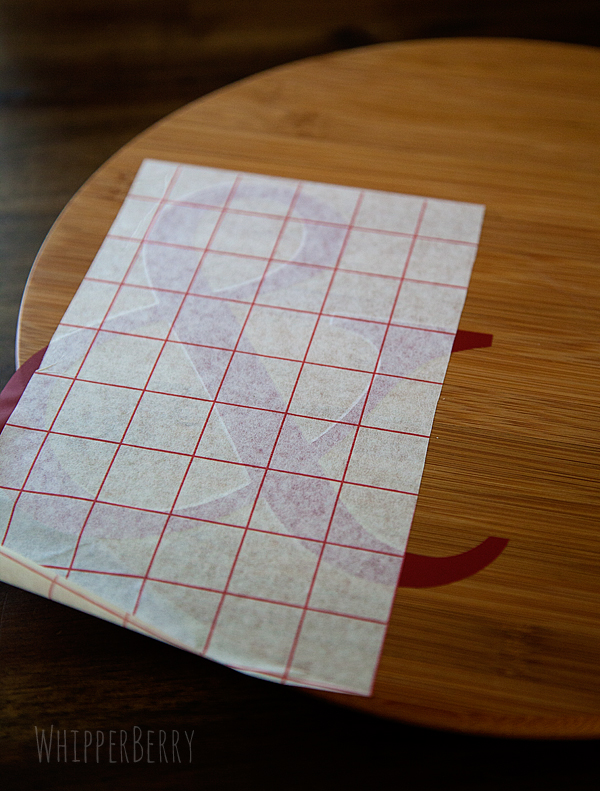
Notice how I left part of the vinyl hanging off the side of the lazy susan…
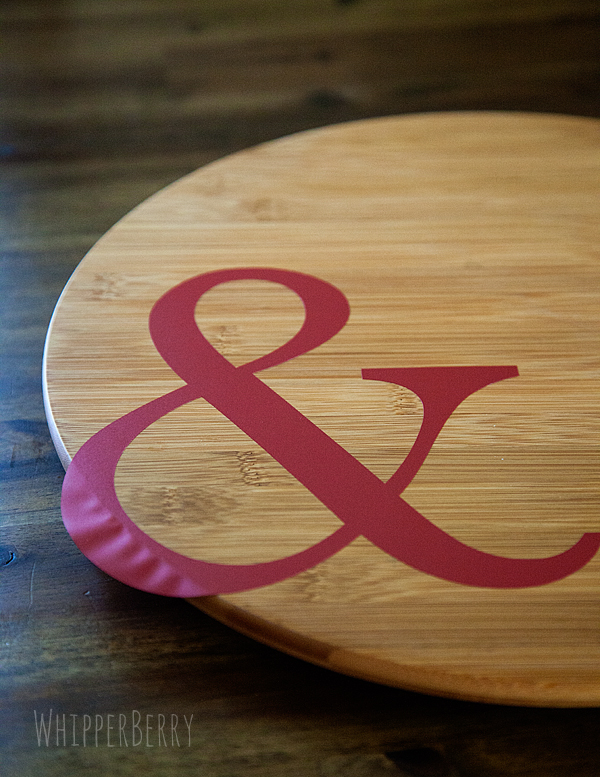
I just love that off set look. After the stencil was in place, I use some fine grit sand paper to carefully rough up the surface of the wood. That helps the paint adhere better. Then, I added 3 or 4 coats of the Americana White Wash so that it had a nice clean surface and that was it. I carefully removed the stencil and voila, I now have a fun lazy susan for the center of my table…

I have another lazy susan that I created for the brand new DecoArt Blog that will debut soon…
I am one of DecoArt’s Core Bloggers and will be sharing posts over there, (when the site launches) twice a month. As soon as this one goes live I will let you know, and you can learn how to make this beauty as well.
That’s it… I’m on a mission! Every house needs to have a fabulous lazy susan!! Run out and grab one of your own, dress it up and then show off your photos on Facebook or Instagram and tag me so I can check them all out!!
53
I love this Heather! Such a great idea!
Love that Heather, looks so sharp! I have a lazy susan in my craft room that needs a makeover, now you've got me thinking!
Great idea. My honey picked me up a lazy susan made with wine corks. I love how unique it is, but it is a tad outdated. I've been pondering how I can incorporate it into my decor, but without losing the cork effect done to it. I may be breaking out my Silhouette today!
Love love love! Now I need one for my house! So many fun decorating possibilites!
Loving this! I need to find a big lazy susan for my girls in our craft room! And another for me!
I just bought a lazy Susan and have been itching to craft-it-up a bit. Thanks for this tutorial.
DO IT! I promise you won’t regret it!
kisses // heather
I am DROOLING over this! This is so perfect!
Thanks my dear!
kisses // heather
very cool and it came out AWESOME!!!!!! thanks for sharing.
Aww Julie, you’re too sweet!
Thanks!
heather
So, so cute!! Can't wait to make one. Did you let the paint dry before you removed your stencil? And did you paint the sides of the lazy susan white, after you removed the stencil? Thanks!! 🙂
Shannon-
Thanks so much! I removed the stencil after it was dry, but I scored it with an exacto knife before I removed it so that the paint wouldn’t peel as well. I actually painted the sides white the stencil was on.
kisses // heather
Heather, you're a creative genius. What a simple update with gorgeous results!!
Heather, I love the ampersand, and also the grain of the wood showing through the white. Such a crisp and clean design. Two questions, the website says the white wash paint color is semi-opaque. It looks pretty opaque to me. Is this just one coat? And where did you find the lazy susan? P.S. Your photographs are beautiful as usual. 🙂
Fabulous! I've got 2 lazy susans…now I know what I'm doing with them!
This is so pretty! I love how the wood grain is peeking out.
I'm visiting you today from Skip to my Lou. I co-host a Linky Party Tuesday (open thru Sat) and I'd love for you to link up! I hope you get a chance to stop by, link up and leave a comment, too!
~ Megin of<a href="https://vmg206.com/"> VMG206</a>
Join me each Tuesday for <a href="https://www.vmg206.com/2013/05/brag-about-it-link-party-no-7.html">Brag About It Link Up Party</a>
This is SO eye-catching! The simplicity of the design is fantastic — I could see this on a table top as well!
This is awesome! Now, if only I were crafty I could make this. 🙂
I have several leftover pieces of contact paper from shelf lining that aren’t enough for a shelf yet I really don’t just want to add them to the landfill. I’ve been looking for ideas for how to make them over into something I would actually use. Thank you for the inspiration!
Oh, you asked for other ideas for contact paper so here are some other things I have used it for:
* decorate my appliances without the commitment of paint
* clear contact paper as recipe book covers so my cookbooks don’t get ruined in the kitchen
* border around bathroom mirror