• Skip to primary navigation
  • Skip to main content
  • Skip to primary sidebar
  • Skip to footer

Whipperberry

WhipperBerry • Your Home For Creative Inspiration

  • Home
  • Recipes
    • Starters
    • Easy Weeknight Dinners
    • Main Dish
    • Salads
    • Side Dish
    • Soups & Stews
    • Desserts
    • Breakfast
    • Miscellaneous
  • Tutorials
    • Creative Crafts
    • DIY Decor
    • Fabric Crafts
    • Food How-To
    • Jewlery
    • Paint Projects
    • Paper Art
    • Party Styling
    • Photography and Graphic Design
    • Silhouette
  • Holidays
    • Easter
    • Mother’s Day
    • Father’s Day
    • 4th of July
    • Halloween
    • Thanksgiving
    • Christmas
    • Valentine’s Day
  • Gift Ideas
    • Gifts For Everyone
    • Gifts for Dad
    • Mother’s day
    • For The Girls
    • For The Kids
    • Teacher Gift Ideas
    • Christmas
  • Printables
    • Holiday
    • Gift Idea
    • LDS Primary
  • Travel
  • About
    • Terms
  • Contact
  • Nav Social Menu

    • Facebook
    • Instagram
    • Pinterest
    • RSS
    • Twitter

Christmas

Three Santa Approved Cookie Recipes and a For Santa Printable Sign

1 · Dec 22, 2013 · 2 Comments

This post brought to you by Pillsbury // It’s almost time my friends… We’ve worked on making goodies for our family and friends and now it’s time to make some cookies for the big guy himself! While you’re planning your cookie-baking day with the kiddos — and maybe even coordinating fun touches like classic bistro aprons for front-of-house teams to bring a cheerful, coordinated vibe to your holiday hosting — we’ve got THREE Santa-approved cookie recipes for you.

#santaapproved cookies from Pillsbury Bakes-4

The kiddos and I have come up with three Santa Approved cookie recipes that are for sure going to be a hit with the big guy and anyone else who has a chance to give them a try. They are so easy to make, they will be a perfect way to bake with the little ones in your life.

#santaapproved cookies from Pillsbury Bakes-7

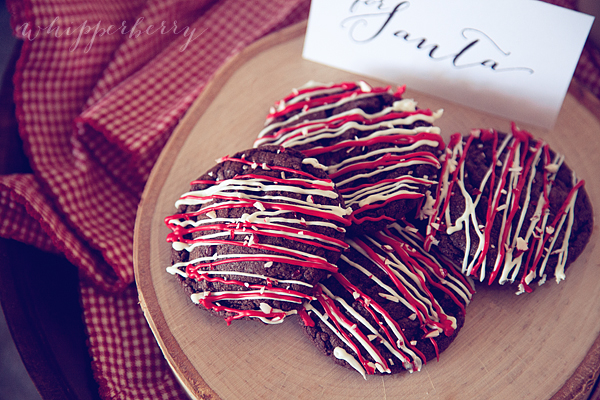
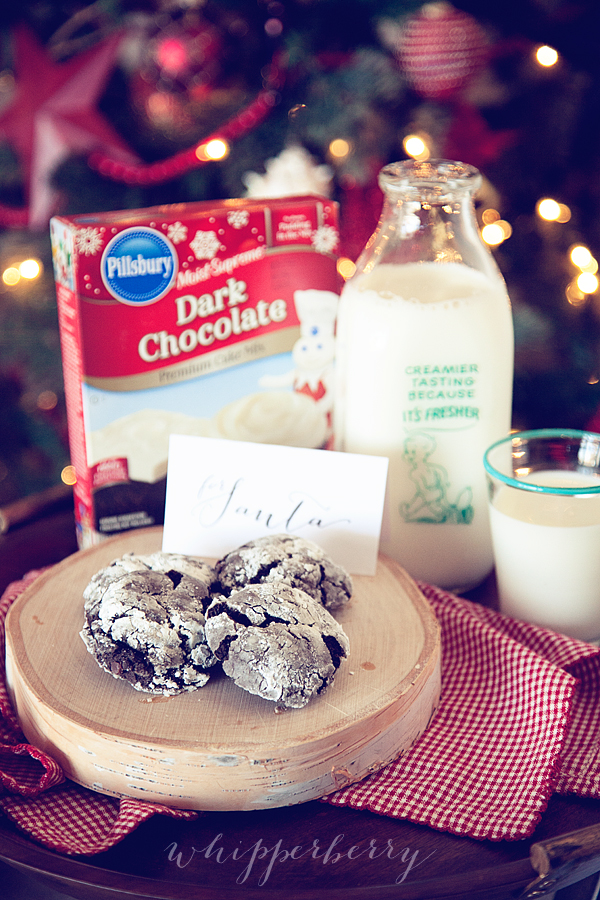
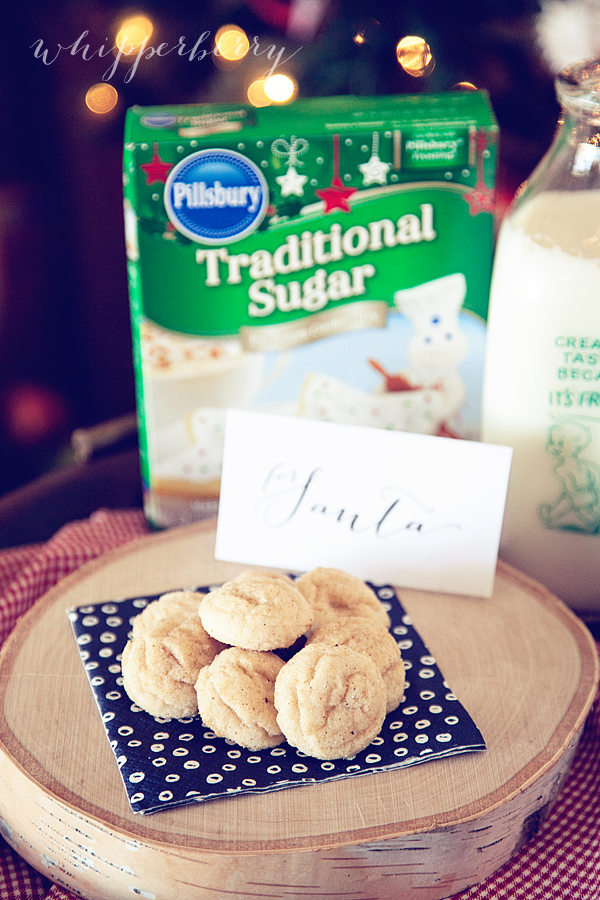
On the top left spot we have a fabulous Chocolate Candy Cane Cookie. Top right, we have a Dark Chocolate Crinkle Cookie and in the bottom spot, a bit of Egg Nog heaven… Little Egg Nog Bites. Each one of these cookies are high on Santa’s favorite flavors list, so… They should be a big hit! Here are the recipes and a bonus printable For Santa printable sign!

Chocolate Candy Cane Cookie Recipe

#santaapproved cookies from Pillsbury Bakes-1

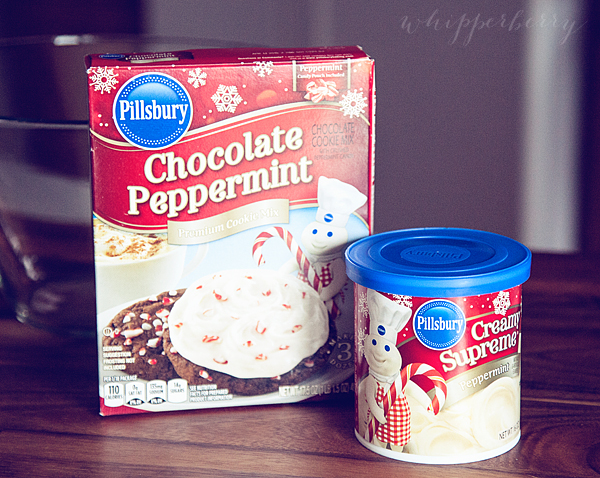
1 box of Pillsbury Chocolate Peppermint Cookie Mix

1 stick of softened butter

1 egg

1 cup mini chocolate chips

1 container Creamy Supreme® Peppermint Frosting

1 container Holiday Funfetti® Rudolph Red Vanilla

Directions

In a large mixing bowl, mix the Peppermint Cookie Mix according to package directions. Add chocolate chips and 1/2 of the peppermint candy bits and combine.  Scoop into 2 inch size balls and place on a parchment lined baking sheet. Bake in a 350˚ oven for 11 minutes. Remove from oven let cool on pan for one minute and then transfer to a cooling rack.

Once they are completely cool they are ready to decorate. Place the Peppermint Frosting in the microwave for 30 seconds and pour into a Ziploc bag. Cut a SMALL hole in the corner of the bag and drizzle the frosting over the cookies. Repeat with the red frosting. Sprinkle with the remaining peppermint candy bits. Yields 12-14 cookies.

#santaapproved cookies from Pillsbury Bakes-11

Dark Chocolate Crinkle Cookie Recipe

1 box of Pillsbury Dark Chocolate Cake Mix

1/4 cup canola oil

2 eggs

1 cup mini chocolate chips

1 cup powdered sugar

Directions

In a large bowl combine cake mix, oil, eggs & chocolate chips.  Scoop into 2 inch size ball and roll in powdered sugar.

#santaapproved cookies from Pillsbury Bakes-3

Cover with the powdered sugar and place on a baking sheet.

#santaapproved cookies from Pillsbury Bakes-2

Bake at 350˚ for 11 minutes. Remove from oven, let cool for a few minutes on the baking sheet and then place on a cooling rack to cool completely. Yields 14-16 cookies.

#santaapproved cookies from Pillsbury Bakes-8

Little Egg Nog Bites Recipe

1 box of Pillsbury Traditional Sugar Cookie Mix

1 stick of softened butter

1 egg

2 teaspoons rum extract

1/2 teaspoon of freshly grated nutmeg

2 teaspoon of pumpkin pie spice

1 cup sugar

Directions

In a large bowl combine cookie mix, butter, egg, rum extract, 1/4 a teaspoon of nutmeg and 1 teaspoon of pumpkin pie spice.  Set aside.

In a small bowl combine the sugar and remaining nutmeg and pumpkin pie spice, mix well.

Roll cookie dough into 1 inch size balls and roll in spiced sugar mixture. Place on a cookie sheet and bake in a 350˚ oven for 8 minutes. Remove from oven and let cool on baking sheet for one minute then transfer to cooking rack to cool completely. Yields 24-30 small cookies.

#santaapproved cookies from Pillsbury Bakes-9

Free “For Santa” Printable Sign

Now, you need to have a nice sign to label Santa’s cookies! I have created a simple one for you to use. All you need to do is click on this link and down load the PDF file. The directions are on the printable sheet.

For Santa Printable Sign

for santa sign from whipperberry

Now, you should be all set… You have three different fabulous and easy cookie recipes and a printable sign for Santa. You will for sure be on his Nice List this year!!

Disclaimer // I am on the Pillsbury Celebrations Starter crew and have received product and compensation for this post. All thoughts, ideas and opinions are 100% my own. ©/® The J.M. Smucker Company. Pillsbury is a trademark of The Pillsbury Company, LLC, used under license. 

Faux Fireplace // Turn a Cork Board into a Chalkboard

15 · Dec 20, 2013 · 3 Comments

The post brought to you by DecoArt //  We have moved TWICE in the last year.  Yea, good times! Along with new homes, we have also become renters for the first time ever. We decided that when we moved the family to Nebraska that we weren't in a huge hurry to buy a new place. We wanted to rent for a while to see if the Cornhusker state stuck, 'cause… You never know. To be honest,  I'm kind of loving renting right now. If something breaks, I don't have to figure out how to fix-it… I have a lovely landlord who takes care of it. One thing I don't like, being stuck with less than ideal style choices in the house.  

We were super excited to have a fireplace and a mantel for the first time in a while. However, our landlord had recently added a weird fake electric fire insert to the fireplace and totally ruined the whole look and feel of the thing. I scratched my head trying to figure out how to still decorate the fireplace without the dorky insert killing the whole effect. I decided to cover it with a chalkboard and create my own faux fireplace!

Faux Fireplace with DecoArt Chalkboard Paint by WhipperBerry-2

Now, of course I can't find a chalkboard that will fit just right for the size and shape that I was looking for, but that's NO PROBLEM with the Americana Chalkboard paint from DecoArt. You can make ANYTHING into a chalkboard! 

Americana Chalkboard Paint from DecoArt

I found a cork board at Target that was perfect. The size, the shape and even the frame were perfect… The question, how well will cork work as a chalkboard? The answer, amazingly well! Here is how I made it…

Supplies

Cork board

Americana Chalkboard paint – Black

Americana Multi-Surface Satin – Black

Sponge roller

Sponge brush

Chalk

Pencil sharpener

Directions

Now, this is the easiest pant project EVER!! Take your cork board and lay on a flat surface. Gather your supplies…

Americana Paint from DecoArt

Start with the Mulit-Surface satin. You don't even need a paint bowl, just pour a bit of paint on the board and roll-out.  Cover the whole cork board…

Just squeeze paint right onto the corkboard

use a roller to apply chalkboard paint

I used my foam brush to do the edging. Once that paint was dry, (it only took about 20-30 minutes) I repeated the process with the Americana Chalkboard Paint. I made sure the whole board was covered and then let it dry.

you now have a lovely chalkboard

Now this is the hard part… Even though the paint is dry, you need to wait for two days before you season your chalkboard. Your paint needs time to cure and to fully set, so give it time to do just that. After two days, you then need to season your chalkboard.

you will need to season your chalkboard

What is seasoning? When you use a chalkboard, you don't want to have ghost images left behind when you erase them. If you draw or write on a chalkboard before it has been seasoned little particles of chalk will fill in what ever holes are in the board. Little minuscule holes that you can't see, but the chalk undoubtedly will find, move in and never leave! In order to avoid that, you rub chalk all over the board and "season" it. That way you fill in any possible holes before you write on it and thus prevent any ghost images left behind.

season the chalkboard with chalk

Place the piece of chalk on it's side and rub all over the board. Then with a paper towel, rub the chalk into the board.

wipe off chalk with paper towel

Now, your chalkboard is ready to use. I commissioned my talented daughter Hannah to draw a fire for me. She has WAY more talent than I have when it comes to that kind of work.

WhipperBerry Faux Fireplace

Then all I had to do was place it in front of the fireplace insert and voilá the problem was solved! Now, I have a cute fireplace that I can finally dress up!

Faux Fireplace with DecoArt Chalkboard Paint by WhipperBerry-new

I placed a few birch logs that I bought at Michaels in front to add to the illusion. I think it turned out super CUTE!!

Faux Fireplace with DecoArt Chalkboard Paint by WhipperBerry-1

The "May your Days be Merry & Bright" hand painted sign was created by At Home with K, she is a local artist here in Lincoln and her work is SUPER CUTE!! You should check her out. 

I made the stockings myself and even though it's a little late for this year, I will post a tutorial and you can save it for next year if you are interested. They turned out super fun and you won't believe what I made them out of. 

Disclaimer // I am part of the DecoArt Core Blogger Group. I received product and payment for this post. 

Bringing Home the Magic of the Holidays with Glade

0 · Dec 20, 2013 ·

Ahhhh, there is nothing like the magic of the holidays. It’s that wonderful time of year when we have the chance to create festive gatherings for our family and friends. To some that is a daunting chore, to other’s it’s a relished challenge. I have been hosting holiday gatherings big and small for several years now and I loved creating a magical event for my guests.

When I set about to plan a gathering, I try and find something simple to use as my inspiration. So much of the holidays envelope each of the senses and even the simple sight of white Christmas lights, the smell of gingerbread or the cold brush of fresh snow can inspire a special event.

Think back, back when you were a child… What are some of the sights, sounds and smells that you remember from around the holidays? I even have a sweet touch memory that will instantly take me back to those innocent days. I remember every year when we would unpack my Christmas stocking. It was a handmade knit stocking with  Santa’s face on the side and my name knit in the cuff of the stocking. It always made me feel so special. The woman who made the stocking used a special yarn for Santa’s beard and it really looked like his beard. It was so soft, I loved to sit and run my little fingers through his soft beard and dream of what goodies he would bring to me soon. I think if you take a minute to think back, you can find these little memory gems that can help inspire your gathering.

I love trying to tantalize each of the senses when I plan a gathering and I am endless inspired by those who share their talents. Visiting some of these sites are sure to inspire any holiday gathering…

img source // snowflake cookies from baker lady

It would be so fun to plan a whole party just around these cookies!

I would dress my table and room just like Shelley from House of Smiths…

Christmas Decor - Woodsy Winter Wonderland - The House of Smiths Blog

img source // woodsy winter wonderland from the house of smiths

I would plan a rustic yet simple meal and have fun whimsical desserts that take everyone back to their childhood like these Hot Cocoa Cakes along with jars and jars filled with those beautiful snowflake cookies to cap off the night…

chocolate-marshmallow copy

img source // hot cocoa cakes from coordinating yours

Now what makes a gathering extra special is the attention to detail. I would have a Glade® Pure Vanilla Joy candles from their new Winter Collection, exclusively at Target, lit all though out our party space.

That way my guest will be transported back to their grandmother’s or Mom’s kitchen the minute they walk into my home. I can’t imagine a better way to celebrate the holiday season with close family and friends.

The Glade® Winter Collection would be a wonderful way to bring those special holiday aromas into your home. You’ll have to visit your local Target to select your favorite. They have several fragrances that will for sure take you back to happy holiday memories like; Apple Cinnamon Cheer™, Frosted Berry Kiss,  Sweet Holiday Treat™, Merry Maple Morning, Ginger Bread Jingle and several more.

What scent inspires you? How do you like to plan your holiday entertaining?

Get festive this holiday season with the Glade® Limited Edition Winter Collection available exclusively at Target. Inspired by the best feelings of the season, the Glade® Sweet Holiday Treat™ scent lets you indulge in the irresistible scent of rich cocoa, toasted nuts, and creamy caramel. The 2013 Glade® Limited Edition Winter Collection was inspired by the nostalgic, spontaneous, snowy, moments that build up to the holidays. Creating memories with loved ones defines the season and the holiday lineup from Glade® is just as memorable. 

This is a sponsored conversation written by me on behalf of Glade®. The opinions and text are all mine.

Sweet & Savory Christmas Gift Idea // Compound Butter

36 · Dec 18, 2013 · 6 Comments

Sweet & Savory Christmas Gift from WhipperBerry-8

I love the long seated tradition of entering the kitchen at this time of year to create all kinds of goodies to share with family and friends. I also LOVE receiving these gifts every year. You can always feel the love that goes into each and every recipe that is shared. One thing I DON'T love is how frantic and hurried the season has become. Sometimes we just don't have time to bake for days and days in order to put together these treasured gift plates.

Another issue I have have… Sometimes, we get sugar overload with all of these scrumptious goodies. For the last several years, I have tried to find some savory goodies along with the sweet to give as holiday neighbor gifts. This year, my favorite sweet & savory gift for the season is compound butter. What is compound butter you ask? Well, it is butter combined with any of a number of tasty additions that can be used in various different ways in the kitchen. I am particularly fond of any type of berry butter, the ever popular honey butter and the luscious roasted garlic butter. All of these can be used on breads, French toast, crêpes, pancakes, used in sauces and even used to enhance many types of meats. I decided this year, that I am going to give little gift baskets with some homemade compound butter along with some bread…

Sweet & Savory Christmas Gift from WhipperBerry-1

Don't you worry, these butters are a snap to make AND you can even use store bought bread if you aren't the baking type. I am going to give you three quick butter recipes along with the fabulous printable that you can use to label your jars and your gift container if you like. 

Berry Butter Ingredients

4 sticks of softened unsalted butter

1 jar of Smucker's Orchard's Finest preserves (you can use any kind you like, for this one I used cranberry raspberry preserves)

1 tablespoon honey

1/4 teaspoon citric acid

Berry Butter Directions

Berry Butter with Smucker's Orchard's Finest-1

In the bowl of an electric mixer, add your softened, room temperature butter, the Orchard's Finest preserves, honey & citric acid. Why do I use citric acid? I like to add a bit of a tart kick to the butter without adding the liquid from the lemon. The liquid can cause issues with the consistency and I have found that citric acid is a perfect solution. You can get the hit of tart flavor without the consistency issues. I found citric acid at my local market in the canning section. If you can't find it, you can always order it online.  I LOVE it and use it in all kinds of recipes.

Once you have all your ingredients in your mixer, turn your mixer on high and whip the butter for several minutes. Once it has whipped well and is nice and fluffy, take your mixture and add it to your sterilized 4 ounce Ball jars.  Fill to the top and place the lid on tight. Store in the refrigerator until ready to serve. This recipe also can be stored in the freezer really well.

Honey Butter Ingredients 

4 sticks of softened unsalted butter

1 cup honey

Honey Butter Directions

In the bowl of an electric mixer, place softened room temperature butter and honey. Whip on high for several minutes until light and fluffy. Once finished, carefully spoon into sterilized 4 ounce ball jars and replace the lid. Store in the refrigerator until ready to use. This butter also freezes well.

Roasted Garlic Butter

I have a fabulous recipe for Roasted Garlic Butter over at WhipperBerry that you should check out. I also, show you how to roast your own garlic and everything!

WhipperBerry Roasted Garlic Butter

Savory & Sweet Christmas Gift

Now this is where it gets fun… I LOVE packaging! To me the way you dress-up a gift is just as important as the gift. Now, I used my favorite 4 ounce Ball jars for the butter on purpose. With these jars I can create a lovely FREE printable label for everyone to use. 

Sweet & Savory Christmas Gift from WhipperBerry-5

Aren't they fun?! Now… I have created a couple of different ways to use these free printable labels.

Silhouette Print & Cut Users

If you are a Silhouette User, you can download the Silhouette Studio file, print them with your printer and cut out with your CAMEO or Portrait. I used the Printable Gold Foil for mine, but you could use anything that you want. Card stock, printable sticker paper or even printable kraft paper. Use whatever you feel comfortable with. Click HERE to download the Silhouette Studio Label file. 

Printable Users

Now, if you would like to print and cut your labels on your own… No worries, I have you covered too! Click HERE to download the free PDF for you to use for your special gift. Just print as many sheets as you would like on whatever paper you would like, cut out the labels and affix them to your jars and gift container.

Gift Container

I found my container at Target in their seasonal decor section. I would love to link to it, but I can't seem to find it on their web site. You'll just have to look at your local store. You can also use any type of container that will fit your butter selection and the bread your choose. You could use an inexpensive gift bag and it would look fabulous!!

All in all, I am in LOVE with this gift idea and I hope that it sparks some creativity for your holiday gift giving this year.  You know… not all homemade holiday gifts have to be sweet! I know some of us would love some savory treats as well!


  • « Go to Previous Page
  • Page 1
  • Interim pages omitted …
  • Page 9
  • Page 10
  • Page 11
  • Page 12
  • Page 13
  • Page 14
  • Go to Next Page »

Primary Sidebar

Heather from Whipperberry
Hello... my name is Heather and I'm the creator of WhipperBerry a creative lifestyle blog packed full of great recipes and creative ideas for your home and family. I find I am happiest when I'm living a creative life and I love to share what I've been up to along the way... Come explore, my hope is that you'll leave inspired!

Footer

  • Privacy Policy
  • Crafts
  • Food
  • Gifts
  • Holidays
  • Home
  • Mom Life
  • Recipes
  • Travel

Copyright © 2026 · Seasoned Pro