• Skip to primary navigation
  • Skip to main content
  • Skip to primary sidebar
  • Skip to footer

Whipperberry

WhipperBerry • Your Home For Creative Inspiration

  • Home
  • Recipes
    • Starters
    • Easy Weeknight Dinners
    • Main Dish
    • Salads
    • Side Dish
    • Soups & Stews
    • Desserts
    • Breakfast
    • Miscellaneous
  • Tutorials
    • Creative Crafts
    • DIY Decor
    • Fabric Crafts
    • Food How-To
    • Jewlery
    • Paint Projects
    • Paper Art
    • Party Styling
    • Photography and Graphic Design
    • Silhouette
  • Holidays
    • Easter
    • Mother’s Day
    • Father’s Day
    • 4th of July
    • Halloween
    • Thanksgiving
    • Christmas
    • Valentine’s Day
  • Gift Ideas
    • Gifts For Everyone
    • Gifts for Dad
    • Mother’s day
    • For The Girls
    • For The Kids
    • Teacher Gift Ideas
    • Christmas
  • Printables
    • Holiday
    • Gift Idea
    • LDS Primary
  • Travel
  • About
    • Terms
  • Contact
  • Nav Social Menu

    • Facebook
    • Instagram
    • Pinterest
    • RSS
    • Twitter

Decor

Painted Nautical Signal Flags for Boys Room Decor

7 · Jul 13, 2017 · Leave a Comment

Looking for a fun way to dress-up your boys room? Vintage Nautical is one of my favorite ways to decorate for my little guy. Come learn how I created these painted nautical signal flags for our little guy’s room…

Looking for a fun way to dress-up your boys room? Vintage Nautical is one of my favorite ways to decorate for my little guy. Come learn how I created these painted nautical signal flags for Gage's room... WhipperBerry

• This post brought to you by Michaels •

I’ve always been inspired by vintage nautical pieces. All of the fun gadgets and gizmos, the style of the ships, the anchors and I especially love vintage nautical signal flags.

Vintage nautical signal flags

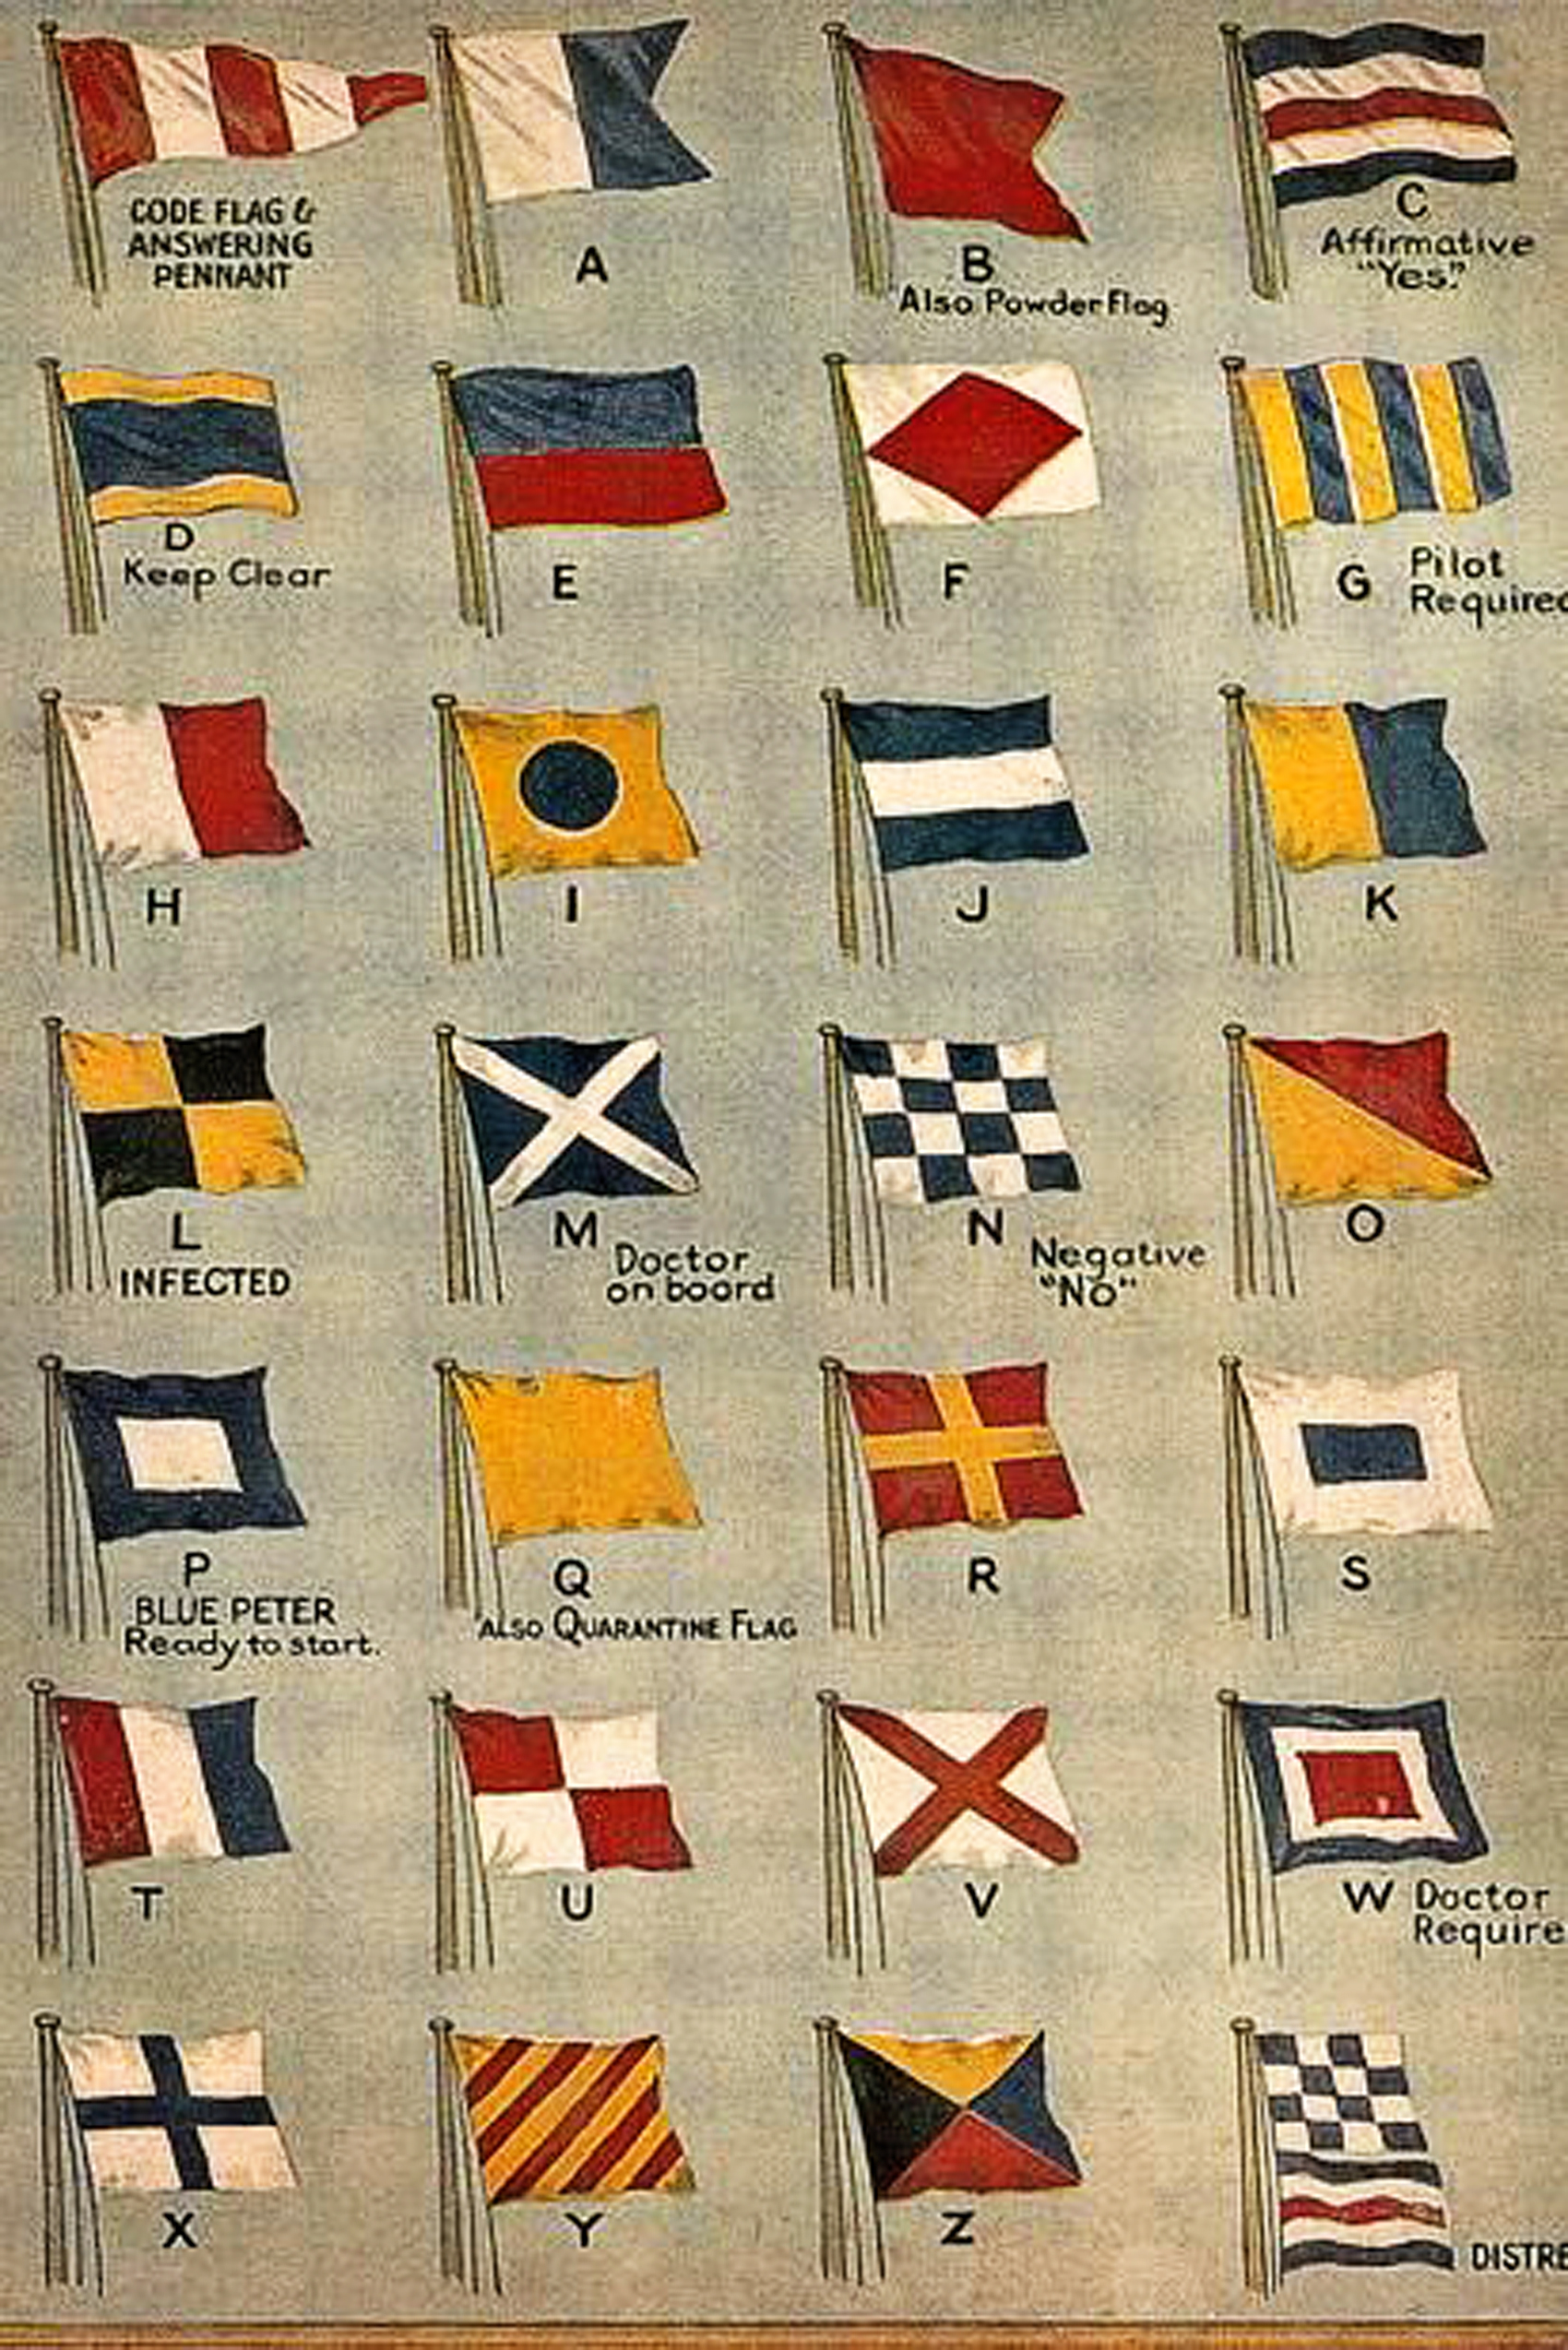
One of my picker friends here in Nebraska does a fabulous job collecting vintage nautical items. Here are a few of Cody’s from The West Place, vintage nautical flags among other items.

Cody from the West Place

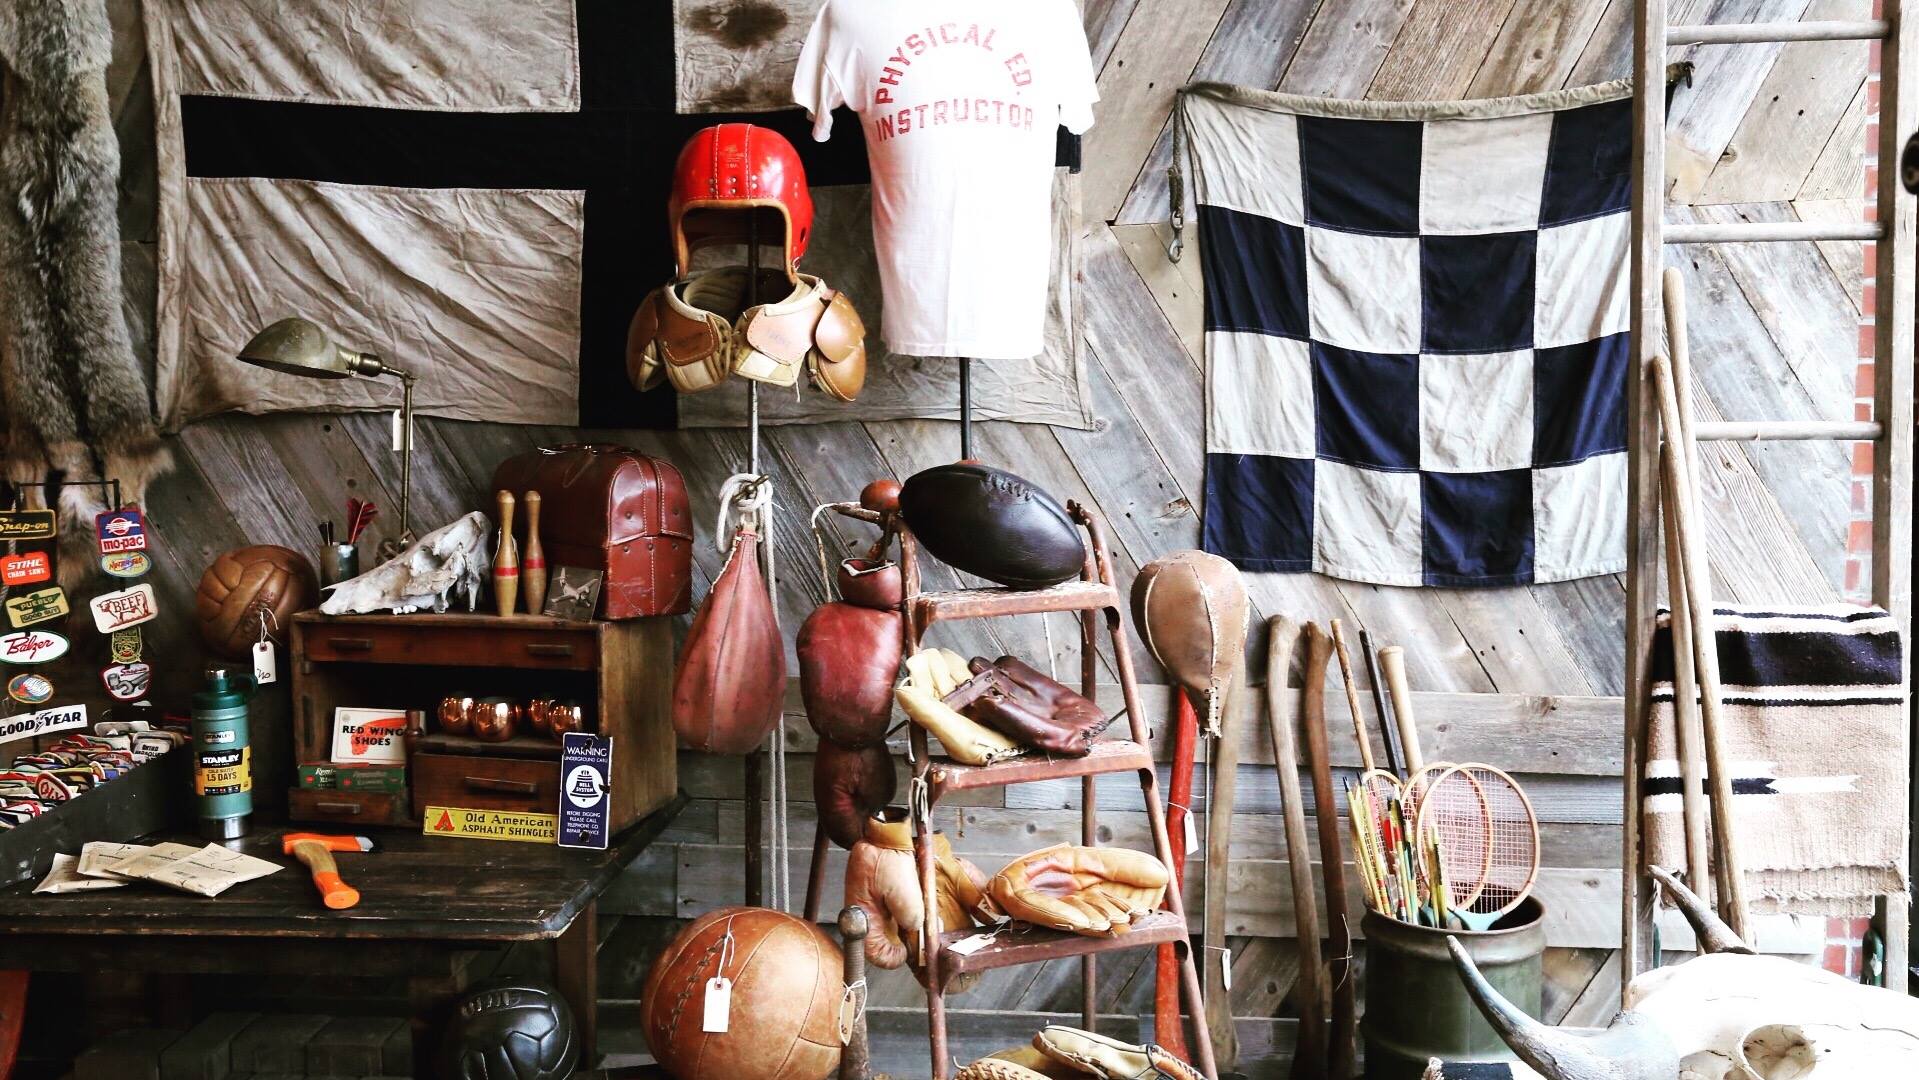
Aren’t they cool?! I purchased a flag from him about a year ago with the intention of using it for my little boy’s room in our new house. The one that I have is (if you look at the chart above) the letter “Z”. It’s colors are amazing! The perfect red, blue, mustard yellow and black. I’m using that as my inspiration for Gage’s room.

If you’re following along, Gage and I introduced you to Davy Jones, Gage’s new octopus wall art for his room…

Create this fun DIY Octopus Wall art for your favorite nautical themed room. This one is going into my son’s vintage nautical room and it’s going to look fabulous! Created by WhipperBerry via @decoArt

24137_SO_July_MarthaPaint_B

I thought it would be fun to create a few more nautical signal flags to go along with Davy Jones. I was thrilled to find out that the Michaels Maker challenge for July is craft paint! Of course this is a perfect opportunity to create these fun flags using a wood canvas that I found at Michaels and the NEW DecoArt Americana Premium Acrylic Paints.

DIY-Octopus-Wall-Art-3

If you don’t already know, Michaels has all kinds of new craft paints in-store now. You need to check it out! They have acrylics, milk paint, chalk paint… All kinds of specialty paints. Not to mention stencils, canvases, brushes and more. Painting with stencils makes things really easy so definitely pick those up. I actually just painted my front door with paint that I purchased at Michaels, the new DecoArt Curb Appeal paint. Who knew you could find that kind of paint at Michaels!

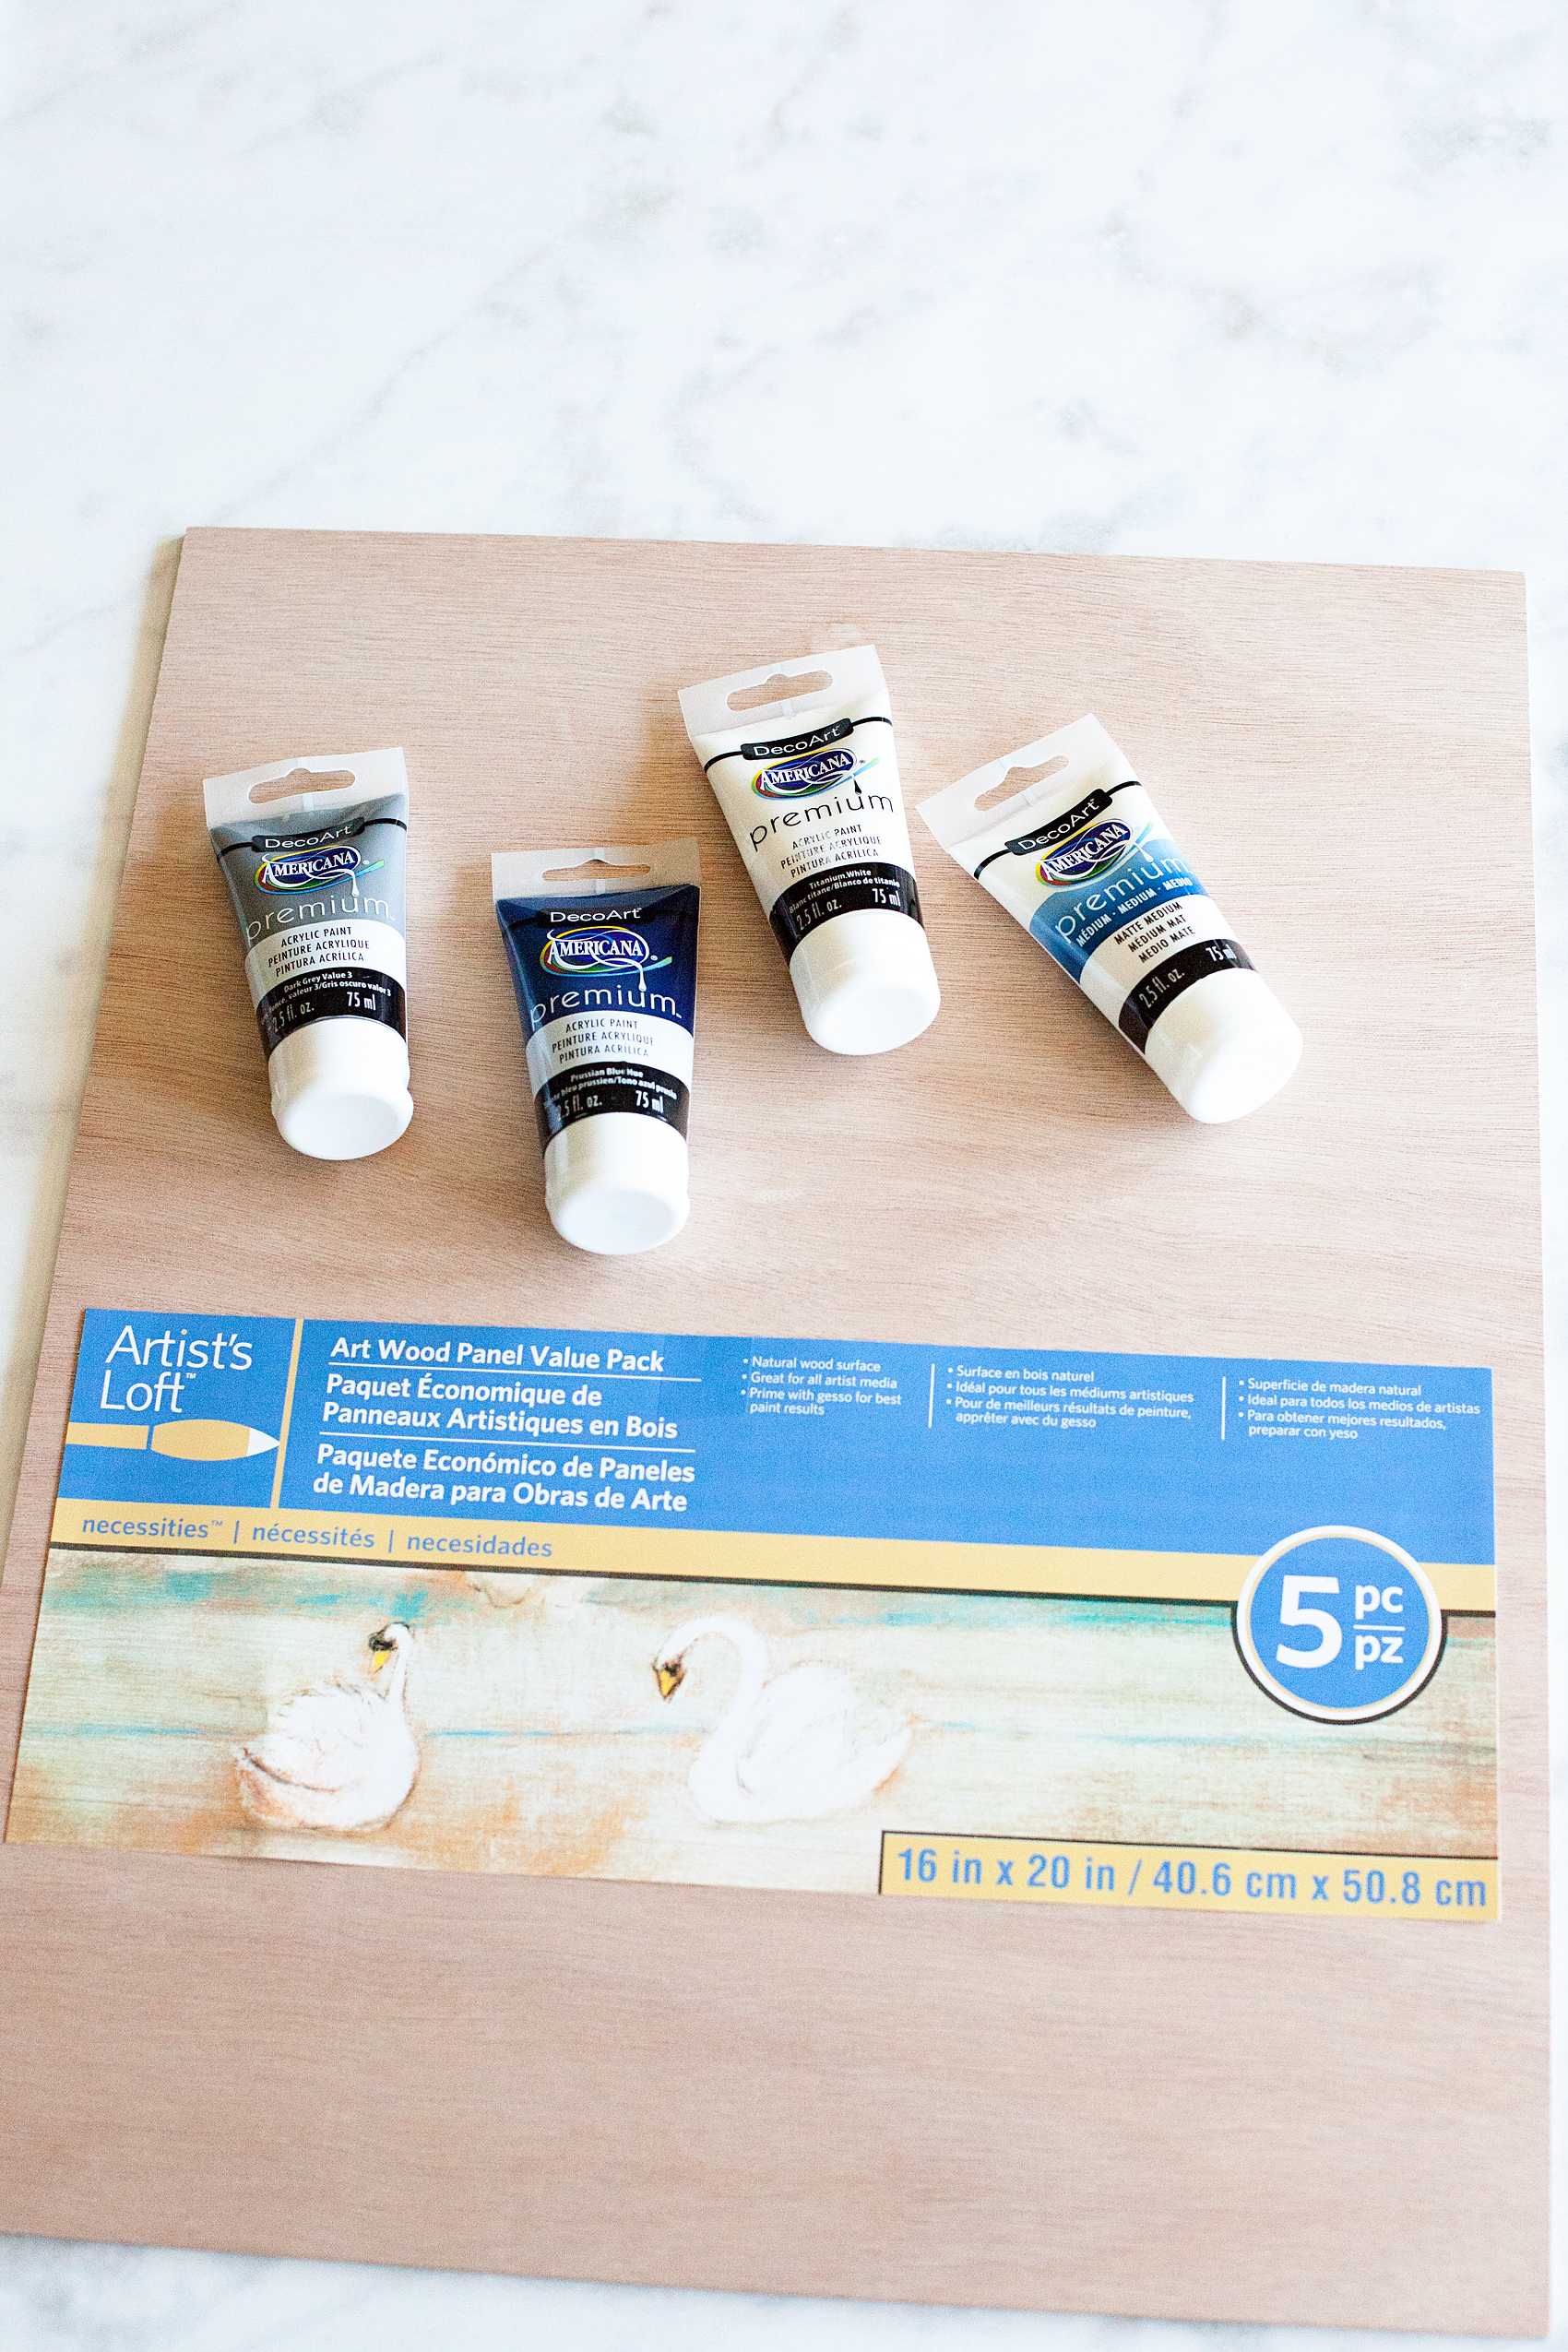
I’m also totally in love with these Art Wood Panels that you can find at Michaels. I wanted my flags to look vintage and a normal canvas wouldn’t be able to create the kind of look I was going for. Nor could I find wood that would look somewhat like a flag. Other wood options would add a lot more bulk and I didn’t want that. This wood canvas is perfect.

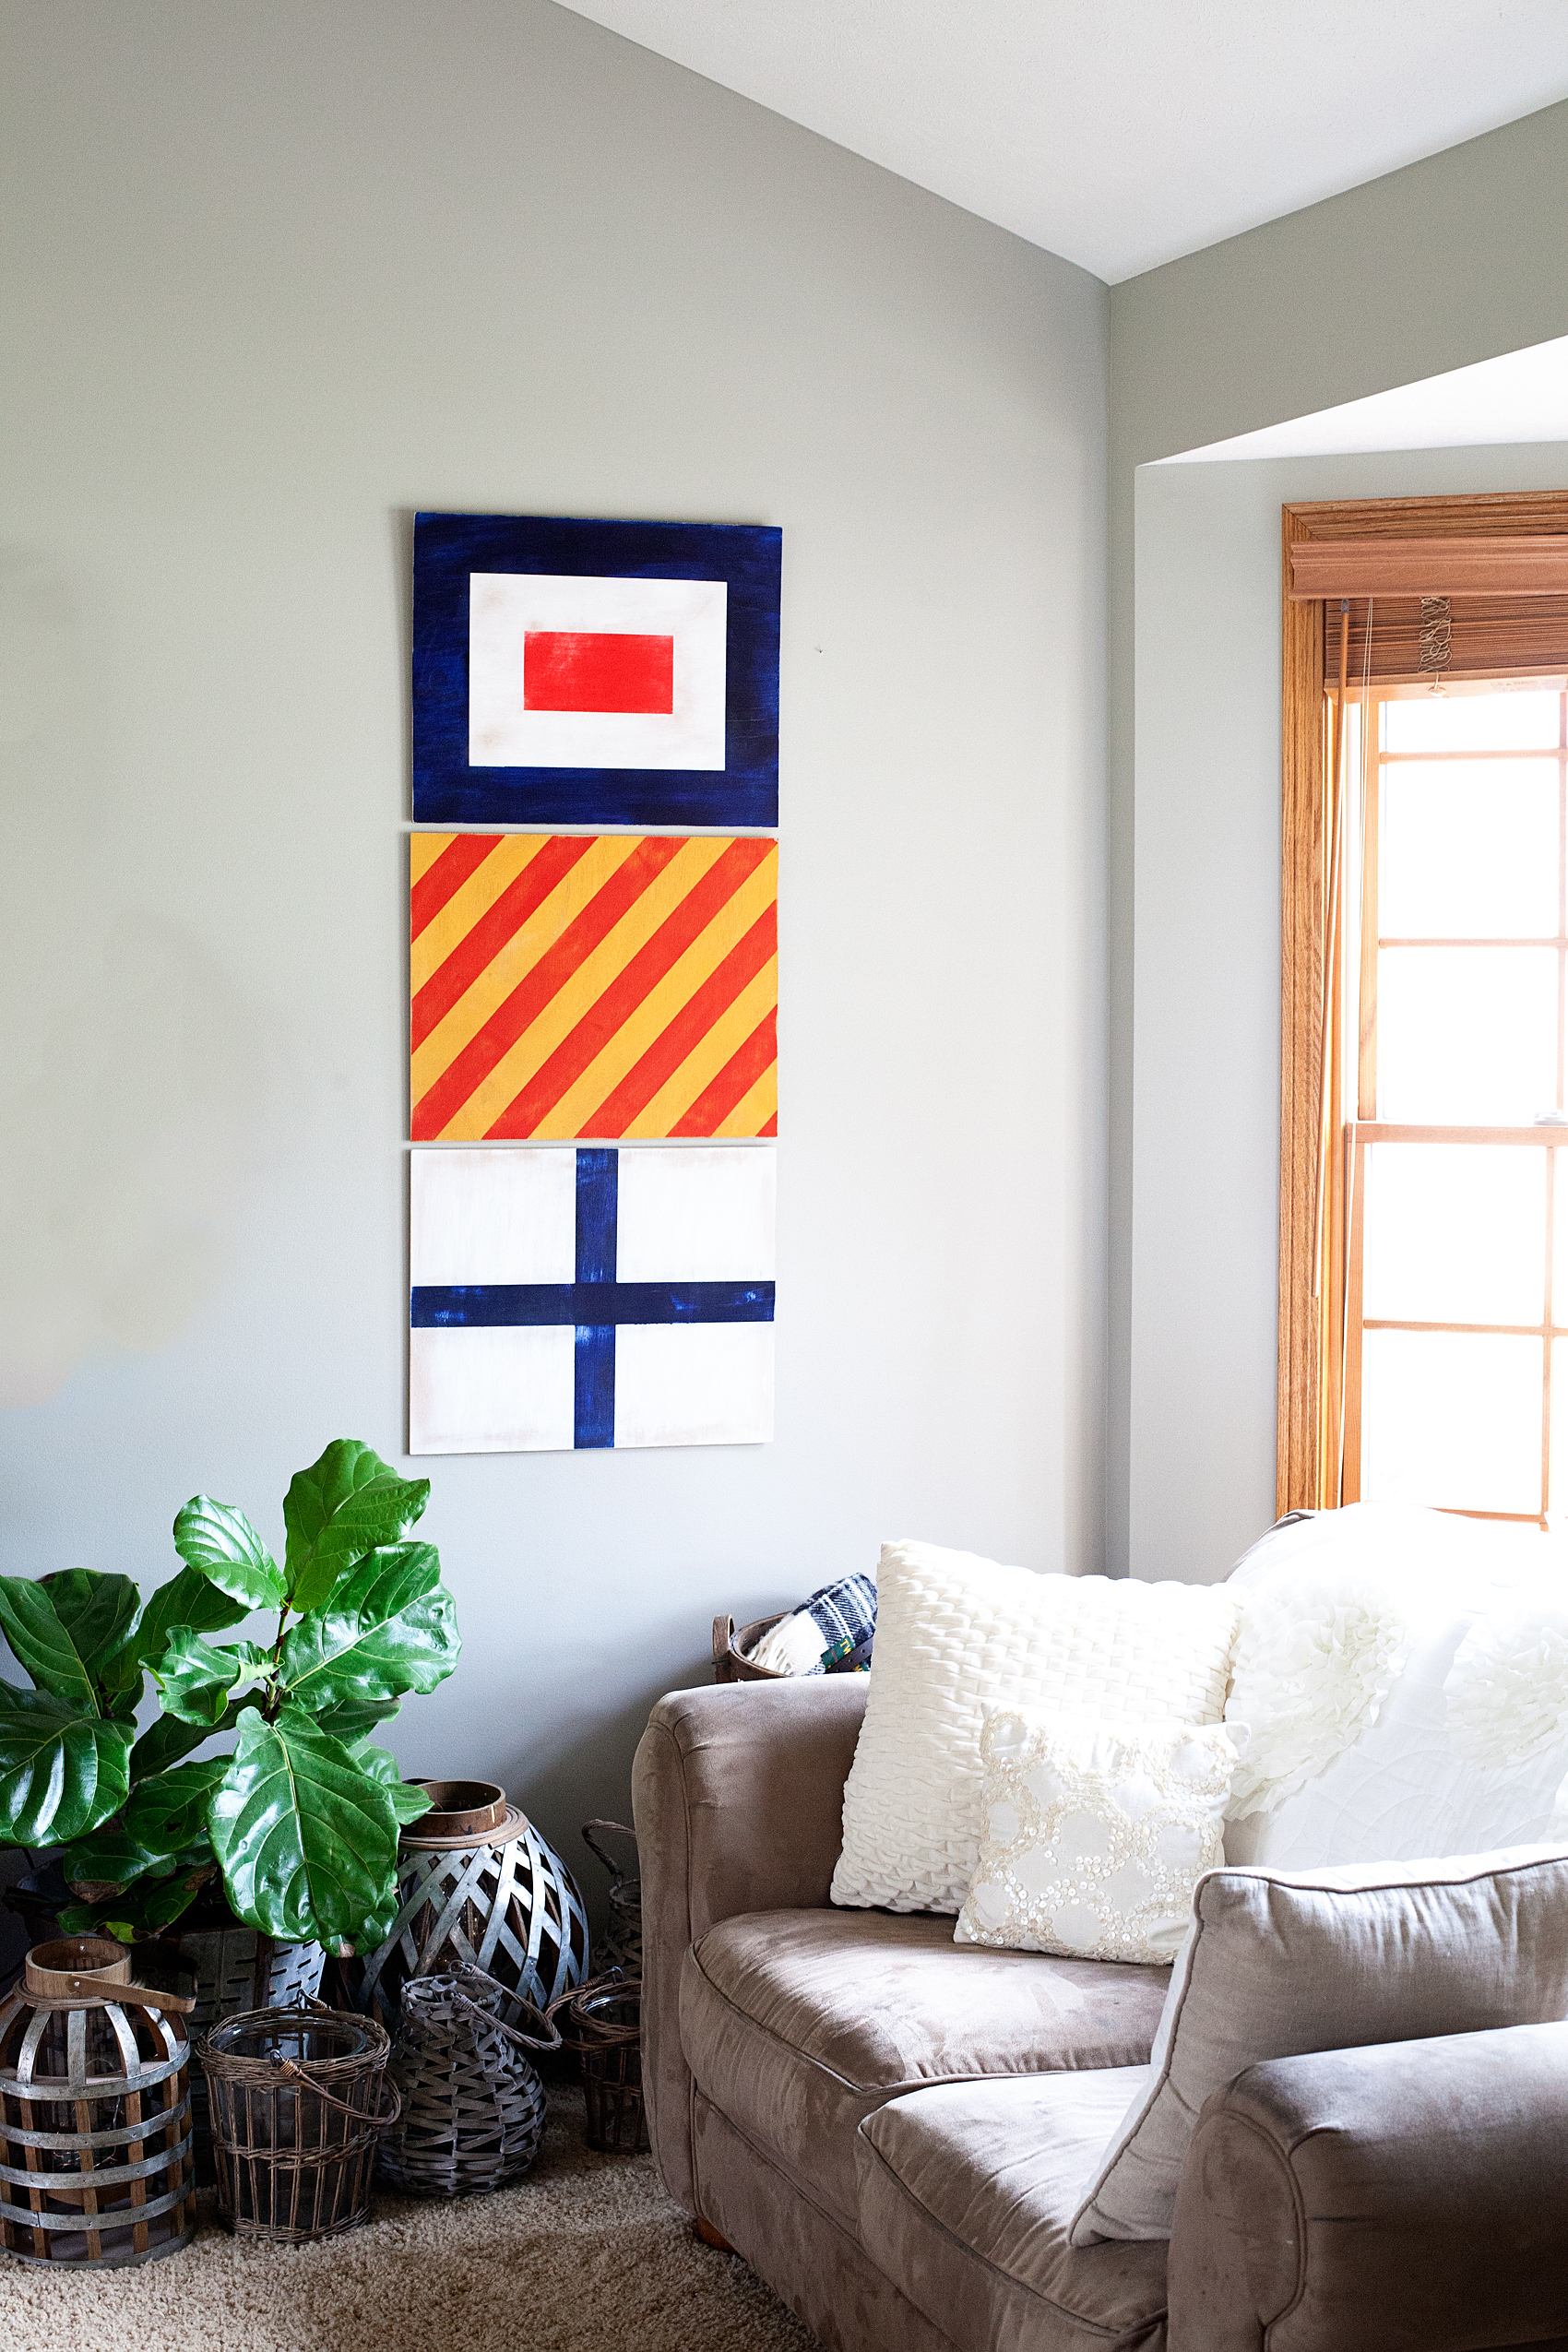
Gage and I talked it over and decided that we would create flags for the letters W-X-Y to go with our actual Z flag.

Looking for a fun way to dress-up your boys room? Vintage Nautical is one of my favorite ways to decorate for my little guy. Come learn how I created these painted nautical signal flags for Gage's room...

Supplies for the Painted Nautical Signal Flags

DecoArt Premium Acrylic Paint

  • Prussian Blue Hue
  • Yellow Oxide
  • Titanium White
  • Cadmium Red Hue

DecoArt Premium Medium • Matte

Artist Loft Art Wood Panel Value Pack

Painter tape

Sponge Brushes

Painted Nautical Signal Signs Instructions

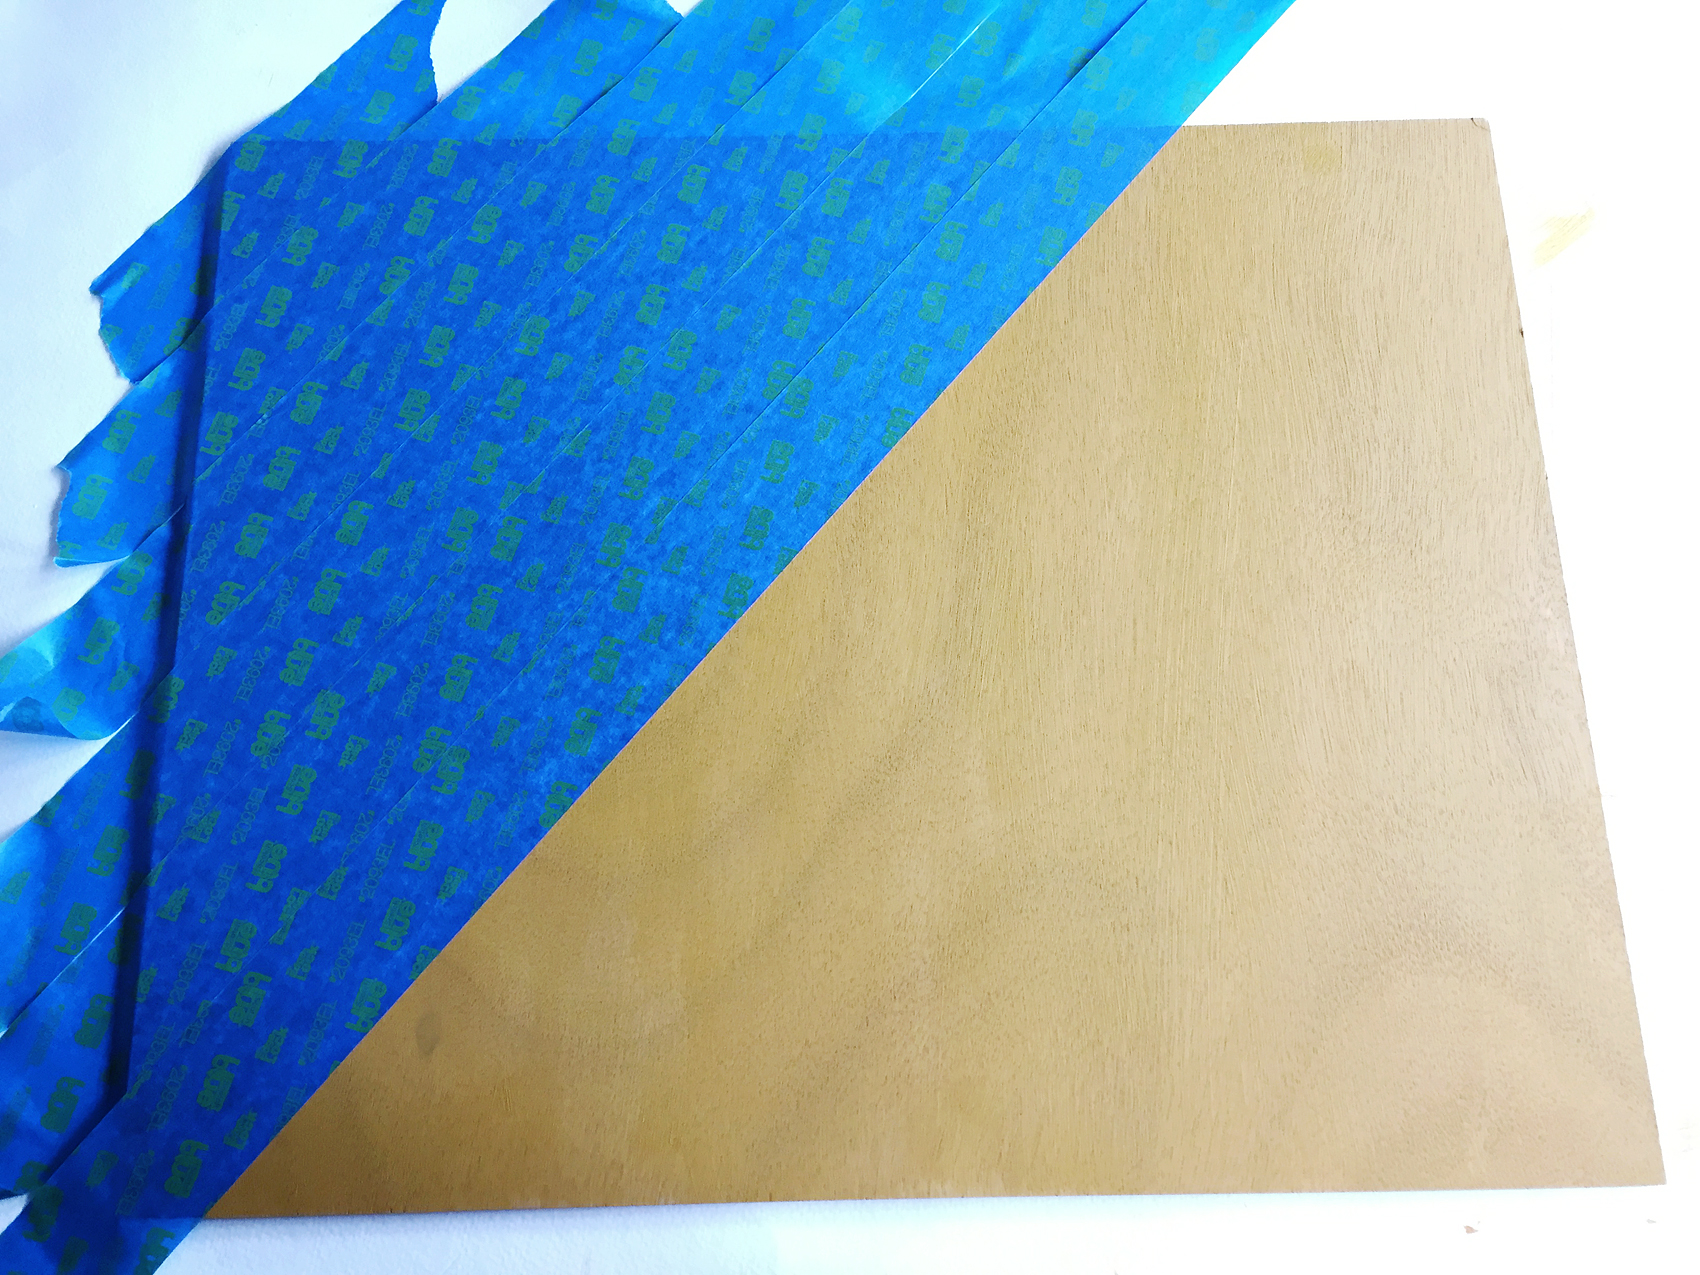
Each flag is going to have a different process due to the designs of the signal flags. You will have to figure out how to best create the design for the letters you create. I’ll show you how I created the letter “Y” flag.

First, I painted the base layer in Yellow Oxide and let it dry. I only did one coat of paint because I was planning on distressing the sign so why make my job harder with an extra layer of paint.

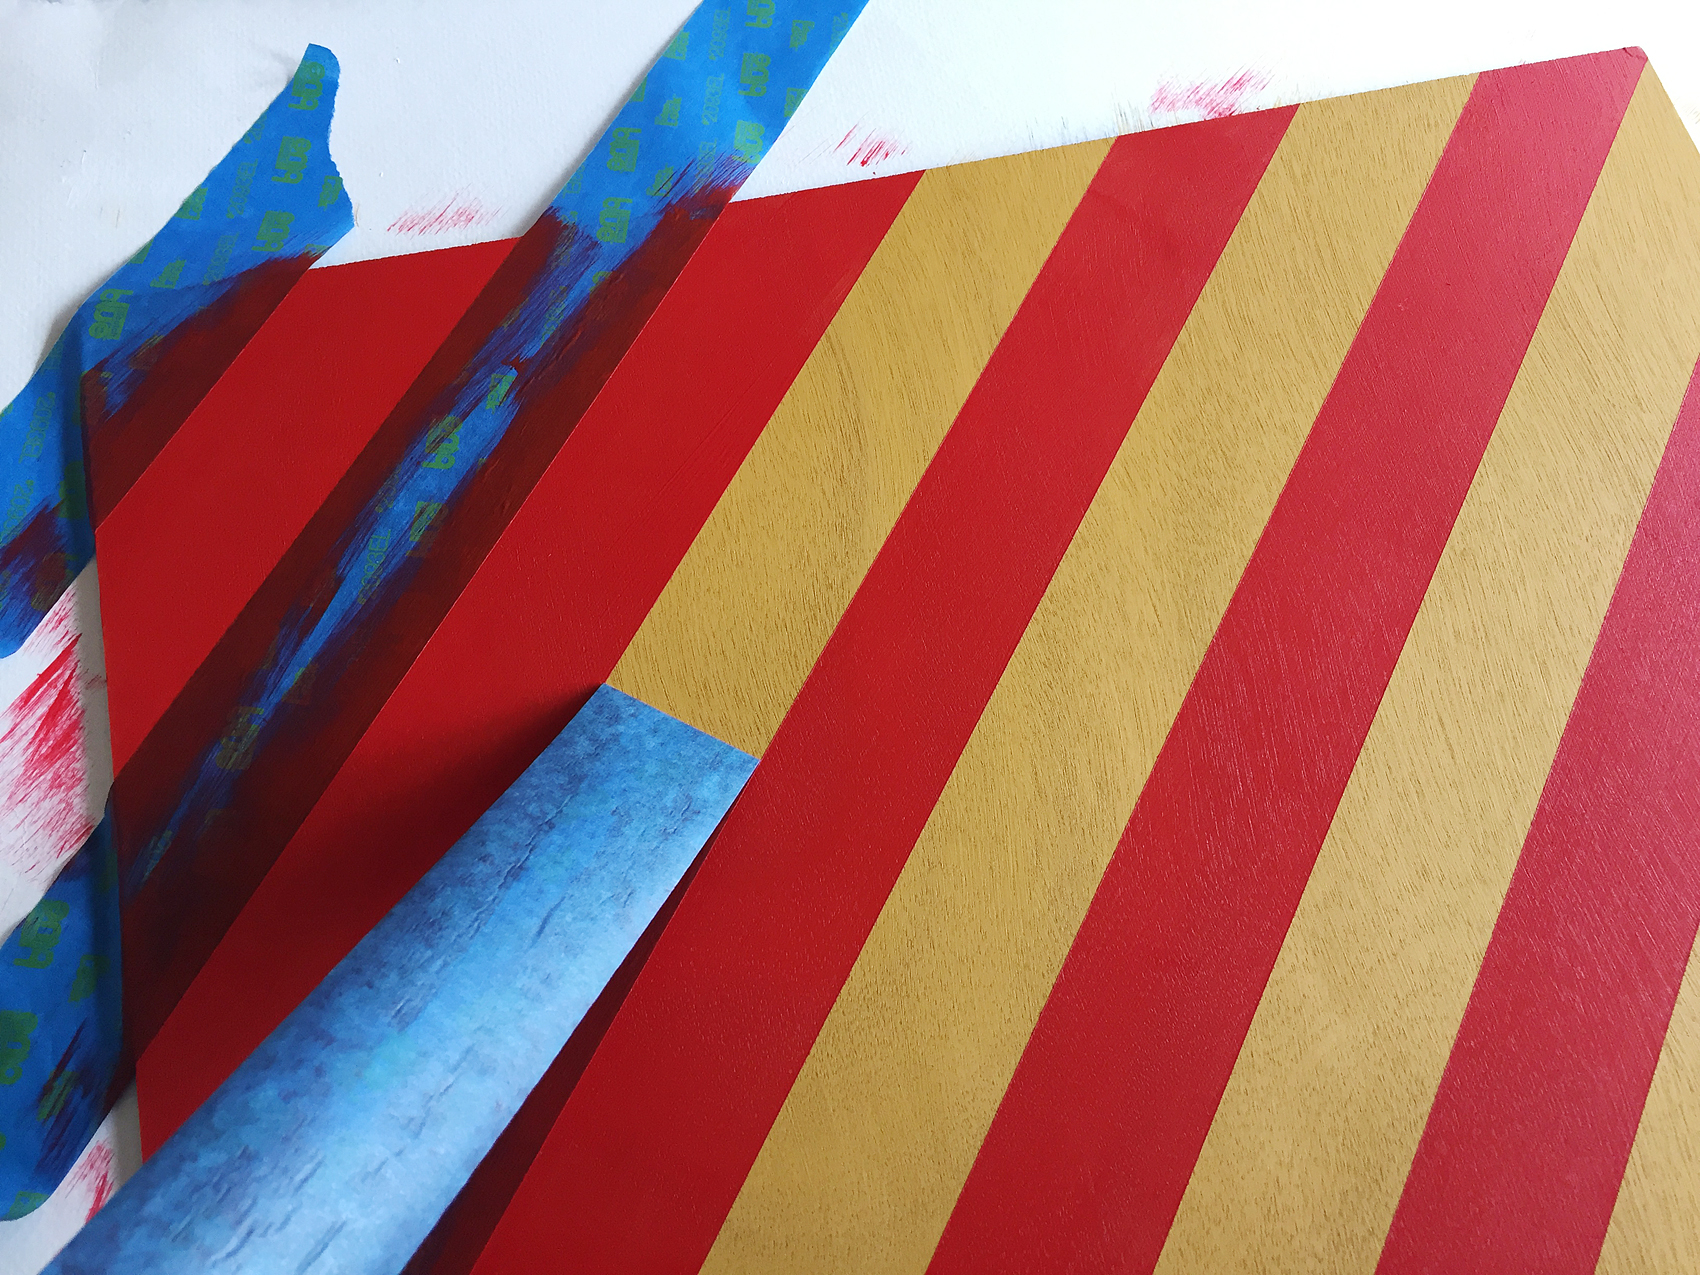
Next, rather than busting out my mad math skills (of which I have none) I layed 2 inch painters tape diagonally across the entire board with the tape bumping right up to the base of the other tape.

Looking for a fun way to dress-up your boys room? Vintage Nautical is one of my favorite ways to decorate for my little guy. Come learn how I created these painted nautical signal flags for Gage's room...

Then, I removed every other strip of tape to then create perfect diagonal stripes. I then painted the red stripes on the board. For this stripe, I did paint two light layers of paint. I wanted a truly bold color even though I was still going to be distressing the board.

Looking for a fun way to dress-up your boys room? Vintage Nautical is one of my favorite ways to decorate for my little guy. Come learn how I created these painted nautical signal flags for Gage's room...

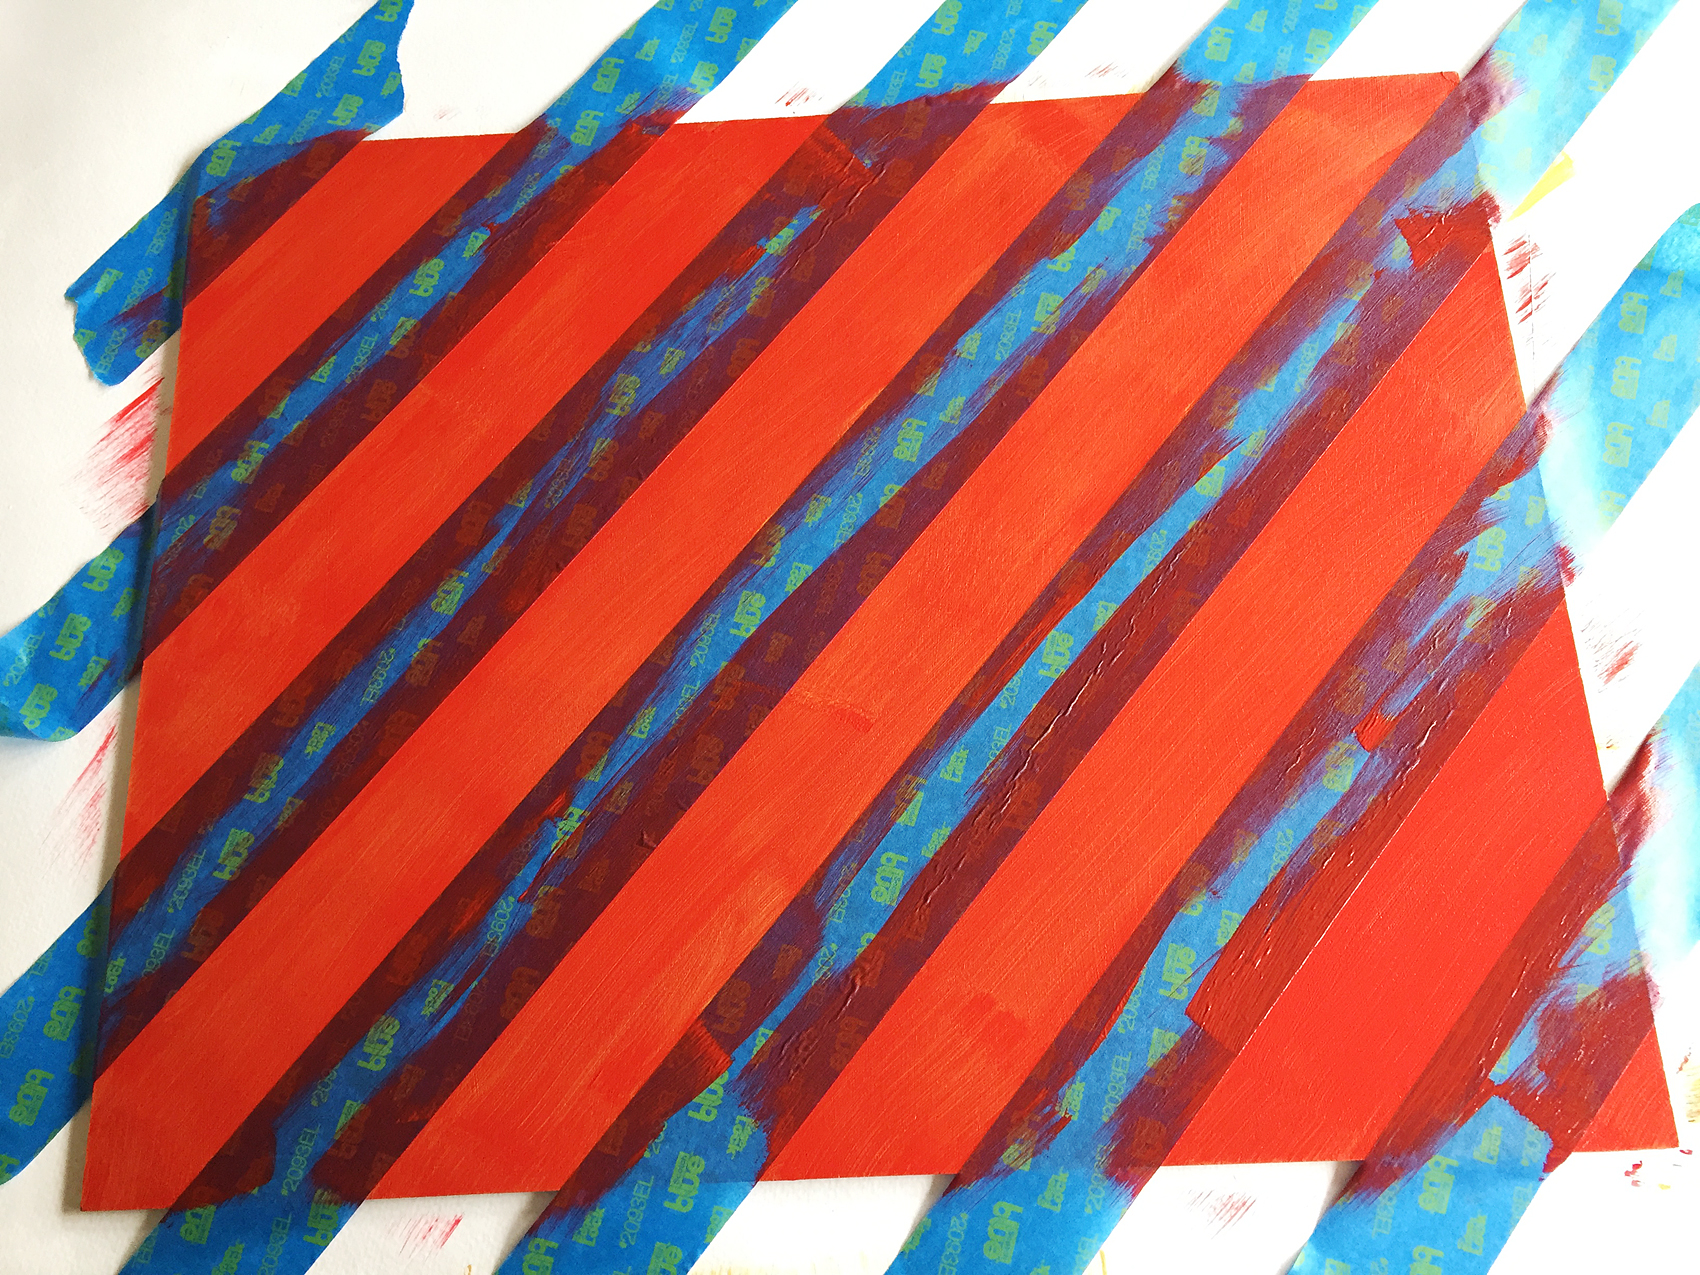
After the paint was dry, I pulled the tape to reveal the PERFECT stripes!

Looking for a fun way to dress-up your boys room? Vintage Nautical is one of my favorite ways to decorate for my little guy. Come learn how I created these painted nautical signal flags for Gage's room...

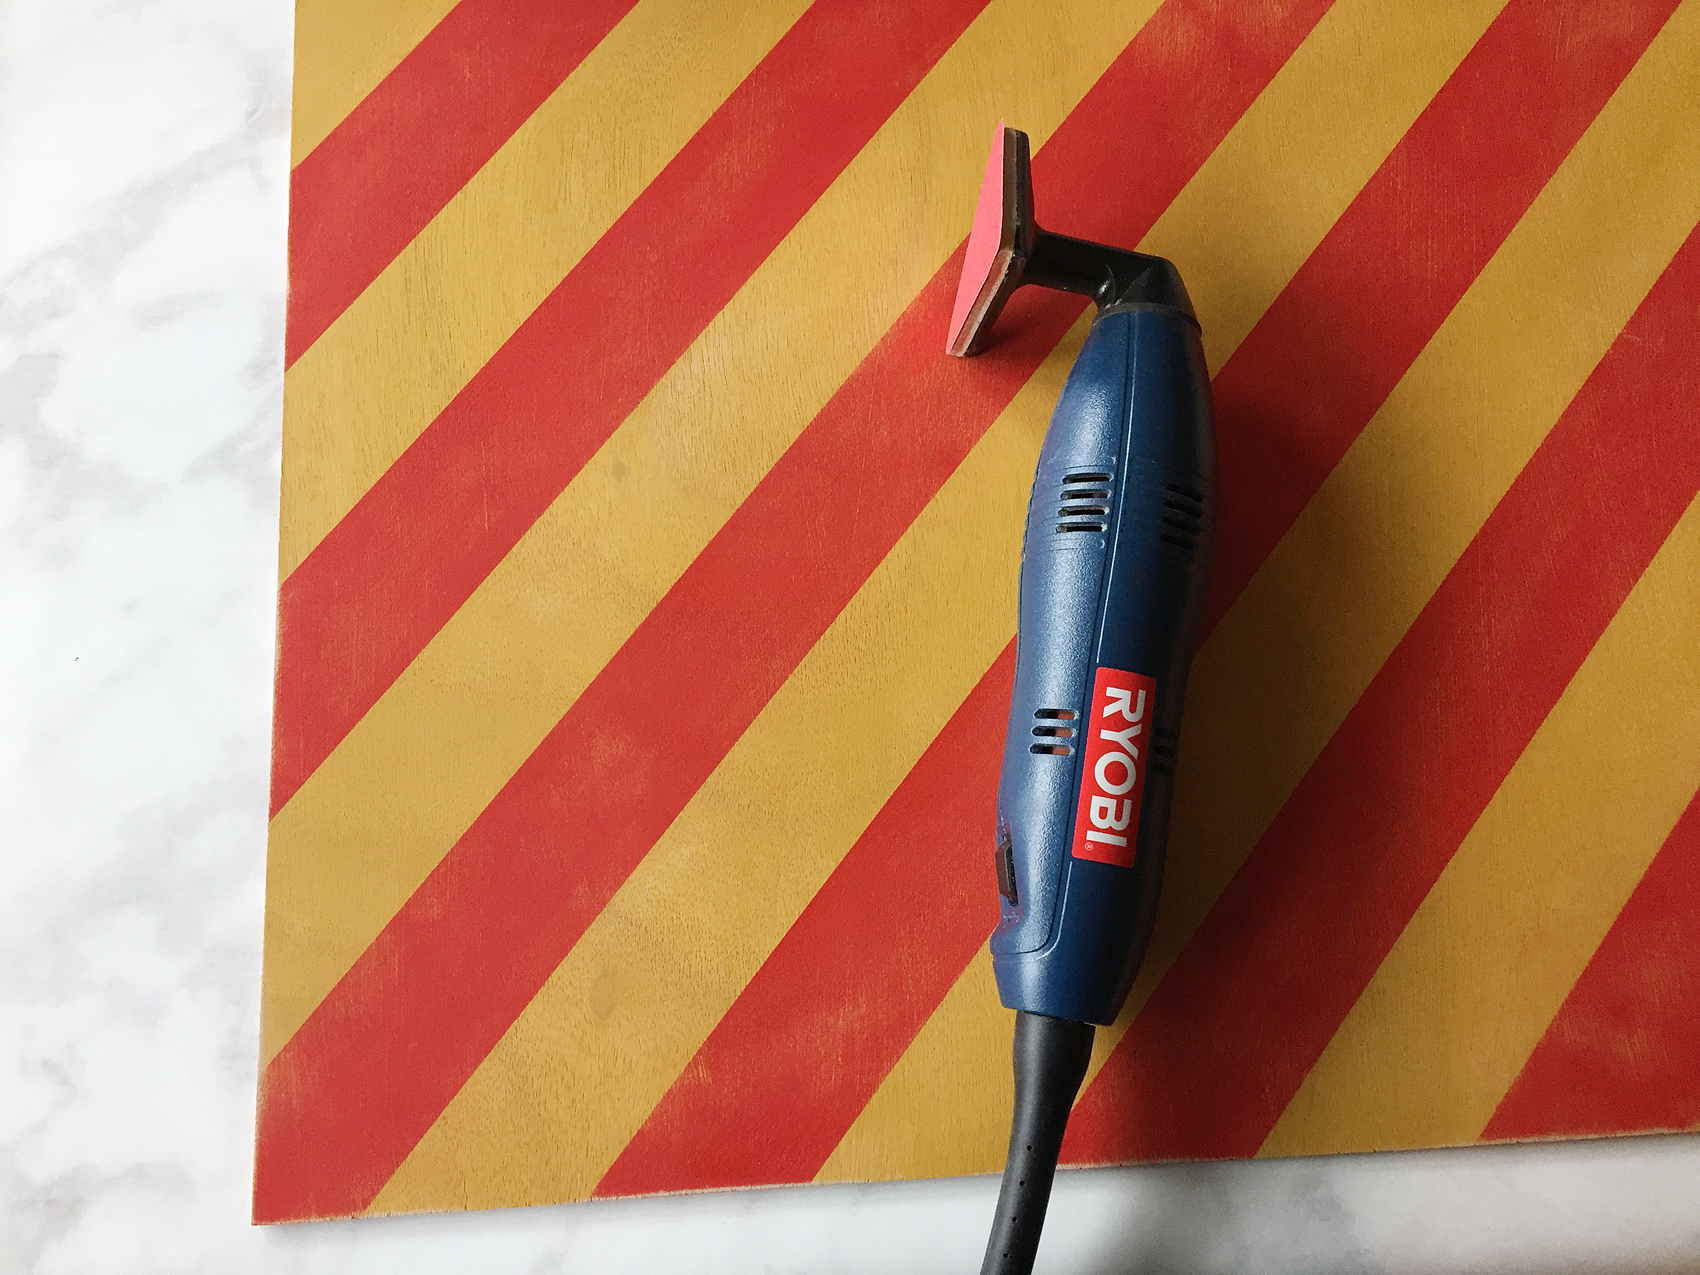
I love how you can still see the wood grain on these art boards. Not to mention, look at those beautiful bold colors. I love this paint! Next, I used my detail sander to distress the board a bit to give this faux flags the vintage look.

Looking for a fun way to dress-up your boys room? Vintage Nautical is one of my favorite ways to decorate for my little guy. Come learn how I created these painted nautical signal flags for Gage's room...

I LOVE how they turned out. I can’t wait to see how they look in Gage’s room when it’s finished.

Looking for more painting inspiration? Michaels has you covered. You can follow along on The Glue String (the Michaels blog) OR, checkout these other projects from the other Michaels Makers…

An InLinkz Link-up

Gnome Garden

4 · May 1, 2017 · 3 Comments

A Gnome Garden is the perfect project for the entire family! With a little imagination, a good container, plants, some sticks from your yard and a little DecoArt Patio Paint,  you can transform a simple garden into a gnome wonderland. Come learn how…Gnome Gardens are a fun trend that the whole family can participate in. Create your own Gnomes with some sticks and @decoart Patio Paint.

This Gnome Garden post brought to you by DecoArt

I have always been fascinated by gardening. Gardening is in my gene pool. I have a sister with a degree in horticulture & landscape design (gardening) and a mother who adores gardening. I SHOULD be an amazing gardener, right?

Well… I’m getting there. To be completely honest, that darn gardening gene is taking awhile to really kick into gear.  Every spring I bring home a new set of, what my husband likes to refer to as, “this years sacrifices!” What?

I’ve tried and tried for a few years to maintain some plants in my home and finally, I feel like I can mange some simple plant care. However, I am no expert. What I love to do is, create with my family and a gnome garden is PERFECT for that.

Gnome and Fairy Gardens are becoming all the rage these days. If you walk into Michaels right now, they have a whole section dedicated to these fun gardens with all kinds of gnomes and their accessories. I decided it would be fun to create a gnome garden together with the family using some budget friendly items like sticks from the backyard as our gnomes & a raw wood bird house that I found at Michaels as their cute home. Here’s what you’ll need to make one with your family…

Gnome Gardens are a fun trend that the whole family can participate in. Create your own Gnomes with some sticks and @decoart Patio Paint.

Gnome Garden Supply List

  • Garden container
  • rocks
  • soil
  • 7-8 small plants
  • 4-5 sticks roughly 6 inches tall
  • DecoArt Patio Paint
    • Suggested Colors
    • Tuscan Red
    • Marigold Yellow
    • Tango Blue
    • Mistletoe Green
    • Cloud White
    • Wrought Iron Black
  • Small round tip paint brush
  • Small flat tip paint brush
  • pencil
  • a sharp whittling knife
  • jar of water
  • paper towels
  • small decorative rocks
  • colored decorative sand
  • garden accessories

gnome-garden

Why Patio Paint is Perfect for Gardens

Not all paint is created equal. Some paint is more durable than others and that’s alright, every type of paint has it’s purpose. What you are looking for with this project is a highly durable paint that is non-toxic, water based and adheres nicely to things that will likely be outdoors or will endure repeated watering like this project. The DecoArt Patio Paint is PERFECT for this! Here are the specifics…

  • No sealer required for a durable, long-lasting finish
  • Weather-proof
  • Satin finish
  • Scuff-resistant
  • Superior coverage
  • Will not crack or peel
  • Water-based and non-toxic
  • Easy to clean
  • Made in the USA

How to Create a Gnome Garden

Here’s a quick video to show you how easy it is to create a special gnome garden of your own…

Gnome Garden from Heather Thoming on Vimeo.

Isn’t that easy and fun for the family? Here’s the step by step…

  1. Place rocks at the bottom of your container. This helps with drainage for your plants. Plants love water, but they typically don’t like to sit in it all of the time. You’ll need to make sure they have proper drainage.
  2. Pour in your potting soil. Fill your container about 3/4 full.
  3. Plant your plants in the container with the lower plants in front and the taller toward the back. Keep in mind, you are trying to set a scene. If you are wondering what plants to use and how to maintain them, here’s a good article from the Empress of Dirt.
  4. Paint your birdhouse. Keep it simple or go crazy… This is your design. I wanted to keep our simple. We painted the door on the back of the bird house and added dots to the roof with a nice red peek-a-boo trim around the scalloped edge of the roof. I used the tip of the brush handle to create the dots on the roof.
  5. ADULT TASK • Whittle the end of your branches into a tip like a pencil. The top portion of the tip will be your gnomes hat. Keep in mind this task either needs to be done by an adult OR supervised by an adult. Gnome Gardens are a fun trend that the whole family can participate in. Create your own Gnomes with some sticks and @decoart Patio Paint.
  6. On one side of your stick, whittle a “U” shaped section for the face of your gnome.Gnome Gardens are a fun trend that the whole family can participate in. Create your own Gnomes with some sticks and @decoart Patio Paint.
  7. Using the DecoArt Patio Paint and your small flat brush, paint on your gnomes hat and let dry.
  8. Take the white paint and paint on your gnome’s beard. Basically in a “U” shape following the line of the face that you whittle in before. Set aside and let dry. Refer to video for more details on how to paint your gnome.
  9. Using a sharped pencil, dip your pencil tip into the black paint and gently place one gnome eye. Reapply the paint to your pencil tip and create another eye. Dipping into the paint twice will help to create eyes that a similar in shape and size. Set aside and let dry.
  10. Once dry, name your cute little little gnomes! Ours are Max (red), Sven (yellow), Einar (green) & Ole (blue). Then place them into your gnome garden.Gnome Gardens are a fun trend that the whole family can participate in. Create your own Gnomes with some sticks and @decoart Patio Paint.
  11. Using the small rocks and colored sand, create a walkway in front of the house.

Gnome Gardens are a fun trend that the whole family can participate in. Create your own Gnomes with some sticks and @decoart Patio Paint.

Wash and Dry Sign • Iron-On Vinyl on Black Canvas

11 · Apr 28, 2017 · 3 Comments

Every laundry room or bathroom for that matter, needs a Wash and Dry sign, right? Let me show you how to make a simple Fixer-Upper inspired sign with Cricut Iron-On Vinyl and a black canvas. Fixer-Upper inspired Wash and Dry Sign created by WhipperBerry • Create this easy to make sign using your @cricut® machine and their Iron-On Vinyl •  Download the digital design file at WhipperBerry.com

• This post is brought to you by Cricut •

A few weeks ago, I had the wonderful experience of traveling to Austin, Texas for the Indulge Conference (which was fabulous by the way!) On the last day of the conference, we hopped onto a bus and made our way to Mecca, I mean Magnolia Market a.k.a The Silos in Waco, Texas. To say that my heart was full that day would be an understatement. I came home with all kinds of goodies AND inspiration as well. They have a laundry room Wash and Dry sign at the Magnolia Market that I’ve been eyeing for awhile and I wanted to create something similar for my laundry room.

Prdctmgnl_1_of_8_1024x1024

Magnolia Market  •  Wash and Dry Sign

The WhipperBerry Wash and Dry Sign Design

I set to work to create a Wash and Dry sign that fit my style and this is what I came up with…

Fixer-Upper inspired Wash and Dry Sign created by WhipperBerry • Create this easy to make sign using your @cricut® machine and their Iron-On Vinyl •  Download the digital design file at WhipperBerry.com

It has a little of JoJo’s vibe with more of a modern flair I would say. I kind of love it! For those of you who would like to download this sign design, click HERE for the PNG file. Shortly, I will have a full tutorial on how to use a PNG file in the NEW Cricut Design Space. It’s sooooo cool, so stay tuned!

How to create the Wash and Dry Sign

Once I had the design created, I needed to find the easiest way to create a nice looking sign. I decided that a black canvas with Cricut’s Iron-On Vinyl would be the best and easiest way to accomplish my mission. I grabbed a black canvas at Michaels and set to work… Here’s what you’ll need.

Wash and Dry Sign Supplies

  • Black Canvas 18×24
  • Cricut Machine { I use the Cricut Explore Air 2 }
  • Cricut Design Space { I don’t want to knock your socks off BUT… The new Cricut Design Space has launched in BETA. That is a link to the new, awesome software!! No more Flash, which means… No more lag time! }
  • Computer / Tablet / Phone { You guys… They all work WIRELESSLY with the Cricut Explore Air 2 }
  • White Cricut Iron-On Lite
  • Cricut 12×24 Light Grip Cutting Mat
  • Light cotton tea towel { flower sack material is great } OR Parchment paper

Fixer-Upper inspired Wash and Dry Sign created by WhipperBerry • Create this easy to make sign using your @cricut® machine and their Iron-On Vinyl •  Download the digital design file at WhipperBerry.com

Ok, before we get started on the project, here’s a quick time lapse that shows how I made the sign…

Wash & Dry Sign by WhipperBerry from Heather Thoming on Vimeo.

Seriously, to quote Ina Garten… “How easy was that?” Let’s go into it in a little more detail starting with my tips and tricks for a successful project.

Fixer-Upper inspired Wash and Dry Sign created by WhipperBerry • Create this easy to make sign using your @cricut® machine and their Iron-On Vinyl •  Download the digital design file at WhipperBerry.com

First tip, take your time. Many people try and rush through their projects and get frustrated when they don’t turn out right. SLOW DOWN! Especially if this is your first time working with the heat transfer vinyl. You want to love your project, take the time to do it right.

Cutting out the Iron-On Lite Material

First thing you need to do is, cut your file on the Iron-On Lite material via your Cricut machine. When working with Iron-On lite, you’ll want to place the material with the shiny protective film down and the matte side facing up. Yep, I’ve messed that up a few times so, don’t beat yourself up if you do as well!

Another key item, make sure that you select the iron-on button when setting up your design in Design Space. This will mirror your image so that it will work with the iron-on vinyl.

Fixer-Upper inspired Wash and Dry Sign created by WhipperBerry • Create this easy to make sign using your @cricut® machine and their Iron-On Vinyl •  Download the digital design file at WhipperBerry.com

Next step, weeding your Iron-On Lite vinyl. This is my favorite part and if you don’t believe me, watch my Instagram story from yesterday. You’ll see why I love it and, you’ll get to see more of the project!

Wash and Dry Instagram Story @whipperberry from Heather Thoming on Vimeo.

Adhering your Iron-On Lite Vinyl to Your Canvas

Now, working with traditional stretched canvas rather than your fabric does provide for a few little obstacles. Namely, the canvas is stretched on a wood frame which makes it hard to “iron-on” something to it. To get a good transfer of the vinyl you need to apply pressure on a hard surface and the raised nature of the canvas makes that a challenge. To solve this problem, I put some books under the canvas to provide that firm surface that I needed.

Fixer-Upper inspired Wash and Dry Sign created by WhipperBerry • Create this easy to make sign using your @cricut® machine and their Iron-On Vinyl •  Download the digital design file at WhipperBerry.com

I also placed a heat mat on top of the books to protect them from the heat of the iron. I found this portable heat mat at Target in the laundry section.

Fixer-Upper inspired Wash and Dry Sign created by WhipperBerry • Create this easy to make sign using your @cricut® machine and their Iron-On Vinyl •  Download the digital design file at WhipperBerry.com

You’ll lay down your design onto the surface of your canvas with the protective film on top. That protective film is your friend at this point. It’s a bit sticky so it holds your design in place for you.

Fixer-Upper inspired Wash and Dry Sign created by WhipperBerry • Create this easy to make sign using your @cricut® machine and their Iron-On Vinyl •  Download the digital design file at WhipperBerry.com

Fixer-Upper inspired Wash and Dry Sign created by WhipperBerry • Create this easy to make sign using your @cricut® machine and their Iron-On Vinyl •  Download the digital design file at WhipperBerry.com

Cover your design with a light cotton cloth or some parchment paper. Set your iron to it’s hottest setting and then start to iron-on your design.

Now… This is not like ironing a shirt. You don’t want to use steam and it’s going to take a little time. You are basically wanting the vinyl to melt into the canvas and that takes a little time. DO NOT iron directly on the protective film OR place your iron on a section and just leave it there. Keep the iron moving and firmly press down on the canvas. This will help adhere the heat transfer vinyl to the canvas.

After a few minutes, check to see how things are sticking. Look at the protective film and you’ll kind of be able to see that the vinyl is pulling away from it and sticking to the canvas. You may find a few spots that need a little more time. Replace the cloth and continue to iron. Once you feel good about the adhesion, pull the protective film away and admire your sign.

At this point, I actually replace the cloth and do another light pass with the iron to make sure the vinyl is good and set. You could even flip your canvas over and iron on the back side with the protective film still in place to again make sure the vinyl is set.

Now, all you have to do is step back and admire your work! It’s so EASY and it looks AAAAMAZING!

Fixer-Upper inspired Wash and Dry Sign created by WhipperBerry • Create this easy to make sign using your @cricut® machine and their Iron-On Vinyl •  Download the digital design file at WhipperBerry.com

Disclaimer // I am a Cricut Ambassador and receive  product and payment to help with my projects. As always, I will NEVER promote a product that I don’t truly believe in!

Using Cricut Faux Leather + Gold Foil to Dress-up Your Home

15 · Feb 15, 2017 · 2 Comments

149781-Hayneedle Photo Shoot-005

5 stylist walk into a bar… Alright, maybe not a bar. A glorious industrial blank space in the heart of Salt Lake, they have 3 Cricut Explore Air 2 machines, new bedroom furniture from Hayneedle and all kinds of Cricut tools & materials. One stylist says…

Alright, this is starting to sound like a really bad joke. The strange thing is, it really happened. I had the great opportunity to head out to Salt Lake to share in the creation of a fun bedroom space with some great blog friends. Hayneedle graciously supplied the basic room elements and then we had the assignment to add a little pizzaz to the space. The main themes were industrial, softened up with a little romantic floral flair. My assignment was the chair and then heading up the collaboration of one of the gallery walls.

For the chair, I created a classic pillow using the Cricut Faux Leather and designed a fun wreath using crafting pearls from Michaels for the “berries.”

Classic Wreath Pillow created by WhipperBerry using Cricut Faux Leather and the Cricut Explore Air 2

I LOVED how it turned out… It added just enough personality to make the beautiful chair from Hayneedle SING!

149781-Hayneedle Photo Shoot-014

I then worked on a super fun piece of wall art that I adore…

Let us dance in the sun with wildflowers in our hair wall art from WhipperBerry

Since the room was going to have a floral flair, I thought a playful quote on the wall would look fantastic. I found this quote and then set to designing it so that would tie the other wall art pieces from the other designers together. I decided to use the AAAAMAZING Adhesive Gold Foil from Cricut for this piece and I ADORED how it turned out.

Come on over to the Cricut Blog to see WHO the other stylist are, see the rest of the projects, learn how to RE-CREATE what I designed and see the COMPLEATED ROOM. PLUS, you’ll have a chance to WIN the whole room for yourself!! You won’t want to miss out on that!

Disclaimer + I am a Cricut Ambassador and this post does have affiliate links. Please know, I will NEVER promote a company or product that I don’t truly believe in and use myself.

  • « Go to Previous Page
  • Page 1
  • Page 2
  • Page 3
  • Page 4
  • Page 5
  • Page 6
  • Go to Next Page »

Primary Sidebar

Heather from Whipperberry
Hello... my name is Heather and I'm the creator of WhipperBerry a creative lifestyle blog packed full of great recipes and creative ideas for your home and family. I find I am happiest when I'm living a creative life and I love to share what I've been up to along the way... Come explore, my hope is that you'll leave inspired!

Footer

  • Privacy Policy
  • Crafts
  • Food
  • Gifts
  • Holidays
  • Home
  • Mom Life
  • Recipes
  • Travel

Copyright © 2026 · Seasoned Pro