• Skip to primary navigation
  • Skip to main content
  • Skip to primary sidebar
  • Skip to footer

Whipperberry

WhipperBerry • Your Home For Creative Inspiration

  • Home
  • Recipes
    • Starters
    • Easy Weeknight Dinners
    • Main Dish
    • Salads
    • Side Dish
    • Soups & Stews
    • Desserts
    • Breakfast
    • Miscellaneous
  • Tutorials
    • Creative Crafts
    • DIY Decor
    • Fabric Crafts
    • Food How-To
    • Jewlery
    • Paint Projects
    • Paper Art
    • Party Styling
    • Photography and Graphic Design
    • Silhouette
  • Holidays
    • Easter
    • Mother’s Day
    • Father’s Day
    • 4th of July
    • Halloween
    • Thanksgiving
    • Christmas
    • Valentine’s Day
  • Gift Ideas
    • Gifts For Everyone
    • Gifts for Dad
    • Mother’s day
    • For The Girls
    • For The Kids
    • Teacher Gift Ideas
    • Christmas
  • Printables
    • Holiday
    • Gift Idea
    • LDS Primary
  • Travel
  • About
    • Terms
  • Contact
  • Nav Social Menu

    • Facebook
    • Instagram
    • Pinterest
    • RSS
    • Twitter

dessert

Cookie Dough Brownies

3 · Mar 27, 2015 · 7 Comments

+  This Cookie Dough Brownies post is brought to you by the Pillsbury Baking +

Cookie-Dough-Brownie-Bites-by-WhipperBerry

Have you ever had one of those nights when the sweet monster attacks? I know you have…

You’re standing in the kitchen rummaging through to the pantry, the fridge & the freezer and you just want something quick, sinful and sweet! You start dreaming of crazy concoctions and then it hits you…

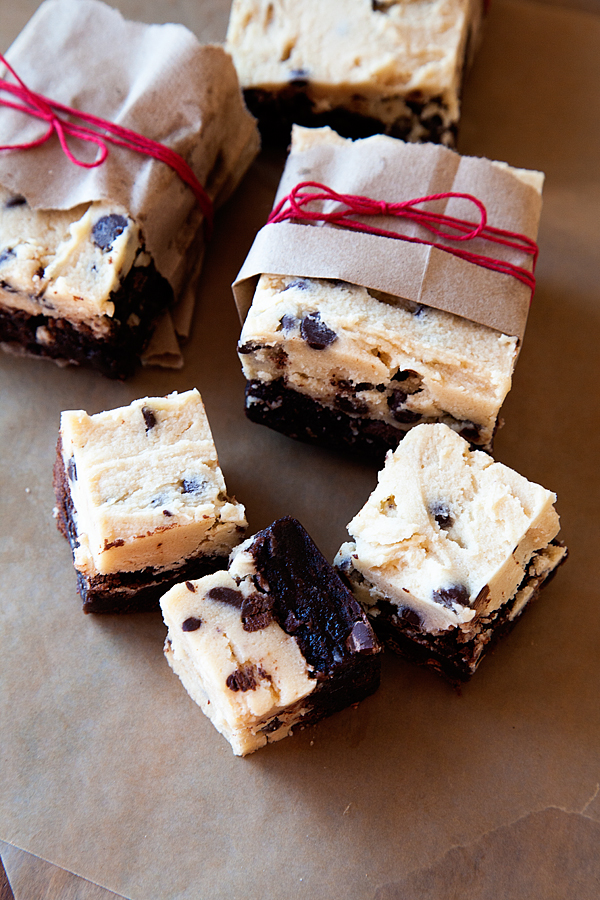
Cookie Dough Brownies!!

What… that hasn’t ever happened to you?

Ok, well… it’s happened at our house and these little bites of goodness couldn’t be easier to make.

All you need to do is stock up on these two goodies from the folks at Pillsbury Baking…

Pillsbury-Brownies-and-Chocolate-Chip-Cookies

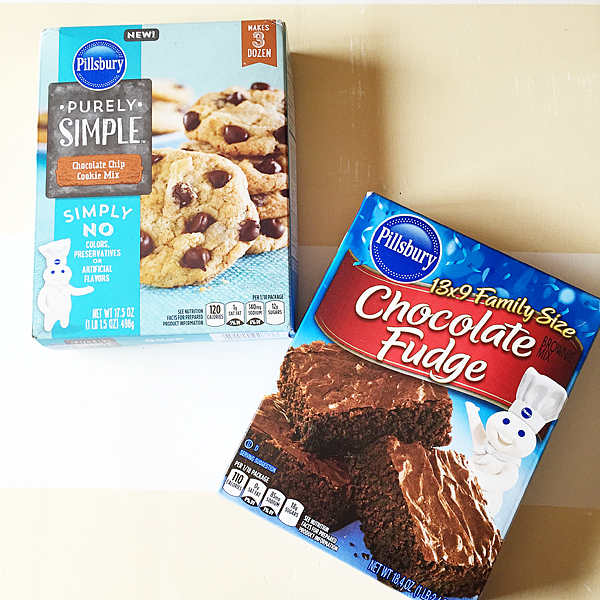
Purely Simple Chocolate Chip Cookie Mix & Family Size Chocolate Fudge Brownie Mix from Pillsbury. It’s really quite amazing how far these box mixes have come. The folks at Pillsbury Baking have been tirelessly working on creating box mixes that are just as good as homemade. What I love about them is how quick they are to mix-up, especially on those days when you have a monster craving or when you need a treat to take to an event. All you have to do is keep your pantry stocked with a few boxes and you’re all set.

I’m especially LOVING the new Purely Simple line of goodies from Pillsbury. These mixes are lovely and they don’t have any of those troublesome preservatives and artificial colors or flavors. I love’em!

Now these Cookie Dough Brownies couldn’t be any easier to make.

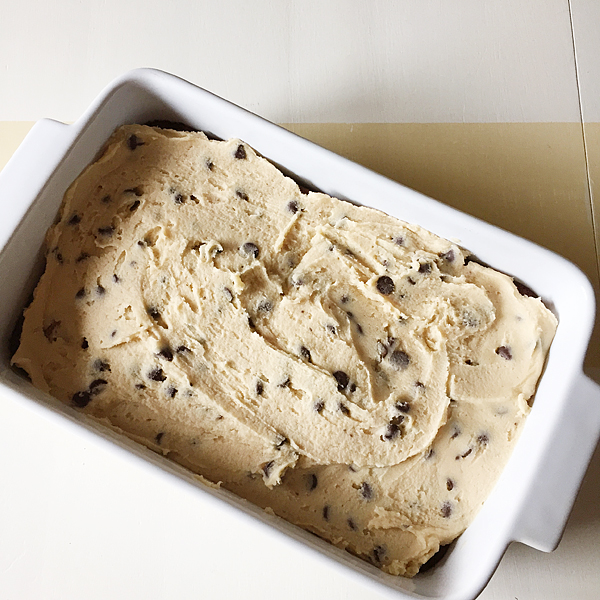
First, bake-up your brownies, mixing according to package directions. I like my brownies nice and thick, so I baked mine in a smaller baking dish like a 8×8 or 9×9 pan. While the brownies are cooling, mix up your cookie dough. The only change that I make with the cookie dough is that I leave out the eggs. Since we are not baking the cookies, I don’t want to mess around with possible food illness issues with the raw eggs.

Mix-up the cookie dough and then spread it on top of the brownies, carefully, while they are still slightly warm. It’s it’s just as if you are frosting your brownies. You want to have a lighter hand so you don’t tear up the brownies underneath…

how-to-make-cookie-dough-brownie-bites

Voliá… Cookie Dough Brownies!

IMG_2111

Let the brownies fully cool and give the cookie dough time to set and then you can cut them into bite sized pieces…

Cookie-Dough-Brownie-Bites-from-WhipperBerry-4

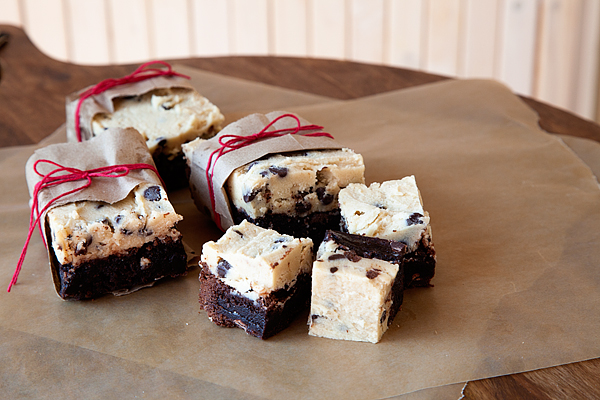
This is the best of both world… It’s a chance for brownie lovers and cookie dough lovers to unite!

Cookie-Dough-Brownie-Bites-from-WhipperBerry-1

What’s not to celebrate about that? Sometimes you need to take a quick moment and celebrate the little things and this quick recipe is the perfect way to do that!

Visit Pillsbury Baking for all kinds of fun recipe ideas. Don’t forget to follow them on Facebook, Instagram & Pinterest for even more baking fun!

Disclaimer // This post is sponsored by Pillsbury Baking. I received product and payment for this post, however… I will only post about products that I truly love and use in my everyday life.

Caramel Corn Recipe

0 · Dec 3, 2013 · 5 Comments

Caramel Corn Recipe //  Hello Whipperberry friends!  Can you believe that it's December already?  It feels like this season flies by so fast…it's hard to take it all in isn't it?  There's just so much to do, and so little time to do it!  But I admit I love it all…the fast pace of the malls, the music, the gatherings and the goodies.  Oh my, how much do I love the goodies!  I might need a bigger pants by the time January rolls around!  Nah, holiday calories don't count right?!  😉

Speaking of goodies, I wanted to share a family favorite recipe with you today.  This caramel corn is actually my Grandma's recipe, and I remember my Mom making it for us every year…I always looked forward to it!  And now I make it for my family.  Don't you just love recipes that get passed down through the generations?  There's something so special about sharing a recipe with your loved ones that generations before you have been enjoying too.  Love that so much.

Anyway, this caramel corn is SO good.  Creamy, and chewy and delicious!  I hope you try it and love it!

Caramel-Corn-{A-Pretty-Life}

This caramel corn is also perfect for gift giving or simply just enjoying with your family during a movie night!  It's quick and easy to make and it's crazy delicious!  Trust me when I say this treat will get devoured.  I seriously could eat this all by my lonesome!

 Whisk

Ingredients

  • 1⅓ cups granulated sugar
  • 1 cup salted butter
  • 1/2 cup corn syrup
  • 1 tsp vanilla
  • 8 cups popped popcorn
  • 1 cup pecans & almonds (optional)

Instructions

  1. Pop your popcorn.  Then measure out about 8 cups and spread it out onto a large cookie sheet.
  2. If you wish to add nuts to your popcorn, you might want to toast them in a 350 degree oven for 2-5 minutes, watching them very carefully.  Toasting them brings out amazing flavor!  When the nuts are toasted, sprinkle them over the popped popcorn.  Set aside.
  3. Now on to the caramel!  In a saucepan melt the butter, then add the sugar and corn syrup.
  4. Bring to a boil over medium heat, stirring constantly.
  5. Continue to boil, stirring occasionally until the mixture turns caramel colored.
  6. Remove from the heat and stir in the vanilla.
  7. Then pour the caramel over the popcorn and nuts.  Using a fork, gently mix, and separate into clusters.
  8. You can eat it at this point while it's soft and warm, or you can let it cool and enjoy it later.
  9. Store in a tightly closed container.

Deeeelish!  I hope your holiday season is full of cheer and much deliciousness!

– – – – – – – – – – – – – – – –

If you get at chance this season, I'd love for you to stop by my blog for some Christmas cookie recipes!  Yum.

Christmas-Cookies-{A-Pretty-Life}

Mint Chocolate Chip Blizzard Cookies  |  Candy Cane Crumble Nutella Cookies  |  Eggnog Ice Box Cookies

Have a delicious day! Signature

Perfect Gingersnap Cookies

1 · Nov 12, 2013 · 2 Comments

Hi all! It’s exciting to be back here from One Sweet Appetite! Today we are talking cookies. Around this time of the year it seems that all I can think about are trays full of the little treats. Every year we like to have a baking day to put together fun plates of goodies for our neighbors and this cookie always seems to take the show! These gingersnap cookies are full of holiday flavor. Lots of ginger, cinnamon, molasses… All rolled into a cinnamon and sugar mixture then baked to perfection. Chances are good you’ll end up snacking on one (or ten) before packaging them up for neighbors and friends!
perfect-ginger-snaps
Perfect Ginger Snap Cookies

2 C. sifted all-purpose flour 
1 T. ground ginger
2 t. baking soda
 t. ground cinnamon
1/2 t. salt
3/4 C. shortening
1 C. white sugar
1 egg
1/4 C.  dark molasses
1/3 C. cinnamon sugar


Preheat your oven to 350 degrees. Line two baking sheets with parchment paper and set aside.

Whisk together the flour, ginger, soda, cinnamon, and salt in a medium sized bowl. Set aside. Combine the shortening and sugar in the bowl of an electric mixer. Mix until light and fluffy. Add the egg and molasses. Stir in the dry ingredients.

Pinch of small amounts of dough and form into a circle. Roll in the cinnamon sugar mixture, and place on your prepared tray. Bake for ten minutes and cool on a wire rack.


ginger-snaps

These are full of flavor and one of our favorite cookies. I know they should be crisp, but I’m a soft and chewy kind of gal. If you want to each cookie to be equal in size I suggest buying a small cookie scoop. I found one on amazon for fairly inexpensive.

ginger-snap-cookies

I hope these cookies will inspire you to create some treats of your own! Check out a few other cookies that you might enjoy:


gingercookies_thumb     oatmeal-cookies-1_thumb     thin-mints_thumb

Gingerbread cookies & Eggnog Dip // Oatmeal cookies three ways // Homemade Thin Mints  

Autumn Inspired Red Bird Buttercream Cake

0 · Nov 5, 2013 · 6 Comments

This buttercream cake post brought to you by Craftsy // Have you ever had that experience of learning a new skill, and then the excitement of wanting to practice, practice, practice? That is totally how I felt after taking the FREE Modern Buttercream Class on Craftsy. I have always wanted to create beautiful cakes and I have learned some skills over the years, but this class really helped to take me to the next level. I learned how to shape the cake so that it looks more professional, not all rounded and wonky. That amazing trick of adding simple syrup to the cake to keep it moist. So many fun fabulous tricks. Not to mention the step-by-step instructions on how to make Swiss buttercream. That helped me with my first practice my simple buttercream cake. You can check it out here. You can tell in that picture I still had some stuff to work on. With all of that, I had to try my hand at another cake. This time I was going to conquer a challenge of mine… FONDANT.  In the class Joshua John Russell teaches how to make gum paste embellishments, but I decided I wanted my decor to be made out of fondant. I didn't want my fun graphic elements to be hard I wanted them to be soft but, the steps are pretty close.

For this cake, I was inspired by the beautiful time of year we are in. When we first moved here to Lincoln last year, we arrived at this time of year. It was so fun to actually have a real fall for the first time in 8 years. I had a very special morning one day early on here. I was feeling a little blue with the move and looking out the window at the new scenery. The trees and the leaves were beautiful, but I was feeling weighted down. Then all of a sudden a beautiful Cardinal flew right up next to my window and just sat there for a moment. My spirits soared! I hadn't ever seen such a beautiful red bird. From that time forward, Cardinals have been a special fall friend for me. I decided to make a modern little red bird cake to celebrate the season…

Now remember, I have a little bit of a fear of fondant. For some reason, it has always been one of those elements that only really cool cake decorators could use. I just didn't feel like I was at that level yet. I lacked confidence. After taking Modern Buttercream I felt like it was time to tackle this skill! 

I found these fondant cutters from Wilton that are normally leaves, but I thought they could easily turn into cute modern looking birds. I used a fondant roller with rolling pin guides to make sure I had a uniform thickness just like Joshua did while working with the gum paste. He made little butterflies and affixed them to his amazing cake…

I cut out my little birds in just the same way…

Then I pinched the front of the shape to make it look a little more bird like…

I used a little gold Gragée for the eye and then affixed it to the side of the cake.

Because the cake is buttercream, it's super easy to affix the fondant birds right to the side of the cake. I kept things simple with the cake to keep the modern feel.  I didn't want a completely smooth cake so I kept a little bit of movement in the buttercream, but not a ton.

It turned out so cute… It also helped that I had the cutest little red bird cake plate that I found while I was at the Smucker's Company Store in Ohio. I just adore it!

Now,  as Joshua teaches in the Modern Buttercream class on Craftsy… You can have the most beautiful cake, but if I doesn't taste good, you've missed the mark. Here's one of my little secrets… If you don't have time to bake a cake, but you want to decorate your own cake, go to your favorite bakery! You may want to call a day or two ahead, but you can purchase pre-made cake rounds that are generally frozen and ready to decorate. For sure a time saver, but if you have a good bakery, you know you will always have a scrumptious cake to serve. 

I CAN'T WAIT to practice some more. I also can't believe how just a little bit of education can help boost my confidence. I now love cake decorating and can't wait to learn even more though Craftsy. Have you guys checked it out yet? What classes would you like to take? 

This is a sponsored conversation written by me on behalf of Craftsy. The opinions and text are all mine.

  • « Go to Previous Page
  • Page 1
  • Page 2
  • Page 3
  • Page 4
  • Page 5
  • Page 6
  • Go to Next Page »

Primary Sidebar

Heather from Whipperberry
Hello... my name is Heather and I'm the creator of WhipperBerry a creative lifestyle blog packed full of great recipes and creative ideas for your home and family. I find I am happiest when I'm living a creative life and I love to share what I've been up to along the way... Come explore, my hope is that you'll leave inspired!

Footer

  • Privacy Policy
  • Crafts
  • Food
  • Gifts
  • Holidays
  • Home
  • Mom Life
  • Recipes
  • Travel

Copyright © 2026 · Seasoned Pro