• Skip to primary navigation
  • Skip to main content
  • Skip to primary sidebar
  • Skip to footer

Whipperberry

WhipperBerry • Your Home For Creative Inspiration

  • Home
  • Recipes
    • Starters
    • Easy Weeknight Dinners
    • Main Dish
    • Salads
    • Side Dish
    • Soups & Stews
    • Desserts
    • Breakfast
    • Miscellaneous
  • Tutorials
    • Creative Crafts
    • DIY Decor
    • Fabric Crafts
    • Food How-To
    • Jewlery
    • Paint Projects
    • Paper Art
    • Party Styling
    • Photography and Graphic Design
    • Silhouette
  • Holidays
    • Easter
    • Mother’s Day
    • Father’s Day
    • 4th of July
    • Halloween
    • Thanksgiving
    • Christmas
    • Valentine’s Day
  • Gift Ideas
    • Gifts For Everyone
    • Gifts for Dad
    • Mother’s day
    • For The Girls
    • For The Kids
    • Teacher Gift Ideas
    • Christmas
  • Printables
    • Holiday
    • Gift Idea
    • LDS Primary
  • Travel
  • About
    • Terms
  • Contact
  • Nav Social Menu

    • Facebook
    • Instagram
    • Pinterest
    • RSS
    • Twitter

Recipe

Greek Baked Eggs and Potatoes

0 · Mar 20, 2014 ·

I said it before and I’ll say it again… I LOVE eggs! I especially love the combination of eggs & potatoes. There is just something lovely about the rustic pairing. Both ingredients are wonderful on their own and yet they can both be blank canvases as well. They are just waiting to be dressed up with simple, yet fancy new flavors. Together they make the perfect pair and you can dress them up however you like. As a matter of fact, you can create a recipe of your very own out of your black slate, head over to Food.com and enter to win $3000 from Simply Potatoes®. All you need to do is come up with a 5 ingredient fix and submit it to the contest and you could have and extra $3000 to play around with this summer!

The folks at Simply Potatoes® challenged me to come up with a 5 ingredient fix and this is what I came up with…

Baked-Greek-Eggs-with-Simply-Potatoes-#whipperberry

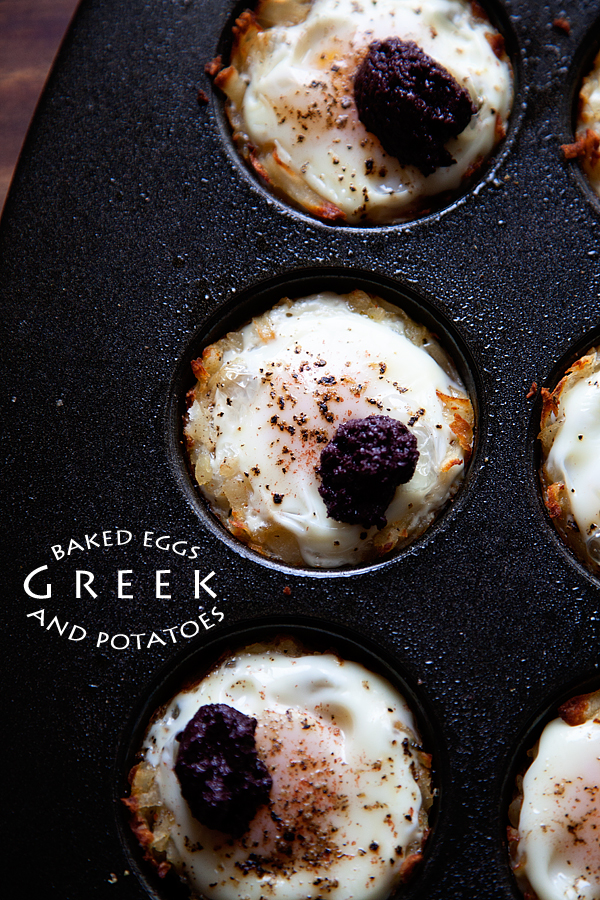
Greek Baked Eggs & Potatoes! I am always looking for a quick weeknight meal for the family and this one couldn’t be easier. Now technically, this recipe does have 5 ingredients but that only if you count the salt & pepper as separate ingredients. But don’t be fooled… This recipe is packed full with flavor and some hidden ingredients as well.

Baked-Greek-Eggs-with-Simply-Potatoes-#whipperberry-1

I started with Simply Potatoes® O’Brien Hash Browns’ as my base for my baked eggs. Here’s where the magic happens… First of all, these potatoes are fresh potatoes that you will find in your refrigerated section, generally by the eggs at your market. You won’t find them in the freezer section or dehydrated because Simply Potatoes are always fresh with simple ingredients.

Next, these O’Brien Hash Browns also have onions and peppers in the mix. Two hidden ingredients that I didn’t have to purchase or prepare. They are already in the hash browns. SCORE!

I used a jumbo muffin tin, sprayed it with cooking spray and then placed two heaping tablespoons of the hash brown mixture in the muffin tins and then created a hash brown nest…

I topped the potatoes off with some salt & pepper and some more cooking spray. I placed it into a 400˚ oven for 18-20 minutes to cook the potato mixture. After the potatoes are baked and slightly brown, I remove the pan from the oven and add the…

You guessed it… My eggs. All you need to do is crack them right into the hash brown nests and top with a little more salt & pepper.

Return them to the oven for an additional 15 minutes to bake the eggs. Keep a close eye on them and remove them from the oven as soon as the eggs have set. You don’t want to over cook your eggs. You still want that yolky gold running through your egg & potato nest.

Let your eggs cool for a few minutes and then top with one of my favorite new ingredients, a prepared olive tempenade. It’s basically Greek olives that are chopped up fine with a little bit of olive oil to tie the olive caviar together. It’s tasty on bread or with veggies and hummus. It tastes GREAT on top of these baked eggs. Just top the eggs & potatoes with a small teaspoon of tempenade and then serve immediately.

Serve with a lovely Greek salad and you have the perfect SIMPLE week night meal.

What’s your favorite way to cook with potatoes? Remember, you can enter to win the Simply Potato 5 Ingredient Fix Contest and win $3000 with your simple, but inventive recipe!

For rules on how to enter the Sweepstakes click here.

This is a sponsored conversation written by me on behalf of Simply Potatoes. The opinions and text are all mine.

The Best Homemade Vanilla Ice Cream Recipe

38 · Mar 19, 2014 · 13 Comments

// The Best Homemade Vanilla Ice Cream Recipe //

Homemade-ice-cream-from-Whipperberry-22

I am so ready for things to start warming up!  I am single handedly willing the warmer weather to arrive with this fantastic ice cream recipe! Without question, anything homemade is ten times better than anything that you can buy pre made at the store. Ice cream is definitely one of those goodies that lives buy that rule.

I have fond memories of when I was a little girl, sitting on the back porch on a hot summer day, slowly turning the crank on our family’s “old fashioned” ice cream maker.  I didn’t quite understand why you needed to salt the ice, but I trusted that my Dad knew what he was doing. I vividly remember homemade peach ice cream that could curl your toes it was so good. My Mom would make the ice cream base in the kitchen and us girls along my dad were in charge of churning the ice cream until it was just right, out in our back yard.

Things are a little different today… Today we have nifty, easy to use ice cream machines right at our finger tips. No more salting the ice, still not sure what that was all about. I’m not a science whiz.  You can find ice cream machines in several different price brackets. I personally have a Cuisinart Ice Cream maker that I’ve had for years. I wish it was a little bigger, but it does the job. This cute turquoise one is priced at $59.95 at Amazon.  Not too bad… You can ask for one for Mother’s Day this year!

71rA3wIIeyL._SL1500_

If you have a Kitchen Aid mixer you can purchase a freezer bowl for your mixer and create all kinds of fun frozen concoctions with that. It’s available at Amazon for $76.00.

5153jZHlJ4L

Either option is pretty good for the home cook.  Once you have a good freezing option, then you have to find a good ice cream base recipe. This is the key to good homemade ice cream. I have found a fabulous egg custard base recipe that I LOVE. I originally found it via The Pioneer Woman, but I have modified it a bit for my taste. It’s a rather large recipe but it can be prepared and then stored in the fridge for up to 5 days and then churned in batches.  I love that I can create one flavor one day, and a completely different flavor the next all with the same base. Here is how you make it…

Vanilla Ice Cream Base

First you will need to grab your 18 eggs and separate the yolk from the whites. Save your whites in your fridge and use them to make macrons or angel food cake or egg white omelets… either way, you don’t want to just throw them down the drain.

Homemade-ice-cream-from-Whipperberry-3

In a large sauce-pan, combine the sugar and whole milk (you may also use pasteurized milk). Stir to combine. Place over medium-low heat. Carefully stir and watch that is doesn’t ever come to a boil.

Homemade-ice-cream-from-Whipperberry-4

Cut your vanilla bean length wise and scrape out the vanilla caviar and place in the milk, sugar mixture. Then add the entire vanilla bean as well. Continue to gently stir. Heat the mixture until it is hot, but not boiling.

Add the yolks to a large bowl and whisk for 2 minutes until the yolks become a lighter color.

Homemade-ice-cream-from-Whipperberry-5

Now you need to temper the egg yolks with a couple of ladles full of the hot milk and sugar mixture. You need to do this so that your eggs don’t become scrambled eggs in the hot milk. Once your egg yolks are tempered or brought up to temperature, slowly stir them into the hot milk. Cook for an additional 2-3 minutes until the mixture starts to thicken. You can tell that it’s ready when it coats the back of a spoon.

Using a fine mesh strainer, strain your mixture into a large bowl. Discard any lumps. Slowly stir in the heavy cream.

Homemade-ice-cream-from-Whipperberry-6

At this point I divide my ice cream base into three separate containers, I refrigerate two batches and then prepare and churn the third batch.

For the basic vanilla ice cream, all you need to do is churn the ice cream base in your ice cream maker following the directions for the specific machine. Your ice cream will still be pretty soft when it is finished churning and will need more time in the freezer before you serve.
I line a bread pan with plastic wrap and scoop my ice cream in the bread pan, cover and place in the freezer for 3-4 hours before serving. More or less depending on what consistency you like for ice cream.

5.0 from 3 reviews
The Best Homemade Vanilla Ice Cream
 
Save Print
Prep time
10 mins
Cook time
30 mins
Total time
40 mins
 
This luscious vanilla ice cream base is perfect for any type of ice cream you can dream up! This recipe is adapted from The Pioneer Woman.
Author: Heather // WhipperBerry
Recipe type: Dessert
Cuisine: American
Serves: 20-30
Ingredients
  • 6 cups whole milk
  • 4 cups of sugar
  • 1 vanilla bean
  • 18 large egg yolks
  • 6 cups heavy cream
Instructions
  1. First you will need to grab your 18 eggs and separate the yolk from the whites. Save your whites in your fridge and use them to make macrons or angel food cake or egg white omelets... either way, you don't want to just throw them down the drain.
  2. In a large sauce pan combine the sugar and whole milk stir to combine. Place over medium-low heat. Carefully stir and watch that is doesn't ever come to a boil.
  3. Cut your vanilla bean length wise and scrape out the vanilla caviar and place in the milk, sugar mixture. Then add the entire vanilla bean as well. Continue to gently stir. Heat the mixture until it is hot, but not boiling.
  4. Add the yolks to a large bowl and whisk for 2 minutes until the yolks become a lighter color.
  5. Now you need to temper the egg yolks with a couple of ladles full of the hot milk and sugar mixture. You need to do this so that your eggs don't become scrambled eggs in the hot milk. Once your egg yolks are tempered or brought up to temperature, slowly stir them into the hot milk. Cook for an additional 2-3 minutes until the mixture starts to thicken. You can tell that it's ready when it coats the back of a spoon.
  6. Using a fine mesh strainer, strain your mixture into a large glass bowl. Discard any lumps.
  7. Slowly stir in the heavy cream.
  8. At this point I divide my ice cream base into three separate containers, I refrigerate two sections and then prepare and churn the third.
  9. For the basic vanilla ice cream, all you need to do is churn the ice cream base in your ice cream maker following the directions for the specific machine.
  10. Your ice cream will still be pretty soft when it is finished churning and will need more time in the freezer before you serve.
  11. I line a bread pan with plastic wrap and scoop my ice cream in the bread pan, cover and place in the freezer for 3-4 hours before serving. More or less depending on what consistency you like for ice cream.
3.2.1275

 Disclaimer // This is not a sponsored post however, I am an Amazon affiliate.

Chocolate VS Vanilla Cupcakes // Classic Chocolate Cupcake Recipe

7 · Mar 18, 2014 · 7 Comments

Classic Chocolate Cupcake Recipe // Are you a chocolate or vanilla fan?? I’m a vanilla girl all the way, but when I asked my son what he wanted for his birthday treat he chose chocolate. Which shouldn’t surprise me at all. He’s five. Every five year old loves a good chocolate cupcake, right? Except a few hours later he changed his mind and VANILLA was the winning flavor… I decided to put the two classic flavors to the test and whipped up a batch of both for a chocolate vs. vanilla showdown!

chocolate-vs-vanilla1

These chocolate cupcakes are moist and delicious. I topped them with a simple chocolate frosting that had guests begging for more. My sister in law even asked if she could scrape off the topping on a few of the leftover cakes! So without further ado…

chocolate-cupcake-recipe

For the cupcake:
1/2 cup butter, softened
1-1/2 cups sugar
2 regular sized Hershey chocolate bars, melted
3 eggs
3/4 cup canola or vegetable oil
1 tablespoon vanilla extract
heaping 1/3 cup plain Greek yogurt (I used Tillamook)
1-1/2 cups flour
3/4 teaspoon salt
3/4 teaspoon soda
3/4 cup cocoa powder
3/4 cup water

Preheat your oven to 350 degrees. Line two muffin tins with paper liners and set aside.

Cream together the butter and sugar. Slowly stir in the melted chocolate and eggs. Add the oil, vanilla, and yogurt. Stir until combined.

Whisk together the flour, salt, soda, and baking powder in a separate bowl. Slowly mix into your wet ingredients along with the water.

Fill your paper cups half to 3/4 full. Bake for 15-18 minutes, or until a toothpick comes out clean.

For the frosting:
1/2 cup plus 1 tablespoon soft butter
4 cups powdered sugar
3/4 cup cocoa powder
3-4 tablespoons whole milk
1 teaspoon vanilla extract

Cream together the butter and powdered sugar. Add the milk, cocoa, and vanilla. Whip until your desired consistency is reached.

chocolate-cupcakes

The overall vote for these at the party was that they were amazing! But did they win the chocolate vs. vanilla challenge?? Hop over to my blog for the vanilla cupcake recipe and to see which cake took home the prize!

vanilla-or-chocolate1
Which would you vote for? Are you a chocolate or vanilla fan? Don’t forget to hop over to my site, One Sweet Appetite, for the class vanilla cupcake recipe!

Classic Chocolate Cupcake Recipe
 
Save Print
Prep time
20 mins
Cook time
20 mins
Total time
40 mins
 
Are you a chocolate or vanilla fan? The classic chocolate cake recipe may sway your vote!
Author: Jesseca // One Sweet Appetite via WhipperBerry
Recipe type: Dessert
Cuisine: American
Ingredients
  • For the cupcake:
  • ½ cup butter, softened
  • 1-1/2 cups sugar
  • 2 regular sized Hershey chocolate bars, melted
  • 3 eggs
  • ¾ cup canola or vegetable oil
  • 1 tablespoon vanilla extract
  • heaping ⅓ cup plain Greek yogurt (I used Tillamook)
  • 1-1/2 cups flour
  • ¾ teaspoon salt
  • ¾ teaspoon soda
  • ¾ cup cocoa powder
  • ¾ cup water
  • For the frosting:
  • ½ cup plus 1 tablespoon soft butter
  • 4 cups powdered sugar
  • ¾ cup cocoa powder
  • 3-4 tablespoons whole milk
  • 1 teaspoon vanilla extract
Instructions
  1. For the cupcakes... Preheat your oven to 350 degrees. Line two muffin tins with paper liners and set aside.
  2. Cream together the butter and sugar. Slowly stir in the melted chocolate and eggs. Add the oil, vanilla, and yogurt. Stir until combined.
  3. Whisk together the flour, salt, soda, and baking powder in a separate bowl. Slowly mix into your wet ingredients along with the water.
  4. Fill your paper cups half to ¾ full. Bake for 15-18 minutes, or until a toothpick comes out clean.
  5. For the frosting... Cream together the butter and powdered sugar. Add the milk, cocoa, and vanilla. Whip until your desired consistency is reached.
3.2.1275

The BEST Grilled Pork Chops

627 · Mar 13, 2014 · 11 Comments

// How to marinade and grill the BEST Pork Chops //

How-to-Grill-the-best-Pork-Chops-#whipperberry

I admit it… I LOVE to grill! Well, my husband and I love to grill. We are a team really. I work on creating amazing marinades for our meat and veggies and he is the grill master. It’s a perfect partnership. From the minute the weather starts to warm up we fire-up the grill and it’s hard at work until the first snow flies. I have been known to grill some fabulous steaks standing in a snow storm a few years back. We don’t prescribe to the Memorial Day to Labor Day idea, that’s for the birds!  Any day that you don’t have to completely bundle up in a parka is fair game in my book.

This week has finally started to warm up and of course we busted out the grill and had one of our favorite dinners, grilled pork chops with a fresh green salad. My secret to these pork chops is an amazing marinade. This one is super simple with only a handful of ingredients, namely… olive oil, white wine, garlic, dried oregano, dried basil, bay leaf, salt & pepper. That’s it!

To start, I grab a nice head of garlic, olive oil & white wine.

Pork-Chop-Marinade-from-#whipperberry-1

Now, I ‘m not a wine drinker so, I don’t really know to much about wine. What I typically do is find a lower to average priced wine for this purpose. Under $10 a bottle for sure.  My rule of thumb is white wine for pork, chicken & fish.  Red wine for beef.  I really like Tyler Florence’s California Crush wines for this marinade, you can find it at Target. Here is the marinade recipe…

5.0 from 1 reviews
The BEST Grilled Pork Chops
 
Save Print
Prep time
5 mins
Cook time
20 mins
Total time
25 mins
 
This simple grill marinade is perfect for pork & chicken. Your family is going to fall in love!
Author: Heather Thoming // WhipperBerry
Recipe type: Main Dish
Cuisine: American
Serves: 6
Ingredients
  • 6 thick cut pork chops
  • 1 cup olive oil
  • 2 cups white wine
  • 5-6 garlic cloves
  • 1 tablespoon dried oregano
  • 1 tablespoon dried basil
  • 1 bay leaf
  • 1 teaspoon salt
  • 1 teaspoon pepper
Instructions
  1. In a small mixing bowl combine the olive oil, wine, garlic, oregano, basil, bay leaf, salt & pepper. Whisk together.
  2. Place pork chops in a large Ziplock bag and pour marinade over the chops.
  3. Seal the bag and place in the refrigerator for 4 hours, best over night if possible.
  4. Grill on a outdoor grill.
  5. Start with 2 minutes over high heat on the first side. Flip over and grill for an additional 2 minutes. Flip again, and give the meat a ¼ turn for optimum grill marks, 2 more min, then flip and turn again, 2 more min.
  6. Then turn the heat to med-low and cook until they reach your target internal temp (160˚F)
  7. Once your meat is at 160˚ remove from grill and let rest for 10 minutes.
3.2.1275

Grilling Tips

Now, once you’ve marinaded the meat it’s time to grill… This is my sweet husband’s area of expertise.  Here are his grilling tips…

  1. Make sure you are working with a clean well maintained grill. Whether it is charcoal or gas, taking care of  your grill is well worth the investment of your time. Keep your grill clean and carefully spray with high heat cooking spray and you won’t have any issues with your  food sticking to the grill.
  2. Give your grill proper time to pre-heat.
  3. Have a meat thermometer and a timer handy.
  4. For these pork chops, start with high heat and place your chops on the grill. Set your timer for 2 minutes.  After 2 minutes, turn your meat and set the timer for an additional 2 minutes. After 2 minutes turn your chops, giving them a 1/4 turn to get those fabulous, professional  looking grill marks. Cook for an additional 2 minutes. Turn one more time with the 1/4 turn for the other side and set the timer for 2 minutes. After 2 minutes, turn your heat down to medium or if using charcoal, move your meat to a cooler side of the grill. Let cook turing every few minutes until your chops reach 160˚ F.
  5. Remove the chops from the grill and let rest for 10 minutes.

Pork-Chop-Marinade-from-#whipperberry-5

That’s it! It’s really that easy and they taste sooooo good!! After your meat has rested, serve it with a nice garden salad and your family and friends will just adore you. The marinade with all of it’s flavorful goodness has made it’s way through the pork and created this amazing meal you won’t soon forget!

Give it a go and then tell me what you think…  Take a photo of your pork chops and tag me on Instagram with the #WBwhatsfordinner hashtag and let me know what you thought!

  • « Go to Previous Page
  • Page 1
  • Interim pages omitted …
  • Page 28
  • Page 29
  • Page 30
  • Page 31
  • Page 32
  • Interim pages omitted …
  • Page 53
  • Go to Next Page »

Primary Sidebar

Heather from Whipperberry
Hello... my name is Heather and I'm the creator of WhipperBerry a creative lifestyle blog packed full of great recipes and creative ideas for your home and family. I find I am happiest when I'm living a creative life and I love to share what I've been up to along the way... Come explore, my hope is that you'll leave inspired!

Footer

  • Privacy Policy
  • Crafts
  • Food
  • Gifts
  • Holidays
  • Home
  • Mom Life
  • Recipes
  • Travel

Copyright © 2026 · Seasoned Pro